


1.0 introduction
Thank you for purchasing your Professional Series
TM
uAttend
TM
Timeclock, part of
the uAttend Employee Management System by ProcessingPoint, Inc. This document
will guide you through the steps of setting up your uAttend account, setting up your
timeclock, and linking the timeclock to your uAttend account. It will also give an
overview of the features and functionality of the CB1000, CB2000, BN1500, and
BN2500 timeclocks.
To get started with uAttend, you will need to perform these tasks in the following order:
1. create your uAttend account, using the steps provided in Section 2.1.
2. Add departments, using the steps provided in Section 2.2.
3. Add employees, using the steps provided in Section 2.2.
4. Set up your timeclock, using the steps provided in one of the following
sections:
For information on the CB1000, see Section 3.0 beginning on page 6.
For information on the CB2000, see Section 4.0 beginning on page 10.
For information on the BN1500, see Section 5.0 beginning on page 15.
For information on the BN2500, see Section 6.0 beginning on page 22.
2.0 setting up your
uAttend Account
This section describes the steps you will take to create a new uAttend account and
set up departments and employees. After you complete Section 2.0, you can skip to
the appropriate timeclock section.
2.1 creating an Account
1. open your web browser and visit: http://trackmytime.com/signup
You will be prompted to enter the Dealer ID, which can be found on a sticker on
the outside of the timeclock box and on the cover of this document. If the Dealer
ID is missing, please contact Customer Support at [email protected]
or 1-800-518-8925.
2. enter the dealer Id.
31
2
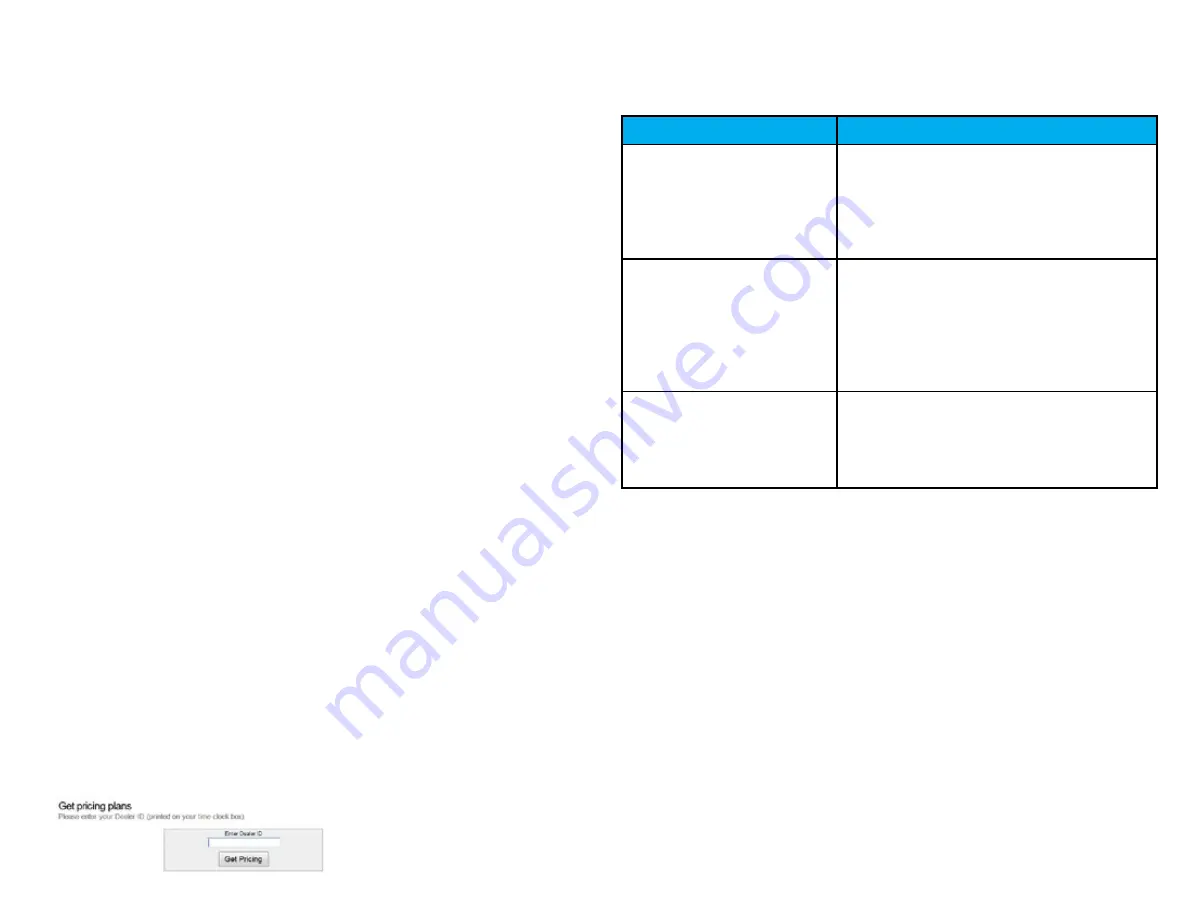
ERROR MESSAGE
NOTES
server connection
error
this messAge dispLAys if
the timecLock is unAbLe to
communicAte With the server due
to A fireWALL, content fiLter,
or Any other kind of netWork
bLock.
dns error
this messAge dispLAys if the
timecLock does not hAve A
vALid dns server ip Address to
contAct, or the dns server it
is contActing cAnnot properLy
resoLve the host nAme for the
server.
dhcp error
this messAge dispLAys if the
timecLock does not receive
proper ip Address informAtion
provided to it from the dhcp
server.


