

1
2
3
INSTRUCTION MANUAL
!!!Please refer to our website: www.geemarc.com
for an up to date user guide, as there may be
important updates and changes you need to be
aware of !!!
Cautions:
Precautions and maintenance
z
For indoor use only
z
To avoid risk of fire or electric shock, do not expose the unit to
moisture or condensation.
z
To avoid overheating, do not block the ventilation holes on the
back of the Clock Display.
z
Keep the Clock Display out of direct sunlight.
z
Do not dismantle the Clock Display. There is a risk of electric
shock and there are no user-serviceable parts inside.
Dismantling the Clock Display will void your warranty.
Cleaning the LCD Screen
z
Treat the screen carefully. tThe screen of the Clock Display is
made of glass and can easily be broken or scratched.
z
If fingerprints or dust accumulate on the LCD screen, we
recommend using a soft, non-abrasive cloth such as a camera
lens cloth to clean the LCD screen.
z
Moisten the cleaning cloth with a cleaning solution and apply the
cloth to the screen.
Introduction:
Thank you for the purchase of the Clock Display. It is designed to
allow you to see the time quickly and easily and any warning
functions displayed.
Please read this User Manual carefully to use the Clock Display
correctly.
Features:
Days Clock
Packaging Check List:
z
7 inch Clock Display
z
User manual
z
Bracket
z
AC adapter
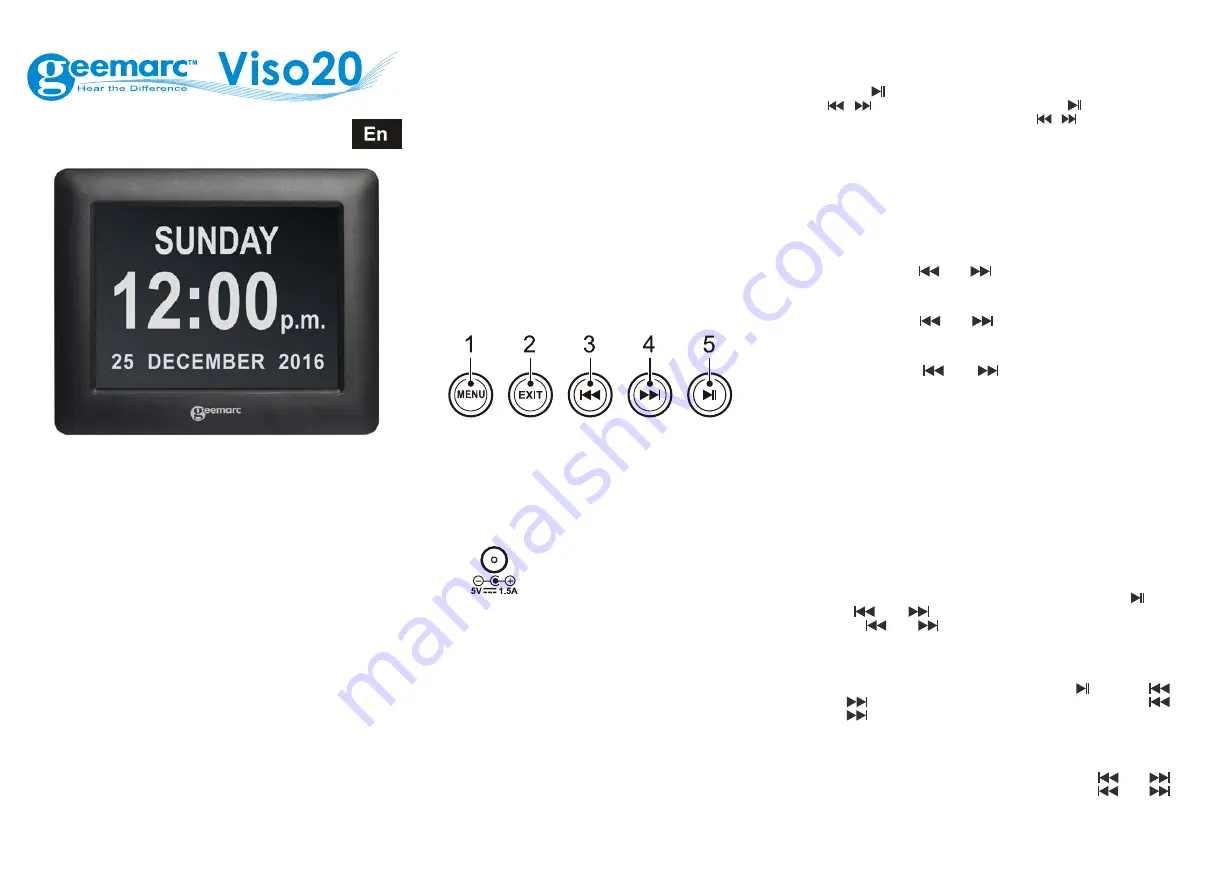
1. Product Diagram
1.1 Back side Buttons
1. Menu
2. Exit
3. Vol- / Up / Left / Increase
4. Vol+ / Down / Right / Reducing
5. Play / Pause / OK
1.2 Left side of the Clock Display
DC in “
” on the left side of the Clock Display.
2. Getting Started
1. Place the Clock Display with installing bracket on a steady flat
position, then plug the AC adapter into a standard 100-240V AC
electrical outlet and the other end into the DC IN slot on the left
side of the Clock Display.
2. Remove the protective film covering the Screen.
3. Hold and Press the
MENU
button on the backboard to On/Off
Switch.
3. Operating Instruction
When you power the unit on for the first time it will show the
startup logo. Then the main menu will display after a few seconds.
After this the Days Clock will display you can easy see the details
week day, time, month and year on the Clock Display screen, and
they will change automatically.
4.Setting
Press
Menu
key and select the
Setting
icon
in the main menu.
Press “
”
Button to enter the
Setting
interface and press
to highlight your selection. Press “
”
Button to enter
the setting value. Then hold and press
to set the value.
You can select Style Setup, Set Days-Clock, Calendar Setup,
System Setup, and so on.
4.1. System Setup
Language
Changes the operating language of the photo Clock Display.
Available Values: English, Nederland, Français, Deutsch, Italiano,
Espanol, Hebrew.
Grayscale
Hold and press “
” or “
” buttons to select the Gray Scale
level that you require between 1 to 10.
Brightness
Hold and press “
” or “
” buttons to select the Brightness
level that you require between 1 to 10.
Contrast
Hold and press “
” or “
” buttons to select the Contrast
level that you require between 1 to 10.
Auto power on & off function
Remarks:
1. In order to activate the auto power ON & OFF function, please
check the settings for the
Sleep timer
and
Auto boot Time
are
set correctly. If set to
OFF
, the function is not activated.
2. A reminder for the Auto OFF appears 1 Minute before the frame
switches off. Press any key to cancel the Auto OFF function.
3. If Power OFF is activated and the frame switches off at the
selected time, the frame goes into Sleep-mode. To switch the
frame on again, you need to press and hold the
Menu
Button at
the rear side of the frame.
Auto Shut Time
Set the auto power off time in the format of “[Hour]:
[Minute]”.Choose
System setup/ Auto shut time
with
. Use
the “
” or “
” buttons to switch between fields, hold and
press “
” or “
” buttons to change time field values. Keep
the Sleep Timer on.
Auto Boot Time
Set the auto power on time in the format of “[Hour]: [Minute]”.
Choose
System setup/ Auto boot time
with
Use the “
”
or “
” buttons to switch between fields, hold and press “
”
or “
” buttons to change time field values. Keep Regular Boot
on.
Power Frequency:
You can choose to set the function auto power ON/OFF as follows:
- Workday, Week end, Once, Every day. Use the “
” or “
”
buttons to switch between fields, hold and press “
” or “
”
buttons to change mode field values.
Firmware Version:
You can check the software version of your Viso 20.


