background image

15

18

5.0   setting up And using  
   

the bn1500

Now that you have set up your uAttend account, you may mount your timeclock and 
link it to your account. 
 
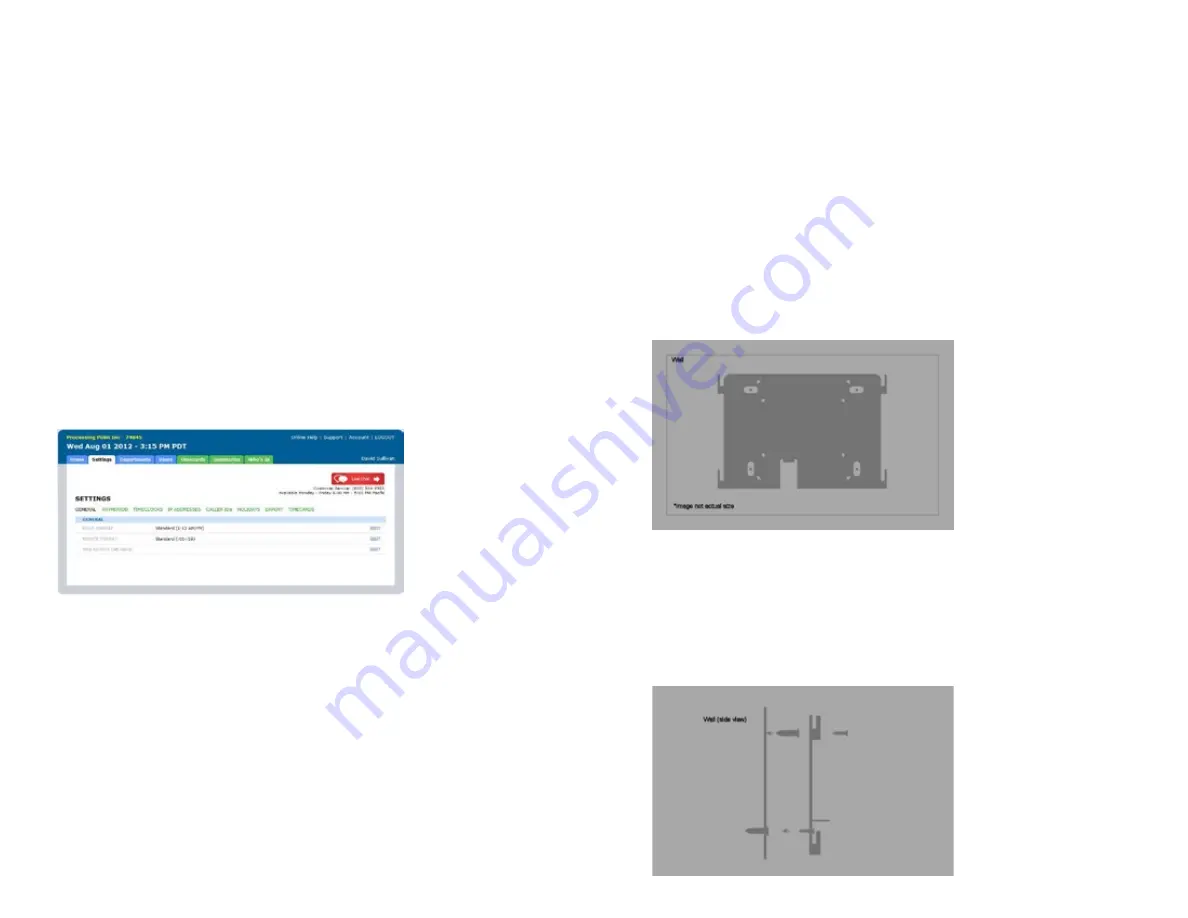
5.1  mounting Your Bn1500 
Follow these steps to mount your timeclock to a wall: 


1. Find a location near a power outlet and a router, switch, or ethernet  


jack where you would like to mount the timeclock. 


2. place the metal back plate against the wall, as shown below, and  


mark the four screw holes against the wall.


3. Insert the wall studs into the center of the wall marks in all four  

 locations. 


4. place the metal back plate against the wall, with prongs facing away  


from the wall and pointing upward, and screw the back plate to the  


wall in all four locations.


birth date of October 22, 1984 would be registered as “102284.” Each  


template must be assigned a unique code. Make note of the employee’s name  


and 6-digit code in the Template Assignment Sheet at the back of this guide. 


You will be prompted to place a finger on the fingerprint sensor. 


6. the designated employee should press their finger firmly on the  


sensor until you hear a beeping sound. the employee should then  


remove their finger from the sensor. this process will be repeated two  


more times with the same finger. 

 
note:  If desired, you may repeat the fingerprint scanning process for the same 
employee with a different finger, so that the employee can have a back-up template. 
If you choose to scan a second fingerprint, it will also require a unique Fingerprint ID. 
We recommend using the employee’s birth date in reverse order as the ID code. 


7. repeat the previous steps for each employee who will be using the  

 timeclock. 
 
Follow these steps from your uAttend account: 


1. click the Settings tab on the main menu.


2. click the timeclocks link. 


3. click the Assign templates link that appears next to the name of  


the timeclock that you used to register the fingerprint templates. 


4. Assign each fingerprint template to the appropriate employee,  


using the template Assignment Sheet in this guide as a reference. 

 
The BN1500 is now ready for registered employees to punch in and out with their 
fingerprints. 
 
ImportAnt:  The BN1500 timeclock employs an advanced fingerprint sensor. 
Despite the quality of the sensor, there is a segment of the population with 
fingerprints that will not record. These employees can still use the timeclock to punch 
in and out by using a PIN. 

Содержание CB1000

Страница 1: ...PROFESSIONAL SERIES PRODUCT GUIDE 2796 Loker Ave Suite 111 Carlsbad CA 92010 800 518 8925 Toll Free 877 730 3578 Fax www processingpoint com CB1000 CB2000 BN1500 BN2500...

Страница 2: ...oducts or parts are based upon tests believed to be reliable but do not constitute a guaranty or warranty PPOINT SHALL NOT UNDER ANY CIRCUMSTANCES WHATSOEVER BE LIABLE TO ANY PARTY FOR LOSS OF PROFITS...

Страница 3: ...0 Setting Up and Using the BN1500 15 5 1 Mounting Your BN1500 15 5 2 Linking the BN1500 to Your uAttend Account 16 5 3 Registering Fingerprint Templates 17 5 3 1 Transferring Fingerprint Templates to...

Страница 4: ...5 For information on the BN2500 see Section 6 0 beginning on page 22 2 0 Setting Up Your uAttend Account This section describes the steps you will take to create a new uAttend account and set up depar...

Страница 5: ...d on our system encrypted and secure for recurring monthly billing All plans come with a 30 day money back guarantee if you are not satisfied When you have entered all information click Create my acco...

Страница 6: ...w time if time settings in the uAttend account change Device ID used to display the Device ID for the BN2500 Upload Logo used to import a logo from a uAttend account to display on the BN2500 Date Form...

Страница 7: ...500 and BN2500 only you will register their fingerprints using the steps in Section 5 3 BN1500 or Section 6 3 BN2500 of this document Next you can skip to the timeclock section that pertains to you 5...

Страница 8: ...l timeclocks requires interaction with both the BN2500 and your uAttend account Follow these steps from your uAttend account 1 Click the Users tab on the main menu 2 Click Manage Fingerprint Templates...

Страница 9: ...12345678 7 26 6 The designated employee should press their finger firmly on the sensor until you hear a beeping sound The employee should then remove their finger from the sensor This process will be...

Страница 10: ...our uAttend account 6 2 2 Connecting via LAN Cable Follow these steps on your BN2500 to link the BN2500 to your uAttend account via a LAN cable to a router The timeclock should be turned on with the d...

Страница 11: ...e back of the timeclock If you cannot locate this sticker you can also find the Device ID in the timeclock To do this press the Menu key and enter the password default password is 53178 Scroll to Devi...

Страница 12: ...4 Place the metal back plate against the wall with prongs facing away from the wall and pointing upward and screw the back plate to the wall in all four locations 5 Affix the timeclock to the metal ba...

Страница 13: ...r the Device ID assigned to the CB2000 You can find the Device ID on a sticker on the back of the timeclock If you 6 0 Setting Up and Using the BN2500 Now that you have set up your uAttend account you...

Страница 14: ...he password and press OK To enter alpha characters press the key and follow the onscreen directions The timeclock will connect to your WIFI network using the credentials you supplied After the WIFI mo...

Страница 15: ...r PIN In all other modes this key is used to scroll down OK Used to accept key entries Used to switch between alpha and numeric during WIFI password entry and is otherwise used as a toggle button 5 4...

Страница 16: ...em Management menu offers the following options Reset resets the CB2000 to the factory default settings Help displays the Customer Support telephone number MAC Address displays the CB2000 s MAC addres...

Страница 17: ...ing sound The employee should then remove their finger from the sensor This process will be repeated two more times with the same finger NOTE If desired you may repeat the fingerprint scanning process...

Страница 18: ...n the timeclock To do this press the Menu key and enter the password default password is 53178 Scroll to Device Management and press OK then scroll to Device ID and press OK Be sure to enter the compl...

Страница 19: ...Any Changes or modifications not expressly approved by party responsible for compliance coulk void the user s authority to operate the equipment Radiation Exposure Statement This equipment complies wi...

Отзывы: