background image

16

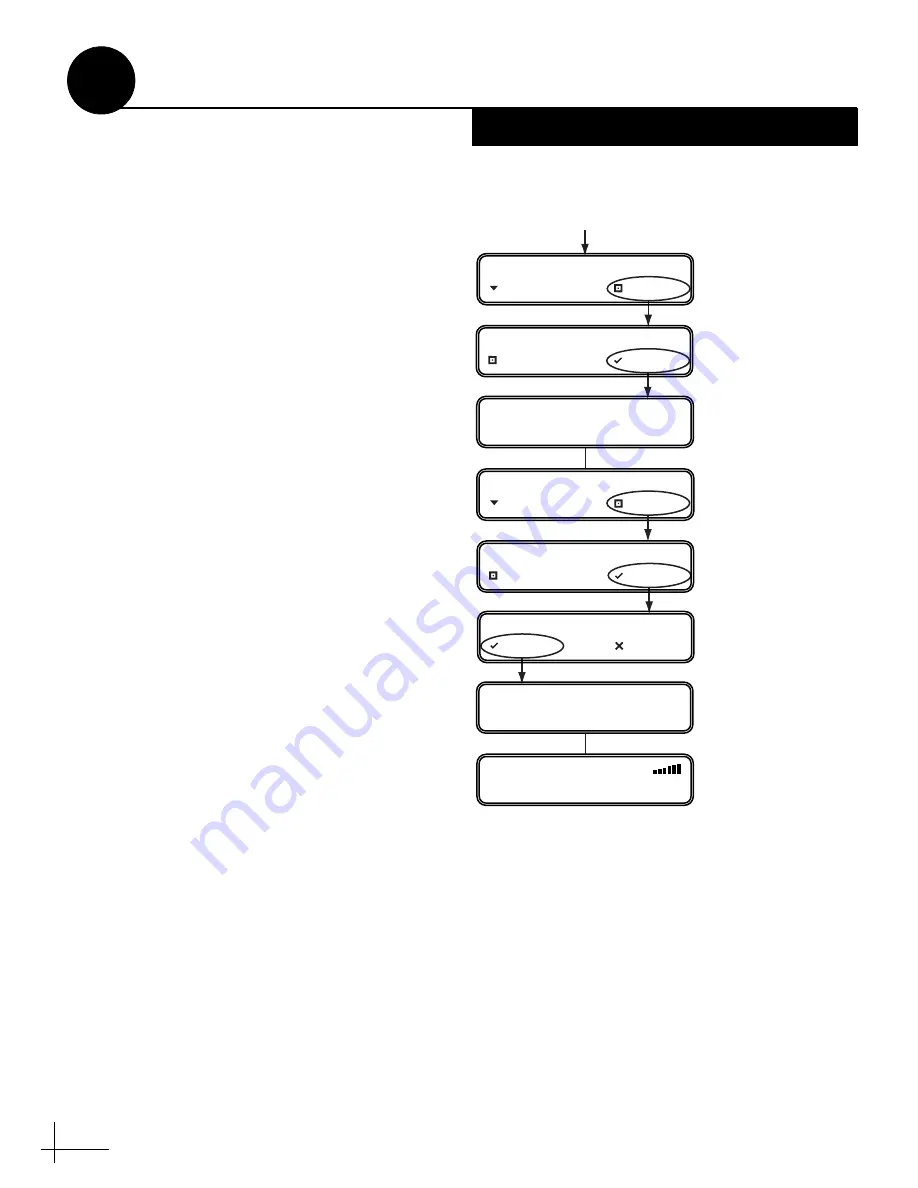
Resetting the System Before Retrying 

If the receiver Check Switch results displayed on 
the TV do not match the expected values shown 
in Figure 22 on page 15, follow these steps and 
refer to the flowchart in Figure 23 to reset and 
reconfigure the system.

a.

On the interface box, press MENUS until the 

display shows “Diagnostics= No.”

b.

Press CHANGE until the display shows 

“Diagnostics = Yes.” Then press ACCEPT.

c.

At “System Reset= No,” press CHANGE 

until the display shows “System Reset = Yes.” 

Then press ACCEPT.

d.

At “Reset to Factory?,” press ACCEPT.

e.

Wait a few minutes for the system to reset to 

its factory conditions.

f.

When the display shows “System Needs 

Setup,” repeat the setup procedure on 

page 12.

g.

Be sure the vehicle is parked in a blockage-

free area, and make certain the antenna has a 

clear, unobstructed view of the sky.

h.

Repeat the Check Switch steps on page 15.

Additional Receiver(s) - 1 Check Switch 
Test

If you connected multiple receivers, follow these 
steps to run a Check Switch test on each 
additional receiver (one at a time), 

unless it is a 

preconfigured DISH receiver

When you are done, 

reconnect the receivers as before.

a.

Temporarily disconnect the primary receiver 

from the “Unstacked Output” jack. 

b.

Connect the additional receiver to the 

“Unstacked Output” jack.

c.

Perform Steps a-e on page 15 to run a single 

Check Switch test on the receiver.

d.

Wait 15 minutes, then verify the values on the 

TV match the values shown in Figure 22 on 

page 15. If your values do not match, try 

running another Check Switch test.

Figure 23:  Factory Reset

Press MENU

S


u

ntil

DIAGNO

S

TIC

S

= No is displayed.

DIAGNOSTICS= NO

 NEXT MENU    CHANGE

DIAGNOSTICS= YES?

 CHANGE       ACCEPT

ENTERING DIAGNOSTICS

SYSTEM RESET= YES?

 CHANGE       ACCEPT

SYSTEM RESET

RESET TO FACTORY?

 ACCEPT       EXIT

TRACKING DTV 101

SYSTEM NEEDS SETUP 

SYSTEM RESET= NO

 NEXT MENU    CHANGE

Continued 

Run Check Switch Tests

12

DISH Network Only

Содержание R1DX

Страница 1: ...TracVision R1 DX Installation Guide TracVision R1DX with Multi service Interface Box Controller...

Страница 2: ...technician install the TracVision R1DX antenna To find a technician near you please visit www kvh com wheretogetservice Related Documentation The following additional documents are provided with the T...

Страница 3: ...roof 5 8 diameter hole saw Augat IT1000 connector installation tool KVH part 19 0242 Eight 1 4 fasteners see Mount the Interface Box on page 10 RG 6 or RG 11 RF coax cable s to connect the receiver s...

Страница 4: ...e use an RG6 75 ohms cable that does not exceed 80 feet in length Once you ve chosen a location for the antenna identify a safe location nearby for the 5 8 cable access hole in the roof It should be l...

Страница 5: ...the antenna using the eight M5 screws supplied in the kitpack see Figure 5 b Over each mounting plate fit a supplied rubber bumper into the hole in the antenna s baseplate see Figure 5 c Carefully car...

Страница 6: ...rical and weather proof connection see Figure 6 d Position the rubber boot over the connector to help protect the connector from the elements e Leave an adequate service loop approximately 8 of slack...

Страница 7: ...r of the vehicle see Figure 8 c Attach the four antenna mounting plates to the roof using 20 fasteners appropriate for the roof s construction see Figure 8 d Seal all fasteners with silicone sealant o...

Страница 8: ...e box into an unstacked signal which receivers are configured to decode Terminate all RF coaxial cables including the antenna cable with Snap N Seal F connectors using an Augat IT1000 tool Low quality...

Страница 9: ...ect the positive red wire to clean 12 VDC vehicle power NOTE If vehicle power fluctuates or is noisy KVH recommends that you use an AC DC power supply KVH part 72 0206 01 to provide stable power to th...

Страница 10: ...the vent slots see Figure 13 b Secure the brackets to the mounting surface using appropriate 1 4 fasteners not supplied NOTE Be sure to leave enough slack in the connecting cables service loop for ea...

Страница 11: ...ormation e Verify that the System Needs Setup screen is displayed on the interface box see Figure 15 f Using the buttons on the interface box front panel see Figure 16 follow the steps in the next sec...

Страница 12: ...this mode if you wish to receive programming from the 119 and 110 satellites for DISH 500 service d Be sure to follow the instructions in Step 11 page 14 to enter your position and Step 12 page 15 to...

Страница 13: ...pports the Tri Sat AutoSwitch the Tri Sat Pairs mode supports the HDTV Converter These HDTV devices are no longer available Dual Sat Select this mode to receive programming from the 101 and 119 satell...

Страница 14: ...ur vehicle s current latitude Then press ACCEPT The cursor moves to the next number e Repeat Step d to set the remaining digits plus North South and East West directions of your latitude and longitude...

Страница 15: ...sregard any messages on the TV they do not correctly indicate when the antenna is ready for the next Check Switch test g Once you have waited the proper amount of time choose Test then press SELECT to...

Страница 16: ...heck Switch steps on page 15 Additional Receiver s 1 Check Switch Test If you connected multiple receivers follow these steps to run a Check Switch test on each additional receiver one at a time unles...

Страница 17: ...gularly Dirt buildup on the radome can affect satellite TV reception DISH 1000 only You may need to change the operating mode when traveling between regions see page 12 for details Please register the...

Страница 18: ...info kvh com KVH Europe A S EMEA Headquarters Kokkedal Denmark Tel 45 45 160 180 Fax 45 45 160 181 E mail info emea kvh com KVH Singapore Asian Headquarters Singapore Tel 65 6513 0290 Fax 65 6472 3469...

Отзывы: