14
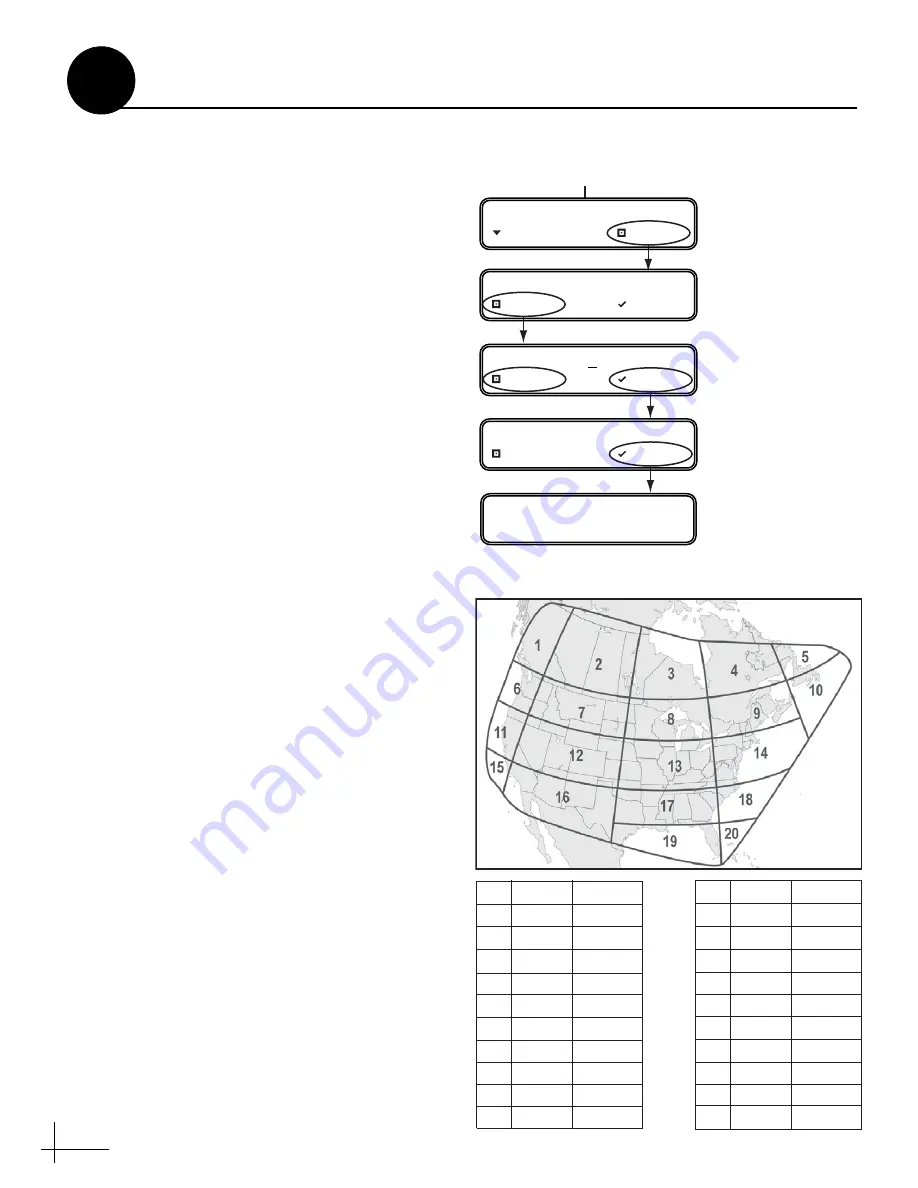
Follow these steps and refer to the flowchart in
Figure 20 to enter your vehicle’s latitude and
longitude into the system. The antenna will use
your position information to speed up satellite
acquisition, which is critical for DISH Network
configurations. If the antenna knows where you
are, it knows where it should start looking for the
satellite.
If you don’t know your latitude/longitude,
simply use the latitude and longitude for your
region shown in Figure 21. For example, if you
are located in San Francisco, CA (region #11), you
would enter 40° N latitude and 125° W longitude.
a.
Press MENUS on the interface box front
panel until the display shows “Lat/Long.”
b.
At “Lat/Long= 41N, 071W,” press CHANGE.
c.
Press CHANGE again. A cursor appears
under the first number in the displayed
latitude.
d.
Press CHANGE until the number is set to the
first digit of your vehicle’s current latitude.
Then press ACCEPT. The cursor moves to the
next number.
e.
Repeat Step d to set the remaining digits
(plus North/South and East/West directions)
of your latitude and longitude. Once you
have set the entire position, the cursor
disappears from the display.
f.
Press ACCEPT. The antenna restarts. Wait
one minute for system startup.
Press MENU
S
u
ntil LAT/LONG is displayed.
Press CHANGE to set
each digit pl
u
s N/
S
(north or so
u
th) and
E/W (east or west).
Press ACCEPT to
save each digit.
LAT/LONG= 41N, 071W?
CHANGE ACCEPT
LAT/LONG= 41N, 071W
NEXT MENU CHANGE
LAT/LONG= 41N, 071W
CHANGE ACCEPT
LAT/LONG= 55N, 125W?
CHANGE ACCEPT
RESTARTING ANTENNA
Figure 20: Latitude/Longitude Setting
#
1
2
3
4
5
6
7
8
9
10
125° W
110° W
90° W
70° W
55° W
125° W
110° W
90° W
70° W
50° W
55° N
55° N
55° N
55° N
55° N
45° N
45° N
45° N
45° N
45° N
LAT
LONG
#
11
12
1
3
14
15
16
17
1
8
19
20
125° W
110° W
90° W
70° W
125° W
110° W
90° W
75° W
83
° W
7
8
° W
40° N
40° N
40° N
40° N
3
2° N
3
2° N
3
2° N
3
2° N
27° N
27° N
LAT
LONG
Figure 21: Latitude/Longitude Data for North America
Enter Latitude & Longitude
11


