background image

83

50" / 55" 2160p (4K), 60Hz, LED Chromecast built-in TV

www.tv.toshiba.com

Adjusting menu settings

You can adjust how the TV menus look by:

• Selecting the menu language
• Labeling a video input source

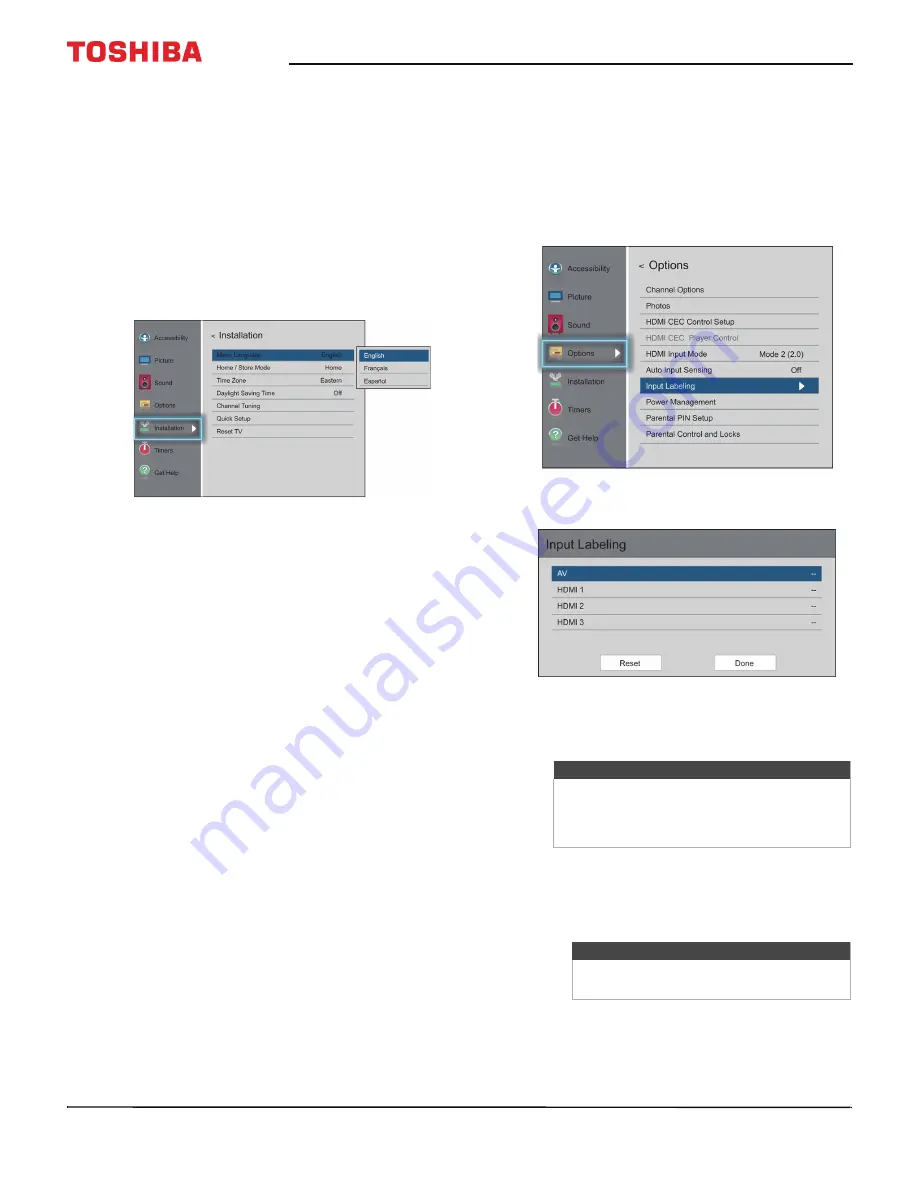
Selecting the menu language

You can choose from three different menu language 
settings (English, Français, and Español) for the 
on-screen display of menus and messages.

1

Press 

MENU

, press 

S

 or 

T

 to highlight 

Installation

, then press 

OK

.

2

Highlight 

Menu Language

, then press 

OK

3

Press 

S

 or 

T

 to select a language, then press 

OK

.

4

Press 

EXIT

 to close the menu.

Labeling a video input source

You can add a label to a video input source to make it 
easier to identify.
You can also hide a video input source so that it is 
grayed on the 

Input Selection

 list and your TV skips the 

video input source when you press 

INPUT

1

Press 

MENU

, press 

S

 or 

T

 to highlight 

Options

then press 

OK

.

2

Highlight 

Input Labeling

, then press 

OK

.

3

Highlight the video input source you want to 
label, then press 

W

 or 

X

 to select a label from the 

list.

4

Repeat steps 2 and 3 to label another input.

5

Press 

S

 or 

T

 to highlight 

Done

, then press 

OK

 to 

save the label.

6

Press 

EXIT

 to close the menu.

Note

If you are not using an input, you can select 

Hide

 for the label. 

Hide

 grays the input in the 

Input Selection

 list and skips the input when 

you press 

INPUT

 on the remote control.

Notes

To reset the input labels to the default 
labels, highlight 

Reset

, then press 

OK

.

Содержание 50L711M18

Страница 1: ...Before using your new product please read these instructions to prevent any damage 50 55 2160p 4K 60Hz LED Chromecast built in TV 50L711U18 55L711U18 50L711M18 55L711M18 ...

Страница 2: ...stands 55 model 12 Installing a wall mount bracket 14 TV components 17 Package contents 17 Front 17 Power INPUT button 17 Side jacks 18 Back jacks 19 Remote control 20 Virtual Remote control 21 What connection should I use 23 Connecting a cable or satellite box 24 HDMI best 24 DVI same as HDMI but requires an audio connection 25 AV good 26 Coaxial good 27 Connecting an antenna or cable TV no box 2...

Страница 3: ...pple mobile device 49 Casting a video movie or TV show 53 Setting up the ANT CABLE IN jack 54 Understanding the basics 54 Turning your TV on or off 54 Selecting the video input source 55 On screen menu overview 56 Navigating the menus 57 Adjusting the volume 57 Selecting a channel 57 Viewing channel information 58 Controlling CEC compatible devices 58 Turning HDMI CEC Control on or off 59 Turning ...

Страница 4: ... Downloading rating information for USA region 76 Temporarily unlocking programs 77 Locking video inputs 78 Locking channels 78 Setting the GameTimer 79 Using closed captioning 79 Turning closed captioning on or off 79 Selecting the analog closed captioning mode 80 Selecting the closed captioning mode with the CCD button 80 Customizing digital closed captioning settings 81 Adjusting time settings ...

Страница 5: ...86 Chromecast built in TV FAQ 87 Video and audio 88 Remote control 91 General 91 CEC compatible devices 92 Specifications 94 50 inch 50L711U18 50L711M18 94 55 inch 55L711U18 55L711M18 95 Legal notices 96 One year limited warranty Toshiba Televisions 97 One year limited warranty Toshiba Televisions Mexico 98 ...

Страница 6: ...d over pulled or grabbed WALL OR CEILING MOUNT YOUR TELEVISION ALWAYS contact your retailer about professional installation if you have any doubts about your ability to safely mount your television ALWAYS use a mount that has been recommended by the television manufacturer and has a safety certification by an independent laboratory such as UL CSA ETL ALWAYS follow all instructions supplied by the ...

Страница 7: ...paratus should not be exposed to dripping or splashing and no objects filled with liquids such as vases should be placed on the apparatus 18 Your TV has four VESA mounting holes on the back If you attach a wall mount bracket or TV stand to the back of your TV the bracket or stand must be securely attached using all four holes If you do not use all four mounting holes your TV may fall and cause pro...

Страница 8: ...ng the operating instructions Adjust only those controls covered by the operating instructions because incorrect adjustment of other controls may result in damage and will often require extensive work by a qualified technician to restore your TV to its normal operation If your TV has been dropped or damaged in any way When your TV exhibits a distinct change in performance Outdoor antenna grounding...

Страница 9: ... for information about disposal or recycling and about finding a recycler in your area before you dispose of your TV Non active pixels The LCD panel contains almost 3 million thin film transistors which provide exceptionally sharp video quality Occasionally a few non active pixels may appear on the screen as a fixed blue green or red point These non active pixels do not adversely affect the perfor...

Страница 10: ... you can keep using your phone for other things without disrupting what is playing on the TV HDMI CEC Control Enjoy the benefit of having HDMI CEC compatible products plug and play No setup is needed CEC technology lets different devices discover and communicate with each other See page 58 for instructions on how to use HDMI CEC Control DTS Studio Sound DTS Studio Sound is an advanced surround sou...

Страница 11: ...ount your TV on a wall go to Installing a wall mount bracket Installing the stands 50 model 1 Carefully place your TV face down on a cushioned clean surface to protect the screen from damages and scratches 2 Secure the TV stands to the back of your TV with the provided screws Notes If you plan to wall mount your TV do not install the stands Store the stands and stand screws in case you decide to u...

Страница 12: ...shiba com Installing the stands 55 model 1 Carefully place your TV face down on a cushioned clean surface to protect the screen from damages and scratches 2 Attach a stand neck to each of the stand legs with two of the provided 12 mm screws the long screws Screw type Screw length of screws M4 12 mm 4 ...

Страница 13: ...to the slots on the bottom of your TV Secure each neck to the back of your TV using two of the provided 10 mm screws the short screws and to the bottom of your TV using two of the 12 mm screws the long screws Screw type Screw length of screws M5 10 mm 4 M4 12 mm 4 M5 10 mm screws M4 12 mm screws ...

Страница 14: ...ounting holes on the back If you attach a wall mount bracket to the back of your TV the bracket must be securely attached using all four holes If you do not use all four mounting holes your TV may fall and cause property damage or personal injury See the documentation that came with your wall mount for complete mounting instructions This TV is intended to be supported by a UL Listed wall mount bra...

Страница 15: ...15 50 55 2160p 4K 60Hz LED Chromecast built in TV www tv toshiba com 2 If the stands are installed remove the screws that secure the stands to your TV then remove the stands 50 model 55 model ...

Страница 16: ...ation about which screws to use and how to correctly hang your TV Notes The length of the wall mount screws vary depending on the wall mount bracket you purchased See the instructions that came with the wall mount bracket for screw lengths The mounting holes on the back of your TV take type M6 screws 15 74 in 400 mm 7 87 in 200 mm 50 model 7 87 in 200 mm 11 81 in 300 mm 55 model ...

Страница 17: ...n Item Description 1 Remote control sensor Receives signals from the remote control Do not block 2 Power indicator Turns off when your TV is on Lights red when your TV is off standby mode Item Description INPUT Press to turn on your TV when your TV is off in standby mode Press and hold to turn off your TV when your TV is on Warning When your TV is off power still flows through it To completely dis...

Страница 18: ... page 24 29 31 or 34 or DVI same as HDMI but requires an audio connection on page 25 or 35 OR Connect an ARC enabled home theater receiver to the HDMI IN 1 ARC jack 3 DIGITAL OUTPUT Optical Connect a soundbar digital speaker system or home theater system to this jack to listen to TV audio through external speakers For more information see Connecting external speakers or a soundbar on page 38 4 AUD...

Страница 19: ... Chromecast built in For more information see Connecting a network router on page 33 2 VIDEO and AUDIO L and R Connect the video and audio for an AV device to these jacks For more information see AV good on page 26 30 or 32 3 ANT CABLE IN Connect an antenna or cable TV to this jack For more information see Coaxial good on page 27 or Connecting an antenna or cable TV no box on page 28 ...

Страница 20: ...us USB Rotate a photoina slideshow S or T orgo to the previous or next photoin a slideshow W or X 9 Switch toChromecast built in 10 OK Confirm selections or changes in TV menus 11 INPUT OpentheInputSelectionlist Press INPUTone or moretimes orpress S or T toselectthevideoinputsource then press OK See Selecting the videoinput source on page 55 12 ACC Open the Accessibility menu See Adjusting accessi...

Страница 21: ...ch and hold to continuously increase the volume 4 Volume down Tap todecrease the volume one step Touch and hold to continuously decrease the volume Toshiba TV Remote icon on Android device Toshiba TV Remote icon on iOS device 5 Play Pause Taptopause castingvideo Tap again toresume playback 6 Mute Taptomute the soundor un mute thesound 7 Direction key TaptogototheDirectionkeypage SeeDirectionkeypag...

Страница 22: ...or press S or T toselect the video input source then press OK 2 Arrows Use these buttons to browse through on screen menus 3 OK Taptoconfirm selections orchangesin TV menus 4 Back Taptogotothe previouschannel or go back to the previous step 5 Menu Taptoopen on screen menus 6 Game Taptoturn Game mode on or off 7 SOUND Taptoselect thesound mode You can select Standard Music Movie Clear Voice or Enha...

Страница 23: ...y Connection type and jack Cable connector Best use this ifyourdevices have HDMI HDMI video audio Good AV requires an audio connection Good Coaxial video audio Connection type and jack Cable connectors Optical digital audio output Analog audio input 3 5mmanalog audio output Cautions Check the jacks for position and type before making any connections Loose connections can cause poor audio or video ...

Страница 24: ...wer cord is unplugged and all connected equipment is turned off 2 Connect the incoming cable from the cable wall jack to the cable in jack on the cable or satellite box 3 Connect an HDMI cable not provided to one of the HDMI IN jacks on the side of your TV and to the HDMI OUT jack on the cable or satellite box 4 Plug your TV s power cord into a power outlet turn on your TV then turn on the cable o...

Страница 25: ...ter to the DVI OUT jack on the cable or satellite box 4 Connect the other end of the cable to one of the HDMI IN jacks on the side of your TV 5 Plug your TV s power cord into a power outlet turn on your TV then turn on the cable or satellite box 6 Press INPUT to open the Input Selection list 7 Press S or T to highlight HDMI1 HDMI2 or HDMI3 then press OK Note Your TV supports DVI video only To add ...

Страница 26: ...R jacks on the back of your TV and to the AV and audio out jacks on the cable or satellite box 4 Plug your TV s power cord into a power outlet turn on your TV then turn on the cable or satellite box 5 Press INPUT to open the Input Selection list 6 Press S or T to highlight AV then press OK Notes Cables are often color coded to match color coded jacks Important When you connect the audio using the ...

Страница 27: ...able or satellite box 4 Plug your TV s power cord into a power outlet turn on your TV then turn on the cable or satellite box 5 Press INPUT to open the Input Selection list 6 Press S or T to highlight ANT CABLE then press OK 7 If you cannot tune to channels you know exist scan for channels See Automatically scanning for channels on page 72 Notes Use a coaxial cable to eliminate interference and no...

Страница 28: ...nce and noise from radio waves Do not bundle the coaxial cable with the power cord or other cables If the antenna is not installed correctly contact qualified service personnel to correct the problem If the signal level for a channel is weak the picture may be distorted Adjust the antenna or use a highly directional outdoor or set top antenna with a built in amplifier If the picture quality is goo...

Страница 29: ...ur TV s power cord is unplugged and the DVD or Blu ray player is turned off 2 Connect an HDMI cable not provided to one of the HDMI IN jacks on the side of your TV and to the HDMI OUT jack on the DVD or Blu ray player 3 Plug your TV s power cord into a power outlet then turn on your TV and DVD or Blu ray player 4 Press INPUT to open the Input Selection list 5 Press S or T to highlight HDMI1 HDMI2 ...

Страница 30: ...nd to the AV OUT jacks on the DVD or Blu ray player 3 Plug your TV s power cord into a power outlet then turn on your TV and DVD or Blu ray player 4 Press INPUT to open the Input Selection list 5 Press S or T to highlight AV then press OK Note Cables are often color coded to match color coded jacks Important When you connect the audio using the AUDIO L and R jacks the audio output is analog AV cab...

Страница 31: ... TV and to the HDMI OUT jack on the game console 3 Plug your TV s power cord into a power outlet then turn on your TV 4 Turn on the game console then set it to the correct output mode For more information see the documentation that came with the console 5 Press INPUT to open the Input Selection list 6 Press S or T to highlight HDMI1 HDMI2 or HDMI3 then press OK Note An HDMI cable carries both audi...

Страница 32: ...our TV 4 Turn on the game console then set it to the correct output mode For more information see the documentation that came with the console 5 Press INPUT to open the Input Selection list 6 Press S or T to highlight AV then press OK Note Cables are often color coded to match color coded jacks Important Some older game consoles come with a special AV cable See the documentation that came with you...

Страница 33: ...the back of your TV 1 Make sure that your TV s power cord is unplugged and the router is turned off 2 Connect an Ethernet cable not provided to the LAN jack on the back of your TV and to an Ethernet jack on the router 3 Plug your TV s power cord into a power outlet then turn on your TV and the router Ethernet cable Network router Back of TV Ethernet cable connector LAN jack On your TV ...

Страница 34: ...o one of the HDMI IN jacks on the side of your TV and to the HDMI OUT jack on the computer 3 Plug your TV s power cord into a power outlet then turn on your TV and the computer 4 Press INPUT to open the Input Selection list 5 Press S or T to highlight HDMI1 HDMI2 or HDMI3 then press OK 6 Adjust the display properties on the computer if necessary HDMI cable Side of TV HDMI cable connector HDMI IN j...

Страница 35: ...f your TV 4 Plug your TV s power cord into a power outlet then turn on your TV and the computer 5 Press INPUT to open the Input Selection list 6 Press S or T to highlight HDMI1 HDMI2 or HDMI3 then press OK 7 Adjust the display properties on the computer if necessary Notes Your TV supports DVI video only To add sound for a DVI connection connect external speakers or a soundbar to the computer HDMI ...

Страница 36: ...B port on the side of your TV 2 Press INPUT press S or T to highlight USB then press OK The Media Player menu opens Caution Do not remove the USB flash drive or turn off the TV while using the USB flash drive You may lose data or damage the USB flash drive Note For information about supported file types see Supported photo file formats on page 62 USB flash drive Side of TV ...

Страница 37: ...the AUDIO OUT jack on the side of your TV 2 In the Headphones Audio Output screen that opens press W or X to highlight Headphones Audio Out Variable then press OK Warning Loud noise can damage your hearing When using headphones use the lowest volume setting on your headphones that still lets you hear the sound Note The Headphones Audio Output screen closes after 30 seconds without any action To op...

Страница 38: ...UDIO IN jack on the digital speaker system or soundbar 3 Plug your TV s power cord into a power outlet then turn on your TV 4 Turn on the digital speaker system or soundbar then set it to the correct source For more information see the documentation that came with the digital speaker system or soundbar 5 On your TV s Sound menu highlight Digital Audio Output then press OK Highlight Audio Format th...

Страница 39: ...ighlight Audio Output Fixed then press OK 4 Turn on the analog speaker system or soundbar then set it to the correct source For more information see the documentation that came with the analog speaker system or soundbar Note If the TV Speakers option on the Sound menu is set to Auto or Off the TV speakers are muted when you connect an analog sound system or soundbar Note If you want to mute the TV...

Страница 40: ...o and audio jacks available on your devices Refer to the documentation that came with your devices for connection information Just remember to use the best connection types available for the best picture and sound For information about connection types see What connection should I use on page 23 DVD or Blu ray player Cable or satellite box Antenna or cable TV connected directly to the wall jack AV...

Страница 41: ... power outlet Cautions Your TV should only be operated from the power source indicated on the label Always unplug the power cord from the power outlet when you will not be using your TV for an extended period of time The power cord is permanently attached to your TV Do not try to unplug it from the back of your TV ...

Страница 42: ... battery compartment 3 Replace the battery compartment cover Aiming the remote control Point the remote control towards the remote control sensor on the front of your TV Cautions Batteries should not be exposed to excessive heat such as sunshine heat registers or fire Battery chemicals can cause a rash If the batteries leak clean the battery compartment with a cloth If chemicals touch your skin wa...

Страница 43: ...0650 11265 10154 10765 10767 10178 11314 10700 10702 11935 10832 11959 10036 10149 11343 11369 10781 10003 10250 10156 0060 003 0154 0156 Cox 074 168 170 822 093 991 156 060 154 093 030 031 038 039 0170 0074 0168 1270 0060 0154 0156 1256 1265 1945 1704 1656 1635 1356 1343 1325 1306 1156 0845 0832 0650 0149 0036 1369 1042 1060 1061 1062 1087 1091 1097 1098 1130 1131 1183 1524 1935 2006 1959 1936 11...

Страница 44: ...our device has this option On your phone go to the Wi Fi menu in the settings app Install the remote control batteries see page 42 and connect the power cord see page 41 Connect the correct device to watch standard broadcast TV channels using a cable box satellite box or external antenna See page 24 through 28 Know the Wifi network name and password if you are using a wireless network to set up yo...

Страница 45: ...gle Play 5 Tap INSTALL The app installs 6 Tap OPEN 7 Tap ACCEPT to agree to the Terms of Service and Privacy Policy 8 Tap TURN ON LOCATION 9 Tap ALLOW Your mobile device searches for Cast TVs in range Note If you have not turned on Wi Fi on your device a message tells you to turn on Wi Fi ...

Страница 46: ...L711U18 55L711M18 50 55 2160p 4K 60Hz LED Chromecast built in TV www tv toshiba com 10 Tap CONTINUE after your device finds your Cast TV 11 Make sure that the codes on your device and TV match then on your mobile device tap YES ...

Страница 47: ...ame of your TV to something distinct delete the current name type in a new one then tap CONTINUE 13 Choose your Wifi network enter the Wifi password if necessary then tap CONTINUE Your TV connects to the network and is ready to cast Note If your TV receives an update wait for the update to finish ...

Страница 48: ...ge and control the devices on your network After setting up Chromecast built in your TV s menu language time zone and daylight savings time settings should be set automatically to match the settings on your mobile device If the settings are not correct or you want to change the settings see Setting the time zone and Daylight Saving Time status on page 82 Selecting the menu language on page 83 If y...

Страница 49: ... network name and password if you are using a wireless network to set up your TV 2 Turn on Wifi on your mobile device and connect it to your home Wifi network 3 Turn on Bluetooth on your mobile device 4 Press power to turn on your TV The Welcome screen opens 5 Type google com cast setup in the search bar of your device s browser 6 Tap Download on the App Store Note If you want to use a wired conne...

Страница 50: ...iba com 7 Tap GET then tap Install 8 Tap OPEN 9 Tap ACCEPT to agree to the Terms of Service and Privacy Policy Your mobile device searches for Cast TVs in range 10 Tap CONTINUE after your device finds your Cast TV Note If you have not turned on Wi Fi on your device a message tells you to turn on Wi Fi ...

Страница 51: ...1 50 55 2160p 4K 60Hz LED Chromecast built in TV www tv toshiba com 11 Make sure that the codes on your device and TV match then on your mobile device tap I SEE IT 12 Select your region then tap CONTINUE ...

Страница 52: ...onal To change the name of your TV to something distinct delete the current name type in a new one then tap CONTINUE 14 Choose your Wifi network enter the Wifi password if necessary then tap CONTINUE Your TV connects to the network and is ready to cast Note If your TV receives an update wait for the update to finish ...

Страница 53: ...ce If the settings are not correct or you want to change the settings see Setting the time zone and Daylight Saving Time status on page 82 Selecting the menu language on page 83 If you connected cable TV without a box or an external antenna to the ANT CABLE IN jack set up the ANT CABLE IN jack and scan for channels See Setting up the ANT CABLE IN jack on page 54 Automatically scanning for channels...

Страница 54: ...ers basic information for Turning your TV on or off Selecting the video input source On screen menu overview Navigating the menus Adjusting the volume Selecting a channel Viewing channel information Turning your TV on or off 1 Make sure that the power cord is connected securely and correctly For more information see Connecting power on page 41 2 Press power to turn on your TV The power indicator t...

Страница 55: ... CEC compatible device is connected to an HDMI jack the HDMI CEC icon appears in the list If a connected CEC compatible device has CEC compatible devices connected to it a separate device selection pop up window appears For example the pop up window for a CEC compatible DVD player with a CEC compatible audio receiver connected might appear as follows If you press INPUT to select a CEC compatible d...

Страница 56: ...uilt in TV www tv toshiba com On screen menu overview Accessibility menu Picture menu Sound menu Options menu Installation menu Timers menu Notes Depending on the signal source selected you may see different options on your screen Menu items that are not selectable are grayed out ...

Страница 57: ...l or select the sub channel from the channel list On the virtual remote control on your mobile device press the number buttons to enter the channel number you want then press OK to immediately change the channel To change the channel to a sub channel enter the main channel number press enter the sub channel button then press OK See Virtual Remote control on page 21 Press back to go to the last vie...

Страница 58: ...nu to control CEC compatible devices HDMI CEC Control lets you control HDMI CEC compatible devices connected to the HDMI jacks on your TV using the remote control that came with your TV To use HDMI CEC Control you must set the Enable HDMI CEC Control setting on the HDMI CEC Control Setup menu to On Note If you pressed INFO press INFO again to close the banner Notes HDMI cables must be used to conn...

Страница 59: ... menu Turning TV Auto Power on or off TV Auto Power automatically turns on your TV when an HDMI CEC device is turned on if the device has this feature 1 Press MENU press S or T to highlight Options then press OK 2 Highlight HDMI CEC Control Setup then press OK 3 Make sure that Enable HDMI CEC Control is set to On 4 Highlight TV Auto Power then press OK 5 Highlight On or Off then press OK 6 Press E...

Страница 60: ... CEC Control is set to On 4 Highlight Auto Standby then press OK 5 Highlight On or Off then press OK 6 Press EXIT to close the menu Turning Amplifier Control on or off Amplifier Control lets you use your TV s remote control to control the volume and mute the sound on an audio receiver 1 Press MENU press S or T to highlight Options then press OK 2 Highlight HDMI CEC Control Setup then press OK 3 Ma...

Страница 61: ...or off on page 59 2 Press MENU press S or T to highlight Options then press OK 3 Highlight HDMI CEC Player Control then press OK 4 Highlight an option then press OK You can select Power Turns the selected device on or off Root Menu Accesses the root menu of the selected device Contents Menu Accesses the contents list of the device Setup Menu Accesses the setup menu of a selected device Top Menu Ac...

Страница 62: ...wing photo file formats Data type JPEG EXIF ver 2 1 File format JPEG Maximum photo size 6 MB Maximum number of files or folders 500 files per folder Base line format maximum photo resolution 4096 x 4096 pixels Progressive format maximum photo resolution 1024 x 768 pixels Mode 1 1 4 YCbCr 422 444 supports timing limit on 3840x2160 30Hz HDMI 1 4 mode for 4K 30Hz or lower Mode 2 2 0 YCbCr 420 support...

Страница 63: ...lder and press OK the folder opens and displays thumbnails of the photos in the folder Press to return to the previous thumbnail screen or folder If you select a photo and press OK the photo is displayed full screen If all the photos do not fit on one screen Highlight the top left thumbnail then press W to move to the previous screen Highlight the bottom right thumbnail then press X to move to the...

Страница 64: ...us and some remote control functions Depending on the broadcaster audio narration of key elements in programs may also be available 1 Press MENU press S or T to highlight Accessibility then press OK 2 Highlight an option then press OK You can select Voice Guide Audibly narrates menu selections and some remote control functions You can select On or Off Video Description Audibly narrates key visual ...

Страница 65: ...cture viewing Normal Provides enhanced HDR picture viewing Movie Provides a natural HDR picture Game Provides an optimized picture for HDR gaming content Store The Store picture mode is only available if you selected Store Mode during initial setup This option is hidden in the Home mode Reset Resets all picture settings to the factory default Backlight Sets the overall brilliance of the screen Con...

Страница 66: ...ring of dark areas in the video according to the level of darkness You can select High Low or Off HDR Tone Mapping HDR Optimizes the luminance response You can select On or Off Dynamic Contrast SDR Automatically detects changes in picture quality that affect the appearance of your contrast settings and automatically adjusts the video You can select High Middle Low or Off MPEG Noise Reduction Reduc...

Страница 67: ...gs then press OK 3 Highlight Picture Size then press OK 4 Press S or T to select a picture size then press OK or wait a few seconds The menu closes Note The Picture Position option may be grayed and unavailable for some Picture Size settings Notes Picture setting adjustments affects the current video input only You can adjust the picture quality separately for each input Depending on the Sharpness...

Страница 68: ...This setting is for viewing VGA SVGA XGA WXGA and SXGA sources Note This option adjusts the timing when a computer is connected to an HDMI IN jack Dot by Dot Dot by Dot is a non scaling display Depending on the input signal format VGA for example the picture may appearwith sidebars and orbars at the top and bottom This setting is for viewing VGA SVGA XGA WXGA and SXGA sources This option is only a...

Страница 69: ...eset then press OK 5 Press EXIT to close the menu Automatically adjusting the aspect ratio When the Auto Aspect option is set to On your TV automatically selects the picture size when one of the following input sources is received 480i 480p 720p 1080i digital signal from the ANT CABLE IN jack 480i 480p 720p 1080i 1080p 2160p or VGA 60Hz signal from an HDMI jack 1 Press MENU press S or T to highlig...

Страница 70: ...ress OK 2 Highlight an option then press OK You can select Sound Mode Selects the sound mode You can select Standard Music Movie Clear Voice or Enhanced Bass Reset Resets all sound settings to the factory default Balance Adjusts the balance between the left and right audio channels Bass Adjusts the low sounds Treble Adjusts the high sounds Advanced Sound Settings Adjusts advanced sound settings Yo...

Страница 71: ...or digital channels Digital Audio Output Opens the Digital Audio Output menu where you can adjust digital audio Audio Format Selects the digital audio format sent to an external audio system You can select PCM to convert and output sound as PCM pulse code modulation format Auto to pass through the original digital sound Audio Delay Fine tunes the audio when it is not in sync with the video You can...

Страница 72: ...e press EXIT to close the menu Your TV tunes to the first scanned channel Manually adding channels to the channel list Channels with weak signals may not be added to the channel list when you scan for channels You can manually add a channel to the channel list if you know the channel number 1 Press MENU press S or T to highlight Installation then press OK Note When you scan for channels your TV er...

Страница 73: ...den channels You can still tune to a hidden channel by pressing the number buttons on the virtual remote control for the channel If you tune to a hidden channel the channel appears in the History list 1 Press MENU press S or T to highlight Options then press OK 2 Highlight Channel Options then press OK 3 Highlight a channel you want to hide then press OK A check appears in the box next to the chan...

Страница 74: ...mporarily unlocking programs Locking video inputs Locking channels Setting the GameTimer Setting a new PIN A PIN is necessary for some menus The Parental Control and Locks menu is grayed out if no PIN has been set 1 Press MENU press S or T to highlight Options then press OK 2 Highlight Parental PIN Setup then press OK 3 Press W or X on the number bar at the bottom of the screen to select a number ...

Страница 75: ...ng a new PIN on page 74 To view a program or movie rating tune to the program or movie then press INFO U S TV ratings TV Y Suitable for all children TV Y7 TV Y7FV Suitable for children 7 and older Note Programs in which fantasy violence may be more intense or more combative than other programs in this category are designated TV Y7FV TV G General audiences TV PG Parental guidance suggested May cont...

Страница 76: ...press OK 7 Press S T W or X to highlight a rating then press OK 8 When you have finished highlight Done then press OK to save your changes 9 Press EXIT to close the menu Downloading rating information for USA region In the future an additional rating system may become available for use in selectively blocking TV programs and movies The currently tuned station must be receiving a digital signal bef...

Страница 77: ...mode and a warning message appears on the screen You can temporarily unlock the program 1 Press MUTE 2 Enter your four digit PIN then press OK The program is unlocked and the normal picture appears The program is locked again when you change the channel Notes The ALT RS option is only available if an additional rating system is currently available Your TV may take several minutes to download the a...

Страница 78: ...is step to enter the other three numbers in your PIN 4 Press T to highlight Input Lock then press OK 5 Highlight a video input locking level then press OK You can select Video Locks AV HDMI 1 HDMI 2 and HDMI 3 Off Unlocks all video inputs 6 Press EXIT to close the menu Locking channels 1 Press MENU press S or T to highlight Options then press OK 2 Highlight Channel Options then press OK 3 Press W ...

Страница 79: ...oning displays a text version of the TV program audio or displays information provided by the broadcaster Closed caption controls include Turning closed captioning on or off Selecting the analog closed captioning mode Selecting the closed captioning mode with the CCD button Customizing digital closed captioning settings Turning closed captioning on or off 1 Press MENU press S or T to highlight Acc...

Страница 80: ...e then press OK 4 Highlight an analog captioning mode then press OK You can select CC1 through CC4 Closed captioning appears in a small banner across the bottom of the screen CC1 is usually the printed version of the audio CC2 through CC4 display content provided by the broadcaster T1 through T4 Closed captioning covers half or all of the screen T1 through T4 display content provided by the broadc...

Страница 81: ...n Size Selects the font size Caption Text Type Selects the font type Caption Text Edge Selects the style of the letter edge Caption Text Color Selects the color for the words Text Foreground Opacity Selects the opacity level for the words Background Color Selects the color for the background Text Background Opacity Selects the opacity level of the background Caption Text Edge Color Selects the col...

Страница 82: ... then press OK 5 Highlight On if your viewing area observes Daylight Saving Time or Off if your viewing area does not observe Daylight Saving Time then press OK 6 Press EXIT to close the menu Setting the sleep timer You can specify the amount of time before your TV automatically turns off 1 Press MENU press S or T to highlight Timers then press OK 2 Highlight Sleep Timer then press OK 3 Press S or...

Страница 83: ...input source to make it easier to identify You can also hide a video input source so that it is grayed on the Input Selection list and your TV skips the video input source when you press INPUT 1 Press MENU press S or T to highlight Options then press OK 2 Highlight Input Labeling then press OK 3 Highlight the video input source you want to label then press W or X to select a label from the list 4 ...

Страница 84: ...eaning the TV cabinet Clean the cabinet with a soft lint free cloth If the cabinet is especially dirty moisten a soft lint free cloth in a weak detergent solution squeeze the excess moisture from the cloth then wipe the cabinet with the cloth Use a clean cloth to dry the cabinet Cleaning the TV screen Clean the screen with a soft lint free cloth Troubleshooting Use the following troubleshooting in...

Страница 85: ...gs you have customized are reset 1 Press MENU press S or T to highlight Installation then press OK I 2 Press S or T to highlight Reset TV then press OK A confirmation screen opens 3 Highlight Yes to reset or No to not reset then press OK If you select Yes your TV turns off then turns on again Complete the Initial Setup wizard and set up the ANT CABLE IN jack For more information see Turning on you...

Страница 86: ...wer Down then press OK 4 Press S or T to select On or Off then press OK 5 Press EXIT to close the menu Making your TV turn on faster When you turn off your TV it normally goes into a power savings mode to conserve energy When you turn your TV back on it takes several seconds to exit the power saving mode and display a picture You can turn on your TV faster by bypassing the power savings mode When ...

Страница 87: ...th its assigned name and the current time and a photo slideshow playing Try casting from the Google Home app to see if the device is correctly connected or requires setup If you re using an iOS device turn on Bluetooth when setting up your TV Try rebooting your Wifi router by unplugging the power cord and turning off your TV Plug your router back in and turn on your TV Try uninstalling and reinsta...

Страница 88: ...ast Make sure that your TV is connected to your Wifi network and make sure that you set up Chromecast built in on your mobile device and connected the device to the same network Disconnect what you re currently casting from Netflix Try casting again Disconnect from a Virtual Private Network VPN or proxy server if applicable over these networks If you are seeing an error such as Error 16003 or 1600...

Страница 89: ...page 24 or Connecting an antenna or cable TV no box on page 28 If you are using an antenna and the signal strength is low adjust the antenna or use a highly directional outdoor antenna or set top antenna with a built in amplifier Problem Solution Picture quality is good on some channelsandpoor on others Sound is good The problem may be caused by a poor or weak signal from the broadcaster or cable ...

Страница 90: ...70 Make sure that the audio cables are connected correctly and securely to your TV Make sure that the antenna or cable TV is connected correctly and securely See Connecting a cable or satellite box on page 24 or Connecting an antenna or cable TV no box on page 28 The audio cables you are using may be bad Try a new set Problem Solution Poor picture Make sure that the room is not too bright Light re...

Страница 91: ... remote that came with that box to change channels After Auto ChannelSearch there are no channels Reception can vary by channel depending on the broadcast power level of a given station Contact your cable or satellite TV provider Make sure that the antenna or cable satellite TV is connected securely to your TV Try replacing the cable between the antenna cable or cable satellite box and your TV Whe...

Страница 92: ...the TV picture See Adjusting the TV picture on page 65 Problem Solution My TV is not playing the audio from the connected CEC device Make sure that the HDMI cable is connected securely to your TV and the device Make sure that the device is connected to your TV with an HDMI cable Make sure that the device is a CEC device See the documentation that came with the device Make sure that the TV volume i...

Страница 93: ...ed on See Turning HDMI CEC Control on or off on page 59 Make sure that the device is a CEC device See the documentation that came with the device Problem Solution My device does not turn off when I turn off my TV Make sure that the HDMI CEC Control feature is turned on See Turning HDMI CEC Control on or off on page 59 Make sure that Auto Standby is set to On See Turning Auto Standby on or off on p...

Страница 94: ...dy c digital Response time 8 ms Horizontal viewing angle 178 Vertical viewing angle 178 Analog NTSC Digital ATSC 8 VSB Clear QAM HDMI 3 Composite video 1 DVI shared with HDMI HDMI IN USB 1 Supports JPEG Antenna Cable 1 Analog audio Headphone 1 Digital audio 1 optical WiFi Yes LAN Ethernet Yes Audio enhancement DTS Studio Sound Speakers Number 2 Watts per channel 10W Power consumption ON 109 6W Pow...

Страница 95: ...gle 178 Vertical viewing angle 178 Analog NTSC Digital ATSC 8 VSB Clear QAM HDMI 3 Composite video 1 DVI shared with HDMI HDMI IN USB 1 Supports JPEG Antenna Cable 1 Analog audio Headphone 1 Digital audio 1 optical WiFi Yes LAN Ethernet Yes Audio enhancement DTS Studio Sound Speakers Number 2 Watts per channel 10W Power consumption ON 147 3W Power consumption in standby 0 5W Power input 120V 60Hz ...

Страница 96: ... EMI connector hoods to maintain compliance with FCC Rules and Regulations Canadian Notice Analog and Digital Television Receiving Apparatus Appareil de réception de télévision analogigue et numérique Canada BETS 7 NTMR 7 IC Statement This device complies with Industry Canada licence exempt RSS standard s Operation is subject to the following two conditions 1 this device may not cause interference...

Страница 97: ... cover Customer instruction education Installation Set up adjustments Cosmetic damage Damage due to acts of God such as power surges Accident s Misuse unintentional or intentional Abuse unintentional or intentional Negligence Commercial purposes use including but not limited to use in a place of business or in communal areas of a multiple dwelling condominium or apartment complex or otherwise used...

Страница 98: ...so dentro del período de esta garantía y proporcionar sin cargo extra para el Cliente los repuestos de las partes defectuosas En el caso de que la reparación del Producto o el reemplazo de partes no solucione el defecto o que hayan transcurrido 30 días posteriores a la recepción del Producto para su reparación o se hayan realizado 3 tres reparaciones consecutivas sobre la misma falla e incurra en ...

Страница 99: ...e vendió el Producto Fecha de compra y recepción Fecha de Instalación en caso de ser aplicable ___________ _____________ _____________ Centro de atención telefónica para la Ciudad de México e interior de la República 01 800 BESTBUY 2378289 http www bestbuy com mx O puede presentar la factura o recibo o el comprobante en el que consten los datos específicos del producto adquirido DÍA MES AÑO ...

Страница 100: ...st Buy China LTD All rights reserved Mexico 01 800 926 3080 Best Buy Imports S DE R L DE C V Avenida Santa Fe No 440 Piso 2 Ofna 202 Y 203 P3 Y P4 ColoniaSantaFeCuajimalpa C P 05348 CuajimalpaDeMorelos México Ciudad De México 2017 Best Buy All rights reserved Madein China V3 ENGLISH 17 0044 If the power cord is damaged it must be replaced by the manufacturer or its service agent or qualified perso...

Отзывы: