background image

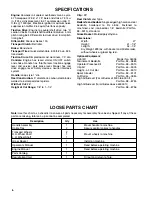
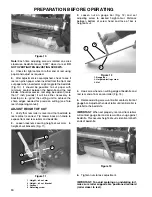
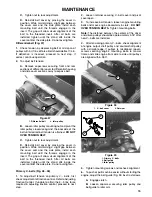
. Rotate belt guide clockwise until a gap of

approximately .06" is obtained between guide

finger and backside of drive belts.

. Tighten capscrew and lock nut securing idler

pulley and belt guide to idler arm. The .06"

dimension is a starting recommendation the actual

gap may vary per machine.

Close cover and secure retainer.


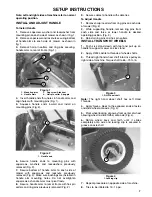
Remove capscrews securing traction drive and

reel drive belt covers to right side plate and remove belt

covers.

Loosen idler pulley mounting nut, on each idler

pulley and pivot each idler pulley counterclockwise

away from the backside of each belt to release belt

tension. Remove belts.

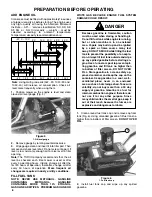
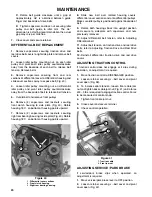
Remove capscrews securing front and rear

sections of differential cover to differential housing and

slide cover sections away to expose belt (Fig. 40).

Loosen idler pulley mounting nut, on differential

idler pulley and pivot idler pulley counterclockwise

away from the backside of belt to release belt tension.


Cut old belt and remove from pulleys.

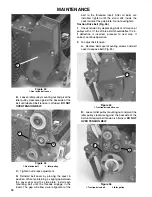
Remove (2) capscrews and locknuts securing

front clutch housing to side plate (Fig. 40). Rotate

housing 180

_

, so bottom of housing points upward.

Remove (2) capscrews and locknuts securing

right rear bearing housing to side plate (Fig. 40). Rotate

housing 180

_

, so bottom of housing points upward.

)'2/% 

 )&&%/%-1)"+ $.3%/ 0%$1).-0

 /.-1 $+21$( (.20)-'

 )'(1 /%"/ #%"/)-' (.20)-'

Slide new belt over rotated housing covers,

differential cover sections and onto differential pulleys.

Make sure idler pulley is positioned against backside of

belt.

Rotate both housings back into upright position

and secure to sideplate with capscrews and nuts

previously removed.

Adjust differential belt tension, refer to Adjusting

Differential belt.

Adjust belt tension on traction drive and reel drive

belts, refer to Adjusting Traction Drive and Reel Drive

belts.

Reinstall differential, traction drive and reel drive

covers.


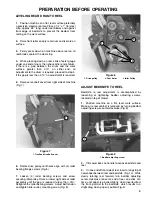
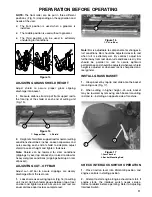
If traction control does not engage or it slips during

operation, an adjustment is required.

Move traction control to DISENGAGED position.

Loosen retainer securing v-belt cover and pivot

cover open (Fig. 38).

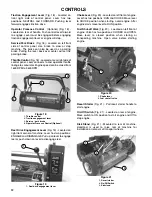
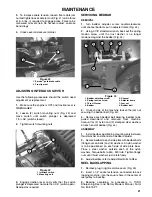
To increase cable tension, loosen front cable jam

nut and tighten back cable jam nut (Fig. 41) until a force

of 3-5 lbs. is required to engage traction control. Force

to be measured at control knob.

Tighten front cable jam nut.


Close cover and secure retainer.


Check control operation.

)'2/% 

 /"$1).- $"#+%

 /.-1 *", -21

  !   

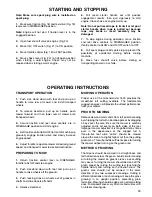
If service/park brake slips when operated, an

adjustment is required.

Move service/park brake lever to OFF position.

Loosen retainer securing v-belt cover and pivot

cover open (Fig. 42).

Содержание 04060 Greensmaster 1600

Страница 1: ... 1 1 27 12 0 1 0 5 5 01 2 31 0 0 3 7 1 71 2 1 27 1 4 6 3 1 27 2 3 0 08 2 5 2 2 1 11 2 2 2 7 3 0 7 2 0 0 2 0 2 8 0 3 012 2 2 21 2 1 3 0 2 1 12 02 7 02 3 0 22 2 2 2 1203 2 1 2 7 2 20 3 0 1 27 02 17 30 2 7 5 2 2 1 27 1203 2 1 7 0 13 2 01 307 ...

Страница 2: ...derstood For more details concerning safety read the safety instructions on pages 3 and 4 identifies special mechanical information and identifies general information worthy of special attention The engine exhaust from this product contains chemicals known to the State of California to cause cancer birth defects or other reproductive harm In some places a spark arrester muffler must be used becaus...

Страница 3: ...afety instructions Operate the machine only after reading and understanding the contents of this manual A replacement manual is available by sending complete model and serial number to The Toro Company 8111 Lyndale Avenue South Bloomington Minnesota 55420 1196 Never allow children to operate the machine or adults to operate it without proper instructions Become familiar with the controls and know ...

Страница 4: ...amaged reel or bedknife must be repaired or replaced before operation is commenced Whenever machine is left unattended be sure engine is stopped and cutting unit reel is not spinning Close fuel shutĆoff valve if machine is not to be used for an extended period of time Before servicing or making adjustments to the machine stop the engine and pull the spark plug wire off spark plug to prevent accide...

Страница 5: ... 045 10 5 0 09 1 13 3 2 5 2 35 06 34 3 45 18 0 0 5 2 354 5 1 3 3 3 2 054 31 9163 65 13 131 453 6513 0 10531 0 35 1 0 10531 0 35 1 0 5 17 3 35 1 0 3 44 35 1 0 6 0 35 1 0 6 0 35 1 0 3 44 35 1 04 5 17 34 35 1 04 5 17 3 35 1 0 6 0 35 1 ...

Страница 6: ...to Rc 48Ć54 Fastened to machined cast iron bedbar 1 8 bedknife Part No 93 9015 standard Molded polyethylene Width 41 Height 41 1 2 Length 54 1 4 Dry Weight 229 lbs with basket and Wiehle roller without wheels or grooming reel Light Kit Model No 04059 Tournament Bedknife Part No 94 5885 Operator Presence Kit Part No 93 9010 Clip Kit Part No 65 9000 Height of Cut Bar Part No 94 9010 Spark Arrester P...

Страница 7: ... arms to rear of frame with hair pin cotters and ring pins previously removed Fig 2 Secure cables to handle with cable ties 201 Remove hairpin cotters from ring pins on each side of mower FIg 2 While supporting handle remove ring pins from each side and raise or lower handle to desired operating position Fig 2 Reinstall ring pins and hair pin cotters Push kick stand down with foot and pull up on h...

Страница 8: ...r opening 27 The TORO Company recommends that the oil level be checked each time mower is used or after every 5 operating hours Initially change oil after the first 20 hours of operation thereafter change oil after every 50 hours of operation 25 5 48 17 2 1 6 5 5 48 5 1 867 25 57 21 7 216 86 62 1 6 00 87 21 0867 86 1 6725 1 25 1 1 7 2 127 8 7 1 1 1 6 5811 1 27 25 1 0 1 6 1 1 1 26 5 3256 0 8 83 1 1...

Страница 9: ...align with 4 roller bearing flange screws Fig 8 Loosen 4 roller bearing screws and screw securing idler pulley Raise or lower right side of roller assembly until the gap is reduced to less than 010 Retighten the roller bearing screws Adjust belt tension and tighten idler pulley mounting screw Fig 8 0 2 2 Bedknife to reel adjustment is accomplished by loosening or tightening bedbar adjusting screws...

Страница 10: ...ife to reel contact is correct Tip mower back on handle to expose front and rear rollers and bedknife Loosen locknuts securing heightĆofĆcut arms to heightĆofĆcut brackets Fig 11 74 6 2 76 40 6 2 76 4 6 2 176 756 1 5 4 9 Loosen nut on gauge bar Fig 12 and set adjusting screw to desired heightĆofĆcut Distance between bottom of screw head and face of bar is heightĆofĆcut 74 7 4 6 756 1 5 4 9 76 Hook...

Страница 11: ...ngs are cleanly discharged from the reel area Loosen screws securing top bar Fig 16 to cutting unit Insert 060 inch feeler gauge between top of reel and bar and tighten screws Assure bar and reel are equal distance apart across complete reel 0 0 Bar is adjustable to compensate for changes in turf conditions Bar should be adjusted closer to reel when turf is extremely wet By contrast adjust bar fur...

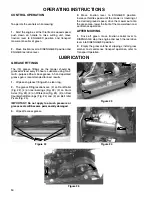
Страница 12: ...ied from 1600 RPM to 3600 RPM Fig 19 Ć Located on right front corner of machine Lever has two positions ENGAGE and DISENGAGE Pull up on lever to engage reel or push down on lever to disengage reel Fig 20 Ć Located on left front of engine Lever has two positions RUN and CHOKE Move lever to CHOKE position when starting a cold engine After engine starts move lever to RUN position 0 Fig 20 Ć Located o...

Страница 13: ... destination Return traction control lever to DISENGAGE throttle to SLOW and stop engine Push kickstand down with foot and pull up on handle to raise wheels off the ground Push locking clips on wheels out of grooves in shafts and slide wheels off shafts Release kickstand Proper use of the Greensmaster 1600 provides the smoothest turf cutting available The fundamental suggestions given will provide...

Страница 14: ...e off green move traction control lever to DISENGAGE stop the engine and push the reel drive lever into DISENGAGED position Empty the grass catcher of clippings install grass catcher and commence transport operation refer to Transport Operation The 13 grease fittings on the mower should be greased at least every 25 hours Lubricate using No 2 multi purpose lithium base grease A hand operated grease...

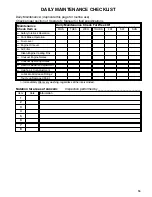
Страница 15: ...fety Interlock Operation n Park Brake Operation n Fuel Level n Engine Oil Level n Air Filter Clean Engine Cooling Fins n Unusual Engine Noises n Unusual Operating Noises n Reel to Bedknife Adjustment n Height of Cut Adjustment Lubricate All Grease Fittings1 Touch up Damaged Paint 1 Immediately after every washing regardless of the interval listed Inspection performed by____________________________...

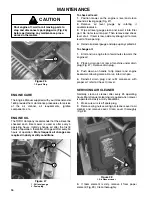
Страница 16: ...o not screw into port Then remove and check level of oil If level is low add only enough oil to raise level to filler opening Reinstall oil level gauge and wipe up any spilled oil Start and run engine for a few minutes to warm the engine oil Place a drain pan at rear of machine under drain plug Fig 27 Remove drain plug Push down on handle to tip mower and engine backward allowing more oil to run i...

Страница 17: ...emove plug from cylinder head Fig 30 Figure 30 1 Spark plug 1 IMPORTANT Replace a cracked fouled or dirty spark plug Do not sand blast scrape or clean electrodes because engine damage could result from grit entering cylinder 3 Set air gap at 0 028 0 032 Fig 31 Install correctly gapped spark plug and tighten firmly to 17 ft lb Figure 31 0 028 0 032 CLEANING FUEL FILTER Initially clean fuel filter a...

Страница 18: ...visual alignment of the bolt to the threaded insert After all bolts are installed tighten until the stand offs inside the cover contact the side plate Do not overtighten Check tension by depressing belt at mid span of pulleys with 4 1 lbs of force Belt should deflect 1 4 in If deflection is incorrect proceed to next step If correct continue operation To adjust belt tension Remove belt cover mounti...

Страница 19: ...unting bolt until the threads engage in the insert The gap will allow visual alignment of the bolt to the threaded insert After all bolts are installed tighten until the stand offs inside the cover contact the side plate Do not overtighten 2 To adjust belt tension on primary V belts first check adjustment of traction control Refer to Adjusting Traction Control If unable to attain the 3 5 lbs force...

Страница 20: ...ng right rear bearing housing to side plate Fig 40 Rotate housing 180_ so bottom of housing points upward 2 1 3 0 1 0 1 21 20 1 20 Slide new belt over rotated housing covers differential cover sections and onto differential pulleys Make sure idler pulley is positioned against backside of belt Rotate both housings back into upright position and secure to sideplate with capscrews and nuts previously...

Страница 21: ...er is no longer tensioned against the bedbar Fig 44 3 645 0 4 3 8 23 0 5 04 10 4 3 8 3645 4 3 3 63 00 645 3 3 065 3 1 5 On each side of the machine loosen the jam nut securing the bedbar bolt Fig 44 Remove each bedbar bolt allowing bedbar to be pulled downward and removed from machine Account for 2 nylon and 2 stamped steel washers on each end of bedbar Fig 44 Install bedbar positioning mounting e...

Страница 22: ...a file across the front face of the bedknife when the lapping operation is completed This will remove any burrs or rough edges that may have built up on the cutting edge Reinstall plug in cover when backlap operation is completed 0 0 1 ...

Страница 23: ...Operator s and Service Manual for specifications and procedures The GreensmasterR 1600 has two identification numbers a model number and a serial number These numbers are stamped into a plate located on rear of frame In any correspondence concerning the unit supply the model and serial numbers to ensure correct information and replacement parts are obtained Do not order by reference number if a pa...

Страница 24: ...rational hours whichever occurs first Product equipped with hour meter D This warranty does not apply to parts subject to consumption through use unless found to be defective Examples of parts which are consumed or used up during normal Product operation include but are not limited to blades reels bedknives tines spark plugs castor wheels tires filters belts etc D This warranty does not apply to f...

Отзывы: