background image

© TIMYO B.V.   

 TIMYO USER MANUAL EN   SKO52021V2    

 PAGE 55

MANUAL 


VANDIJCK 

E-BIKES 

     VD0.1

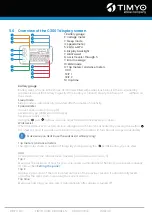
5.8.2  Walk assist on/off 

To activate the walk assist function, press and hold the '       ' button on the remote control. After 2 

seconds, the e-bike will be activated and will maintain a uniform speed of 6 km/h while the display 

shows '      '. The walk assist function is switched off as soon as you release the '         ' button. The e-bike 

system cuts off the power supply immediately.


The walk assist function should only be used while walking alongside the e-bike. Never use  


the walk assist while riding the e-bike!

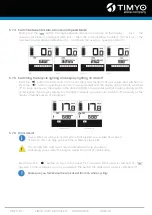
5.8.3  Switching backlight on/off

To switch on the backlight and headlight of the e-bike, press and hold  

'       ' for 2s. When cycling at night or in a low-light place, you can turn on the LCD 

backlight. Press and hold '        ' again for 2s and the backlight and e-bike headlight 

will be switched off.

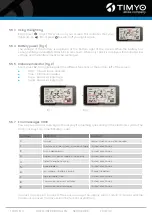
5.8.4  Engine assist level

Press the '       ' or  '         ' button to change the electric assistance and engine power. 

The default assistance level ranges from level '0' to level ‘5’. The initial power is set 

to level '0' by default. Level '1' is the minimum power- level '5' the maximum power. 

When you reach '5', press the '        ' button again, the interface will still show '5', and 

flash '5' to indicate the maximum power. When you reach level '0' when shifting it 

down and you press the '        ' button again, the '0' flashes to indicate the minimum 

power. The default value is level '1'.

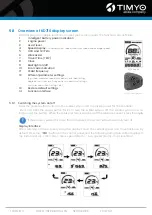
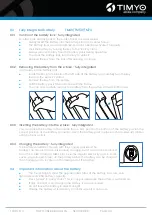
5.8.7  Battery capacity 

The five battery bars represent the capacity of the battery. The five battery bars are bright when 

the battery is at full voltage. When the battery is in low voltage, the battery frame will flash at the 

frequency of 1HZ to give a notification that the battery needs to be charged immediately.

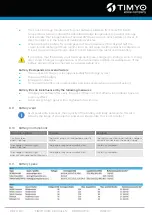
5.8.8  Error code indication

If an error occurs in the electronic control system of the e-bike, the display will 

show the corresponding error code. The definitions of the codes are included in 

the error code list.


Allow the display to recover when an error code is displayed.  


Otherwise you cannot ride the e-bike normally.

!

Fully charged

Battery low (charging required)

!

 KD716 control panel

Содержание kreutzer E-pack

Страница 1: ...E PACK e bike user manual...

Страница 2: ...ler software information 24 5 2 20 Display hardware information 24 5 2 21 Display software information 25 5 2 22 BMS hardware information 25 5 2 23 BMS software information 25 5 2 24 Sensor hardware i...

Страница 3: ...Backlight settings 56 5 8 14 Unit settings KM Miles 56 5 8 15 General parameter settings 56 5 8 16 Wheel diameter settings 57 5 8 17 Speed limit settings 57 5 8 18 Personalized parameter settings 57...

Страница 4: ...ns 65 6 8 Storage of the battery pack 66 6 9 Battery wear 67 6 10 Battery malfunctions 67 6 11 Battery specs 67 7 Charger 68 7 1 Operating instructions 68 8 Drive unit 69 8 1 Central drive engine 69 8...

Страница 5: ...ets with a favorable price quality ratio And in compliance with the latest standards Because safety comes first For example our batteries are equipped with advanced software that protects the battery...

Страница 6: ...r your electric e bike so that you always have it at hand This user manual contains four different types of instructions one provides important information about your new electric e bike and how to us...

Страница 7: ...e the e bike in accordance with the law a mandatory user manual for the technology of the e bike in accordance with the ISO standard 4210 2014 must be enclosed and handed over to you Before you start...

Страница 8: ...ts can happen No modifications should be made to the e bike or engine that will increase the speed or performance of the e bike Also the use of a boost set or adjusting the gearing is not permitted 3...

Страница 9: ...nstructions Follow the instructions in the owner s manual while riding your e bike Regularly check the battery charger for damage especially the cable plug and housing If the battery charger is damage...

Страница 10: ...ed or must you carry with you What kind of brakes should the e bike be equipped with There may also be age restrictions on riding in certain areas This addresses for example the issue of children ridi...

Страница 11: ...your foot on the pedals The engine starts moving forward as soon as you step on a pedal This assist is unusual and may result in falls injuries or dangerous traffic accidents 3 9 For first ride Before...

Страница 12: ...s are in good working order and tightly fitted All bolts nuts are tight There are no deformations or cracks in the frame or fork The handlebars stem saddle and seat post are all properly and securely...

Страница 13: ...C Mid Engine D Battery E Front light Rear rack front wheel engine A Display B Control unit C Front wheel engine D Battery E Front light Intube mid engine A Display B Control unit C Mid Engine D Batte...

Страница 14: ...the e bike may not function properly If something is defective contact an official dealer who will carry out repairs using original parts only Incorrect operation of the drive system and changes made...

Страница 15: ...utton Turn on the power long press the power button 2S to turn on the display the display will start working Long press the power button 2S again to turn off the display If the e bike is not used the...

Страница 16: ...turn off the display backlight and the headlight There are 5 levels of backlight brightness that can be selected by the user can be set in brightness If the display is switched on in a dark environmen...

Страница 17: ...s blinking 12 Error with power sensor in controller Have your dealer check the sensor 13 Error with temperature sensor in battery Check the battery 21 Error with speed detection sensor Check the engin...

Страница 18: ...in calories note if the display has this functionality Display of error messages Maintenance USB charging function 5 2 1 Overview control panelDPC10 1 Real time display of battery capacity 2 Menu 3 M...

Страница 19: ...rrect password to get to the home screen 5 2 3 Selection of assist levels When the display is on short press or to change the assist level The lowest level is 1 the highest level is 5 When the system...

Страница 20: ...nary e bike To activate Short press until level 0 is set Then short press and the symbol will be displayed Then long press to activate the walk assist function The symbol will flash and the e bike wil...

Страница 21: ...y automatically returns to the main screen and no data is saved 5 2 10 Resetting mileage When the system is switched on short press twice to enter MENU The message tC will appear on the display as sho...

Страница 22: ...ght sensitivity can be set to 0 5 Select 0 to turn off the light sensitivity Once you have made your choice short press twice to save your choice and return to the main screen or short press once to s...

Страница 23: ...ress repeatedly until nnA appears on the display as shown below Then press or to choose between 0 and 1 Select 0 to turn off the notification Once you have made your selection short press twice to sav...

Страница 24: ...ection and return to the main screen or short press once to go to the next item Controller software information 5 2 19 Controller software information PLEASE NOTE All data under this item cannot be ch...

Страница 25: ...n to the main screen or short press once to go to the next item BMS software information 5 2 23 BMS software information PLEASE NOTE All data under this item cannot be changed and can only be viewed W...

Страница 26: ...EO9 The error code 00 indicates that there is no error Once you have checked all the information you want short press twice to return to the main screen 5 2 27 Battery information This function is di...

Страница 27: ...ike cool down 2 Contact your dealer if the problem persists 15 Error with the temperature sensor in the controller Contact your dealer 21 Speed sensor error 1 Reboot the system 2 Check that the magnet...

Страница 28: ...battery is too high Contact your dealer 42 The total voltage of the battery is too low Contact your dealer 43 The total power of the battery cells is too high Contact your dealer 44 The voltage of the...

Страница 29: ...Energy consumption indicator in calories note if the display has this functionality Display of the remaining range this display can differ from the actual range due to various conditions terrain tempe...

Страница 30: ...assword function is enabled you must enter the correct password to go to the basic screen 5 3 3 Selection of assist levels When the display is on short press or to change the assist level The lowest l...

Страница 31: ...5 km h When you let go the engine will automatically stop and the assist level will automatically return to level 0 Please note you cannot use the walk assist while cycling 5 3 7 Maintenance The disp...

Страница 32: ...hen short press to access the following settings 5 3 11 TRIP Reset Mileage reset Short press or to select Trip Reset in the Display Setting menu then short press to confirm your selection Then use or...

Страница 33: ...matic switch off time Short press or to select Auto Off in the Display Setting menu then short press to confirm your selection Then use or to select from OFF 9 8 7 6 5 4 3 2 1 the numbers are times in...

Страница 34: ...rmation and short press to confirm your choice and open Information 5 3 18 Wheel Size Short press or to select Wheel Size then short press to confirm your choice and view the wheel size Short press to...

Страница 35: ...rm Now short press or to view the hardware or software version Short press to return to Information 5 3 23 Torque Info Torque information Short press or and select Torque Info Then short press to conf...

Страница 36: ...t your dealer 13 Error with the temperature sensor in the battery Contact your dealer 14 The protection temperature in the controller has reached its maximum protection value 1 Turn the system off and...

Страница 37: ...Braking signal has an error If brake sensors are fitted 1 Check all connectors 2 Contact your dealer if the problem persists 35 Detection circuit for 15V has an error Contact your dealer 36 Detection...

Страница 38: ...ou can adjust the assistance level up or down 7 Walk assist When the Walk assist is active an icon will appear with 6km It is activated by pressing the button for a few seconds If you release the butt...

Страница 39: ...acklight off 5 4 2 Layout display C300S Short press MODE to switch between trip distance trip time total kilometres traveled and maximum speed 5 4 3 Battery power on display C300S When the battery is...

Страница 40: ...ards If you try to boost the e bike the consequences are at your own risk Do not modify the technology of the e bike in any way Treating the e bike in any way to increase performance or speed may lead...

Страница 41: ...m h If you exceed the speed with the e bike the pedal assistance will stop You can continue to ride but you will no longer receive assistance As soon as you get above 25 km h the e bike will not pedal...

Страница 42: ...nce single trip B fig 1 fig 2 5 5 7 Error messages C600 You may see an error message in the display if something goes wrong in the electronic system The error messages have the following codes Contact...

Страница 43: ...e and buttons you can adjust the assistance level up or down Walk assist When the Walk assist is active an icon will appear with 6km It is activated by pressing the button for a few seconds If you rel...

Страница 44: ...n the backlight off 5 6 2 Layout display C300T Short press MODE to switch between trip distance trip time total kilometres traveled and maximum speed 5 6 3 Battery power on display C300T When the batt...

Страница 45: ...djusting the speed limit downwards If you try to boost the e bike the consequences are at your own risk Do not modify the technology of the e bike in any way Treating the e bike in any way to increase...

Страница 46: ...have to move the whole bike yourself 5 6 7 About the throttle This throttle is located under the control unit This is in addition to walk assist where the engine provides an impulse while walking Num...

Страница 47: ...can be displayed 7 Assist level This shows the selected level of assistance by the engine 1 5 8 Walk assist When the Walk assist is active an icon will appear with 6km It is activated by pressing the...

Страница 48: ...itch between the different views and functions 5 7 2 On off button Press the button for 2 seconds The display and system are switched on Press the button again for 2 seconds The monitor and the system...

Страница 49: ...lay light are both switched off As soon as you use the display in the dark the lights on your e bike will also automatically switch on Exception If you have switched on the light manually you must als...

Страница 50: ...will light up to show the current charge status see diagram If all 10 lights are off and the digital screen is flashing it means you need to charge your battery immediately 5 7 9 Settings DP C07 DO N...

Страница 51: ...Resetting the data of a single trip For this setting mode tC appears on the screen To delete the data of your last single trip TRIP maximum speed MAXS and average speed AVG press the button y appears...

Страница 52: ...ponents of an e bike you need specialist knowledge experience and tools Take your e bike to a specialist to have the error fixed The display will indicate if a malfunction has been detected in your e...

Страница 53: ...to the electrical system may result in criminal prosecution This may be the case if the supported maximum speed has been modified Number Definition Solution 12 Error with the current sensor in the dri...

Страница 54: ...ller overcurrent settings etc 13 Restore default settings 14 Function interface 5 8 1 Switching the system on off Press the power button to turn on the e bike system and to provide power for the contr...

Страница 55: ...nce and engine power The default assistance level ranges from level 0 to level 5 The initial power is set to level 0 by default Level 1 is the minimum power level 5 the maximum power When you reach 5...

Страница 56: ...rage brightness Level 3 is the highest brightness The default value is 1 To change the backlight brightness press the or button to increase or decrease until the desired brightness level is displayed...

Страница 57: ...ifferent requirements There are 8 setting choices Battery Capacity Meter Settings Engine Assist Level Settings Overcurrent Control Settings Engine Assist Sensor Settings Speed Sensor Settings Switch F...

Страница 58: ...ratios refer to the attached list 5 8 22 Controller overcurrent settings optional CUR represents overcurrent settings CUR value varies from 7 0Ato 22 0A The default value is 15A Press or to increase o...

Страница 59: ...ing to switch it on or off 5 8 28 Gear level on off HF y means that the gas velocity is limited by the current PAS level while HF n means that the gas velocity is not restricted by the current PAS lev...

Страница 60: ...ccess Enable Password Settings Otherwise still remain in the password entry status 5 8 34 Enabling disabling password Press or and select Y or N and press to confirm Select Y and press to access power...

Страница 61: ...fault value is N To access the restore default settings press and hold both and for 2 s then access the selection interface to press and to select Y or N N means not restoring default settings Y means...

Страница 62: ...ry pack backwards to remove it from the battery slot 6 1 3 Installing the battery in the e bike rear rack The battery can be slid into the battery slot under the carrier You hear a click at the end to...

Страница 63: ...ards you Grasp the battery with your other hand and also pull it towards you You can now carefully remove the battery from the battery slot with both hands 6 2 3 Inserting the battery into the e bike...

Страница 64: ...attery slot with both hands 6 3 3 Inserting the battery into the e bike fully integrated You can place the battery in the middle frame First position the bottom of the battery pack in the correct posi...

Страница 65: ...s not mean that the battery pack is full So only when the light on the charger is green the battery is fully charged 6 6 General information on battery range It is difficult to determine your exact ra...

Страница 66: ...60 C 140 F as overheating may cause a short circuit in the battery pack which will cause it to overheat smoke deform or catch fire Avoid charging near open flames or in direct sunlight This may cause...

Страница 67: ...ends on several factors The number of charge cycles approximately 500 charge cycles The age of the battery Storage conditions Of course the battery also deteriorates and loses power when you are not u...

Страница 68: ...the charger away from children and animals Small children and animals could damage the cable if they play with it Doing so may result in electric shock malfunction or fire The charger must not be use...

Страница 69: ...ke could rotate and slip 8 2 Hub engine The front wheel engine with internal rotor is compatible with a roller brake and has a nominal output of 250W The internal rotor design and high reduction ratio...

Страница 70: ...t the repairs 10 RANGE OF YOUR E BIKE It is best to charge the battery when it is warm and place it just before you leave Range data is based on optimal conditions The following factors can affect the...

Страница 71: ...ansport to protect the e bike Make sure that the engine display and battery connections are covered to prevent possible moisture damage during transport Transport damage is not covered by the warranty...

Страница 72: ...Stepvelden 1 4704 RM Roosendaal 31 165 224612 info timyocycle com www timyocycle com...

Отзывы: