OO-DR Circuit Breaker Upgrade Kit
page 2 of 3
Teledyne RD Instruments
EAR-Controlled Technology Subject to Restrictions Contained on the Cover Page.
Replacing the back panel:
1. Remove the 4-40 screws, washers, and lock-nuts holding the RS-232, OO Electronics, and 115/230 AC
connectors to the original back panel.
2. Remove the 5/16 nut and washer holding the green ground wires on the post on the back panel. Slide
the ground wires off the post.
3. Remove the four screws located in the corners that hold the original back panel in place. Use the same
screws to install the new back panel.
4. Install the RS-232, OO Electronics, and 115/230 AC connectors into the new back panel using the 4-40
screws, washers, and lock-nuts. Spare hardware is included with the kit.
5. Connect the green ground wires onto the back panel post. Install the 5/16 nut and washer.
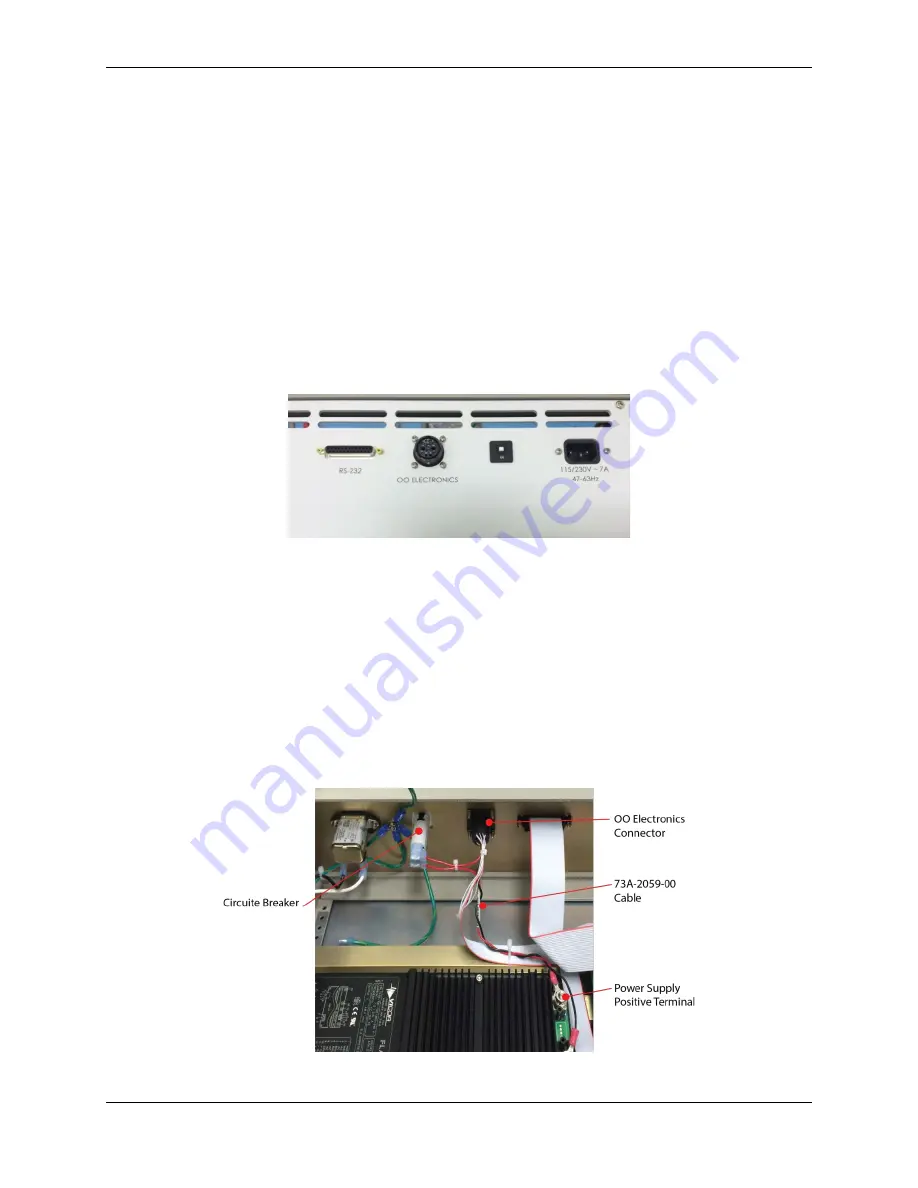
6. Slide the T9-611P-4A circuit breaker from the outside of the back panel until the circuit breaker snaps in
place (see Figure 2 and Figure 3).
Figure 2.
New TSIB Back Panel with Circuit Breaker Installed
Modify the OO Electronics Cable Wire
1. Disconnect the red wire from the VICOR power supply Positive (+) terminal by removing the 3/8 nut and
washers.
2. Cut the red wire three inches from the back of the OO Electronics connector.
3. Strip the wire and crimp on the 3-520133-2 FASTON connector. Connect this to one side of the circuit
breaker.
4. Connect the 73A-2059-00 cable from the circuit breaker to the VICOR power supply Positive (+) termi-
nal. Install the 3/8 nut and washers. To keep the wires from touching the heat sink, twist the wire
around the black ground wire as shown in Figure 3. Use wire ties to hold the wires in place as needed.
Figure 3.
OO Electronics Connector to Circuit Breaker Connections


