background image

ENGLISH

Specifications

26

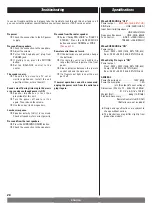
In case of trouble with the unit, please take the trouble to look through this chart and see if
you can solve the problem yourself before you call your dealer or TEAC service center.

No power

e

Check the connection to the AC power
supply.

No sound from speakers.

e

Check the connection to the speakers.

e

Adjust the volume.

e

Pull out the headphones' plug from
PHONES jack.

e

If muting is on, press the MUTING
button.

e

Set the BALANCE control to the
center.

The sound is noisy.

e

The unit is too close to a TV set or
similar appliances. Install the unit
apart from them, or turn them off.

Sound cuts off during listening to the music
or no sound even though power is ON.

e

Speaker impedance is less than
prescribed for this unit. 

e

Turn the power off and turn it on
again. Then reduce the volume.

e

Use the correct  6 ohm speakers.

Low bass response.

e

Speaker polarity (

+

/

_

) is reversed.

Check all speakers for correct polarity.

No sound from the rear speakers.

e

Press the SURROUND ON/OFF button.

e

Check the connection to the speakers.

Troubleshooting

No sound from the center speaker.

e

Select "Dolby PRO LOGIC" or "DOLBY 3
STEREO". Press the CENTER MODE
button and select NORMAL or WIDE.

(See page 22)

Remote control does not work.

e

If the batteries are exhausted, change
the batteries.

e

Use remote control unit within the
range (5m/15ft) and point at the front
panel.

e

Clear obstacles between the remote
control unit and the main unit.

e

If a fluorescent light is near the unit,
put it off.

If normal operation cannot be recovered,
unplug the power cord from the outlet and
plug it again.

When SURROUND is “OFF”

Power output . . . 

50 W (6

, 1kHz, 0.5% THD)

S/N Ratio . . . . . . . . . . . . . . LINE : 85dB (IHF-A)
Input Sensitivity/Impedance

LINE:200mV/47k

Frequency Response . . . . LINE : 20Hz~60kHz 
Tone Control. . . . . . . . . BASS : ±10dB (100Hz)

TREBLE : ±10dB (10kHz)

When SURROUND is “ON”

Power output

Front : 35 W + 35 W (1kHz, 0.5% THD, 6

)

Rear : 35 W + 35 W (1kHz, 0.9% THD, 6

)

When Dolby Pro Logic is “ON”

Power output

Front : 35 W + 35 W (1kHz, 0.5% THD, 6

)

Center : 40 W (1kHz, 0.5% THD, 6

)

Rear : 35 W + 35 W (1kHz, 0.9% THD, 6

)

GENERAL

Power Requirement . . . . . . . . . . . . 120V, 60Hz
Power Consumption . . . . . . . . . . . . . . . . . 1.5A 

(at L/R output, 6% over voltage)

Dimensions (W x H x D) . . 285 x 132 x 350mm

(11-1/4" x 5-3/16" x 13-3/4")

Weight (Net). . . . . . . . . . . . . . 6.6kg (14-9/16lb)
Standard Accessory :

Remote Control Unit (RC-767)

(Batteries are not included)  

<

Design and specifications are subject to
change without notice.

<

The illustrations may differ slightly from
production models.

Содержание AV-H500D

Страница 1: ...9A07928300 AV H500D AV Surround Amplifier OWNER S MANUAL MANUEL DU PROPRIETAIRE...

Страница 2: ...ure grounding of the lead in wire to an antenna discharge unit size of grounding conductors location of antenna discharge unit connection to grounding electrodes and requirements for the grounding ele...

Страница 3: ...DE CONNEXION CA ATTENTION POUR VITER LES CHOCS LECTRIQUES INTRODUIRE LA LAME LA PLUS LARGE DE LA FICHE DANS LA BORNE CORRESPONDANTE DE LA PRISE ET POUSSER JUSQU AU FOND For CANADA Pour le CANADA Caut...

Страница 4: ...nettoyer l appareil avec des solvants chimiques car ceci pourrait endommager le fini de l appareil Utiliser un chiffon propre et sec Garder soigneusement ce manuel d instructions pour une r f rence ul...

Страница 5: ...NDBY de votre amplificateur AV H500D pour mettre sous tension ou mettre en veille tous les l ments raccord s l aide des cordons de commande distance Lorsque vous appuyer sur la touche PLAY de l un des...

Страница 6: ...uit Torsadez les fils ensemble pour viter qu ils ne partent dans tous les sens A 1 FRONT REAR CENTER How to connect FRONT 1 Turn the terminal cap counterclockwise to loosen it The speaker terminal cap...

Страница 7: ...cted to the outlets on the receiver does not exceed 100 watts Cordon d alimentation AC Bien brancher le cordon d alimentation sur une prise de courant qui fournit la tension correcte Tenir la fiche d...

Страница 8: ...ompact Connection Connexions Connect the component with RCA pin cords Make sure to connect white plug w white jack L left red plug w red jack R right Raccorder l appareil l aide de cordons munis d une...

Страница 9: ...que platine cassette Connection Connexions Connect the component with RCA pin cords Make sure to connect white plug w white jack L left red plug w red jack R right Raccorder l appareil l aide de cordo...

Страница 10: ...prises S VIDEO les connecter l aide des cordons S VIDEO Si vous avez d j connect les fiches S VIDEO il n est pas n cessaire de connecter les fiches VIDEO Remarque Le signal provenant des prises VIDEO...

Страница 11: ...and S VIDEO jacks cannot be mixed When you use S VIDEO jacks be sure to connect all the components DVD VCR monitor etc via S VIDEO jacks Le connecteur S VIDEO vous permettra d obtenir une image d une...

Страница 12: ...ettet Si l appareil poss de des prises S VIDEO les connecter l aide des cordons S VIDEO Si vous avez d j connect les fiches S VIDEO il n est pas n cessaire de connecter les fiches VIDEO Remarque Le si...

Страница 13: ...tc via S VIDEO jacks Le connecteur S VIDEO vous permettra d obtenir une image d une tr s grande nettet Si l appareil poss de des prises S VIDEO les connecter l aide des cordons S VIDEO Si vous avez d...

Страница 14: ...use different types of batteries together Rechargeable and non rechargeable batteries can be used Refer to the precautions on their labels When the remote control unit is not to be used for a long tim...

Страница 15: ...ter 2 Press to enter 21 Press Touches pour le fonctionnement d autres appareils TEAC Reference 500 touche veille sleep Cette touche permet d activer la temporisation de veille du syntoniseur touches n...

Страница 16: ...ct Lecteur de LD etc DVD AUX lecteur de DVD syntoniseur DBS etc VCR TAPE magn toscope platine cassette etc 5 1CH DIRECT INPUT Lecteur de DVD ou LD connect la prise 5 1 CH DIRECT IN voir page 11 Si vou...

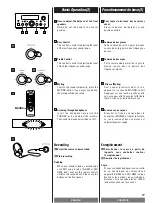
Страница 17: ...tons situ s en face avant 2 1 Listening through headphones Insert the headphone plug into the PHONES jack and adjust the volume The sound from speakers will be cut off E Ecoute avec un casque Brancher...

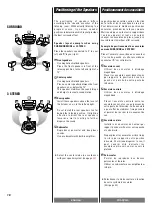
Страница 18: ...our d terminer la meilleure position des enceintes proc der de la fa on suivante Mettre un disque ou tout autre support dans l un des appareil et tout en coutant changer les enceintes de place jusqu c...

Страница 19: ...Dolby Digital AC 3 discs provide up to 5 1 channels of discrete digital surround sound When a disc with DOLBY DIGITAL mark or DTS mark is played on the DVD LD player connected to 5 1CH INPUT jacks you...

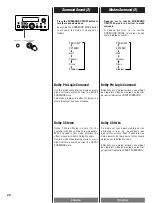
Страница 20: ...tiver le mode surround A chaque pression sur la touche SURROUND MODE le mode change comme indiqu ci apr s Dolby 3 Stereo Dolby 3 Stereo Mode is useful for the customer who does not have rear speakers...

Страница 21: ...No sound from the rear and center channels Surround Ces diff rents modes peuvent tre utilis s pour appr cier l effet du son surround avec une source qui ne porte par l indication DOLBY SURROUND Hall L...

Страница 22: ...xiste 3 types de modes centraux S lectionner le mode DOLBY PRO LOGIC ou le mode 3 STEREO l aide de la touche SURROUND MODE Puis appuyer sur la touche CENTER MODE pour s lectionner le mode central d si...

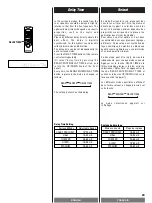
Страница 23: ...acoustiques de la pi ce et en particulier des murs et du mobilier Pour obtenir un effet optimum il est donc recommand d essayer plusieurs r glages diff rents Ce d calage est synth tis de fa on num riq...

Страница 24: ...ess the TEST TONE button again Avant gauche Centre Arri re Surround Arri re Surround Avant droit Avant gauche Centre Avant droit Avant gauche Avant droit PRO LOGIC NORMAL WIDE PRO LOGIC PHANTOM 3 STER...

Страница 25: ...ng the REAR CENTER DELAY TIME button and adjust the level by rotating the UP DOWN knob of the front panel The level of rear and center speakers can be adjusted in 1 dB steps from 10 dB to 10 dB 5 R gl...

Страница 26: ...Dolby PRO LOGIC or DOLBY 3 STEREO Press the CENTER MODE button and select NORMAL or WIDE See page 22 Remote control does not work eIf the batteries are exhausted change the batteries eUse remote contr...

Страница 27: ...nner le mode DOLBY PRO LOGIC ou DOLBY 3 STEREO Appuyer sur le bouton CENTER MODE et s lectionner le mode NORMAL ou WIDE voir page 22 La t l commande ne fonctionne pas eRemplacer les piles si celles ci...

Страница 28: ...A De C V Privada De Corina No 18 Colonia Del Carmen Coyoacon Mexico DF 04100 Phone 5 658 1943 TEAC UK LIMITED 5 Marlin House Marlins Meadow The Croxley Centre Watford Herts WD1 8YA U K Phone 01923 81...

Отзывы: