manualshive.com logo in svg
background image

TASCAM  DR-44WL


7

2 – Names and functions of parts

press the 

/

 button to move forward to the next mark. 

(See “Moving to the cue mark position” on page 28.)
When the 

PLAY


FUNCTION

 screen is open, use this 

button to set the IN (start) and OUT (end) points of the 

interval that you want to set for loop playback. When the IN 

(start) and OUT (end) points are already set, press this button 

to clear the IN and OUT points.

t

  QUICK button

When the Home screen, 

PLAY


FUNCTION

 screen, 

BROWSE

 screen or 

SONG

 screen is open, press this 

button to pop up the quick menu. (See “QUICK button 

overview” on page 40.)

y

 Wheel

This is used to select items or change value on setting 

screens. Also used to change the playback position in a file.

Front panel

u

 Wi-Fi indicator

Indicates the status of wireless LAN.

Lights out: OFF
Blinks: Waiting to be connected
Lights up:  Operable from the exclusive application 

(TASCAM DR CONTROL)

i

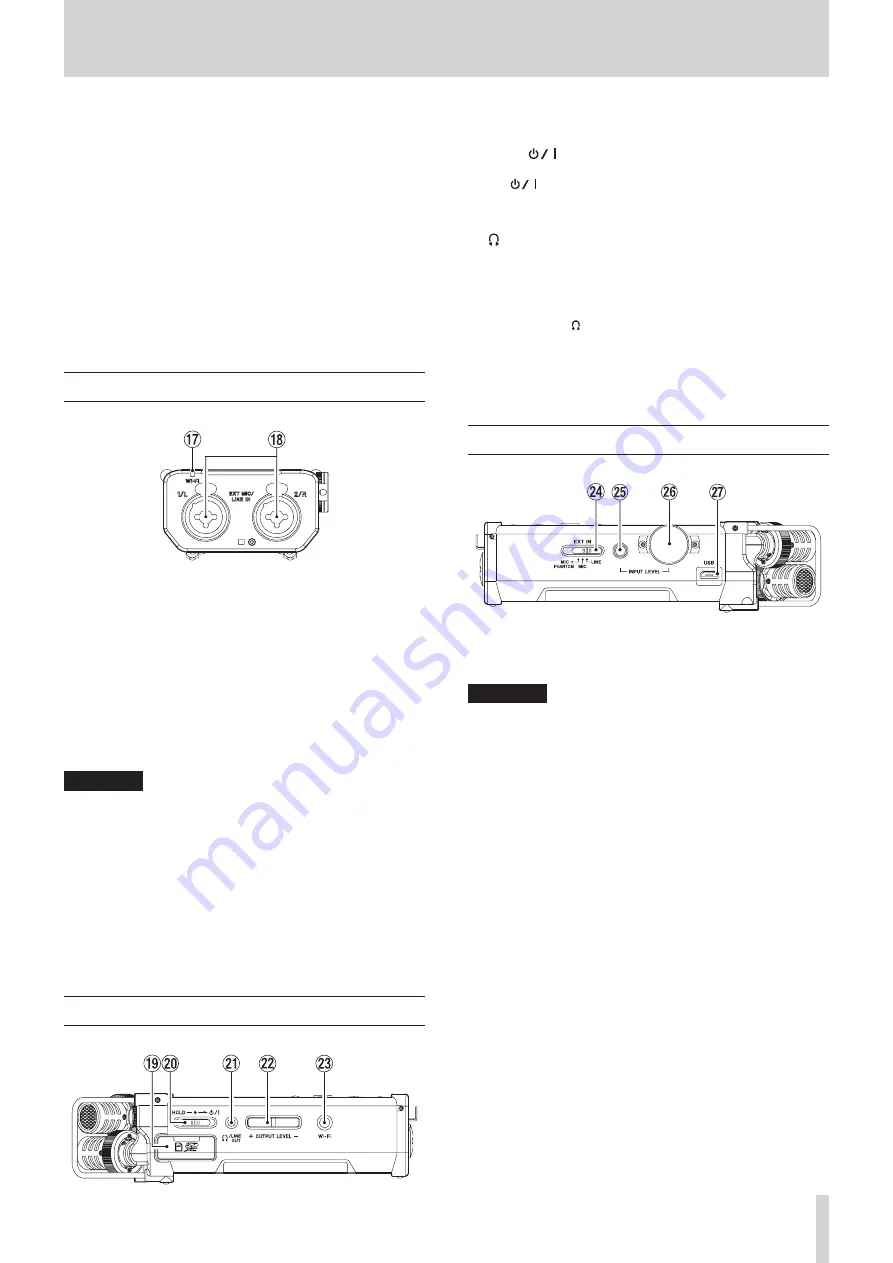
 EXT MIC/LINE IN 1/L / 2/R jack (XLR/TRS)

These are balanced analog XLR/TRS combo jacks for micro-

phone and line level inputs.

XLR (1: GND, 2: HOT, 3: COLD)
TRS (Tip: HOT, Ring: COLD, Sleeve: GND)

CAUTION

• 

Confirm that phantom power is OFF before connecting 

a line level device to these 

EXT MIC/LINE IN

 jacks. If you 

connect a line level device while phantom power is being 

supplied, that device and this unit could be damaged.

• 

When connecting to or disconnecting a condenser micro-

phone from the 

EXT MIC/LINE IN

 jack, confirm that the 

phantom power for that jack is OFF. If you connect or 

disconnect a microphone while phantom power is being 

supplied, that microphone and this unit could be damaged.

• 

Do not connect an unbalanced dynamic microphone to 

an XLR connector when phantom power is being supplied. 

Doing so could damage that microphone and this unit.

Left side panel

o

  SD card slot

Insert or remove a SD card.

p

 HOLD/

 switch

To turn the power on/off, slide and hold the switch towards 

the 

 icon.

When you slide the switch towards the HOLD side, all the 

functions of the buttons are locked.

a

   /LINE OUT jack

A headphone or a line input jack of an external device (via 

stereo mini-jack cable) can be connected to this jack.

s

  OUTPUT LEVEL button

These buttons adjust the output sound level of the built-in 

speaker or the   /LINE OUT jack.
During adjustment, a volume indicator will be displayed in a 

pull-up window.

d

  Wi-Fi button

Use this button to turn on/off the Wi-Fi function.

Right side panel

f

  EXT IN switch

Set the gain for the EXT MIC/LINE IN jack and whether 

phantom power is on or off.

CAUTION

• 

Confirm that phantom power is OFF before connecting a 

line-level device to the 

EXT MIC/LINE IN

 connector. If you 

connect a line-level device while phantom power is being 

supplied, that device and this unit could be damaged.

• 

Do not connect or disconnect mics when the phantom 

power switch is set to ON. Doing so could cause a loud noise 

and might damage this unit and connected equipment.

• 

Turn phantom power ON only when using a condenser 

microphone that requires phantom power. Turning 

phantom power on when a dynamic mic or other mic that 

does not require it is connected could damage this unit and 

connected equipment.

• 

When using condenser mics that require phantom power 

and dynamic mics together, be sure to use balanced 

dynamic mics. Unbalanced dynamic mics cannot be used 

when phantom power is enabled.

• 

Supplying phantom power to some ribbon mics could break 

them. If you are unsure, do not supply phantom power to a 

ribbon mic.

• 

When using USB bus power, the unit might not be able to 

supply phantom power depending on the computer. If this 

occurs, use the included AC adapter (GPE053B).

• 

Some condenser microphones will not operate when 

phantom power is set to +24V.

• 

Do not connect or disconnect the AC adapter when using 

phantom power. Doing so could cause the unit to turn off 

even when batteries are installed in it. This can result in 

recording data being damaged or lost.

Содержание dr-44wl

Страница 1: ...D01238020C DR 44WL Linear PCM Recorder REFERENCE MANUAL...

Страница 2: ...ing in 4 channel 23 Record in MTR mode MTR mode only 24 Switch files during recording track increment available in 4 CH mode only 24 Manual track increment during recording 24 Automatic track incremen...

Страница 3: ...44WL to a smart phone 53 Connecting this unit to a computer by Wi Fi 53 Downloading and installing the TASCAM DR FILE TRANSFER software 53 Connecting this unit to a computer by Wi Fi for the first ti...

Страница 4: ...ilable to reduce the level automatically in case of excessively large input Low cut filter conveniently reduces low frequency noise VSA function can change the playback speed in the range from 0 5 to...

Страница 5: ...customer support service Precautions SD cards are delicate media Please refer to the below when using memory cards to prevent memory and or card damage Do not leave a memory card in extremely hot or c...

Страница 6: ...BROWSE screen press this button to return to the Home screen and play the file or the first file in the folder from the beginning 8 MENU button When the Home screen is displayed press this button to...

Страница 7: ...off slide and hold the switch towards the icon When you slide the switch towards the HOLD side all the functions of the buttons are locked a LINE OUT jack A headphone or a line input jack of an extern...

Страница 8: ...ding mode o o Speaker output setting is turned off l Tripod attachment screw hole 1 4 inch A tripod can be attached to the DR 44WL CAUTION Ensure the tripod or microphone stand screws are securely fas...

Страница 9: ...d instead when included in the MP3 file When there are multiple files in the 4CH mode only the format portion of each of the file names and the basic number of a recording file are displayed When a si...

Страница 10: ...7 Level meter guide display This is a level meter guide for adjusting the input and output levels It is displayed at the 12 dB position of the scale 8 Level meter Displays the input sound level 9 Fil...

Страница 11: ...y 8 Press the MENU button to return to the MENU screen Press the 8 HOME button to return to the Home screen Basic operations Use the following buttons to operate the various screens MENU button Opens...

Страница 12: ...ately to power the unit Using an AC adapter Connect the dedicated AC adapter GPE053B supplied with the unit and the USB port of the unit with the included USB cable as shown in the illustration AC out...

Страница 13: ...rt The Home screen will appear NOTE Power is supplied from the USB port when USB cable is connected to the unit inserted with batteries USB bus power prioritized CAUTION Depending on the USB bus power...

Страница 14: ...creen 2 Using the wheel select highlight SYSTEM menu item and press the ENTER MARK or button The SYSTEM screen is displayed 3 Use the wheel to select DATE TIME and press the ENTER MARK or button Exec...

Страница 15: ...C card 3 Press the ENTER MARK button to start formatting CAUTION Formatting an SD card erases all the data on it 4 When formatting is complete it will return to the Home screen You may format the card...

Страница 16: ...her device are connected to the LINE OUT jack the upper level will be set to 12 after the unit restarts CAUTION Listening at high volumes could cause hearing damage If the surroundings are noisy the s...

Страница 17: ...press the ENTER MARK or button The MODE screen is displayed 3 Using the wheel select highlight MODE and press the ENTER MARK or button 4 Use the wheel to select operation mode Options 4CH default val...

Страница 18: ...e created in the MTR folder Select the file format and sampling frequency 4CH mode only Select the desired audio file type before you start recording 1 Press the MENU button to open the MENU screen 2...

Страница 19: ...ne to the LINE OUT jack To adjust monitor sound go to the Home screen and use the OUTPUT LEVEL button at the left side panel Adjusting the monitor sound will not affect the recording quality Set the i...

Страница 20: ...53B supplied with the unit instead Some condenser microphones will not operate when phantom power is set to 24V Do not connect or disconnect the AC adapter when using phantom power Even when the batte...

Страница 21: ...The MODE screen is displayed 3 Press the ENTER MARK or button 4 Using the wheel set the mode to MTR mode and press the ENTER MARK button Options 4CH 4 CH mode default value MTR MTR mode 5 Press the IN...

Страница 22: ...he setting has been completed press the 8 HOME button to return to the Home screen Set the low cut filter The low cut filter can reduce noise such as offensive wind noise from air conditioners and pro...

Страница 23: ...f sounds may occur when excessively large input signals come in even if the LIMITER function is activated If this occurs reduce the input level manually or move the unit farther away from the sound so...

Страница 24: ...ke recording 1 Press the button during recording NOTE Numbers at the end of file name will increment each time when a new file is created CAUTION The maximum total number of folders and files you can...

Страница 25: ...the input signal level becomes higher than the set level again it starts recording to a new file When new files are created incremental numbers are added to the end of each file name 10 Press the 8 H...

Страница 26: ...ng with the regular recording For example when recording with microphones you can make an ordinary recording with the input level set as high as possible and simultaneously record at a slightly lower...

Страница 27: ...to be created simultaneously The name of the second file created by dual recording has _D added to the name of the file recorded ordinarily TASCAM 0002S12 WAV TASCAM 0002S12 D WAV 1 Set with the WORD...

Страница 28: ...Add cue marks automatically according to set time 1 Press the MENU button to open the MENU screen 2 Using the wheel select highlight AUTO FUNCTION and press the ENTER MARK or button AUTO FUNCTION scre...

Страница 29: ...IN jack channel can be changed using INPUT Punching in out MTR mode only Punching in and out is a technique used to replace parts of already recorded tracks Punching in out manually You can start pla...

Страница 30: ...punch function is on the icon appears at the top of the Home Screen 9 Press the TRACK INPUT buttons for the tracks that you want to record 10 Press the RECORD button to start playback Recording will...

Страница 31: ...8kHz 34 hour 43 minutes 138 hour 277 hour 1111 hour 96 kbps 44 1kHz 48kHz 23 hour 08 minutes 92 hour 35 minutes 185 hour 740 hour 128 kbps 44 1kHz 48kHz 17 hour 21 minutes 69 hour 26 minutes 138 hour...

Страница 32: ...a file is selected press the ENTER MARK or button to return to the Home Screen and load the file The folder that contains this file becomes the current folder the currently selected folder and recorde...

Страница 33: ...s the ENTER MARK button to delete the files and press the 8 HOME button to cancel the delete operation NOTE Read only files and unrecognized files by the DR 44WL will not be deleted Files on different...

Страница 34: ...FORMATION Information about the selected song date time size will pop up RENAME V1 10 supported Edits the name of the selected song DELETE Deletes the selected song Loading Songs Use the following pro...

Страница 35: ...34 TIPS The song name title can also be edited later using RENAME in the QUICK menu The song name can also be edited when saving the song 9 Press the 8 HOME button to return to the Home screen NOTE T...

Страница 36: ...R MARK or button The SONG screen will be displayed 4 Use the wheel to select the song that you want to delete 5 Press the QUICK button to open the quick pop up menu and use the wheel to select DELETE...

Страница 37: ...d in the middle of a file the status 9 icon will appear on the screen To move a file press the button or button repeatedly as many times as needed Special Playback Control Functions Using the unit s p...

Страница 38: ...u cannot set the IN and OUT points in different files The previous IN and OUT point settings are lost when you set the IN point in a different file MP3 files with VBR variable bit rate format may affe...

Страница 39: ...nd use the and buttons to select a file recorded with a 44 1kHz or 48kHz sampling frequency 1 When the PLAY FUNCTION screen is open press QUICK to open the QUICK pop up menu on the PLAY FUNCTION scree...

Страница 40: ...n is disabled Actions of the QUICK button for different screens and statuses are as follows Screen State Action Home Screen Stopped paused Displays file information only in the 4CH mode Playback Contr...

Страница 41: ...ume balance and right and left positions can be freely set on the MIXER screen See Song Operation on page 34 BOUNCE MTR mode only This function can be used to bounce tracks in the current song See Son...

Страница 42: ...ou want to divide 2 While the Home screen is open when stopped press QUICK to open the QUICK pop up menu 3 Use the wheel to select DIVIDE and press the ENTER MARK button The DIVIDE screen shown below...

Страница 43: ...e end of the original file name are created in order Example 2 marks File name before division 140826_0001 wav File names after division 140826_0001_01 wav 140826_0001_02 wav 140826_0001_03 wav When u...

Страница 44: ...k See Setting the mixer on page 46 For mono bounce to odd numbered track set the PAN knob to L12 For mono bounce to even numbered track set the PAN knob to R12 Adjust the overall level with the master...

Страница 45: ...was created is loaded In this state you can press the 7 9 button to play the mixdown file NOTE When a mixdown file is created it is named by adding an incremental number to the end of the name of the...

Страница 46: ...Options Action SEND 0 100 Adjusts the forwarding level of the selected reverb See Reverb function on page 48 0 Minimum to 100 Maximum PAN L12 C R12 Adjusts the balance between the right and left chann...

Страница 47: ...reo mic EXT 1 Input from EXT MIC LINE IN 1 L jack EXT 2 Input from EXT MIC LINE IN 2 R jack 14 Press the ENTER MARK button to confirm the setting and enable selection of other setting items 15 Perform...

Страница 48: ...button to start the metronome Press the 7 9 button to stop the playing metronome 9 Once the setting has been completed press the 8 HOME button to return to the Home screen Reverb function A reverb is...

Страница 49: ...values 4 Use the wheel to set the desired option value 5 Press the ENTER MARK button to confirm the setting and enable selection of other setting items 6 Once the setting has been completed press the...

Страница 50: ...it that contains batteries USB bus power prioritized If an SD card is not properly inserted before making the USB connection a Can t Save Data pop up message will appear When you open computer DR 44WL...

Страница 51: ...nternet 2 Search the exclusive application TASCAM DR CONTROL and download from either Google Play Android smart phone or App Store iOS device for installation Connecting the DR 44WL to a smart phone v...

Страница 52: ...phone via Wi Fi from second time onward When you establish a connection between the DR 44WL and your smart phone for the first time and need to connect them again you only need to select the SSID fro...

Страница 53: ...owse button on the TASCAM DR CONTROL screen 2 The Browse screen displays a list of files from the DR 44WL select the file you want to transfer 3 Detail screen on the selected file will appear tap the...

Страница 54: ...up message disappears from the display the unit is waiting to connect to the computer 4 Click the wireless connection icon in the computer taskbar menu bar Windows Mac to open a list of wireless netw...

Страница 55: ...CH mode only The PROJECT page displays information on the currently loaded audio file TITLE FILE1 4 Shows the file name If an MP3 file has ID3 tag title information that information appears FORMAT Sho...

Страница 56: ...utton to move the cursor and turn the wheel to set characters In addition to alphabets and numbers the following characters can be used _ Initializing the numbers COUNT To execute press ENTER MARK but...

Страница 57: ...YPE item to set the battery type This setting is used to display the remaining battery power and to calculate the minimum capacity for normal operation Options ALKAL alkaline batteries default value N...

Страница 58: ...card with another or press the ENTER MARK button while this message is being shown to format the card Formatting will erase all the data on the SD card Invalid Card Change Card The SD card may be abn...

Страница 59: ...tly with the terminals aligned correctly Confirm that the power plug of the dedicated AC adapter GPE053B provided with the unit and a USB connector are securely inserted Is the USB cable connecting th...

Страница 60: ...20 mW with headphones connected with 32 load Built in speaker 0 3 W mono Control input output ratings USB port Connector Micro B type Format USB 2 0 HIGH SPEED mass storage class Audio performance Fre...

Страница 61: ...ng JEITA recording time Playback JEITA music playback time Using NiMH batteries eneloop Format Operation time Note Recording in 2ch WAV 96 kHz 24 bit About 10 5 hours Input from the built in micro pho...

Страница 62: ...o Churubusco 364 Colonia Del Carmen Delegaci n Coyoac n CP 04100 M xico DF M xico TEAC UK Ltd http tascam eu Phone 44 8451 302511 2 Huxley Road Surrey Research Park Guildford GU2 7RE United Kingdom T...

Отзывы: