EN
43
@Note
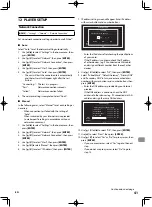
for “IP Address”, “Subnet Mask”,
“Default Gateway”, “Primary DNS” and
“Secondary DNS”
•
The range of input numbers is between 0 and 255.
•
If you enter a number larger than 255, the number will
automatically be 255.
•
When you enter a wrong number, select “Clear” to clear.
(The number will be back to “0”.)
•
If you want to enter a 1 or 2-digit number in one cell,
press
[
1
]
to move on to the next cell.
@Note
for “Proxy Address” and “Proxy Port”
•
The range of input numbers for the port number is
between 0 and 65535. (If you enter a number larger
than 65535, it will be regarded as 65535.)
•
For proxy port, certain ports might be closed, blocked or
unusable depending on your network environment.
•
When the settings are changed, the network connection
may be disabled depending on the device.
Attenuation
[HOME]
→
“Settings”
→
“Audio Out”
→
“Attenuation”
If noise can be heard in the audio from the ANALOG
OUTPUTS jack, it may be reduced by changing the
“Attenuation” configuration.
HDMI CEC
[HOME]
→
“Settings”
→
“HDMI”
→
“HDMI CEC”
HDMI CEC allows integrated system control over HDMI and
is part of the HDMI standard. This function may not work
properly depending on the device connected to the unit.
When “HDMI CEC” setting is set to “On”, functions listed
below will be available.
■
One Touch Play
HDMI CEC operations are performed using remote control
buttons. The TV will automatically be turned on and
switched to the appropriate input source signal.
Buttons for one touch play:
-
[
B
(play)]
,
[
H
(skip)]
,
[
G
(skip)]
,
[the Number buttons]
,
[HOME]
, or
[ON SCREEN]
-
[TOP MENU]
or
[POP UP/MENU]
(when a disc is inserted
in the unit)
■
One Touch Standby
When you press and hold
[
(STANDBY/ON)]
for 2
seconds, it will turn off the power to the TV first and then
turn off the power to this unit.
When the connected HDMI CEC compatible display device
is turned off first, this unit will be turned off subsequently.
■
System Information
Get & Set Menu Language
The unit recognizes the OSD language set on the TV and
automatically sets the same language as the player menu
language (OSD menu language) for this unit. Refer to the
“Player Menu” on page 39 for available languages.
•
This feature is available only when “Auto” is selected in
the “Player Menu” section in the setup menu.


