7.
MAINTENANCE
Tapflo LPX series
45
3.
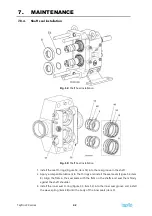
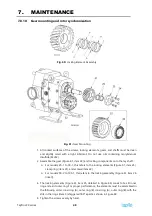
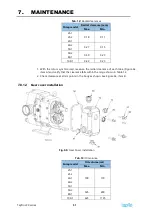
Re-using rotors
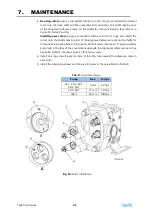
: Apply a compatible lubricant to the O-rings and install the marked
rotor onto the drive shaft and the unmarked rotor onto the short shaft, making note
of the alignment reference mark on the shafts for rotor positioning. (See item A in
Figure 56, Detail F and G.)
Installing new rotors
: Apply a compatible lubricant to the O-rings and install the
rotors onto the shafts, making note of the alignment reference mark on the shafts for
rotor positioning. (See item A in Figure 56, Detail F and G.) Stamp an “X” approximately
3mm high in the face of the counterbore opposite the alignment reference mark. See
Figure 56, Detail F; also see Figure 31 for a larger view.
4.
Install one lug screw (Figure 56, item 4) into the hole nearest the reference mark in
each rotor.
5.
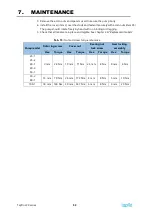
Install the remaining screws and torque all screws to the value listed in Table 8.
Tab. 8:
Lug screw torque
Pump
Hex
Torque
25-1, 25-2, 40-1,
40-2, 50-1
9 mm
24 Nm
50-2, 80-1
13 mm
70 Nm
100-1
18 mm
160 Nm
Fig. 56:
Rotor installation
Содержание LPX Series
Страница 57: ...9 PARTS LISTS Tapflo LPX series 57 9 PARTS LISTS 9 1 Model 25 1 to 50 1 Pump Parts A exploded view ...
Страница 59: ...9 PARTS LISTS Tapflo LPX series 59 9 3 Model 25 1 to 50 1 Pump Parts B exploded view ...
Страница 61: ...9 PARTS LISTS Tapflo LPX series 61 9 5 Model 50 2 to 100 1 Pump Parts A exploded view ...
Страница 63: ...9 PARTS LISTS Tapflo LPX series 63 9 7 Model 50 2 to 100 1 Pump Parts B exploded view ...
Страница 69: ...Tapflo LPX series 69 ...

