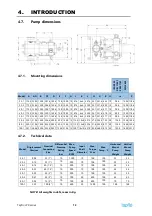
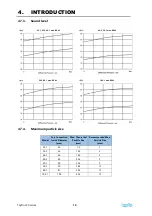


6.
OPERATION
Tapflo LPX series
23
6.
OPERATION
DANGER!
The pump contains internal moving parts. DO NOT put hands or fingers into
the pump body ports or drive area at any time during operation. To avoid serious injury,
DO NOT install, clean, service, or repair the pump unless all power is off and locked out.
CAUTION!
These pumps are positive displacement, low slip design and will be severely
damaged if operated with closed valves in the discharge or inlet lines. The pump
warranty is not valid for damages caused by a hydraulic overload from operation or
start-up with a closed valve in the system.
6.1.
Pre-startup checklist
CAUTION!
Do not use this pump to flush a newly- installed system. Severe damage may
occur to the pump and system if the pump is used to flush the system. Remove the
rotors during system flushing.
WARNING!
Full guards must be installed to isolate the operators and maintenance
personnel from the rotating components. Guards are provided with Tapflo LPX pumps
as part of a complete pump and drive package.
WARNING!
Do not start a pump with seal flush unless the seal flush is installed and on
.
1.
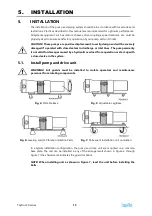
Ensure that the pump is correctly installed as described in chapter 5:
“Installation”
. Review
chapter 5.5:
“Install Relief Valves”
and install relief valves as needed.
2.
Check the coupling alignment. See chapter 5.10:
“Check Coupling Alignment”
.
3.
Ensure that the pump and piping are clean and free of foreign material such as welding
slag, gaskets, etc.
4.
Ensure that all piping connections are tight and leak-free. Where possible, check the
system with non-hazardous fluid.
5.
Ensure that the pump and drive are lubricated. See chapter 7.2:
“Lubrication”
.
6.
Ensure that all guards are in place and secure.
7.
Double mechanical seals require adequate supply and flow of clean flushing fluids.
8.
Ensure that all valves are open on the discharge side and a free flow path is open to the
destination.
9.
Ensure that all valves are open on the inlet side and fluid can fill the pump. A flooded
suction installation is recommended.
10.
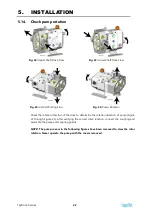
Check the direction of pump and drive rotation to ensure that the pump will rotate in the
proper direction. See chapter 5.14:
“Check Pump Rotation”
.
6.2.
Startup procedure
1.
Start the pump drive. Where possible, start at a slow speed or jog.
2.
Ensure that the liquid is reaching the pump within 60 seconds. If pumping does not begin
and stabilize, check chapter 8:
“Troubleshooting”
.
Содержание LPX Series
Страница 57: ...9 PARTS LISTS Tapflo LPX series 57 9 PARTS LISTS 9 1 Model 25 1 to 50 1 Pump Parts A exploded view ...
Страница 59: ...9 PARTS LISTS Tapflo LPX series 59 9 3 Model 25 1 to 50 1 Pump Parts B exploded view ...
Страница 61: ...9 PARTS LISTS Tapflo LPX series 61 9 5 Model 50 2 to 100 1 Pump Parts A exploded view ...
Страница 63: ...9 PARTS LISTS Tapflo LPX series 63 9 7 Model 50 2 to 100 1 Pump Parts B exploded view ...
Страница 69: ...Tapflo LPX series 69 ...


