


24
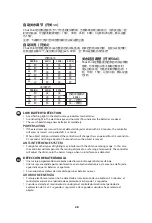
5. 与选配的交流电源适配器配套使用时,龙头将自动切换至交流电源适配器并保存其电池
电量。 新的碱性电池可持续使用450,000个开/关循环。
运行时间范围:
响应时间:
感应范围:
电源:
低电量提示:
15
秒
- 20
分钟
(6
种预设可选
)
0.3
秒
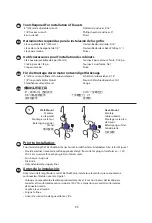
距离传感器
3/4”
至
6-11/16” (2-17 cm)
交流和、或直流
LED
红灯闪烁
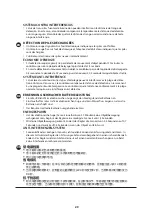
FEATURES
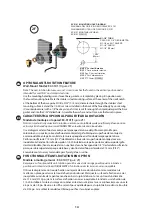
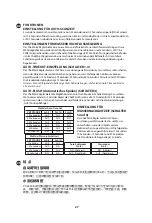
AUTO-ADJUSTMENT SCAN PERIOD
Two scan periods of 0.4 seconds or 0.7 seconds are automatically adjusted. The scan period at 0.4
seconds occurs while the faucet is at standby. The scan period will change to 0.7 seconds when
the faucet detects an object in the front of the sensor.
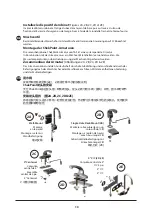
WATER FLOW CONTROL ADJUSTMENTS
The ChekPoint controller off ers a selection of pre-set fl ow control adjustments. These selections
are made by confi guring a bank of six switches, SW(1) to SW(6), according to the tables below.
CARE AND CLEANING OF CHROME AND SPECIAL FINISHES
DO NOT use abrasive or chemical cleaners (including chlorine bleach) to clean faucets as they
may dull the luster and attack the chrome or special decorative fi nishes. Use ONLY soap and wa-
ter, then wipe dry with clean cloth or towel. While cleaning the bathroom tile, the faucet should
be protected from any splattering of cleaner. Acids and cleaning fl uids will discolor or remove
chrome plating. Do not use abrasive or chemical cleaners on the sensor lens as this will damage
it and aff ect operation.
CUIDADO Y LIMPIEZA DE LOS ACABADOS CROMADOS Y ESPECIALES
NO use productos químicos limpiadores o abrasivos (incluyendo blanqueador a base de cloro)
para limpiar los grifos, ya que pueden opacar el brillo y dañar el cromo o los acabados decora-
tivos especiales. SOLO use agua y jabón, después seque con una toalla o paño limpio. Cuando
limpie los mosaicos del baño, debe proteger el grifo para evitar que le salpique limpiador. Los
ácidos y los líquidos de limpieza decolorarán o removerán la cubierta de cromo. No use produc-
tos químicos limpiadores o abrasivos en el lente del sensor, ya que esto lo dañará y afectará su
funcionamiento.
ENTRETIEN ET NETTOYAGE DU CHROME ET DES FINITIONS SPÉCIALES
N’UTILISEZ aucun produit abrasif ou chimique (même de l’eau de Javel) pour nettoyer les robinets
car ces produits peuvent endommager le lustre et attaquer le chrome ou les fi nitions décoratives
spéciales. N’UTILISEZ que de l’eau et du savon, puis essuyez avec un chiff on ou une serviette
propre. Lors du nettoyage du carrelage de la salle de bains, il faut protéger le robinet de toute
éclaboussure de produit de nettoyage. Les acides et les liquides de nettoyage décolorent ou
attaquent le placage de chrome. N’utilisez ni produits abrasifs ni produits chimiques sur la lentille
du capteur car cela l’endommagerait et aff ecterait son fonctionnement.
PFLEGE UND REINIGUNG VON CHROM UND SPEZIALVERARBEITUNG
KEINE aggressiven oder chemischen Reinigungsmittel (einschl. Chlorbleiche) verwenden, um
die Armaturen zu reinigen, da dies den Glanz nimmt und Chrom oder spezielle dekorative
Ausführungen angreift. NUR Wasser und Seife verwenden, dann mit einem sauberen Tuch oder
Handtuch trocken reiben. Beim Reinigen der Badezimmerfl iesen, sollte die Armatur gegen
Spritzer des Putzmittels geschützt werden. Säuren und Reinigungsfl üssigkeiten entfärben oder
entfernen die Verchromung. Keine scheuernden oder chemischen Reinigungsmittel auf der
Sensorlinse verwenden, da diese Beschädigungen verursachen und den Betrieb beeinträchtigen
können.
铬和特殊表面涂层的保养和清洗
切勿使用磨砂或化学清洗剂(包括氯漂白剂)来清洁水龙头,这可能会削弱光泽度并腐蚀铬
或者特殊表面涂层。只能使用肥皂和水清洗,然后用布或者毛巾擦干。在清洗浴室瓷器时,
应避免龙头溅到任何清洗剂。酸性试剂和清洗液会使铬层褪色或者脱落。切勿在传感器镜头
上使用磨砂或化学清洗剂,这会导致其损坏并且影响运行。
ES
FR
DE
CN
EN
EN
Содержание ChekPoint EC-3102-HG
Страница 2: ...2 Exploded View EC 3100 4 8 6 7 9 5 3 2 1 10...
Страница 3: ...3 Exploded View EC 3101 4 8 6 7 9 5 3 2 1 10...
Страница 4: ...4 2 6 5 7 3 4 1 8 Exploded View EC 3102...
Страница 5: ...5 Exploded View EC 3103 2 6 5 7 3 4 1 8...
Страница 6: ...6 Exploded View EC 3104 2 6 5 7 3 4 1 8...
Страница 7: ...7 Exploded View EC 3105 4 8 6 7 9 5 3 2 1 10...
Страница 8: ...8 Exploded View EC 3107...
Страница 34: ...34 LED LED 1 2 1 1 2 3 1 1 2 CN...


