GB-5
*
%
Assembly procedures
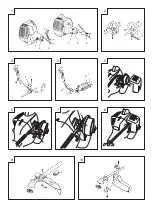
Drive shaft to engine (Fig. 1)
Loosen tube locking bolt (1) about ten turns so that the bolt point
will not obstruct drive shaft tube to be inserted. When inserting
drive shaft tube, hold the tube locking bolt outward preventing
inside fitting from obstructing as well.
Insert the drive shaft into the clutch case of the engine properly
until the marked position (2) on the drive shaft tube meets the
clutch case.
NOTE!
When it is hard to insert drive shaft up to the marked position on
the drive shaft tube, turn drive shaft by the cutter mounting end
clockwise or counter-clockwise. Tighten tube locking bolt lining up
the hole in the shaft tube.
Then tighten clamp bolt securely (3).
Installation of handle
WARNING!
When you use steel/rigid blade on straight shaft trimmers or
brush cutters, always use barrier bar (2) and shoulder harness
with the loop handle. (Fig. 2)
Attach the handle to the drive shaft tube with the angle towards the
engine.
Adjust the location to the most comfortable position before
operation.
NOTE!
If your unit has handle location label on drive shaft tube, follow
indication.
Remove the handle bracket (1) from the assembly. (Fig. 3)
Place the handles and attach the handle bracket with four bolts
lightly. Adjust to appropriate position. Then fix it firmly with the
bolts.
Put stop cords (3) and throttle wire (1) through protective tube (2),
then unhook the hip pad. (Fig. 4)
Throttle wire / stop cord
Remove air cleaner cover. (Fig. 5)
Connect stop cords (1). (Fig. 6)
Connect throttle wire end (1) to carburetor (2). (Fig. 7)
Cover throttle wire and stop cords together with protective tube
provided up to air cleaner cover. (Fig. 8)
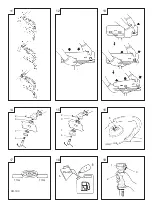
Installation of blade guard (Fig. 9, 10, 11)
NOTE!
The guard bracket may come already mounted to the gear case on
some models.
Install the blade guard and the bracket spacers (1) (If so equipped)
on drive shaft tube against angle transmission. Tighten the guard
bracket firmly so that the blade guard does not swing or move
down during operation.
Install the blade guard to the guard bracket, which also secures the
guard to the gear case using the two guard mounting screws.
CAUTION!
Some blade guards are equipped with sharp line limiters. Be
careful with handling it.
NOTE! (Fig. 11)
When using Tanaka aluminum head (CH-100 or CH-300) on your
unit, the sharp line limiter (2) (If so equipped) which is included in
the tool bag, should be securely fastened to the blade guard using
the bolt shown (3).
When using a trimmer head with two piece type blade guard, attach
the guard extension to the blade guard. (Fig. 12)
NOTE!
When attaching the guard extension to the blade guard, the sharp
line limiter must be removed from the blade guard, (if so installed).
NOTE!
If your unit has guard location label on drive shaft tube, follow the
indication.
NOTE!
To remove the guard extension, refer to the drawings. Wear gloves
as the extension has a sharp line limiter, then push the four square
tabs on the guard one by one in order. (Fig. 13)
Installation of cutting blade (Fig. 14, 15)
(If so equipped)
When installing a cutting blade, make sure that there are no cracks
or any damage in it and that the cutting edges are facing the
correct direction.
NOTE!
When installing cutter holder cap (1), be sure to set concave side
upward.
Insert the allen wrench (2) into the hole of the angle transmission
in order to lock the cutter holder (3). Please note that the cutter
fixing bolt or nut (4) has left-handed threads, (clockwise to loosen/
counter-clockwise to tighten). Tighten the fixing bolt or nut with the
box wrench.
NOTE!
If your unit is of a nut securing type and equipped with a cotter
pin, the blade must be retained with a new cotter pin (5) each time
installed. (Fig. 16)
CAUTION!
Before operation, make sure the blade has been properly installed.
CAUTION!
If your unit is equipped with protection cover under a cutting blade,
check it for wear or cracks before operation. If any damage or wear
is found, replace it, as it is an article of consumption.
Installation of semi-auto cutting head
NOTE!
For installation see your Owner's manual, provided with the cutting
head.
WARNING!
For outstanding performance and reliability, always use Tanaka
nylon cutting line. Never use wire or other materials that could
become a dangerous projectile.
Installation of the BRAIN cutting head
NOTE!
For installation see your BRAIN Owner's manual, provided with the
BRAIN cutting head.
Содержание TBC-290 series
Страница 2: ......
Страница 3: ......
Страница 4: ...FP FP...
Страница 5: ...P...
Страница 6: ...30 31 5 PP PP 32...
Страница 63: ...GR 1 5 PLQ 15 m 2 3 4 5 6 7...
Страница 64: ...GR 2 1 2 3 4 5 6 7 8 9 10 11 12 13 14 15 16 17 18 O 10 10 10...
Страница 65: ...GR 3 5 96 7DQDND 7DQDND...
Страница 70: ...GR 8 0 6 024 100 31 50 32 Tanaka 25 4 mm Tanaka 3 4 7DQDND...
Страница 71: ...0 02...


