TacT Audio BOZ 216 Скачать руководство пользователя страница 45

45

polarity menu 

amps option

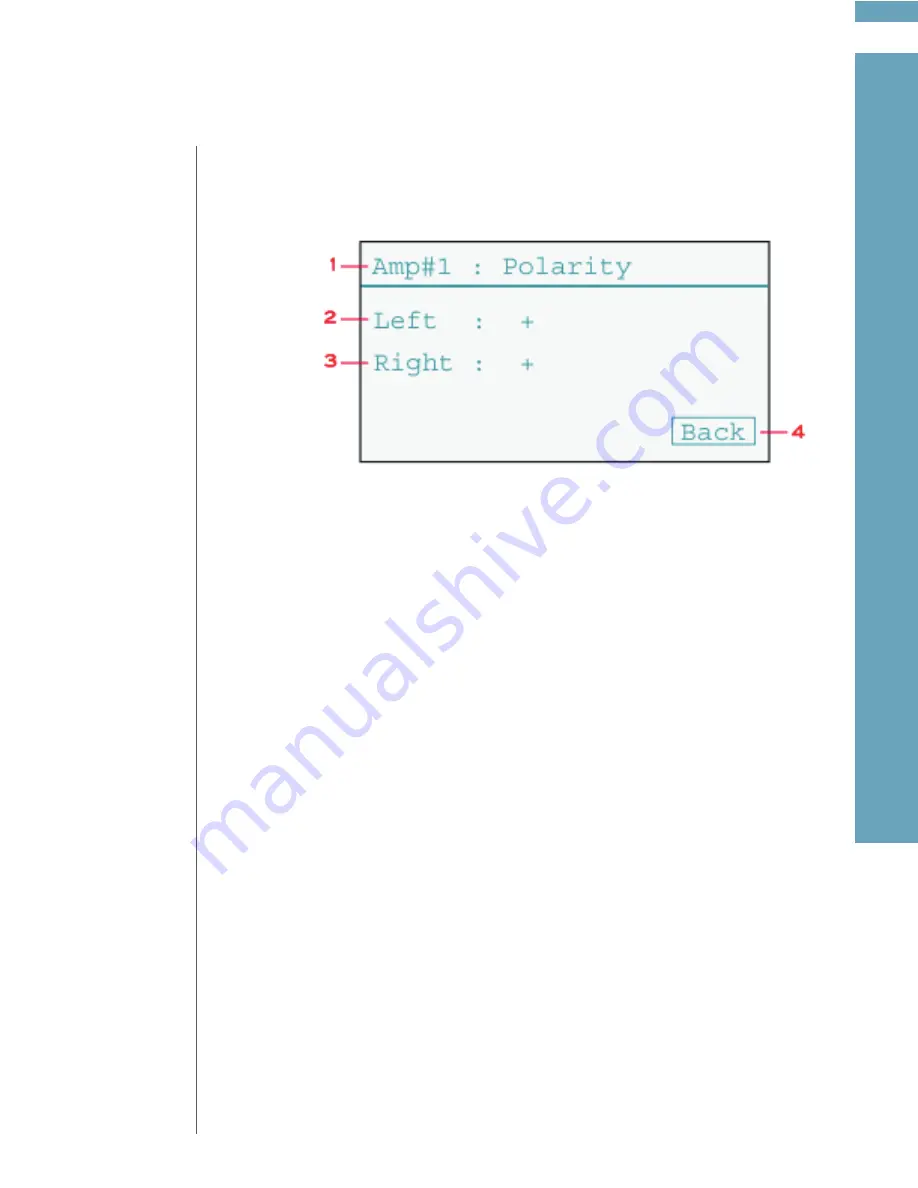
Use this screen to set a BOZ-2200’s Left and Right channel polarity. A “+” sign indicates that the 
output signal is in phase with the input signal. A “-“ sign indicates that the output signal is out of 
phase with respect to the input signal.

To adjust the channel polarity, position the cursor over the desired channel. CLICK the rotary con-
trol knob to toggle between “+” and “-”

1.  Indicates the amplifier number. The amplifier number is determined by the connector  
 

number on the back of the BOZ-216 to which the amplifier in question is connected. 

2. 

Left channel polarity. 

3. 

Right channel polarity. 

th

e


A

M

P

S


o

p

tio

n

Содержание BOZ 216

Страница 1: ...boz 2 1 6 2 2 0 0 Owner s Manual boz 2 1 6 2 2 0 0...

Страница 2: ......

Страница 3: ...nt importance that the power supply be totally free of ripple and noise For BOZ digital ampli ers a switch mode power supply of extreme precision with ripple rejection of more than 135 dB has been dev...

Страница 4: ...nd Tact M S 2150 The rst product of the BOZ line is the BOZ 216 2200 true 16 channel digital ampli er The BOZ design is based on a separate power entry and control module the BOZ 216 referred to as th...

Страница 5: ...package The parametric equalizer package features 12 band parametric equalization per channel and ten presets per channel The ParEq specs are 1 Filter center frequency between 15Hz and 24000Hz 2 Filt...

Страница 6: ...reduction in complexity In a normal chain the output of the D A converter is sent to an analog bu er stage then to an analog pre ampli er with relays input stage volume stage and output stage It is t...

Страница 7: ...produce anything that resembles pure sine waves Conventional ampli ers will overshoot and undershoot transients to varying degrees simply because transients are voltage swings In the BOZ digital ampl...

Страница 8: ...216 Remote Control Diagram Functionality Speci cations 12 13 13 14 14 14 15 16 17 18 19 20 20 21 22 TacT Welcome Boz Line Introduction Characteristics of the Boz Line Unique Technology Technological A...

Страница 9: ...AY menu LEVEL menu POLARITY menu InOut menu OPTIONS menu MODE menu CROSSOVER menu EDIT BUTT EDIT BUTT SQ menu ParEq menu ParEq Left Right Channel Table menu RCS menu SELECT GROUP menu EDIT GROUP menu...

Страница 10: ...01 201 440 9300 E mail info tactaudio com Tact Audio Inc 201 Gates Road Unit G Little Ferry NJ 07643 USA acknowledgments 2005 Tact Audio Corporation All rights reserved No part of this document may b...

Страница 11: ...rted safety precautions safety instructions maintenance unpacking the boz 216 2200 boz 216 front panel boz 216 back panel boz 2200 front panel boz 2200 back panel connecting boz 2200 to boz 216 the re...

Страница 12: ...resence of important operating and maintenance servicing instructions in the literature accompanying the product The lightning with arrowhead symbol within an equilateral triangle is intended to alert...

Страница 13: ...t into your outlet consult an electrician for replacement of the outlet to one that is polarized To protect against electrical shock match the wide blade of the polarized plug to the wide slot in the...

Страница 14: ...rconnect cable per BOZ 2200 module One remote control Two AAA batteries One manual CD ROM with software operating voltage The Boz 216 2200 ampli er is con gured for either 110 or 220 240 volt operatio...

Страница 15: ...knob to scroll through menu options change system parameters and select options 6 Master level display Displays the master level form 0 0 the minimum value to 99 9 the maxi mum value 7 Main display Al...

Страница 16: ...ock 1 7 Filtered AC POWER connector of I O block 1 8 BOZ 216 I O block 2 9 RS232 connector of I O block 2 10 Filtered AC POWER connector of I O block 2 11 BOZ 216 I O block 8 12 RS232 connector of I O...

Страница 17: ...either the level or the sampling frequency of the input signal The level is shown from a minimum value of 0 0 to a maximum value of 99 9 Choosing between the two display options is performed through a...

Страница 18: ...pass through signal 9 Digital output 2 This an SPDIF digital pass through signal 10 Left channel output negative terminal Connect this output to the corresponding loud speaker input 11 Left channel o...

Страница 19: ...thatconsists oftwoBOZ 2200 ampli cationmodules foratotaloffourchan nelsofampli cation Connectionprocedures forsystemsthat consistofadditional BOZ 2200modulesare easilyextrapolated Always turn the powe...

Страница 20: ...20 remote control boz 216 2200 216 2200 216 2200...

Страница 21: ...ton is used to select menu options and or to change their values 10 RIGHT The RIGHT navigational button is used to select menu options and or to change their values 11 ENTER The ENTER button will sele...

Страница 22: ...range 20 Hz 20 kHz 130 dB THD N all power levels 10 Hz 20 kHz 0 01 Digital resolution 16 24 bit Linearity 120 dB 0 2 dB Dimensions WxHxD Boz 216 17 75 x 3 88 x 16 5 in 45 1 x 9 9 x 41 9 cm Boz 2200 1...

Страница 23: ...3 system configurations speaker configurations active passive configurations normal operation daisy chaining and signal flow horizontal bi amping vertical bi amping...

Страница 24: ...package is not standard can be con gured to a maximum of 16 channels of passive ampli cation in up to 8 di erent groups or zones In addition with its advanced DSP control the BOZ 216 can enable digit...

Страница 25: ...two digital outputs for either AES EBU or SPDIF connections The most commonly used setup is bi amped two channels to each speaker high and low How ever the same signal ow is applicable to bi amped tr...

Страница 26: ...zontal bi amping one BOZ 2200 ampli er drives the low frequency drivers in both speakers The other BOZ 2200 ampli er drives the high frequency drivers in both speakers horizontal bi amplification 216...

Страница 27: ...ch BOZ 2200 module is set to the following speci cations Left Out Left In Right Out Right In The InOut Menu needs to be set accordingly TheInOutmenuis describedonp 46 Itisaccessedviathe frontpanelthro...

Страница 28: ...amping one ampli er drives both the high and low frequency drivers of the left chan nel The other ampli er drives both the high and low frequency drivers of the right channel vertical bi amplificatio...

Страница 29: ...utputs Right channel ampli er has to be set to RIGHT on both channels In this way the left channel ampli er will operate on the left channel only and the right channel ampli er will operate on the rig...

Страница 30: ...3...

Страница 31: ...3 boz navigation system accessing the menus navigating the menus the hierarchical menu system...

Страница 32: ...anel design is extremely clean and consists of the volume control knob the optical ro tary control knob the mute button the standby button and the power switch The exclusive BOZ Wheel is the master vo...

Страница 33: ...y cases you can push the knob in and hold it down for fast parameter changes 3 To decrease a parameter s value turn the rotary knob counterclockwise once to display the check mark 4 Turn the knob once...

Страница 34: ...h BOZ 2200 module you want to alter settings for The 9 menus shown below are available for all individual amps The following menus alter settings for individual BOZ 2200 ampli er modules DELAY MENU Al...

Страница 35: ...designate a preset ParEq MENU Use to select one of ten programmed ParEq lter settings EDIT BUTT MENU Use to set an ampli er s Butterworth lter parameters TABLE LEFT MENU Use to edit the parametric eq...

Страница 36: ...NU Allows you to set the following display parameters On Brightness OFF Bright ness Timeout on or off Time out in sec and Screen Saver on or off COMM MENU Allows you to set the following com municatio...

Страница 37: ...odules connected to them will have AMP numbers 1 and 5 designated to them respectively what happens when you ping When you click on PING either through the First Screen or through the AMPS menu a sign...

Страница 38: ...38 boz boz 216 2200...

Страница 39: ...3 3 the individual menus the first screen the amps option the group menu the menu option...

Страница 40: ...is as signed to the whole system when group ALL is selected 2 Displays the selected group The master level controls the signal level only for the ampli ers BOZ 2200 modules assigned to this group All...

Страница 41: ...on the remote Select it by pressing the ENTER button This will open an Amp setup display screen This can also be done from the front panel with the navigation knob 1 Amp selection Using the rotary con...

Страница 42: ...li ers each have two digital inputs Number 1 refers to the balanced XLR AES EBU input and num ber 2 refers to the single ended RCA SPDIF input To select the desired input position the cursor over this...

Страница 43: ...times Delay time can be set in increments of 10 usec The maximum delay time per channel is 40 95 msec To adjust the delay time position the cursor over the desired channel CLICK and turn the rotary co...

Страница 44: ...sor over the desired channel CLICK and turn the rotary control knob clockwise to increase and counterclockwise to decrease 1 Indicates the ampli er number The ampli er number is determined by the conn...

Страница 45: ...out of phase with respect to the input signal To adjust the channel polarity position the cursor over the desired channel CLICK the rotary con trol knob to toggle between and 1 Indicates the ampli er...

Страница 46: ...nput channel signal To change the Left Out and Right Out settings position the cursor over the desired setting and CLICK the rotary control knob to toggle between the Left In and Right In options In t...

Страница 47: ...iagram onp 29 In the example below both the Left output channel and the Right output channel will receive the Right input channel signal In the example below the Left output channel will receive the R...

Страница 48: ...sampling frequency If there is no signal detected will be displayed When LEVEL is selected the display will show the ampli er s level 3 This option sets the peak detector threshold This value can be s...

Страница 49: ...erves no function other than to inform you of the chosen module s mode of opera tion No system changes can be made via this screen As is indicated in the screen above in order to operate in a di erent...

Страница 50: ...is connected 2 Place the cursor over this eld and click to select a lter type for the Left channel 3 Place the cursor over this eld and click to select a lter type for the Right channel 4 Place the c...

Страница 51: ...side lter order for bandpass lter B Highpass lter order eld or right side lter order for bandpass lter C Lowpass lter cuto frequency in Hz or left side bandpass lter cuto fre quency D Highpass lter c...

Страница 52: ...ollowing setting 1 Left channel to lowpass Butterworth lter with cuto frequency of 250 Hz and lter order of 12 2 Right channel to highpass Butterworth lter with cuto frequency of 250 Hz and lter Note...

Страница 53: ...enter the Left channel lter parameter table screen 3 Place the cursor over this eld and click to enter the Right channel lter parameter table screen 4 Use this eld to select one of 10 ParEq lter pres...

Страница 54: ...the ParEq preset number 3 ParEq lters There are in total 12 lters per channel One display page can display 4 lters 4 Place the cursor on the down pointing arrow and click to the next page of 4 lters...

Страница 55: ...of the screen 4 1 Indicates the ampli er number The ampli er number is determined by the connector number on the back of the BOZ 216 to which the ampli er is connected 2 The numbers in these elds rep...

Страница 56: ...ct all of the ampli ers BOZ 2200 modules connected to BOZ 216 control unit To make a selection position the cursor over the desired preset and CLICK the rotary control knob Your selection will be disp...

Страница 57: ...Otherwise a will be displayed 1 Group number 2 Ampli er selection assigned to group number 1 In this particular example ampli ers 1 and 2 are assigned to group number 1 If this group were selected in...

Страница 58: ...nter the system OPTIONS menu 2 Click on this option to enter the DISPLAY menu 3 Click on this option to enter the COMMUNICATION menu 4 Click on this option to enter the LOCK menu It is used to lock un...

Страница 59: ...crementally scroll through numerical values or to toggle between options 1 Maximum Level This option allows you to set the maximum level for the entire system 2 Power On This option toggles between ON...

Страница 60: ...displayed as MAX 3 Use this eld to enable or disable the display timer 4 Use this eld to set the display timer timeout value This value is set in seconds and can be set from 5 to 20 seconds 5 Use thi...

Страница 61: ...X volume control of the BOZ 216 If you have a TCS MKII or an RCS 2 2 X set this option to ENABLE and connect TCS MKII RCS 2 2 X RS232 AUX output to the BOZ 216 RS232 input In this way your TCS MKII R...

Страница 62: ...Click on this option to delete the number entered in the PSWD eld All units come with a factory preset password of 1234 Use the rotary knob to enter the password Place the cursor over number 1 and cl...

Страница 63: ...mber if you decide to purchase the Crossover Parametric EQ or Room Correction software options This number is used by Tact Audio to generate your proper license 2 This eld displays BOZ 216 rmware vers...

Страница 64: ...o incrementally decrease or increase the numerical value To nalize your selection CLICK on the SET eld 1 This eld displays the system s current time setting Once you click on SET any changes made will...

Страница 65: ...number use the rotary knob to highlight the desired number and click on it The number will be displayed in eld 2 4 After the license number is completely entered click on this option to activate the...

Страница 66: ...nd from six letters A B C D E and F To enter the license number use the rotary knob to highlight desired number and click on it The number will be displayed in eld 2 4 After the license number is comp...

Страница 67: ...ers A B C D E and F To enter the license number use the rotary knob to highlight desired number and click on it The number will be displayed in eld 2 4 After the license number is completely entered c...

Страница 68: ...Tact Audio Inc 201 Gates Road Unit G Little Ferry New Jersey 07643 USA Phone 1 201 440 9300 Fax 1 201 440 5580 Email info tactaudio com www bozaudio com www roomcorrection com www tactlabs com...

Отзывы: