getting started
1
8
Synrad
Firestar i401
operator’s manual
Mounting
The
Mounting
section includes subsections:
■
Top down mounting
■
Bottom up mounting
The Firestar i401 baseplate is designed so that the laser is easily mounted using four fasteners as described
in the subsections below. Refer to the Firestar i401 package outline drawing in the Technical Reference
chapter for mounting locations and dimensions.
Caution
possible
equipment
damage
SYNRAD does not recommend mounting lasers in a vertical “head-
down” or “tail-down” orientation. If you must mount your laser in
this manner, please contact the factory for limitations as a vertical
orientation increases the risk of damage to the laser’s output optic.
Top down mounting
To fasten your Firestar i401 laser to a mounting surface from above, perform the following steps:
1
Determine whether you will use metric (ISO) or inch (SAE) fasteners to mount the laser. Four met-
ric (M10) capscrews and flat/split washers are included in the ship kit.
2
Refer to the i401 outline and mounting drawing (Sheet 1 of 2) for dimensions, then drill and tap
four M10 × 1.5 or four 3/8" (UNC or UNF) holes into your mounting surface. These holes should
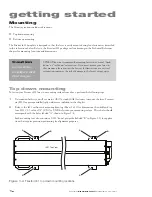
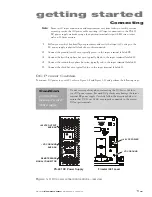
correspond with the holes labeled “A” shown in Figure 1-4.
Each mounting foot also contains a 0.380" dowel pin guide (labeled “B” in Figure 1-3) for applica-
tions that require precision positioning for alignment purposes.
Figure 1-4
Firestar i401 top down mounting locations
A
B
A
A
A
B
i401 Top View
Содержание Firestar i401 Series
Страница 2: ......
Страница 4: ......
Страница 56: ...operation 210 Synrad Firestar i401 operator s manual This page intentionally left blank ...
Страница 112: ...maintenance troubleshooting 422 Synrad Firestar i401 operator s manual This page intentionally left blank ...
Страница 120: ...index i8 Synrad Firestar i401 operator s manual ...

