background image

7

sWaP Signature 

&

 Active

 user guide

www.s-w-a-p.co.uk

Contents

Using the wired earphones

The supplied earphones and microphone can be used 
to listen to music/videos/FM radio as well as making 
and taking calls.

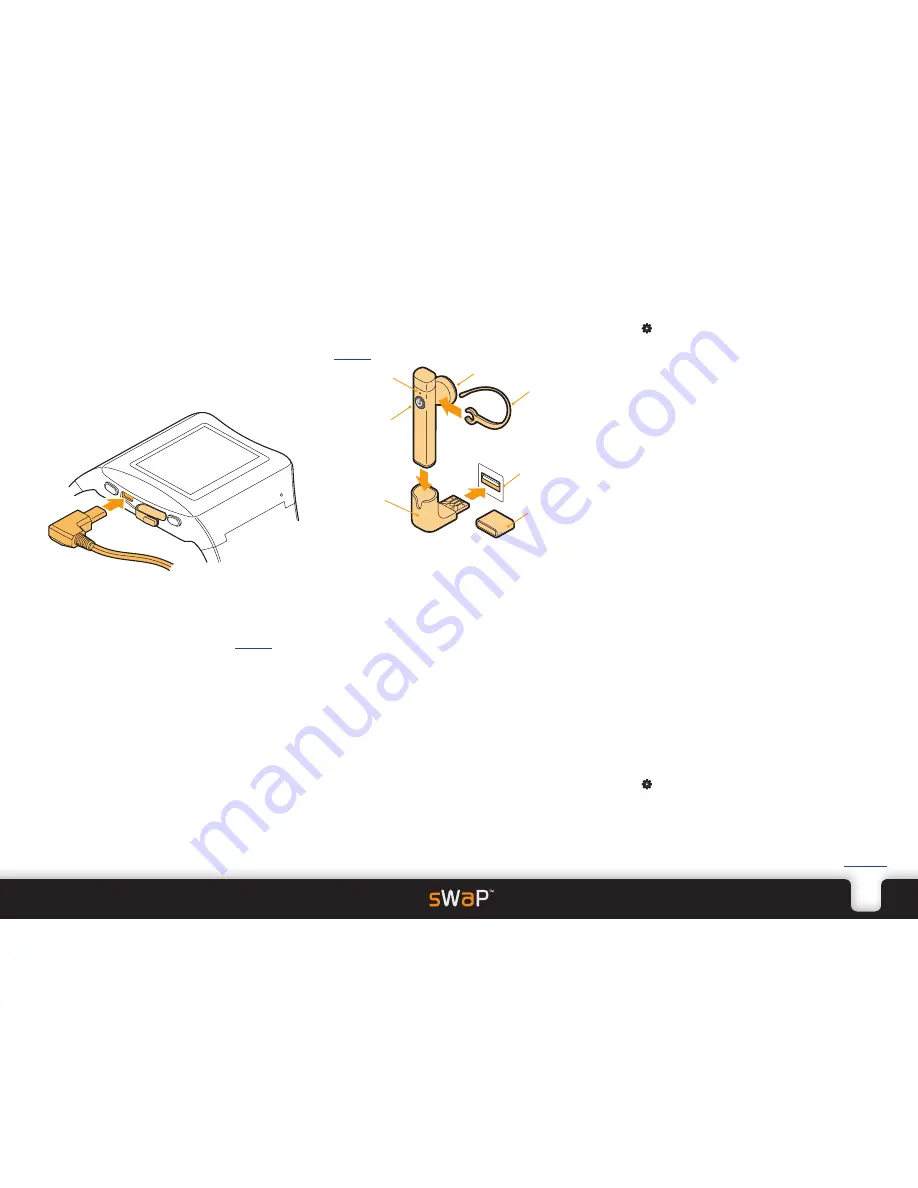
1 Peel back/open the protective cover from the USB port.
2 Insert the right-angle plug of the earphones into the 

USB socket.

Using the Bluetooth headset

The supplied Bluetooth headset allows you to hear and 
speak discretely without need for wires. See also the 

Settings

 section for more Bluetooth information.

The small button on the microphone pod can be used 
to answer* and terminate calls.

*

 Within the 

Headset

 profile, if the 

Answer Mode


option is set to 

Auto

, then calls will be answered 

immediately - you can alter this. See the 

Settings


section for details.    

3 Tap   (twice, if necessary). 
4 Tap 

Organizer

, scroll down and then tap 

Bluetooth

.

5 Tap 

Search Bluetooth Device

. If asked, tap 

Yes

 to 

switch on Bluetooth power. 

  Providing the headset is in range (within ten metres), 

the sWaP watch should find it and automatically show 
its name: 

sWaP

, within the Discovered Device page.

6 Tap 

Bond

. You will be asked to enter a passcode.

7 Tap 

0000

 and tap 

Ok

8  When asked, tap 

Yes

  The headset and your sWaP watch  

will now be paired.

To swap between sWaP and headset

During a call, you can change between the headset and 
the sWaP watch speaker.

• Tap 

Option

 and then tap 

Swap Bluetooth Voice 

Path

. Do the same to swap back again. 

Answering and ending calls

When an incoming call is received, the headset earpiece 
will give a ringing tone (as well as your sWaP watch). 
You can use the headset button to control calls:  

• To answer: Press and release the button. 
• To end: Press and release the button.
• To redial the last dialled number: Press and release the 

headset button twice.

Unpairing your sWaP and headset

When you no longer want to use them together, you 
can break the bond.

1 From the clock face, tap 

Menu

 or press the lower 

button.

2 Tap   (twice, if necessary). 
3 Tap 

Organizer

, scroll down and then tap 

Bluetooth

.

4 Tap 

My Devices

 and then tap the 

sWaP

 entry.

5 Tap 

Delete

 and then tap 

Yes

 to remove the pairing 

bond.

Charging the headset

Charge the headset from a standard USB port. It needs 
two hours for a full charge. The indicator shows red 
while charging and goes out once completed. 

Turning the headset on and off

Press and hold the button until the indicator responds. 
As it switches 

on

, you will see four 

blue

 flashes. As 

it switches 

off

, you will see four 

red

 flashes. When 

it is on, the indicator will flash blue once every three 
seconds (if unpaired) or once every twelve seconds 
when paired with your sWaP watch. Once paired, the 
two devices will always re-locate each other.

Pairing your sWaP and headset

Before they will work together, you need to form a 
pairing bond between them. This needs to be done 
only once.

1 Ensure that the headset is initially switched off. Press 

and hold its button for approximately eight seconds 
(ignore the initial blue flashes) until the indicator flashes 
red and blue, then release.

2 On your sWaP watch, from the clock face, tap 

Menu


or press the lower button.

Earpiece

Indicator

Ear hook

Button: 

power and 

control

Charging 

base

Connector 

cover

USB port 

on your 

computer

Содержание Active

Страница 1: ...Signature and Active user guide www s w a p co uk ...

Страница 2: ...ry 8 Messages 9 Writing an SMS message 9 SMS messages 9 Reading an SMS message 10 SMS message settings 10 Writing an MMS message 11 Reading an MMS message 11 Voice mail server 12 Media 12 Camera 12 Photo album 13 Video recorder 13 Video player 14 Audio player 14 Sound recorder 15 FM radio 15 WAP 16 Settings 17 Pen Calibration 17 Organizer 17 File manager 20 Themes 20 Stopwatch 20 User Profiles 21 ...

Страница 3: ...etooth headset page 7 Use the Phonebook page 8 Use messaging page 9 Use multimedia applications page 12 Access websites page 16 USB port with protective cover Compact stylus stored in the strap Signature Lower button Menu or select Press hold for voice activation 1 46 high resolution touch screen Speaker Microphone High resolution camera USB port with protective sliding cover Upper button Power on...

Страница 4: ...tery Note Avoid touching the gold contacts of your SIM card Fitting the battery 1 Insert the tab s at the end of the battery into the corresponding slot s of your sWaP watch body Ensure that the two gold battery contacts align with the two round gold contacts within the body recess LOCK OPEN Battery locating tab Active Signature 2 Press the other end of the battery down On the Active the battery s...

Страница 5: ...urately on the touch screen It is stored within the strap on Active models and within the shoulder where the strap joins the body on Signature models Active Signature Long press Active stylus Signature stylus Flight mode is available to switch off all communication aspects of your sWaP watch to let you use other features without infringing no mobile rules in certain areas Please see the section Us...

Страница 6: ...t User profile set to use ring alert only User profile set to use vibrate first and then ring User profile set to use vibrate and ring alerts User profile set to use vibration alert only Stopwatch running From the clock face you can access the Menu view your Contacts or make a call tap and hold anywhere See also Phone Setup Swipe Function SETTINGS Pen Calibration Organizer Calendar To Do List Alar...

Страница 7: ...d Place the call on hold End End the current call Volume ctrl Adjust speaker volume Phone Book Access your Phone Book New Call Dial a new number Message Access your messages Sound Recorder Record the call Mute Switch off the microphone DTMF Switch keypad tones on off Connect Lost BT Headset Attempt to reconnect with the headset In the call screen you can also Tap to re display the numeric keypad T...

Страница 8: ...earpiece will give a ringing tone as well as your sWaP watch You can use the headset button to control calls To answer Press and release the button To end Press and release the button To redial the last dialled number Press and release the headset button twice Unpairing your sWaP and headset When you no longer want to use them together you can break the bond 1 From the clock face tap Menu or press...

Страница 9: ...g an entry You can find entries in two main ways By scrolling through the list of contacts or by entering one or more characters of the name to make a search Finding an entry by scrolling 1 From the clock face tap Contacts 2 Tap the up or down arrows to scroll through the list 3 When the required entry is highlighted tap to dial or tap Option to send a message or edit the entry Finding an entry by...

Страница 10: ...nbox Subject to availability Writing an SMS message 1 From the clock face tap Menu or press the lower button 2 Tap twice if necessary 3 Tap SMS then Compose Message 4 Tap out or handwrite your message within the editor page 6 When your message is complete tap Option and then tap Done You can now choose how to send and or save the message Send to one person send to a list of people send to one of t...

Страница 11: ... Copy to Move to Copy All and Move All allow you to copy or transfer messages from one memory area to the other Use Number and Use URL are particularly useful when there are phone numbers or website addresses within the original message These options allow you to use them to make calls save to your Phone book or access the website as appropriate SMS message settings 1 From the clock face tap Menu ...

Страница 12: ... of the same type From the text editor tap Option and then tap either Add Slide Before or Add Slide After You will now see the blank text editor for the new slide It is not necessary to have text on every slide Repeat steps 4 and 5 to populate the new slide 7 To change between slides tap Option and then tap either Previous Slide or Next Slide as appropriate 8 When you have completed the slides you...

Страница 13: ...atch or transfer elsewhere 1 From the clock face tap Menu or press the lower button 2 Tap twice if necessary 3 Tap Camera The camera viewfinder will be shown The camera lens is located on the upper right side of your sWaP watch Ensure that it has a clear view to your subject To capture a picture you can either Tap on the screen or Press the lower button The screen will show your captured image and...

Страница 14: ...ideo recorder Uses the integral camera to capture moving images and sound as video clips AVI format which can be sent to friends or transferred to a computer 1 From the clock face tap Menu or press the lower button 2 Tap twice if necessary 3 Tap Video Recorder The video viewfinder will be shown Video recorder options To change settings within the video recorder viewfinder screen tap Option to view...

Страница 15: ...t be used for this purpose Equalizer allows you to adjust the audio frequency response to suit the type of track s that you are playing Options include Rock Party Dance Classical etc Forward allows you to send the video to someone either via MMS message or by Bluetooth link The latter option will guide you through the process of searching for and bonding with a Bluetooth device in your vicinity Re...

Страница 16: ...nsfer your recordings Forward allows you to copy the entry for use as an alert tone or send it to someone either via MMS message or by Bluetooth link The latter option will guide you through the process of searching for and bonding with a Bluetooth device in your vicinity FM radio This allows you to listen to any FM radio stations available within your vicinity The stereo headphones must be used u...

Страница 17: ...continually fails to use GPRS then there may be a configuration problem see WAP connection configuration for details Once a data connection is made the website will be located and displayed Note While it is possible to access normal websites some will not display correctly because they are designed only for large screens Many organisations offer WAP alternatives which are optimised for compact scr...

Страница 18: ...ock Auto keypad lock change password etc Restore Factory Settings allows you to return all settings back to their default configurations Pen Calibration From time to time or after a complete restore factory settings operation you may need to calibrate the screen to restore its accuracy 1 From the clock face tap Menu or press the lower button 2 Tap twice if necessary 3 Tap Pen Calibration The calib...

Страница 19: ... placed around each date for which the reminder is valid To jump to a specific date 1 Either tap on a day and then tap Option or just double tap on a day 2 Tap Jump To Date and enter the required date 3 Tap Ok and the chosen date will be shown highlighted in a month to view page To Do List Access the Organizer and then tap To Do List When the list opens you will see any existing reminders includin...

Страница 20: ...audio through the microphone and speaker of a suitable Bluetooth device FTP Setting determines where data to send and be received should be stored in memory It also allows you to control whether the other device can write to memory as well as read About shows details for your sWaP watch including Bluetooth device name address and supported services Pairing with another device In order to work toge...

Страница 21: ...me should be automatically changed Options range from hourly to seasonally Set Order allows you to choose the order in which the three themes will be rotated when using the automatic Update Period feature Stopwatch Access the Organizer and then tap Stopwatch This application actually provides multiple stopwatches in one The screen will show two options Typical Stopwatch and nWay Stopwatch The Typi...

Страница 22: ...ower On Off allows you to maximise your power efficiency while you re asleep by choosing times to automatically switch your sWaP watch off and on Language lets you choose the appropriate language for all menus and messages within your sWaP watch Preferred Input Method determines which on screen keypad is displayed first when you need to enter details Display Characteristics contains numerous setti...

Страница 23: ...wn Cancel All Change Barring PW password In each case apart from the last two you can Activate Deactivate or Query Status to discover the current setting Restrictive Call allows you to prevent your sWaP watch from making any outgoing calls Within this option you can choose Call Receive for normal operation or Receive Only to restrict operation to receiving incoming calls only Call Time Reminder al...

Страница 24: ...lower button and then tap your stylus on a displayed target to unlock your sWaP watch Fixed Dial allows you to define one or more phone numbers which may be dialled from your sWaP watch When the Fixed Dial Mode is then enabled only those numbers can be dialled This feature is subject to support from your service provider Barred Dial allows you to define one or more phone numbers which you wish to ...

Страница 25: ...he cable into a vacant USB port on your computer Your computer should respond to the new link and once it has configured its drivers will respond in the same way as if any other USB storage device had been attached If your sWaP watch is switched off when connected then it will appear to the computer as a simple storage device Use your computers file manager application to access the folders within...

Страница 26: ...on box Write this number down in advance and store it in a safe place RF energy interference compatibilities Note Nearly every electronic device is susceptible to RF energy interference from external sources if inadequately shielded designed or otherwise configured for RF energy compatibility In some circumstances your sWaP watch may cause interference Facilities and hazardous areas Turn off your ...

Страница 27: ... to radio frequency RF energy These limits are part of comprehensive guidelines and establish permitted levels of RF energy for the general population The guidelines are based on standards that were developed by independent scientific organisations through periodic and thorough evaluation of scientific studies The standards include a substantial safety margin designed to assure the safety of all p...

Страница 28: ...2 this device must accept any interference received including interference that may cause undesired operation Note This equipment has been tested and found to comply with the limits for a Class B digital device pursuant to part 15 of the FCC Rules These limits are designed to provide reasonable protection against harmful interference in a residential installation This equipment generates uses and ...

Отзывы: