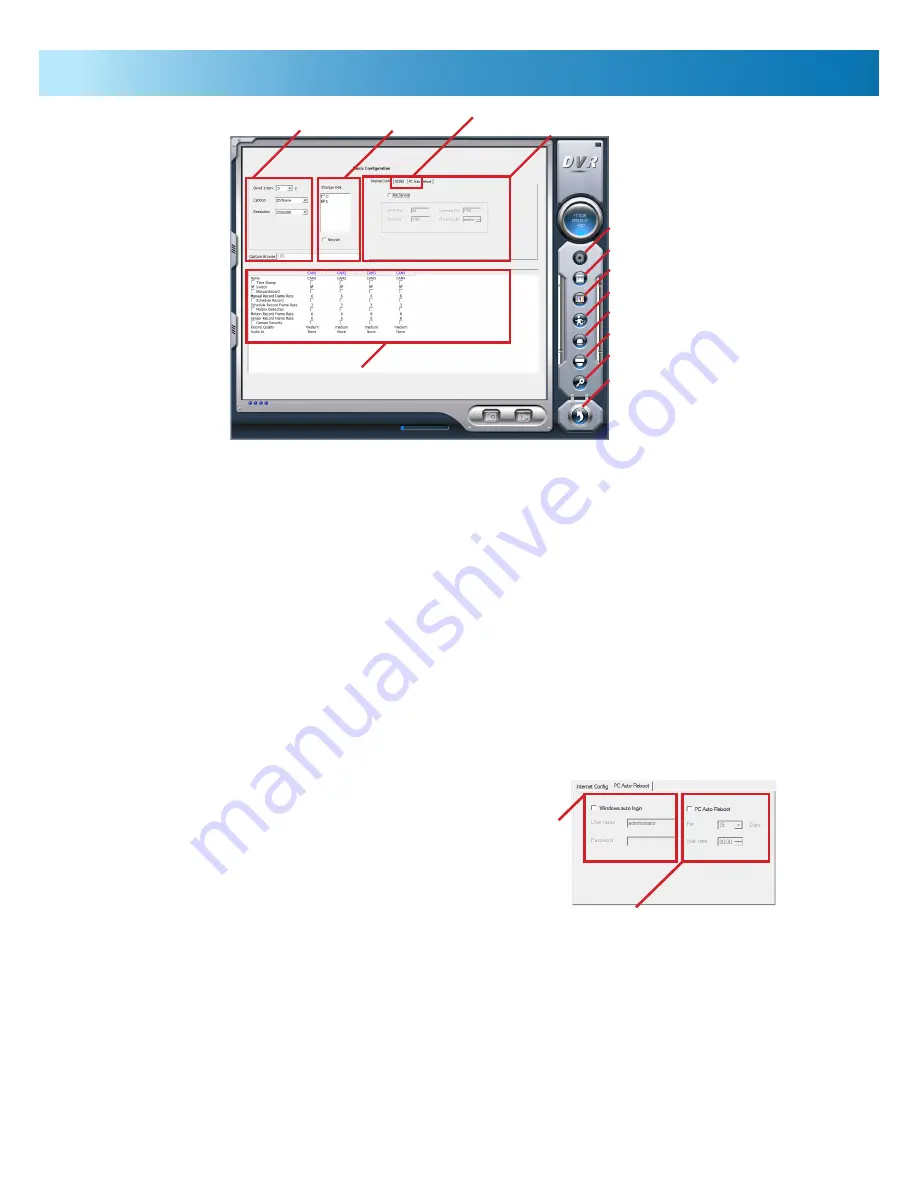
Auto-Cycle Config:
When Auto-Cycle display mode is engaged
(that is, the PC-DVR displays one channel at a time, automatically
cycling through all active channels) these settings will determine
how long it dwells on each channel.
Dwell Time:
How long each channel will be displayed for.
Caption:
Choose how each channel will be identified.
None: No title will be shown.
ID:
Will display the camera’s number.
Name: Will show the name tagged on that camera.
ID/Name: Will show the name and ID of that camera.
Live Audio:
Change which audio channel will be recorded.
Audio Config:
Here you can change the GAIN (essentially the
volume) of one or both audio channels.
Networking Configuration:
Here you can choose the port
settings that the PC-DVR uses to interface with your LAN and the
Internet.
Storage Location:
Lets you choose which hard drive the software
will record data to. Only drives already connected to your system
will appear here.
Auto-Reboot & Auto-Login Configuration Tab:
Click here to
access the Auto-Reboot and Auto-Login Configuration tabs.
Basic Configuration:
The current screen. From other configuration
windows, this will take you back to this screen.
Schedule Configuration:
Opens the schedule window. If you
want the PC-DVR to record at certain specific times, this is where
you can program that schedule.
Video Configuration:
Opens the video configuration window,
where you can change the size and quality of the video files the
software will save.
Motion Detection Configuration:
If you want the PC-DVR to
record when movement occurs within view of the cameras, use this
screen to configure the motion detection settings.
Alarm Configuration:
If you have an external alarm system
connected to the PC-DVR, then this is where you’ll be able to define
which channels record on which alarm signal.
P.T.Z. Configuration:
For remotely controlling the pan, tilt and
zoom features of a P.T.Z. capable camera system.
User Configuration:
Where you are able to configure other
settings not covered in the other menus.
Channel Attributes:
Where the individual attributes associated
with each channel can be changed and modified. See overleaf for
details.
Auto-Reboot Configuration:
As computers need to be
occasionally rebooted to ensure they continue to operate reliably,
the PC-DVR software includes the option to do this automatically.
Select the frequency of rebooting here.
Auto-Login Configuration:
Used primarily in conjunction
with the auto-reboot feature. You can input the username and
password you use to login to Windows here, and the PC-DVR will
automatically login to Windows when the computer restarts.
Access the Basic Configuration screen by clicking on the Configuration Panel icon (the one that looks like a spanner). Here,
you can configure and control various aspects of the PC-DVR’s functionality. In addition, the Configuration Menu located on
the right hand side of this window contains the links to the recording option setup screens.
Basically, if you want to make the PC-DVR function differently from the default settings, this is where you do it.
Basic Configuration
Auto-Reboot Configuration
Auto-Login
Configuration
Storage Location
Network Configuration
Auto-Reboot & Auto-Login Config Tab
Auto-Cycle
Config
Basic Configuration
Schedule Configuration
Video Configuration
Motion Detection Config
Alarm Configuration
P.T.Z. Configuration
User Configuration
Return to Live Viewing Mode
Record Setup
9


