25
Connecting via iPhone
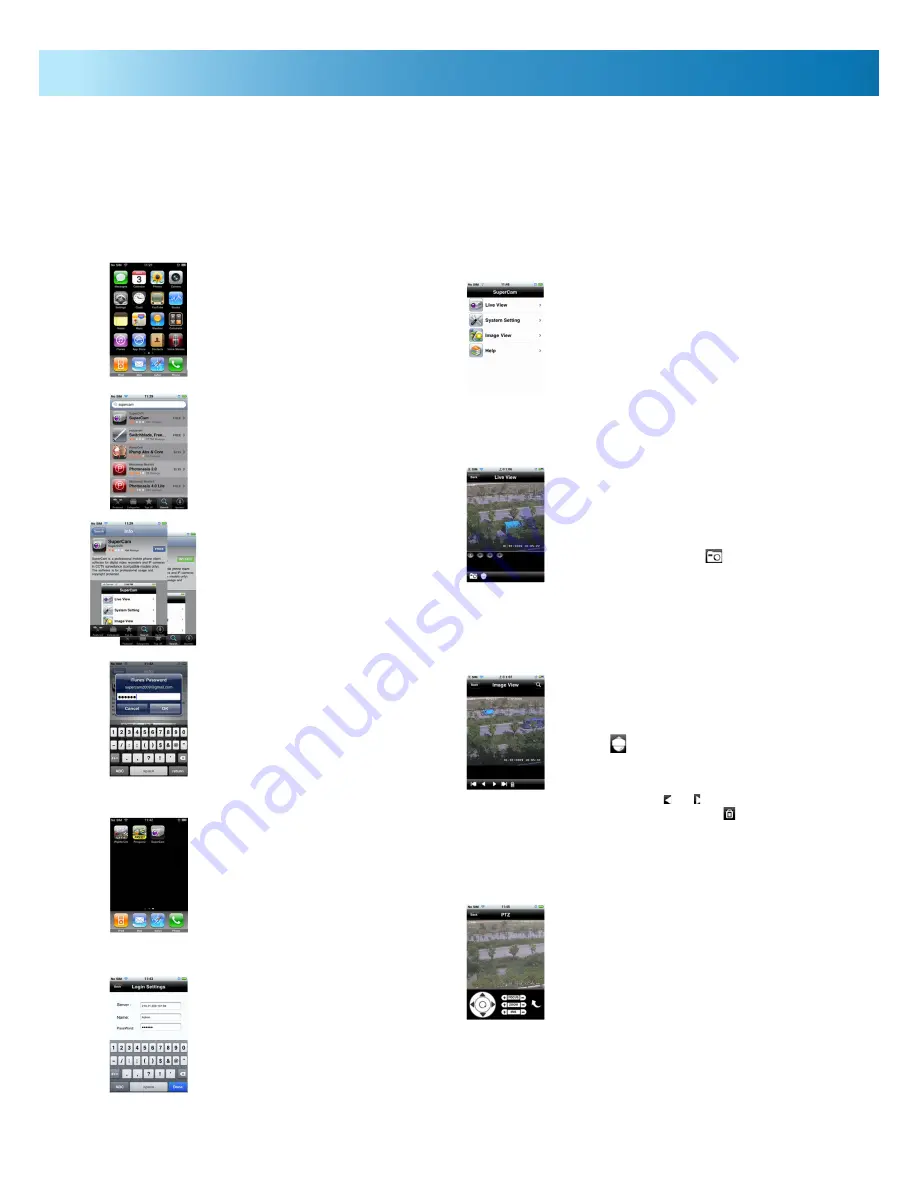
Installing the iPhone App.
Step 1:
Check to make sure you have
space free on your iPhone to install
applications, and you’re running a
compatible version of the iPhone OS
(see above). Navigate to the “App
Store”.
Step 2:
Turn on the “Search” function.
In the search box, enter “
SuperCam
”.
Several results should appear, with
the exact match (the one you’ll want)
should be at the top of the list.
Step 3:
Click SuperCam, navigate to
the into “
Introduce
” interface. Click
the button which says “
Free
” - this
will change immediately to a button
which says “
Install
”. Click the “
Install
”
button.
Step 4:
Enter your iTunes Store
password and click “OK”.
Note: If this is the very first time you’re using
the iTunes Store, then you’ll need to create
a user account (instructions how to do this
are provided by iTunes). If this is the first time
you’ve accessed the iTunes Store from your
iPhone but you already have an iTunes Store
account, then you can use your existing account.
Step 5:
Choose “Download”. The
download will take a few minutes -
once this has completed, continue
with the installation. When installation
is completed, the SuperCam icon will
be displayed in your application group.
Simply choose this icon to open the
SuperCam application.
Step 6:
Click on “System Setting”. A
login screen will appear. Enter the public
IP address of your network and port
number (as if you were logging onto
the PC-DVR via an Internet browser),
and your username and password (for
the PC-DVR, not your iPhone).
Using the iPhone App.
Viewing Live Images:
Once you’ve entered your password to
access the PC-DVR, select “Live View”. By
default, the live feed from channel 1 will
be displayed.
Depending on the strength and integrity
of your iPhone’s connection, there may be
slight delay between the images displayed
in Live Viewing and the actual live event.
This can also lead to a drop in frame-rate.
Capturing Images:
You can capture still images directly from
the Live View. Click
once to capture
picture.
Controlling PTZ Systems:
You can control any PTZ (Pan, Tilt,
Zoom) systems remotely via your iPhone
(assuming they are properly configured
and connected to the PC-DVR via one of
your computer’s COM ports.
Click to enter PTZ mode.
Click Image View to view your captured
pictures. Click or to switch to next or
previous picture. Click
to delete the
current picture.
PTZ Controls
The PTZ control panel looks very much like
the one provided by the PC-DVR software
for your computer.
The arrow buttons will move the camera,
whilst the centre button will stop it (useful
if the PTZ system is in cruise mode). The
focus, iris and zoom controls are located to
the bottom right of the screen.
Note that you will not be able to program
patterns for cruise mode, or configure the
advanced features of your PTZ system via
the iPhone.
You can connect to, view live images from and control some settings on the PC-DVR using an iPhone. Unfortunately, you will
not have the level of access and control that logging on via a computer running the proper software. Only recent releases
of the PC-DVR support this function, as the iPhone is still quite new technology. You can grab an update for the PC-DVR
software from our website (
http://www.swannsecurity.com/downloads/drivers/pcdvr4net/latest
).
Please Note:
You’ll need to be running version 2.2 or higher of the iPhone operating system (usually abbreviated to
iPhone OS v2.2). If you’re running a previous version, you won’t be able to connect to the PC-DVR until the phone is
upgraded.
Mode Selection
Live Viewing
Snapshot
PTZ Controls


