Chapter 6: Advanced Chassis Setup
6-9
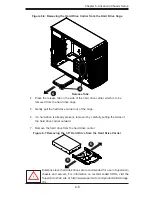
4. Press the release tab on the side of the hard drive carrier which is to be
removed from the hard drive cage.
5. Gently pull the hard drive carrier out of the cage.
6. If a hard drive is already present, remove it by carefully pulling the sides of
the hard drive carrier outward.
7. Remove the hard drive from the hard drive carrier.
Figure 6-6: Removing the Hard Drive Carrier from the Hard Drive Cage
1
5
Release Tabs
1
4
Figure 6-7 Removing the 3.5" Hard Drive from the Hard Drive Carrier
1
6
1
6
!
Enterprise level hard disk drives are recommended for use in Supermicro
chassis and servers. For information on recommended HDDs, visit the
Supermicro Web site at http://www.supermicro.com/products/nfo/storage.
cfm
Содержание 5037A-I
Страница 1: ...SuperWorkstation 5037A I SUPER USER S MANUAL 1 0...
Страница 5: ...v Preface Notes...
Страница 14: ...SuperWorkstation 5037A I User s Manual 1 6 Notes...
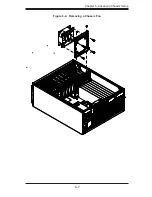
Страница 59: ...Chapter 6 Advanced Chassis Setup 6 7 Figure 6 4 Removing a Chassis Fan...
Страница 66: ...6 14 SuperWorkstation 5037A I User s Manual Notes...
Страница 92: ...7 26 SuperWorkstation 5037A I User s Manual Notes...
Страница 94: ...A 2 SuperWorkstation 5037A I User s Manual Notes...
Страница 101: ...C 3 Appendix D System Specifications Notes...

