Chapter 5: Advanced Serverboard Setup
5-7
Caution:
You can only install the CPU to the socket in one direction. Make sure
that the CPU is properly inserted into the socket before closing the load plate. If it
doesn't close properly, do not force it as it may damage your CPU. Instead, open
the load plate again and double-check that the CPU is aligned properly.
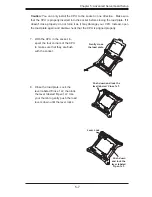
OPEN 1st
OPEN 1st
Lever Lock
Push down
and lock the
lever labeled
'Open 1st'.
Push down and lock the
level labeled 'Close 1st'.
Gently close
the load plate.
7. With the CPU in the socket, in-
spect the four corners of the CPU
to make sure that they are flush
with the socket.
8. Close the load plate. Lock the
lever labeled 'Close 1st', then lock
the lever labeled 'Open 1st'. Use
your thumb to gently push the load
levers down until the lever locks.
Содержание 5037A-I
Страница 1: ...SuperWorkstation 5037A I SUPER USER S MANUAL 1 0...
Страница 5: ...v Preface Notes...
Страница 14: ...SuperWorkstation 5037A I User s Manual 1 6 Notes...
Страница 59: ...Chapter 6 Advanced Chassis Setup 6 7 Figure 6 4 Removing a Chassis Fan...
Страница 66: ...6 14 SuperWorkstation 5037A I User s Manual Notes...
Страница 92: ...7 26 SuperWorkstation 5037A I User s Manual Notes...
Страница 94: ...A 2 SuperWorkstation 5037A I User s Manual Notes...
Страница 101: ...C 3 Appendix D System Specifications Notes...


