


Piarm, Release 1.0
• [constrain () low () high ()]: From Math category for setting the variation of a constant to a certain range.
• [if else]: Conditional judgment block, you can create multiple conditional judgments by clicking the set icon
and dragging [else] or [else if] to the right below the [if].
Step 3
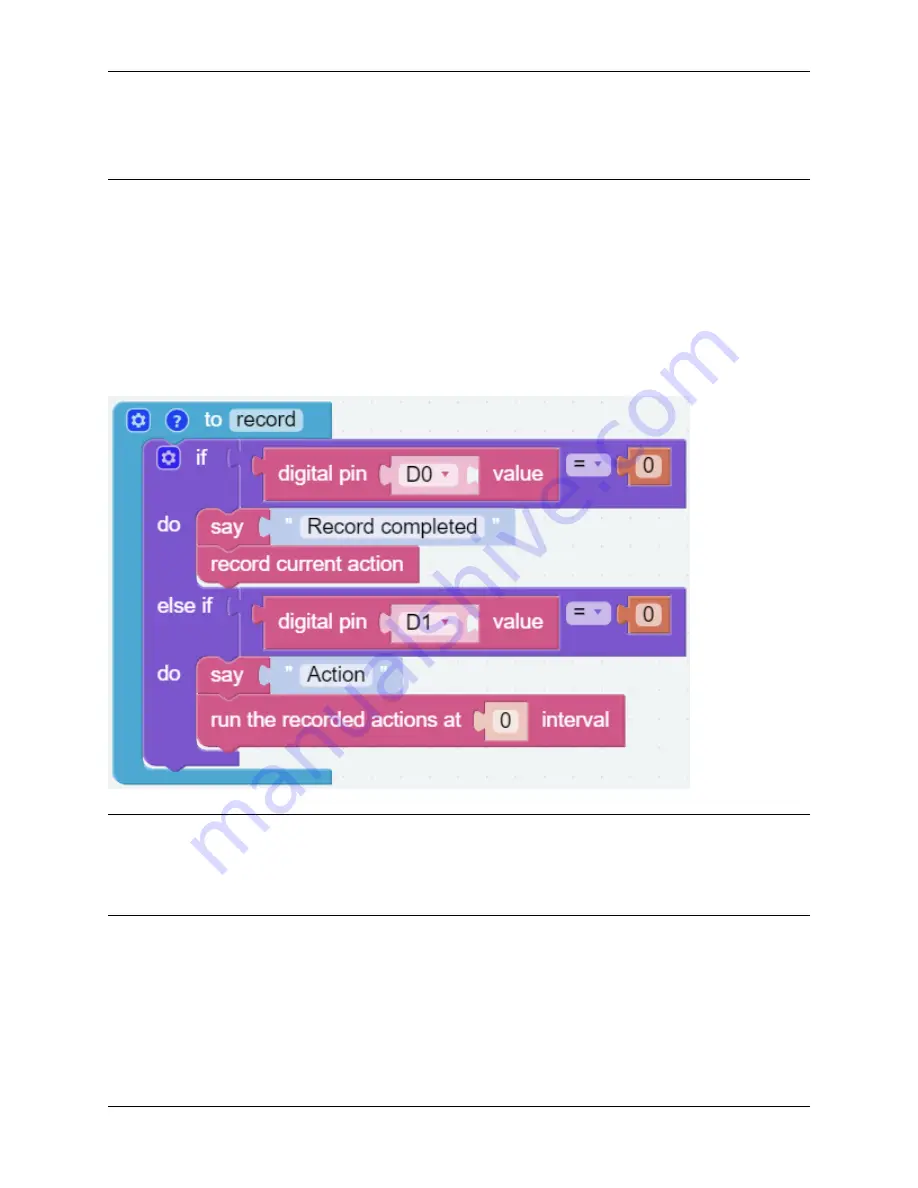
A new function, [record], is created to record the current actions and to allow PiArm to reproduce them.
• The left and right buttons of the Dual Joystick Module are connected to
D0 (Left Button)
,
D1 (Right Buttbon)
respectively.
• The buttons will output low level (0) when pressed and output high level (1) when released.
• When the
button of the left joystick
is pressed, the action of PiArm will be recorded at this time, and there will
be a voice prompt to indicate the completion of recording.
• When the
button of the right joystick
is pressed, PiArm will reproduce these recorded actions.
Note:
• The [if else], [and] and [=] blocks are all from the
Logic
category.
• [run the recorded actions at () internal]: This block is used to set the time interval for each set of recorded
actions, if it is 0 it will reproduce each set of actions continuously.
Step 4
Put the [set_position] and [record] functions into the [Forever] block to execute them sequentially, and finally click the
Download
button to run the code.
Now you can use the joystick to control PiArm, press the
button of the left joystick
to record the desired actions, and
after recording a few groups, press the
button of the right joystick
to make PiArm reproduce these actions.
72
Chapter 3. Play with Ezblock
Содержание PiArm
Страница 1: ...Piarm Release 1 0 www sunfounder com Mar 31 2022 ...
Страница 2: ......
Страница 4: ...ii ...
Страница 6: ...Piarm Release 1 0 2 CONTENTS ...
Страница 8: ...Piarm Release 1 0 4 Chapter 1 Component List and Assembly Instructions ...
Страница 13: ...Piarm Release 1 0 Assemble the Shovel Bucket to the end of the PiArm with M2x4 screws 2 2 Shovel Bucket 9 ...
Страница 14: ...Piarm Release 1 0 The Shovel Bucket has a rotation range of 90 60 10 Chapter 2 Hardware Introduction ...
Страница 15: ...Piarm Release 1 0 Use range Can t dig water can be used to dig sand and gravel 2 2 Shovel Bucket 11 ...
Страница 17: ...Piarm Release 1 0 Attach the Hanging Clip to the end of the PiArm with the M2x4 screw 2 3 Hanging Clip 13 ...
Страница 18: ...Piarm Release 1 0 The angle range of the Hanging Clip is 0 90 14 Chapter 2 Hardware Introduction ...
Страница 48: ...Piarm Release 1 0 44 Chapter 3 Play with Ezblock ...
Страница 82: ...Piarm Release 1 0 Step 6 Put the control function into the Forever block 78 Chapter 3 Play with Ezblock ...
Страница 91: ...Piarm Release 1 0 3 9 GAME Iron Collection 87 ...
Страница 92: ...Piarm Release 1 0 88 Chapter 3 Play with Ezblock ...
Страница 99: ...Piarm Release 1 0 Step 7 Click the WRITE button 4 1 Quick Guide on Python 95 ...
Страница 146: ...Piarm Release 1 0 Ctrl C At this point you can stop the code with Ctrl C 142 Chapter 4 Play with Python ...
Страница 148: ...Piarm Release 1 0 Yes then Ok Finish 144 Chapter 5 Appendix ...
Страница 152: ...Piarm Release 1 0 Step 4 Double click the connection just created 148 Chapter 5 Appendix ...
Страница 153: ...Piarm Release 1 0 Step 5 Enter Username pi and Password raspberry by default 5 2 Remote Desktop 149 ...
Страница 154: ...Piarm Release 1 0 Step 6 Now you can see the desktop of the Raspberry Pi 150 Chapter 5 Appendix ...
Страница 160: ...Piarm Release 1 0 156 Chapter 5 Appendix ...
Страница 162: ...Piarm Release 1 0 158 Chapter 6 Thank You ...


