


Piarm, Release 1.0
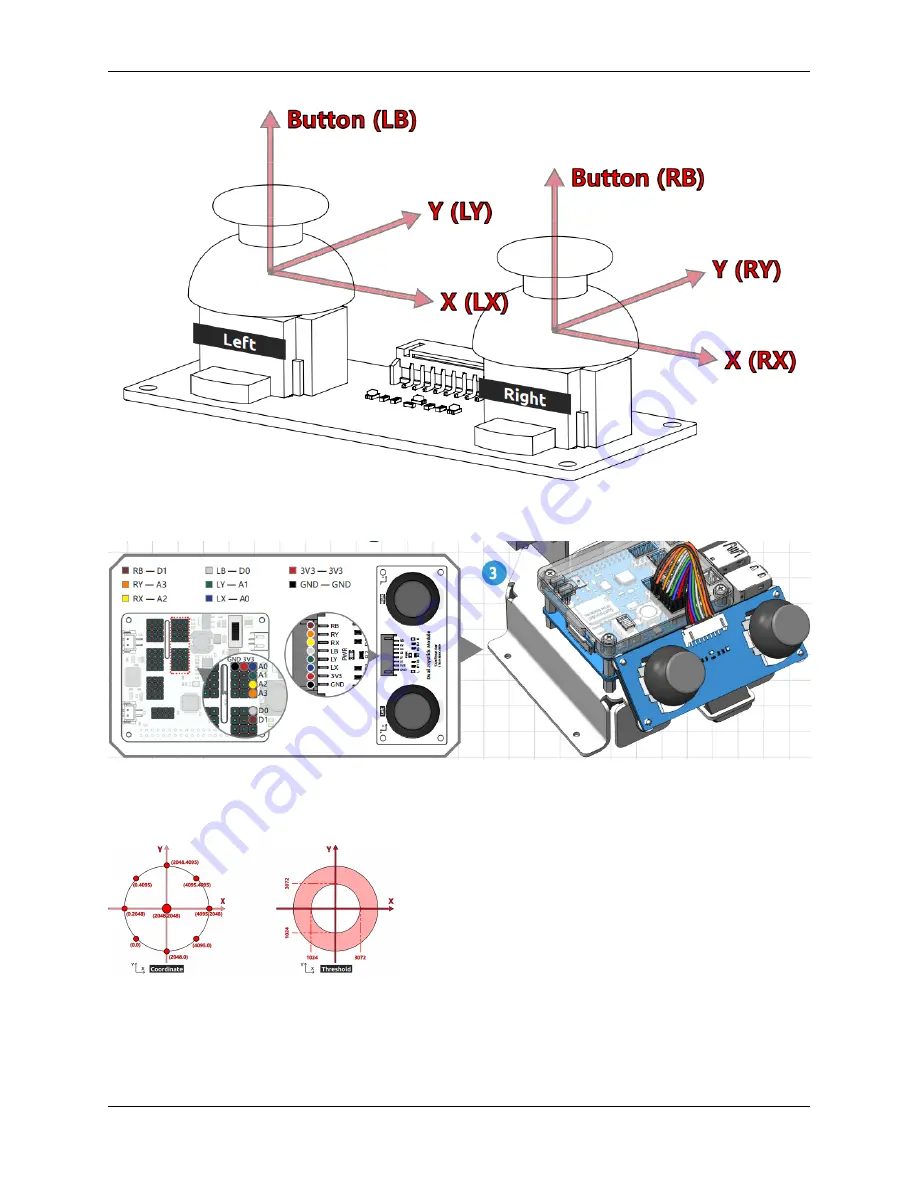
Before you can use the dual joystick module, you need to connect its 8 wires to the corresponding pins of the Robot
HAT as shown in the picture below.
The joystick reads in a plane coordinate system from 0 to 4095, with the origin (0,0) in the lower left corner.
As an example, the coordinate value when the joystick is not pushed is (2048,2048). If the joystick is pushed to the
left, the coordinates are (0,2048). When the joystick is pushed down, the coordinates are (2048,0), as shown below.
However, electrical signals tend to fluctuate and it is difficult to get an absolutely stable reading, so we usually set a
value interval to determine where the joystick is currently located.
The recommended boundary values are set to 3072 and 1024. when the joystick reading is greater than 3072, the
joystick is considered to be pushing up (or right); if the reading is less than 1024, the joystick is considered to be
2.5. Dual Joystick Module
19
Содержание PiArm
Страница 1: ...Piarm Release 1 0 www sunfounder com Mar 31 2022 ...
Страница 2: ......
Страница 4: ...ii ...
Страница 6: ...Piarm Release 1 0 2 CONTENTS ...
Страница 8: ...Piarm Release 1 0 4 Chapter 1 Component List and Assembly Instructions ...
Страница 13: ...Piarm Release 1 0 Assemble the Shovel Bucket to the end of the PiArm with M2x4 screws 2 2 Shovel Bucket 9 ...
Страница 14: ...Piarm Release 1 0 The Shovel Bucket has a rotation range of 90 60 10 Chapter 2 Hardware Introduction ...
Страница 15: ...Piarm Release 1 0 Use range Can t dig water can be used to dig sand and gravel 2 2 Shovel Bucket 11 ...
Страница 17: ...Piarm Release 1 0 Attach the Hanging Clip to the end of the PiArm with the M2x4 screw 2 3 Hanging Clip 13 ...
Страница 18: ...Piarm Release 1 0 The angle range of the Hanging Clip is 0 90 14 Chapter 2 Hardware Introduction ...
Страница 48: ...Piarm Release 1 0 44 Chapter 3 Play with Ezblock ...
Страница 82: ...Piarm Release 1 0 Step 6 Put the control function into the Forever block 78 Chapter 3 Play with Ezblock ...
Страница 91: ...Piarm Release 1 0 3 9 GAME Iron Collection 87 ...
Страница 92: ...Piarm Release 1 0 88 Chapter 3 Play with Ezblock ...
Страница 99: ...Piarm Release 1 0 Step 7 Click the WRITE button 4 1 Quick Guide on Python 95 ...
Страница 146: ...Piarm Release 1 0 Ctrl C At this point you can stop the code with Ctrl C 142 Chapter 4 Play with Python ...
Страница 148: ...Piarm Release 1 0 Yes then Ok Finish 144 Chapter 5 Appendix ...
Страница 152: ...Piarm Release 1 0 Step 4 Double click the connection just created 148 Chapter 5 Appendix ...
Страница 153: ...Piarm Release 1 0 Step 5 Enter Username pi and Password raspberry by default 5 2 Remote Desktop 149 ...
Страница 154: ...Piarm Release 1 0 Step 6 Now you can see the desktop of the Raspberry Pi 150 Chapter 5 Appendix ...
Страница 160: ...Piarm Release 1 0 156 Chapter 5 Appendix ...
Страница 162: ...Piarm Release 1 0 158 Chapter 6 Thank You ...


