


Sun Blade 1000 and Sun Blade 2000 UltraSPARC III Cu CPU Module Installation Guide
25
Finishing the Installation
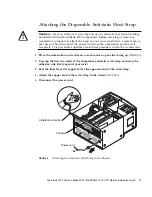
1. Remove the antistatic wrist strap from the chassis.
2. Replace the access panel.
3. Install a lock block on the back panel of the workstation.
4. Reconnect any cables from external devices to the workstation.
5. Reconnect the workstation power cord.
6. Power on the workstation:
a. Turn on power to the monitor and to all external devices.
b. Press the power switch on the front panel and release it.
c. After several seconds, verify that the power-indicator LED on the power switch
is energized and listen to verify that the workstation fans are operating
(spinning).
7. The workstation should automatically recognize installation of the new CPU
module(s).
Note –
Perform a reconfiguration boot
(boot -r)
. If the workstation correctly
boots, the CPU module has been correctly installed.
If problems are encountered, verify proper POST operation. See Section 3.4
“Maximum and Minimum Levels of POST” in the
Sun Blade 1000 and Sun Blade 2000
Service Manual
, 816-3217.
8. If you are returning a used CPU module to Sun Microsystems, return the used
CPU module in the shipping box and packing materials that came with your new
or replacement CPU module.


