


Sun Blade 1000 and Sun Blade 2000 UltraSPARC III Cu CPU Module Installation Guide
21
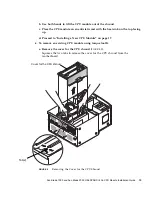
7. Repeat Step 5 and Step 6 until the gap for torque tool B is 0.0 inches (0.0 mm)
See
FIGURE 14
.
Use the torque tool to tighten the left and right captive screws to the correct torque.
Always rotate the left captive screw one turn clockwise and then rotate the right
captive screw one turn clockwise. This assures that a uniform and even torque is
applied to the CPU module.
FIGURE 14
Adjusting Torque Tool B Until the Gap is 0.0 Inches (0.0 mm).
8. Return torque tool B to its green plastic holder, then return the holder to its
storage location in the hard drive bracket.
9. If necessary install the cover for the CPU shroud (
FIGURE 15
).
Torque tool B
0.0 inches
0.0 mm


