14
Sun Blade 1000 and Sun Blade 2000 UltraSPARC III Cu Module Installation Guide • June 2004
■
If you are replacing an existing module and have torque tool B, perform Step 6.
■
If you are installing an additional CPU module, perform Step 7.
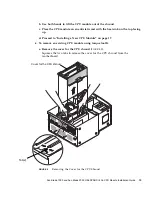
FIGURE 8
Using Torque Tool A to Remove the CPU Module
5. To remove an existing CPU module using torque tool A:
a. Alternately rotate the left and right captive screws one turn counterclockwise
until the screws are free of the threaded inserts
(
FIGURE 8
)
.
Caution –
Do not touch the board for the CPU module or its components. Touch
only the captive screws and plastic top cover of the module to avoid damaging
module components by electrostatic discharge (
FIGURE 11
).
Torque tool A
Right captive screw
Shroud
CPU module
Left captive
screw


