background image

(Dec., 2013)

STULZ CyberRow Chilled Water Series Installation, Operation & Maintenance Manual

1-6

maintenance is performed. The handle of the switch 
may be locked in the “Off” position to prevent 
unintended operation.

1.5.2   Circuit Breakers/Motor Start Protectors

CyberRow units incorporate state of the art component 
protection with the use of motor start protectors and 
circuit breakers. If an overload occurs the switches 
must be manually re-set after the overload condition is 
cleared.

1.5.3   Coil(s)

Cooling coils are aluminum fi nned/copper tube 
construction. The coils are leak tested and cleaned 
before installation by the factory. Condensate drain 
pans are provided to collect water condensed by the 
coils. The drain pans are emptied by a condensate 
pump that directs the water to a pipe stub located 
either at the top or the bottom of the A/C unit 
depending on the piping confi guration (see Sections 
2.7.1.1 and 2.7.1.2). 

A fl oat switch is placed in the lower condensate pan 
to detect if the water level rises. If the condensate pan 

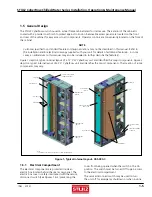
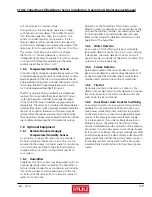
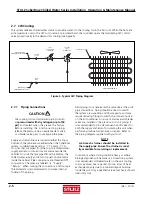
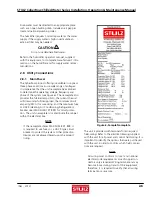
Figure 2- Typical Internal Layout- CRS-180-C

NOTE: 
1. CABINET ACCESS PANELS REMOVED TO SHOW INTERNAL PARTS.

DRAIN PANS

LEVEL ADJUSTMENT 
SCREW (4)

CONDENSATE 
PUMP

EC FAN (3)

HINGED ELECTRIC BOX 

COVER

DISCONNECT 

SWITCH

COIL

AIR FILTERS

SUPPLY / RETURN PIPE 
TRANSITION PLATE

T/H SENSOR

CASTER HOUSING 
(4)

TEMPERATURE SENSORS 
(HIDDEN FROM VIEW)

CW VALVE

HUMIDIFIER

HUMIDIFIER DRAIN 
PUMP

FLOAT SWITCH

fails to drain, the fl oat switch signals the controller to 
annunciate an alarm. 

1.5.4   Condensate  Pump

A condensate pump is factory installed in the lower 
drain pan. The pump automatically eliminates 
condensate water from the drain pan. The pump has an 
internal fl oat switch which turns the pump on and off 
based on the water level.

1.5.5   EC  Fans

The unit is equipped with three high effi ciency, 
Electronically Commutated (EC) fans. EC fans utilize a 
brushless motor equipped with permanent magnets 
and permanently lubricated ball bearings. The fan 
impellers are backward curved and attached to the 
rotor casing. The fan is balanced and aerodynamically 
optimized to minimize vibration. 

The fans do not utilize drive belts. Fan speed is variable 
via a 0 to 10 VDC signal from the system controller. 
The fan motor is equipped with integral electronics and 
does not require the addition of secondary electronics 
such as thermal protection, inverters or fi lters. The fan 

Содержание CyberRow CW Series

Страница 1: ...CyberRow CW Installation Operation and Maintenance Manual Row Based Precision Air Handlers 26 kW 53 kW 60 Hz ...

Страница 2: ...ior written consent of STULZ Air Technology Systems Inc STULZ This document contains confidential and proprietary information of STULZ Air Technology Systems Inc Distributing or photocopying this document for external distribution is in direct violation of U S copyright laws and is strictly prohibited without the express written consent of STULZ Unpublished rights reserved under the copyright laws...

Страница 3: ...ions 2 8 2 8 1 Main Power 2 8 2 8 2 Optional Equipment 2 9 2 8 2 1 Remote Water Detector 2 9 TABLE OF CONTENTS 2 8 2 2 Remote Temperature Humidity Sensor 2 9 2 8 2 3 Remote On Off Control 2 10 2 8 2 4 Remote Power Off 2 10 2 9 Chilled Water System Preparation 2 10 2 10 Settings Adjustments 2 10 2 10 1 Chilled Water Circuit 2 10 2 10 2 EC Fans 2 10 2 10 3 Humidifier Adjustment 2 10 3 0 Start Up Com...

Страница 4: ...1 7 Figure 3 Recommended Installation 2 2 Figure 4 Typical Air Distribution 2 3 Figure 5 Typical CW Piping Diagram 2 5 Figure 6 Sample Nameplate 2 7 Figure 7 Main Display Screen 3 1 Figure 8 User Interface Display Panel 4 2 Figure 9 Controller I O Module 4 3 Figure 10 BMS Interface Ports 4 3 Figure 11 Menu Selections 4 4 Figure 12 Control Inputs Outputs 4 10 Figure 13 Dewpoint Control 4 12 Figure ...

Страница 5: ...meplate to identify which cooling configuration is used with your system NOTE STULZ CyberRow systems have been designed to capture and neutralize heat within close coupled rack based environments Any use beyond what is described in this manual is deemed to be not intended STULZ is not liable for any damage resulting from improper use The functional modes of operation are cooling and dehumidificati...

Страница 6: ...n a conditioned facility are required or if Factory Start up is delayed beyond 180 Days from shipment This STULZ limited warranties do not include diagnostics travel labor circuit breaker resetting refrigerant service and maintenance items consumables including belts filters humidifier canisters or any other expense required to replace the defective component and bring the unit back to a working s...

Страница 7: ...s contained within this manual CAUTION All maintenance and or repairs must be performed by a journeyman refrigeration mechanic or an air conditioning technician CAUTION The unit must be kept in its normal installed position If the unit is not kept level and vertical damage may result CAUTION Never lift any component in excess of 35 pounds without help If a lifting device is used to move a unit ens...

Страница 8: ...nufacturer s Material Safety Data Sheet MSDS prior to using these materials Clean parts in a well ventilated area Avoid inhalation of solvent fumes and prolonged exposure of skin to cleaning solvents Wash exposed skin thoroughly after contact with solvents CAUTION The air intake and discharge areas must be free of obstructions Ensure access panels are secure and latched into position CAUTION Do no...

Страница 9: ...berRow unit and identifies the major components Figure 2 depicts a typical internal layout of a 24 CyberRow unit and identifies the major components The location of some components may vary Figure 1 Typical Internal Layout CRS 090 C DRAIN PANS NOTE 1 CABINET ACCESS PANELS REMOVED TO SHOW INTERNAL PARTS AIR FILTERS HINGED ELECTRIC BOX COVER EC FAN 3 ELECTRIC BOX DISCONNECT SWITCH FLOAT SWITCH SUPPL...

Страница 10: ...NET ACCESS PANELS REMOVED TO SHOW INTERNAL PARTS DRAIN PANS LEVEL ADJUSTMENT SCREW 4 CONDENSATE PUMP EC FAN 3 HINGED ELECTRIC BOX COVER DISCONNECT SWITCH COIL AIR FILTERS SUPPLY RETURN PIPE TRANSITION PLATE T H SENSOR CASTER HOUSING 4 TEMPERATURE SENSORS HIDDEN FROM VIEW CW VALVE HUMIDIFIER HUMIDIFIER DRAIN PUMP FLOAT SWITCH fails to drain the float switch signals the controller to annunciate an a...

Страница 11: ...unit for wiring details specific to your system 1 6 2 Humidifier CyberRow CRS 180 systems may be equipped with an optional electrode steam humidifier The humidifier is factory installed inside the air conditioner and includes fill and drain valves and associated piping to the top or bottom of the cabinet for connecting a source of water and a drain line Operation of the humidifier s fill and drain...

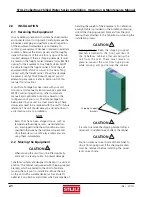
Страница 12: ...y location prior to installation NOTE Items that have been shipped loose such as temperature humidity sensors water detectors etc are shipped inside the air conditioner unless specified otherwise by the customer Unpack and store these items in a safe place unless you are using them immediately 2 2 Moving the Equipment CAUTION When moving the unit it must be lifted vertically and kept in a level po...

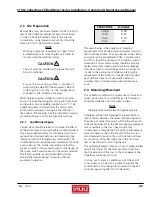
Страница 13: ... thermal resistance to ensure optimum equipment operation STRUCTURE R VALUE Ceiling R 38 Wall R 21 Floor R 19 Door R 5 The vapor barrier is the single most important requirement for maintaining environmental control in the conditioned space The vapor barrier in the ceiling and walls can be a polyethylene film Concrete walls and floors should be painted with a rubber or plastic based paint Doors an...

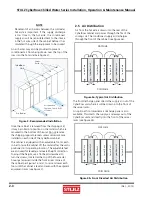
Страница 14: ...ts operating location The adjustable feet are also used for leveling and overall height correction To adjust the height use a flat head screwdriver to turn the screws located at the top of the four caster housings accessed inside the front rear corners of the cabinet per Figures 1 and 2 to raise or lower each foot until the cabinet is level and even with the adjacent equipment racks see Figure 3 2...

Страница 15: ...fitting on one end The harness mates to the fitting on the water detector and connects it to the control terminal block inside the electric box as shown in the wiring diagram provided with your unit 2 6 2 Remote Temperature Humidity Sensor Depending on the type of control selected the temper ature humidity T H sensor may be factory mounted or shipped loose for field installation The remote sensor ...

Страница 16: ...y and return connections are made outside the cabinet On units that are piped from the bottom the chilled water supply and return connections are made inside the cabinet Pipe connections are threaded NPT connections The pipes are labeled i e Supply Return When making the connections a teflon tape thread sealant is recommended to minimize internal fouling of the piping Field piping is not necessari...

Страница 17: ...stalled seal the gaps between the pipes and the cabinet entrance holes so air won t leak around the pipes NOTE Chilled water lines should be insulated to prevent condensation from forming on the pipes if ambient dew point temperatures are higher than the fluid temperatures CAUTION After the interconnecting piping is installed the entire piping circuit must be thoroughly flushed prior to operating ...

Страница 18: ... the fan compartment See the installation drawing provided with your unit for the location Connect the drain line to the fitting so water can be directed to an appropriate place such as an open building drain with an air gap per local and national plumbing codes 2 7 3 Humidifier Optional CyberRow CRS 180 systems may be equipped with an electrode steam humidifier The humidifier empties into its own...

Страница 19: ...oad amps FLA the current the unit will draw under full design load the minimum circuit ampacity MCA for wire sizing and the maximum fuse or HACR Heating Air Conditioning Refrigeration breaker size MAX FUSE CKT BKR for circuit protec tion The unit s nameplate is located inside the cabinet within the electrical box NOTE If the nameplate states MAX FUSE CKT BKR it is required to use fuses or a HACR t...

Страница 20: ...must have a tolerance within 5 and 10 If the measured supply voltage is 230V the unit can operate with a tolerance of 5 if the following change is made The control transformers within the system must have the primary wire connected to its respective 240V tap instead of the 208V tap 2 8 1 3 Three Phase Units Three phase units are designed to have the L1 L2 and L3 supply wires connected to correspon...

Страница 21: ...om the piping system 1 Open a vent valve at highest point of the system 2 Fill the system until the solution is discharging from the vent with minimal signs of foaming due to air in the system 3 Fill out applicable blocks of the Warranty Registration and Start Up Checklist 2 10 Settings and Adjustments 2 10 1 Chilled Water Circuit In a chilled water A C unit cooling is maintained by the flow of ch...

Страница 22: ...the control ler enables its outputs If the actual room conditions are not within the range of the programmed set points the system will begin operating in the mode s needed cooling humidifying dehumidifying to reach the set points Symbols appear in the display to indicate the active operating modes see Section 4 3 6 Temperature and humidity alarms are masked out for 30 minutes to allow for conditi...

Страница 23: ...oints The primary set points entered by the factory still remain stored in the controllers memory as Factory set points The set points for the system may be re adjusted in the Control menu at any time If it becomes necessary the customer may restore the set points back to the Customer Default setpoint values or to the original Factory primary setpoint values in the Service menu See Section 4 5 5 1...

Страница 24: ...isplay equipped with LED illuminated function keys The backlight turns off after 5 minutes of no function key activity The screens that appear on the user interface display panel present data that originates from the controller I O module Figure 9 The controller is operated via a 6 key menu driven loop structure and offers an alarm log plus four different interface menu levels to the operator Info...

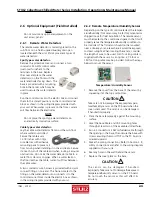
Страница 25: ...t The item numbers that follow coincide with the call outs in Figure 9 1 Connection J10 for interface display panel 2 RS 485 connection for pLAN J11 3 Hatch for BMS or network card 4 Power on LED Yellow 5 Signal LEDs Red Yellow Green 6 Hatch for expansion I O module s 7 Power connector J1 4 1 4 BMS Interface The E2 series controller may incorporate a BMS network card with a communication port Figu...

Страница 26: ...menus may be protected by a built in security protocol and may require the use of a password to gain access Figure 11 Menu Selections 4 2 2 Menus From the Main screen you may press the Program Prg key to select from among the five menus shown in Figure 11 MAIN SCREEN Call STULZ Product Support for Assistance MAIN MENU Control SERVICE Factory MAIN MENU Alarm Log CONTROL Service MAIN MENU Info ALARM...

Страница 27: ...essive use of the Enter key will advance the cursor through the various modifiable fields of the display screen eventually returning to the first field Values that are already correct may simply be skipped over by using the Enter key without modification of the variable The current value if not changed will be retained after pressing the Enter key Values for fields being adjusted will automaticall...

Страница 28: ...o access the requested loop For example if the entered password allows access to level 2 and the Control menu level 1 is requested access will be allowed If the entered password authority level is lower than the level requested the words WRONG PASSWORD will appear for several seconds at the bottom of the screen 4 2 6 2 Wrong Password Enter Password 0 JD 0 Level 0 WRONG PASSWORD The WRONG PASSWORD ...

Страница 29: ...n operating 5 The STULZ logo in the display is replaced with a blower symbol The fans begin operating in stages with five second time delays The middle fan starts first then the upper fan then the lower fan 6 Following a 45 second time delay after the first fan turns on the controller polls the air proving switch If adequate airflow is detected the controller begins proportionally controlling the ...

Страница 30: ...the word Humidity appears in the field at the top of the screen press the Enter key to move the cursor into the setpoint value field Humidity Set Point 45 0 STATUS________________ Hum 45 7 Set 45 0 Dew 51 9 F Increase or decrease the Humidity Setpoint with the Up and Down arrow keys until the desired humidity value is shown Press the Enter key again to accept the setpoint and then press the Escape...

Страница 31: ...u i e Gas Detection Intrusion Alarm etc Upon detection of a customer alarm the controller will activate the summary alarm contact and display a screen message indicating a customer alarm message The screen message Customer Alarm 1 default will appear in the controller display or the user may reconfigure the controller to display any alpha numeric message desired up to 20 characters long in the Ser...

Страница 32: ...enabled Figure 12 Control Inputs and Outputs Digital Inputs Analog Out puts Supply Voltage A D A A A A A D D D D D D D D D D D D D D D D D DX1 Liquid Line Solenoid DX1 Compressor Enable Fan s Enable Humidifier Enable Custom Alarm 1 Summary Alarm A Variable Fan Speed Lower A A Variable Fan Speed Middle A Variable Fan Speed Upper A CW Valve 1 Serial Communications Remote Shutdown Customer Alarm 1 Ai...

Страница 33: ... period of time Decreasing the integral value decreases the interval for the output corrections speeding the rate of adjustment Increasing the integral value increases the interval for corrections slowing the rate of adjustment 4 4 2 Control Methods System operation depends on the controller s programmed operating configuration Control takes place by means of the controller analyzing signal inputs...

Страница 34: ...om a factory set minimum up to a factory set maximum speed The minimum fan speed is used whenever the A C unit has no cooling operations running The maximum fan speed setting is used during times when the A C unit is cooling 4 4 3 Operating Configurations The operating configuration for the controller depends on what type of air conditioner is being controlled i e AR CW W G and what features are s...

Страница 35: ...riable fan speed control for the upper middle and lower zone fans while in the cooling mode With this method the controller continually monitors supply air conditions for each fan zone upper middle and lower as determined by temperature sensors mounted locally to each zone inside the CyberRow cabinet The operator may select from three independent fan speed temperature control methods Variance From...

Страница 36: ...ower source is monitored by a voltage monitor used on 1 phase systems or a phase relay used on 3 phase systems one output of which goes into the power switching circuit and the other output sent to the controller for monitoring purposes Should a power transfer occur the controller provides an alarm message and the alarm display indicates which power source failed 4 5 Menu Screens 4 5 1 Main Menu M...

Страница 37: ...s displayed are used by the controller to develop control output signals for managing system operations Press or Key 01 01 09 00 00 00 00 0 F 00 rh RetT 00 0 F dp 00 0 F Unit ON Continued on next page 4 5 2 3 Return Humidity Sensor Displays the relative humidity as measured by the return T H sensor inputs Return dewpoint is calculated by the controller based on the return T H sensor inputs and the...

Страница 38: ...appears if your unit is configured for static pressure control instead of zone temperature control This screen displays the current operating static pressure The static pressure setpoint and the current proportional control signal to the fans appear below With static pressure control all three fans operate at the same speed and are controlled to maintain a constant static pressure setpoint Press o...

Страница 39: ...n the field to the right of each symbol The controller also displays the temperature value for the sensor from each fan zone The message Var from Avg or Temp Prop appears indicating the system is in a zone cooling control configuration see Section 4 4 4 1 and the unit is in the cooling mode The message in the field is replaced with Dehum when the system is in the dehumidification mode In the dehum...

Страница 40: ...n unchanged until the alarm condition is corrected and the alarm key is pressed again to clear the alarm When access is gained to the Alarm Log loop use of the Up and Down arrow keys allows you to scroll through the log for a history of alarm messages The alarms log may be cleared in the Service Alarm log menu loop The application software supports two 2 types of alarms Non Critical and Critical A...

Страница 41: ...etector No Air Flow CRS 090 units Insufficient airflow as detected by air proving switch Fan Failure CRS 180 units Upper Middle and or Lower fan failure Change Filter Filter replacement time interval elapsed filter needs to be replaced Smoke Fire An alarm condition detected by the smoke detector or firestat High Air Temp Alarm Optional Air temperature is above alarm threshold user configurable Low...

Страница 42: ...e temperature and humidity setpoint control parameters and compare them to system level operating data derived from the various Sensor Transmitter inputs See Section 4 5 4 1 The Alarm Set points ALARM SET screens allow you to enable and adjust the high and low temperature and humidity alarm set points and offsets and compare them to the control set points and to the system level operating data der...

Страница 43: ...g adjustments Fan Control Fan links None Upper Fan Spd Ctrl Var frm Avg Mid Fan Spd Ctrl Var frm Avg Lower Fan Spd Ctrl Var frm Avg If your unit is configured for zone temperature fan speed control instead of static pressure control the Fan Control screen allows you to select a fan speed control method Variance from Average Temperature Proportional or Manual see Section 4 4 4 for each of the three...

Страница 44: ...lled The entered offset applies to both the upper and lower values entered in the Alarm Set points Screens The offset is subtracted when it s applied to the high alarm setpoint and it is added when it s applied to the low alarm setpoint EXAMPLE 1 Temperature Alarm Offset Temperature Alarm Offset 5 0 F STATUS________________ Temp 72 6 F Set 72 0 F Dew 50 1 F If the offset for the temperature alarm ...

Страница 45: ...e to clean or change the air filter The filter change period is adjustable and should be set according to the conditions at the site Extremely dusty environments may require more frequent filter changes 4 5 4 3 Clock Screen CONTROL Alarm Set CLOCK Version The Clock screens may be accessed from the Control menu From this screen you may set the time date and day Set Clock Time 00 00 Date 00 00 0000 ...

Страница 46: ...Dead Band 0 F min deltaT 2 0 F STATUS Temp 73 7 F Set 72 0 F Valve 00 0 The cooling band may be viewed only from the Service Cool menu The CW Prop Band establishes the number of degrees above setpoint for the CW valve to reach fully open The CW Int Time is the integral factor used to adjust the proportional output response The CW Dead Band establishes the range above and below setpoint where P I t...

Страница 47: ...isplayed 0 0 Sensor Offsets Return Air Humidity Apply Offset 0 0 Displayed 0 0 Sensor Offsets Middle Zone Air Temp Apply Offset 0 0 F Displayed 0 0 F Sensor Offsets Upper Zone Air Temp Apply Offset 0 0 F Displayed 0 0 F A Static Pressure Offset screen only appears if your unit is configured for static pressure control Sensor Offsets Static Pressure Sensor Apply Offset 0 0 Displayed 000miwg Additio...

Страница 48: ... the Temp Zone minimum and maximum and the speed setting for the operating mode The higher minimum value is the low speed limit and the lower maximum value is the high speed limit Ex If the Hum Speed is changed to 60 in the Blower Set Up screen and the maximum speed for the Lower Temp Zone fan is set to 75 the fans will run at 60 during humidification 100 0 Off Hum Speed Setting 60 75 Zone Maximum...

Страница 49: ...T H Offset Multiplier Temperature Scale 1 0 Humidity Scale 1 0 Scales effect all the cut in cut out values The Service Options T H Offset Multiplier screen allows you to enter a multiplier to apply to scale both the temperature and humidity cut in cut out offsets The multipliers are factored to the system offset values set in the Service menu Sections 4 5 5 1 and 4 5 5 2 Default Cut in Cut out Off...

Страница 50: ...ER ALARM 3 Customer Alarm2 Text CUSTOMER ALARM 2 The controller may be equipped with up to 2 additional Customer Alarms as an option Customer Alarm Text CUSTOMER ALARM 1 4 5 5 6 7 Custom Alarm Setup The E controller may activate a Custom Alarm output and energize a designated N O N C relay A custom alarm output is set up by adding the binary bitmask numbers assigned to the specific alarms and sign...

Страница 51: ...il 2 2 27 Optional temperature sensor fail 4 4 28 Upper temperature sensor fail 8 8 29 Return humidity sensor fail 16 16 30 DX1 discharge pressure fail 32 32 31 Static air pressure sensor fail 64 64 32 DX1 suction press sensor fail 128 128 Alarms 33 to 40 Sensor Failure Alarms No Description Bit mask Default 33 DX1 suction temp sensor fail 1 1 34 Custom sensor 1 fail 2 2 35 Reserved 4 0 36 Reserve...

Страница 52: ...c The run hours and starts values may be reset to 0 from the display screens The values displayed in each screen are the values logged since the last time the screen was reset 4 30 4 5 5 6 8 Work Group Screens The Service Group display screens shown below only appear if two or more units are wired together as a group They allow you to configure parameters that apply to how the A C units interact i...

Страница 53: ...swords may be changed from the Service Save Cfg menu Customer Save Save Parameters No Restore Parameters To Customer No To Factory No The first Service Save Cfg menu screen allows you to save any adjustments made in Service level menu screens as the new Customer parameters or restore the controller to the previously saved Customer parameters The user may also restore the controller to original fac...

Страница 54: ...y Cut in Offset 5 RH CW valve cuts in at 50 RH Dehumidify Cut out Offset 2 RH CW valve cuts out at 47 RH Dehumidification Fan Speed 60 Fan motor limited to 60 of maximum speed Note 1 Humidify Cut in Offset 5 RH Optional humidifier turns on at 40 RH Humidify Cut out Offset 2 RH Optional humidifier turns off at 43 RH Humidification Fan Speed 100 Fan motor operates at maximum 100 speed Note 1 Passwor...

Страница 55: ...panel allows access to the same data and group control sensor choices that are available from networked system controller display panels 4 6 1 1 Standby If the lead controller in the work group loses a signal acknowledgement from an active A C unit in the group that A C unit is deemed as failed or taken out of service The failed unit will be replaced with the first available standby unit from the ...

Страница 56: ...which again equals 33 NOTE The sum of the controller and terminal address numbers must always equal 33 A work group should ALWAYS start with controller address 1 and go up from there DO NOT skip over controller addresses The list of suitable controller display terminal address pairs is shown below Corresponding Controller to Terminal pLAN Addresses Controller I O board 1 2 3 4 5 6 7 8 Display Term...

Страница 57: ... A message NO LINK will appear Next press the Up Down and Enter keys simultaneously Reconfigure the terminal address following the steps in Section 4 6 2 again This time set the terminal address to match the corresponding controller I O board address If the controller is assigned address 2 then the corresponding terminal address should be set to 31 as shown in the table on the preceding page If th...

Страница 58: ...an examine the entire network set up Press the group set up keys together as done to access the Address Configuration screen but continue holding after the Address Configuration screen appears for at least 5 seconds until the Network Status screen appears The Network Status screen shown below provides overview of the pLAN group indicating which and how many devices are connected and the correspond...

Страница 59: ...ter of the screen press the Enter key to access the Factory Group menu screens From here you may use the Up or Down arrow keys to scroll through the Factory Group menu selections Group Config Unit ACTIVE Total in Network 1 Min Number Active 1 Enb lead override No Lead Unit 1 Display Description Variables Default Unit Assign the duty of the A C unit within the group The duty must be assigned for ea...

Страница 60: ...ndby units It also rotates the role of Lead controller The field will disappear after the role of Lead is rotated to the next A C unit Off On 0 Number of Days Enter the number of days between rotating active units 0 to 999 0 Hour of Day Enter the hour of day for unit rotation to occur 0 to 23 0 Cur Lead Identifies which A C unit controller is currently the lead unit in the group 1 to 8 0 Next lead...

Страница 61: ...delay period for capacity assist unit s to begin operating 0 to 999 300 Cooling Cut in Enter a temperature setpoint offset for cooling capacity assist operation to begin 99 9 to 99 9 1 0 Cut out Enter a temperature setpoint offset for cooling capacity assist operation to stop 99 9 to 99 9 0 0 Factory Group Capacity Assist Screen 4 Capacity Assist Humid Cut in 4 0 Cut out 0 0 Dehum Cut in 4 0 Cut o...

Страница 62: ... together When a group alarm condition is detected by a unit it causes that unit to temporarily switch over from Active to Off and if another unit is available in the group it may rotate into its place A status massage Off by internal alarm will appear in the Main screen of the unit that detected the group alarm and switched off See Section 4 5 5 6 7 for an overview of how to select alarms using b...

Страница 63: ...0 35 Dewpoint 4 0 36 Airspeed 8 0 37 Reserved 16 0 38 Reserved 32 0 39 Reserved 64 0 40 Reserved 128 0 Group Status Off 1 2 3 4 5 6 7 8 C 5 6 7 8 9 0 1 2 T Factory Group Group Status Screen 7 The next screen Factory Group Screen 7 provides an overview of pLAN work group Display Description Variables Default Group Status Indicates if multiple A C unit grouping is enabled On Off 0 C 1 2 3 4 5 6 7 8 ...

Страница 64: ...rating in the capacity assist mode 0 to 8 0 Online Display indicates how many units in the group are currently available to operate 0 to 8 0 Out of Service Display indicates how many units in the group are not available to operate 0 The final step to configure a work group is to access the Service Options Group Setup screens used to configure parameters that apply to how individual A C units inter...

Страница 65: ... at a time only if the unit s currently operating are unable to satisfy the demand 4 6 2 7 3 Capacity Assist 2 Capacity Assist Humid Cut in 4 0 Cut out 0 0 Dehum Cut in 4 0 Cut out 0 0 The second Service Options Capacity Assist screen allows you to adjust local capacity assist humidification and dehumidification set points 4 6 2 7 4 Group Sensors Group Sensors Use lead sensor avg min or max of gro...

Страница 66: ... Sensor Value Local Unit 0 of 0 Lead 1 Press or Key 4 6 2 8 2 Group Alarms This screen only appears when the controller is wired with additional A C unit controllers It displays bitmask values indicating the alarm conditions that will initiate a group internal alarm causing the unit to switch over from Active to Unit Off See Factory Group Group Alarm Setup screen 6 in Section 4 6 2 6 Group Alarm S...

Страница 67: ...onfigured with a CPU address for BMS communication 4 7 1 Direct BMS Control The controller may be configured to accept proportional analog signals that mimics a sensor The controller will act on that signal whether it comes from a real sensor or a BMS analog output Refer to Section 4 9 for the E controller s BMS parameters 4 7 2 BMS Communication SERVICE Alarms BMS Comm Run Hours The Service BMS C...

Страница 68: ... LED off LED on LED flashing Correct operation with or without local terminal Application with error or no pLAN table Application with error or no pLAN table Controller connected to ONLY one terminal Application with correct pLAN table Correct operation in pLAN Awaiting communication with WinLoad factory configuration software Check address LED flashing alternately Communication with WinLoad not v...

Страница 69: ...nt value 0 0 R 4 005 4 Suction pressure S1 act cs 0 0 R 5 006 5 Suction temp S2 act cs 0 0 R 6 007 6 Suction pressure S1 act vfd 0 0 R 7 008 7 Suction temp S2 act vfd 0 0 R 8 009 8 C1 discharge pressure sensor current value 0 0 R 9 010 9 C1 discharge pressure sensor current value 0 0 R 10 011 10 Rotor speed scaled 0 0 100 0 0 0 R 11 012 11 Valve A opening percent 0 0 R W 12 013 12 Average zone sup...

Страница 70: ... 2 131 1002 Middle Fan Speed analog output 0 R 3 132 1003 Rotor speed Hz 0 R 4 133 1004 Rotor Speed rpm 0 R 5 134 1005 HPC analog output 0 R 6 135 1006 Power temperature 0 R 7 136 1007 Frequency 0 R 8 137 1008 Prop humidifier control output 0 R 9 138 1009 Comp error 7 R W 10 139 1010 Cooling analog output 0 R 11 140 1011 Upper fan analog control value 0 R 12 141 1012 Lower Fan analog control value...

Страница 71: ...e 0 Description for Value 1 Description for Value 2 Description for Value 3 Description for Value 4 Description for Value 5 Description for Value 6 Fan link control None Upper Middle Upper Lower Middle Lower All X fan speed control Manual Temperature Proportionate Variance from Average 4 9 3 Boolean Values for HTTP SNMP Modbus Coils Binary Values for BACnet BMS Address Modbus Address BACnet Addres...

Страница 72: ...arm 2 0 R 37 038 37 Customer alarm 3 0 R 38 039 38 Humidifier alarm 0 R 39 040 39 Flow temp sensors CW1 alarm 0 R 40 041 40 Alarm off line power 0 R 41 042 41 Upper Fan alarm 0 R 42 043 42 Lower fan alarm 0 R 43 044 43 Middle fan alarm 0 R 44 045 44 High temperature alarm 0 R 45 046 45 Low temperature alarm 0 R 46 047 46 High humidity alarm 0 R 47 048 47 Low humidity alarm 0 R 48 049 48 High water...

Страница 73: ...ry 0 R W 105 106 105 BMS value to activate lockout function 0 R W 106 107 106 Reset Dirty Filter Alarm 0 R W 4 9 4 Alarm Packed Bit Variables Bit Alarms 1 Alarms 2 Alarms 3 0 Emergency shutdown Middle fan alarm Reserved 1 Remote shutdown Upper fan alarm Reserved 2 Customer Alarm 1 Lower fan alarm Reserved 3 Airflow High temperature Reserved 4 Filter Low temperature Reserved 5 Fire Smoke High humid...

Страница 74: ...0 Remote shutdown Customer alarm 2 1 Customer alarm 1 Customer alarm 3 2 Water Reserved 3 Condensate pan Reserved 4 Humidifier Reserved 5 Moisture Reserved 6 Middle fan alarm Reserved 7 Upper fan alarm Reserved 8 Fire smoke Reserved 9 Lower fan alarm Reserved 10 Dual power input A Reserved 11 Dual power input B Reserved 12 Circuit 1 low pressure Reserved 13 Circuit 1 high pressure Reserved 14 Pump...

Страница 75: ...0 minute span The general procedure is to set up variables like the BMS low fan speed and then write a 1 to the BMS keep alive address If the controller does not see a 2 written to the BMS keep alive address within 10 minutes all the BMS variables will revert to their previous values 4 9 8 Unsigned Values for HTTP SNMP Modbus Holding Registers Analog Values for BACnet BMS Address Modbus Address BA...

Страница 76: ...t turned off at the microprocessor controller To isolate the unit for maintenance turn off power at the main power disconnect switch Always disconnect main power prior to performing any service or repairs WARNING Turn off power to the unit unless you are performing tests that require power With power and controls energized the unit could begin operating automatically at any time To prevent persona...

Страница 77: ... 2 1 and the humidifier operator s manual supplied separately for detailed instructions on changing the cylinder 5 1 6 1 Humidifier Drain Pump The humidifier drain pump located beneath the humidifier should be inspected semi annually and cleaned The same maintenance procedures as detailed in Section 5 1 5 should be performed to properly maintain the humidifier drain pump 5 1 2 EC Fans Periodic che...

Страница 78: ...Decrease temperature setpoint e Discharge air short cycling Place air barrier between hot cold aisles back to return EC Fan s Fail to Start a Power failure Check main voltage power source input cable b Motor starter protector tripped Reset motor starter protector and check amperage of motor against nameplate c Control transformer circuit Check for short circuit or ground fault breaker tripped if n...

Страница 79: ...d the fan s must be manually reset by turning off power for 20 seconds 4 Over temperature of electronics 5 Over temperature of motor Control is Erratic Wiring improperly connected or broken Check wiring against electrical drawing System Fails to Start a Critical alarm condition not cleared Press Alarm key to reset alarm See Section 4 5 3 Humidifier Inoperative a Water supply has been turned off Co...

Страница 80: ...pleted remove all traces of flux After any repair pressurize the system to check for leaks prior to recharging the system 5 3 2 System Repairs Component Replacement Turn off power to the unit at the main power disconnect switch when repairing removing and replacing components Ensure power is turned back on at the main power disconnect switch after repairs are completed All electrical connections s...

Страница 81: ... plugs are secured on the pins If the plugs are loose they may be temporarily squeezed together however the plugs must be replaced since a loose plug could generate enough heat to melt and destroy the plug 15 Replace the steam hose and tighten the clamp s 16 Push the On Off Drain switch to the On position 17 Turn the main power disconnect switch to the On position 18 Turn on the water supply to th...

Страница 82: ...ondensate Pump Replacement The condensate pump is located behind the lower cabinet fan assembly see the figures in Sections 2 7 1 1 and 2 7 1 2 To access the pump the lower fan must be removed as described in Section 5 3 2 2 Screw For Hold Down Bracket Wire ties Cable Loop Discharge Line Pump Pump Hold Down Bracket Cable Splice Wire tie Working in the fan compartment in the front of the cabinet re...

Страница 83: ... UPS ground the customer is responsible for the shipping charges If you do not have established credit with STULZ you must give a freight carrier account number A written or faxed purchase order is required on warranty parts and must be received prior to 2 00 p m for same day shipment The purchase order must contain the following items Purchase Order Number Date of Order STULZ Stated Part Price Cu...

Страница 84: ... Dec 2013 STULZ CyberRow Chilled Water Series Installation Operation Maintenance Manual NOTES ...

Страница 85: ...If manual cut off valve is installed open valve 7 Humidifier On Off Drain switch is in On position 8 Filter s installed 9 Incoming line voltage matches equipment nominal nameplated rating tolerances 10 Main power wiring connections to the equipment including earth ground have been properly installed 11 Customer supplied main power circuit breaker HACR type or fuses have proper ratings for equipmen...

Страница 86: ...Coils Clean Condensate Pump Annually Chilled Water Systems Inspect Chilled Water System For Leaks and Corrosion Conduct a Complete Check of All Services Listed Above Notes ____________________________________________________________________________________________ ____________________________________________________________________________________________________ __________________________________...

Страница 87: ...Hz Hertz IAQ Indoor Air Quality m i w g milli Inches of Water Gauge kVA Kilo Volt Amps kW Kilowatt LRA Locked Rotor Amps MAX CKT BKR Maximum Circuit Breaker MAX FUSE Maximum Fuse MCA Minimum Circuit Ampacity MSDS Material Safety Data Sheet NEC National Electric Code NFPA National Fire Protection Agency PH Phase PI Proportional Integral Control PSIG Pounds Per Square Inch Gauge RLA Run Load Amps R ...

Страница 88: ...equirements STULZ Air Technology Systems Inc 1572 Tilco Drive Frederick Maryland 21704 Phone 301 620 2033 Fax 301 662 5487 E mail info stulz ats com www STULZ com STULZ mission is to be the premier provider of energy efficient temperature and humidity control solutions for mission critical applications Production Facilities U S A Germany Italy China India ISO9001 Registered Quality System ...

Отзывы: