background image

42

BUILD STATUS DISPLAY

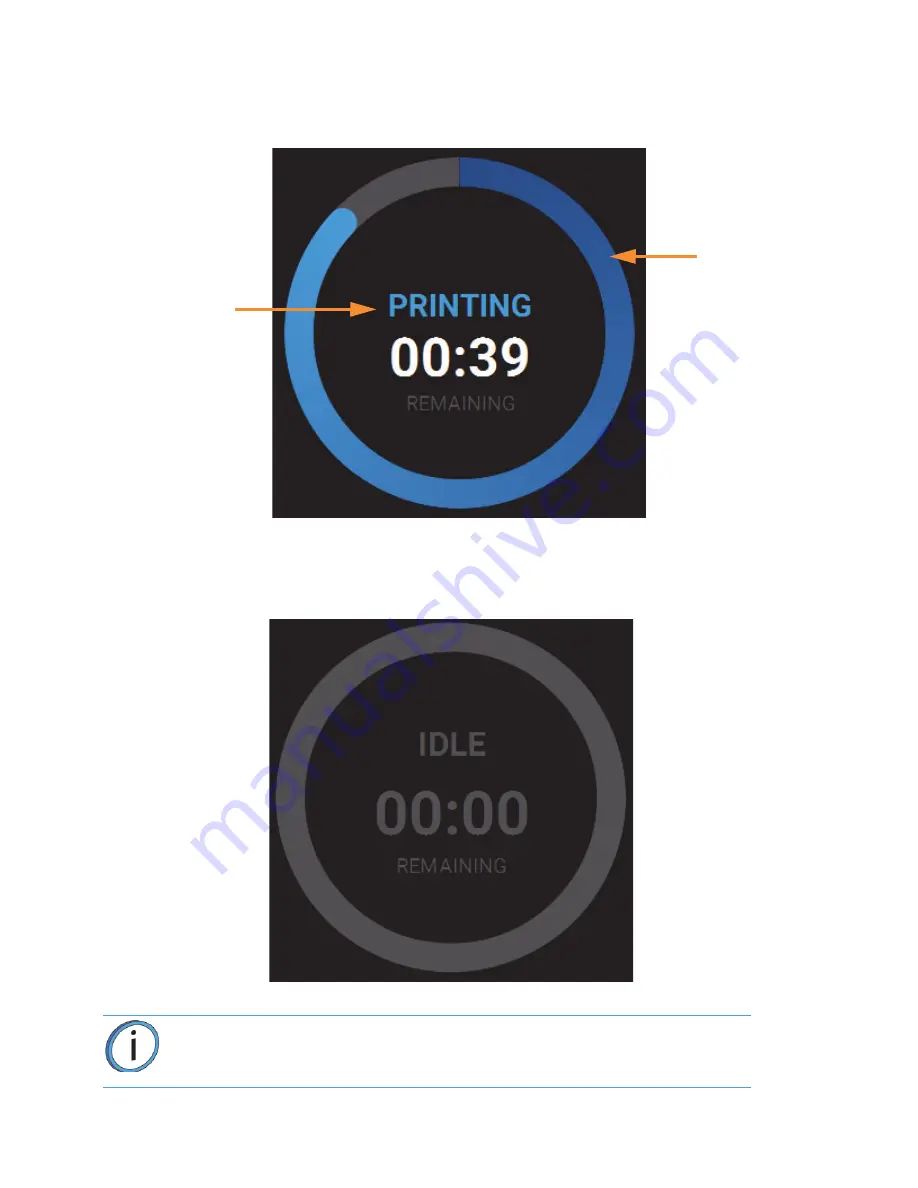
The Build Status Display section of the Build page is composed of a two-part graphic. The center portion 
provides information on a selected and/or building job while the outer progress ring corresponds with the build 
information displayed; the information displayed will vary depending on the state of the printer. 

IDLE

When the printer is idle, "IDLE" will be displayed within the center of the Build Status Display. This indicates that 
the printer is in a state where it is ready to start a build. No progress is indicated within the outer build progress 
ring and the time remaining is displayed as zero.

BUILDING

Note: 

A job file must be loaded onto the printer and selected for building before

build information will be displayed within the Build Status Display. 

Build Status 

Information

Build 

Progress 

Ring

Содержание F170

Страница 1: ...Part No DOC 10001_REV_A F123 Series Shared Office 3D Printers OPERATION AND MAINTENANCE GUIDE ...

Страница 2: ...d This document is protected by copyright No part of this document may be photocopied reproduced or translated into another language without the prior written consent of Stratasys Inc All drawings and information herein are the property of Stratasys Inc All unauthorized use and reproduction is prohibited TRADEMARK ACKNOWLEDGMENTS Stratasys F123 Series F170 F270 F370 Insight GrabCAD and FDM are tra...

Страница 3: ...f waste electrical and electronic equipment The separate collection and recycling of your waste equipment at the time of disposal will help to conserve natural resources and ensure that it is recycled in a manner that protects human health and the environment For more information about where you can drop off your waste equipment for recycling please contact your local city office your household wa...

Страница 4: ...ONS 18 AVAILABLE MATERIALS 19 MINIMUM CLEARANCES 19 OPERATING ENVIRONMENT 19 Safe Environment 19 Environmental Requirements 19 TOOLS WELCOME KIT CONTENTS 20 SAFETY INFORMATION 24 HAZARD TYPES 24 SAFETY SYMBOLS 24 Oven Safety Label Locations 25 Rear Safety Label Locations 26 Electrical Panel Safety Label Locations 26 SAFETY PRECAUTIONS 27 Oven 27 Gantry 27 Z Stage 27 DOOR LOCKS 27 STABILITY PADS 28...

Страница 5: ...59 Loading Material 59 Unloading Material 63 Material Auto Changeover 65 Storing Materials 66 CHANGING HEADS 67 Replacing a Standard Head 67 Replacing a PLA Head 68 TIP CALIBRATION 69 BASIC JOB BUILD TASKS 71 Before a Build 71 Preparing the Printer 71 Selecting a Job to Build 72 Information Available During a Build 73 Build Warnings 74 Pausing a Build 75 Aborting a Build 76 After a Build is Comple...

Страница 6: ...INTENANCE 81 Cleaning the Oven Chamber 81 Cleaning the Platen 81 MONTHLY MAINTENANCE 82 Clean Inspect Tip Wipe Assemblies 82 AS NEEDED MAINTENANCE 84 Cleaning the Exterior Surface of the Printer 84 Cleaning the Touchscreen Display 84 ...

Страница 7: ...m 3D CAD data The F123 Series printers feature a servo belt driven XY gantry with multiple modeling material capability F170 Highlights Envelope Size 10 x 10 x 10 inch 254 x 254 x 254 mm Material Bays 1 model 1 support Touchscreen Graphical User Interface Wi Fi capabilities Three USB ports 2 in front 1 in back Camera for remote monitoring F270 Highlights Envelope Size 12 x 10 x 12 inch 308 x 254 x...

Страница 8: ... Print Software Package A Computer Workstation not sold by Stratasys ACCESS DOORS AND PANELS This printer has been designed to allow easy access to the most frequently accessed areas on the system Warning Do not energize when the rear panel is not secured in place Top Cover Material Bay Drawer Oven Door Interface Panel Front Side Panel left right Storage Drawer Rear Side Panel left right ...

Страница 9: ... MATERIAL BAY DRAWER Allows access to the material bay components material bays material spools and the material drive controllers STORAGE DRAWER Provides a built in area which can be used for miscellaneous storage of spare parts tools etc as needed RIGHT LEFT SIDE PANELS The right and left side panels provide access to the oven chamber fans REAR PANEL The rear panel provides access to the electro...

Страница 10: ...rm calibrations and configure your printer s settings and maintenance options The touchscreen visually displays the operational state of the printer as well as any warning information available POWER BUTTON Allows you to power the printer ON and OFF USB PORTS The printer s USB ports allow you to easily upload job files to be built After plugging a USB flash drive into any of the USB ports you can ...

Страница 11: ...ocks when it is safe for you to access the components of the oven You cannot open the oven door when the printer is building The top cover will automatically unlock in conjunction with the oven door allowing you to manually open the top cover The oven door must be open prior to opening the top cover The oven door gasket which runs around the perimeter of the oven door frame helps to provide an air...

Страница 12: ...sing the GrabCAD Print application installed on your workstation PC you can view the part as it is building allowing you to remotely monitor part build quality Pictures are automatically taken at a set interval via GrabCAD Print Please note that the camera image displayed will include some reflection as a result of the oven door s glass Camera ...

Страница 13: ...o illuminate the oven chamber The light pipe consists of nine high temperature LEDs each LED is rated at 1 watt The oven light is powered by 12 VDC The Light button within the Tools page indicates the current state of the oven light and allows you to manually turn the light ON of OFF Oven Light ...

Страница 14: ... will lock the substrate into its build position pressing down on the handle will release the substrate from the platen for removal The tip offset calibration targets are located on the rear center portion of the platen These targets are used when determining the X and Y offset between model and support tips after either head has been replaced during an automatic Tip Offset Calibration Platen Tip ...

Страница 15: ...blies are mounted behind the purge chute and extend through the purge chute via two slots cut into the chute s exterior After material is purged from a tip the tip passes across the tip wipe assembly The flicker cuts the purged material from the end of the tip and knocks it into the purge chute The brush cleans the tip and tip shield Purged material debris is guided down from the tip wipe assembli...

Страница 16: ... of the oven chamber via the purge chute Material debris exits the purge chute via an opening at the bottom of the chute and then accumulates in the bottom of the oven chamber Accumulated material debris should always be cleaned on a weekly basis or as needed if excessive accumulation occurs Purge Chute Purged material debris will accumulate here ...

Страница 17: ...ds model material while the right bay holds support material While building one model and one support spool will be active An active spool has material filament loaded to the head as indicated by a solid blue pathway between the Material Status Icon and corresponding Head Status Icon a solid blue Head Status Icon and a solid blue border around the Material Status Icon on the touchscreen display Fo...

Страница 18: ...aterial drive controller is a non serviceable item and is instead replaced along with the replacement of a material bay The material drive controller contains a mechanical filament present switch which detects the presence of material within the material drive during the load and unload process This switch also detects errors If the material drive controller detects that filament has broken within...

Страница 19: ... The spool s material type and volume are displayed within the Materials page of the User Interface If a non compatible spool is installed an error will be displayed on the User Interface Each build file contains an estimate of the amount of model and support material required to complete the build When initiating a build this estimate is compared to the amount of material available on each spool ...

Страница 20: ...14 STORAGE DRAWER Directly below the material bay drawer is a storage drawer which can be used to store spare parts or tools as needed Storage Drawer ...

Страница 21: ...open The gantry moves the head in the X and Y directions when building a part The gantry assembly is located under the top cover The entire gantry is outside of the oven only the bottom of the head protrudes into the oven The gantry and its drive motors are thermally shielded from the oven via flexible heat shields To move the head the gantry utilizes one X and two Y servo motors attached to timin...

Страница 22: ...ement head as the head is nearing its odometer limit You can continue using a head which has exceeded its odometer limit but it is highly recommended that you change the head as part quality will be unpredictable The corresponding Head Status Icon will be displayed in its warning state on the User Interface The entire model or support head assembly is replaced as a single unit The Head Release Lev...

Страница 23: ...umber part number and power requirements are given on this tag This tag also lists all patent numbers associated with the printer some FCC compliance information voltage warnings and the Stratasys web address Both tags are located on the back side of the printer near the bottom and are typically placed near the printer s power connection Use the information on these tags when identifying your prin...

Страница 24: ...rounded electrical outlet 2 Connect the female end of the power cord directly into the socket located on the back of the printer Note A 15 foot 4 6m network patch cable is supplied with the printer and located in the welcome kit Facilities having network connection points further from the printer than can be reached by the supplied cable are responsible for the procurement of an appropriate cable ...

Страница 25: ...t containing volatile or flammable compounds ENVIRONMENTAL REQUIREMENTS The F123 Series printer is for indoor use only Air quality conditions with excessive solid particulates conductive or non conductive may result in system damage Air quality conditions in which airborne oils are allowed to accumulate on or within the printer can damage the plastic components System operating temperature shall b...

Страница 26: ...123 Series User Guide this document 2 RJ45 Cable This cable is used to establish a network connection between the F123 Series printer and your Ethernet network 3 USB Flash Drive The printer features 3 USB ports As an alternate method to sending job files to the printer via GrabCAD Print this flash drive can be used to store processed job files which you build frequently 4 AC Cable US or Euro This ...

Страница 27: ...on the head and or tips 3 Needle Nose Pliers 7 1 8 Occasionally you may need to use pliers to aid in the clearing of debris which have accumulated on the head and or tips Please note this item is not included for F170 printers 4 5 Cutters These are used to cut a material spool s filament when unloading and removing materials from the printer 5 Loupe Magnifier This tool is included to aid you with ...

Страница 28: ...Various components of the printer may become dirty and occasionally need to be cleaned Only use a suitable microfiber cloth to clean these components 3 Resealable Bag x6 When unloaded non empty model and support material spools should be stored within these bags to prevent moisture from contacting the spool s filament 4 Nitrile Gloves x10 Gloves used for Y rail lubrication preventive maintenance 5...

Страница 29: ...he surface upon which a part is built The same substrate is used for all model materials including PLA 2 ABS Model Material Spool Material spool containing 60 in3 984 cc of ABS model material 3 QSR Support Material Spool Material spool containing 60 in3 984 cc of QSR support material 4 PLA Material Spool Material spool containing 60 in3 984 cc of PLA material 5 PLA Model Head Print head for use wi...

Страница 30: ... times when you must access areas of the printer where potentially high voltages hot temperatures and or moving mechanical components could cause severe injury Warning Indicates a potentially hazardous situation which if not avoided may result in injury or death Caution Indicates a situation which if not avoided could result in damage to equipment Note Indicates additional information relative to ...

Страница 31: ...d by the symbol you must wear safety gloves provided in the Welcome Kit which have been approved for high temperatures Crushed Hand The crushed hand sign indicates that a hazard exists where you could get your hand crushed between two objects One or more objects move in the area that you are working ...

Страница 32: ...26 REAR SAFETY LABEL LOCATIONS ELECTRICAL PANEL SAFETY LABEL LOCATIONS ...

Страница 33: ...a houses the mechanical drive components of the X and Y axes Use extreme caution whenever accessing this area of the printer Note The printer s servo motors are disabled when the oven door and or top cover are open The XY pinch hazard between the timing belts and pulleys is minimized by locking the oven door and top cover while building and disabling the motors when the oven door and top cover are...

Страница 34: ...neral safety practices when working with this printer Caution The stability pads are used to stabilize the printer after it has been moved to its desired operating location The stability pads must be set prior to printer operation Note Ideally each caster wheel will remain in slight contact with the floor and using minimal force be able to be rotated High Voltage High voltage is present in the pri...

Страница 35: ...t located on the back of the printer 3 Press the Power button located on the front of the printer 4 The printer will begin to boot The touchscreen will turn on and begin initializing 5 The first time the printer is powered ON a dialog will be displayed asking you to select your desired language Select the radio button corresponding to your desired language by touching its row on the screen then co...

Страница 36: ...he Power button located on the front of the printer 3 A dialog will be displayed asking you to confirm the power OFF press Yes to power OFF 4 After a couple of minutes the printer will shutdown Please note that this procedure only powers down the electronics To completely disengage power to the printer you must unplug the power cord located at the rear of the printer Note For extended non use peri...

Страница 37: ...determine the configurable settings displayed within the Network page Selecting the Wired option will allow you to select between a Dynamic or Static network mode Selecting the Wireless option will configure the pinter to use a Wi Fi network You will need to scan for a wireless network and enter the security settings for the selected network if required to complete the configuration Please note th...

Страница 38: ... of the keypad to exit and close the keypad Scroll to the bottom of the page and press the Apply button when finished to save the network configuration Press the Back button in the upper left corner of the page to return to the Network page ...

Страница 39: ...ed IP address will be displayed within the IP Address field of the Network page and corresponding Subnet Mask and Gateway Address information will also be displayed Press the Back button to exit the page and return to the Tools page 7 For wireless networks A The Available Networks row will be displayed Wi Fi dongle must be installed Press anywhere within this row B Press the Scan button the printe...

Страница 40: ...splayed containing the details of the selected Wi Fi network Within this page use the keyboard to enter the password and or username required to connect to the network E When finished touch anywhere on the screen outside of the keypad to exit and close the keypad F Scroll to the bottom of the page and press the Connect button to save the network configuration ...

Страница 41: ...f the selected wireless network will be displayed within the Available Networks row H Press the Back button to exit the page and return to the Tools page The Network button will refresh and a blue indicator will be displayed indicating that the printer is configured for a Wi Fi network ...

Страница 42: ... touchscreen from any other angle may inhibit a clear view of the screen s display The touchscreen is easy to use and allows you to Access material load unload and calibration functions Monitor printer status Monitor material head statuses types loaded installed spool volumes head odometers etc and change materials and or heads when necessary Monitor build progress name of job being built material...

Страница 43: ...ication badge will be displayed within the button indicating a warning related to the functionality of the corresponding page Buttons can appear as follows Navigation Menu Button States After selecting a button from the Navigation Menu a white indicator graphic will be displayed along the left center edge of the button This graphic indicates which Navigation Menu item is currently selected making ...

Страница 44: ...lected job see status and estimated action points for a job in progress and view a visual representation of the completed part Please note that you must load a job file to the printer and select the file to be built before the job s details will be displayed within the Build page The Build page also contains the Notifications Display Depending on the state of the printer a variety of notifications...

Страница 45: ...listed in the Job Queue Job files can be sorted as needed within the Queue page allowing you to select the job you d like to build If you send a single job file to the printer via network transfer using GrabCAD Print the job s details will automatically be displayed within the Build Status Display once the job file is received by the printer as this job will be the only item in the Job Queue The L...

Страница 46: ... The Load File page will display the contents of the USB flash drive Locate the desired job and select it by touching its row on the screen doing so will open its Job Details page Note The Load File button within the Build page allows you to quickly select a single file to build off of a USB flash drive The selected file will automatically be queued for building Note If both USB ports contain a fl...

Страница 47: ...eue button you will be returned to the Build page The Load File button will no longer be visible Instead the details of the selected job file will be displayed within the Print Job Information Panel 7 Pressing the Print button within the Build page will initiate the build Build progress will be displayed within the Build Status Display ...

Страница 48: ...the state of the printer IDLE When the printer is idle IDLE will be displayed within the center of the Build Status Display This indicates that the printer is in a state where it is ready to start a build No progress is indicated within the outer build progress ring and the time remaining is displayed as zero BUILDING Note A job file must be loaded onto the printer and selected for building before...

Страница 49: ...omplete As build progress is made the amount of time remaining will get smaller until zero is reached indicating that the build is complete The build s percentage of completion is also displayed by radially filling in the outer progress ring in blue in a clockwise direction Touching the screen within the center of the Build Status Display while a part is being built will toggle the information dis...

Страница 50: ...page 120 for more information The Print button can appear in the following states Button State Description Printer is in a buildable state AND a selected job is available to build Selecting the Print button will begin the build Print button is disabled and not selectable Printer is not in a buildable state OR a job is not selected available to build i e queue is empty To troubleshoot this issue to...

Страница 51: ...on toggles to display the Play button Selecting the Play button will resume the build If the build was automatically paused as the result of an error a notification will be indicated on the screen Touching the notification text displayed will provide additional details pertaining to the current build state See Build Warnings on page 122 and Build Pause Warnings on page 205 for more information But...

Страница 52: ...t the Job Queue is empty upon initial startup The heading of the Queue page lists the number of jobs currently loaded into the Job Queue Up to three jobs are displayed within the Job Queue list at a given time If the Job Queue contains more than three jobs use the scrollbar to the right of the Job Queue list to scroll up or down through the list of available jobs Pressing the Edit button within th...

Страница 53: ... built Jobs are sent to the printer in CMB format and are placed directly into the Job Queue No additional steps are required to add a job to the Job Queue when sending job files directly to the printer via GrabCAD Print After sending the job file to the printer navigate to the Queue page by pressing the Queue button within the Navigation Menu The transferred job file will be displayed within the ...

Страница 54: ...48 3 Press the Load File button in the upper right corner of the touchscreen 4 The Load File page will be displayed press the USB button within this page ...

Страница 55: ...Add to Queue button this will load the job into the Job Queue Note If any USB port contain a flash drive individual folder graphics will be displayed on the screen representing each flash drive and its contents Touching the folder graphic on the screen will drill down into the folder and display its contents If a single flash drive is installed the job file s located on the flash drive will be dis...

Страница 56: ...50 7 The file will load into the Job Queue Once loading is complete the file will be added to the Job Queue list ...

Страница 57: ...g the Edit button within the Queue page will open the Edit Queue page Using the Job Queue Control buttons found within this page you can sort and or delete the jobs within the Job Queue as needed to ensure the job you wish to build is the first item listed within the Job Queue Pressing the Back button will allow you to exit the Edit Queue page and return to the main Queue page Job Queue Controls ...

Страница 58: ...o the top of the Job Queue list press this button repeatedly until the job appears at the top of the list There is not an option to move a job directly to the top of the list Disabled Move Down Selectable When selectable moves the selected job down one position in the Job Queue list To move a job to the bottom of the Job Queue list press this button repeatedly until the file appears at the bottom ...

Страница 59: ...complete the build Author name of the user that submitted the job Materials model and support materials associated with the job Layers number of layers in the job Slice height slice height associated with the job Version Insight version that the part was compiled with Use the scrollbar along the right side of the page to scroll up or down within the page To close this page and return to the main Q...

Страница 60: ...ete Pressing the Zoom In button within the upper right corner of this portion of the page will hide the job details information and instead zoom in on the representation of the completed part Press the Zoom Out button in the upper right corner of the expanded view display to close the expanded view and return to the Job Details page ...

Страница 61: ...s contained within the Sample Queue will be displayed Overall the functionality of the Sample Queue is the same as that of the Job Queue Additional details for a job can be viewed by opening its Job Details page Within the Job Details page you can view the specifics of the job including build time author material requirements number of layers slice height and Insight version that the job was compi...

Страница 62: ... page this page contains additional information pertaining to the selected head as well as a button for initiating a variety of head maintenance functions Icons will be solid gray or solid blue depending on their status Depending on your printer s configuration either two or four material status icons are displayed within the lower portion of the Display Area These icons represent the model and su...

Страница 63: ...ill be displayed within the heading of the page press this button to return to the main Tools page Within this page you can turn a variety of printer settings on off including part placement standby mode etc select your printer s address type dynamic static or Wi Fi adjust the brightness of the touchscreen display and turn the printer or the oven light on off As a part of its initial installation ...

Страница 64: ...om this page you can preform various printer calibration procedures Maintenance Pressing the Maintenance button opens the Maintenance page From this page you can perform various printer maintenance procedures Network Pressing the Network button opens the Network page From this page you can configure the printer s network connection Power Pressing the Power button opens the Power page From this pag...

Страница 65: ...l than what is available on a single spool you can install a second model and or support spool into the corresponding vacant material bay in order to utilize the auto changeover feature as applicable However it is recommended that you properly store spools that are not in use in order to safeguard against moisture exposure MATERIAL SPOOL PREPARATION The process for preparing a new unopened materia...

Страница 66: ...status information displayed for each of the Materials Status Icons A Material Status Icon with a dashed gray border indicates that a material spool is not present in the material s corresponding material bay A completely gray Head Status Icon indicates that material is not loaded to that head 4 Open the material bay drawer 5 Insert the material spool you d like to load into its appropriate slot w...

Страница 67: ...to be advanced approximately 2 inches 50 8 mm to reach the filament present switch When feeding filament ensure that filament does not fall over the edge of the material spool to avoid cross winding and or load errors The Material Status Icon will refresh and display in its solid gray unloaded state 8 Once filament is detected by the filament present switch press the Load button within the Materia...

Страница 68: ...step also sets the oven temperature to the correct value for the material being loaded Once the tip is within three degrees of the set point temperature the head moves to the purge area and the tip purges a small amount of material 11 Once material is loaded the filament pathway between the Material Status Icon and the corresponding Head Status Icon will be solid blue the Head Status Icon will tur...

Страница 69: ...tus information displayed for each of the Materials Status Icons For a loaded material the pathway between the material s Material Status Icon and corresponding Head Status Icon will be solid blue the Head Status Icon will be blue and the Material Status Icon will display a solid blue border 4 Open the Material Details page corresponding to the material bay you d like to unload by touching its Mat...

Страница 70: ...beyond the filament exit hole 5 Discard the empty spool as it is no longer usable REMOVING A PARTIALLY USED MATERIAL SPOOL 1 Unload filament from the head 2 Once unloaded the material s Material Status Icon will display a solid yellow border with a notification badge over the center of the icon 3 Ensure that the material bay drawer is open 4 Pull up on the latch securing the lid corresponding to t...

Страница 71: ...uild page From the Build page press the Play button to resume building 5 If an error occurs during the auto changeover process the printer will remain paused Navigate to the Materials page by pressing the Materials button within the Navigation Menu Observe the load status for each material The Material Status Icon corresponding to the material spool experiencing the load error will display a red b...

Страница 72: ...desiccant material the desiccant is designed to maintain proper moisture levels for an unopened spool Once the desiccant is exposed to ambient air it can become saturated and ineffective for moisture control Proper handling of the spool after it has been opened is essential to maximizing material life A plastic bag provides an airtight seal to keep moisture from entering the material spool while s...

Страница 73: ...he model and support head The process for replacing a PLA head varies slightly from the process for replacing a standard head 1 Unload material from the head that will be replaced 2 With the printer powered ON open the top cover 3 Depress the release tab and unclip the head ribbon cable for the head that will be replaced model head is on the left support head is on the right 4 Disconnect the mater...

Страница 74: ...bration can occur REPLACING A PLA HEAD The process for replacing a PLA head varies slightly from the process for replacing a standard head The PLA head must be installed into the model head location within the gantry A cooling module is used in conjunction with the PLA model head and must be installed into the support head location The PLA head extrudes both model and support structures To replace...

Страница 75: ...uild parts on the printer until the printer s tips are calibrated Automatic tip calibration can also be initiated from the touchscreen using the following procedure Performing Automatic Tip Calibration 1 Place a new substrate onto the platen and lock the substrate into its build position by lifting up on the substrate ejection handle 2 From the touchscreen navigate to Tools Calibration The printer...

Страница 76: ...me remaining will continually update on the screen 6 Completion of the calibration process will be indicated on the screen press the Finish button within the header of the page when complete Note If calibration fails Failed to calibrate tip offsets will be displayed on the screen You cannot build a part on the printer until the tips have been calibrated Ensure that nothing is blocking the tip or c...

Страница 77: ...ile which is stored on a USB flash drive inserted into one of the available USB ports This method can be used as a backup to the GrabCAD Print method if you are unable to transfer job files to the printer via your network connection due to poor connectivity a network outage etc and provides a convenient option for you to reprint a common job Alternatively you have the option of selecting a single ...

Страница 78: ...aphic the imaginary box surrounding the part Select the job s build location by dragging and dropping the bounding box on the touchscreen When finished press the Print button within the dialog to confirm your selected placement and start the build 5 The Build page will open and the oven will begin to heat to a set point temperature determined by the material types specified for the job Please be p...

Страница 79: ...of this graphic provides information on a selected and or building job Text pertaining to the current status of the build is displayed within the upper portion of the graphic while the amount of build time remaining is displayed within the lower portion of the graphic The outer Build Progress Ring corresponds with the build information displayed As build progress is made the build s percentage of ...

Страница 80: ...starting a build When starting a build you may encounter a variety of warnings pertaining to the printer s current materials configuration If the printer has not been calibrated the materials installed within the printer do not match the requirements of the build or the printer does not contain enough material to complete the build you will receive a warning instructing you to resolve this issue I...

Страница 81: ...e Touching the text on the screen will open a dialog indicating the reason for the pause condition i e empty material spool Correct this condition and then press the Close button to exit the dialog 2 The Pause button will toggle and instead display the Play button To resume building press the Play button A resume command will be sent to the printer instructing it to resume the build 3 Once the bui...

Страница 82: ...ption of directly aborting the build To do so 1 The Abort button within the Build page will be selectable press the Abort button 2 A dialog will be displayed allowing you to confirm or cancel the abort press the Accept button within the dialog to confirm the abort ...

Страница 83: ...age will refresh and display a confirmation of the aborted build CANCELLED will be displayed within the Build Status Display 5 The Print Job Control buttons will be hidden and instead Print aborted will be displayed within this portion of the Build page Touching this text on the screen will open a dialog with instructions on how to remove the aborted build and prepare for your next build ...

Страница 84: ...b Control buttons will be hidden and instead Print successful will be displayed within this portion of the Build page Touching this text on the screen will open a dialog with instructions on how to prepare for your next build The Build button will display a green checkmark icon indicating that the build completed successfully Note If the build was terminated abnormally a warning indicator will be ...

Страница 85: ...ubstrate 3 Remove the substrate from the platen 4 Carefully remove the part from the substrate Warning Wear proper safety equipment when handling items inside the oven as surfaces within the oven can be very hot Caution Do not attempt to remove a part from the substrate while the substrate is on the platen Damage to the platen or platen level may occur ...

Страница 86: ...regional Stratasys office Maintenance Schedule Replacement Consumables Warning Always wear proper heat protective clothing when working inside the oven Weekly Monthly As Needed Maintenance Task X Clean the oven chamber X Clean the platen X Clean Inspect the tip wipe assemblies X Clean the exterior surface of the printer X Clean the touchscreen display Part Number Description 123 00300 Model Head s...

Страница 87: ...lation occurs vacuum the oven chamber as needed CLEANING THE PLATEN The steel platen provides the level surface on which parts are built see Figure 3 7 on page 26 for platen overview A substrate is securely affixed to the platen by the substrate ejection handle If debris collects on the platen it can adversely affect substrate adhesion 1 Remove the substrate from the platen Push down on the substr...

Страница 88: ...ting in clumping clumped bristles cannot properly clean a tip or its tip shield The tip wipe assembly should be replaced once a significant notch develops within the flicker portion of the assembly or whenever bristle clumping which cannot be removed with a brush is apparent within the brush portion of the assembly The tip wipe assembly is replaced as a single unit To clean the tip wipe assembly a...

Страница 89: ...rn and should not contain significant bristle clumping Frayed bristles are acceptable as long as the top edge is even across all of the bristles 8 Replace one or both of the tip wipe assemblies if excessive wear is present The components of the assembly cannot be replaced individually The entire tip wipe assembly must be replaced if excessive wear is present on the flicker or the brush 9 Reinstall...

Страница 90: ...d to remove smudge marks and buildup clean the touchscreen display using the LCD cleaner and microfiber cloth provided in the Welcome Kit Apply an adequate amount of LCD cleaning solution to the provided microfiber cloth and then gently wipe the exterior surface of the touchscreen display to clean its surface It is recommended that you apply LCD cleaner to the microfiber cloth rather than applying...

Страница 91: ...epresentative or visit www stratasys com DOCUMENTATION FEEDBACK Customers resellers and Stratasys employees are encouraged to send comments about our documentation and training to c support stratasys com We greatly value your comments review all of them and use them to improve subsequent releases of the documentation In your email message please include the document title part number located on th...

Отзывы: