6934900000
19
4. Short Life of Torch parts
a. Oil or moisture in air source
b. Exceeding system capability (material too thick)
c. Excessive pilot arc time
d. Air flow too low (incorrect air pressure)
e. Improperly assembled torch
f. NON- genuine manufacturer parts
INSPECTION AND REPLACEMENT
CONSUMABLE TORCH PARTS
WARNING:
ALWAYS
DISCONNECT
INPUT
PRIMARY
SUPPLY!!!
Disconnect primary power to the system before
disassembling the torch or torch leads
DO NOT
touch any internal torch parts while the
AC indicator light of the power supply is ON.
Remove the consumable torch parts as follows
NOTE
The shield cup holds the tip and the starter
cartridge shield cup in place. Position the torch
with the shield cup facing out when the cup is
removed.
1. Unscrew and remove the shield cup from the
torch
NOTE
Slag build-up on the shield cup that cannot be
removed may effect the performance of the
system.
2. Inspect the cup for damage. Wipe it clean or
replace if damaged
Consumables parts
3. Removed the tip. Check for excessive wear
(indicated
by
an
elongated
or
oversize
orifice).Clean or replace the tip if necessary.
4. Remove the starter cartridge. Check for
excessive
wear
plugged
gas
holes,
or
discolouration. Check the lower end fittings for free
motion. Replace if necessary.
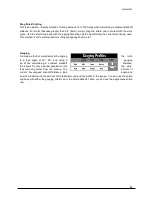
5. Pull the electrode straight out of the torch head.
Check the face of the electrode for excessive
wear. Refer to the following figure.
6. Re-install the electrode by pushing it straight
into the torch head until it clicks.
7. Re-install the desired starter cartridge and tip
into the torch head
8. Hand tighten the shield cup until it is seated on
the torch head. If resistance is felt when installing
the cup, check the threads before proceeding.
GUIDE FOR THE FAULTS and SOLUTIONS
This subsection covers troubleshooting that
requires
disassembly
and
electronic
measurements. It is helpful for solving many of the
common problems that can arise with this torch
assembly.
-
HOW TO USE THIS GUIDE
The following information is a guide to help the
customer / operator determine the most likely
causes for various symptoms.
This guide is set up as follows:
X. symptom (bold type)
Any special instruction (text type)
1.
Cause (italic type))
a. Check/remedy (text type/underlined)
Locate your symptom, check the causes (easiest
listed first) then remedies. Repair as needed being
sure to verify that unit is fully operational after any
repairs.
-
Troubleshooting
-
A. torch will not pilot when switch is
activated
1.red led always on.
Содержание THOR 123
Страница 23: ...6934900000 23 WIRING DIAGRAM THOR 123...
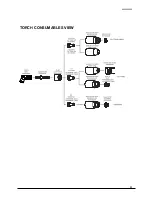
Страница 25: ...6934900000 25 TORCH CONSUMABLES VIEW...
Страница 29: ...6934900000 29 Info www stelgroup it tel 39 0444 639525...


