GX1100E
Page 46
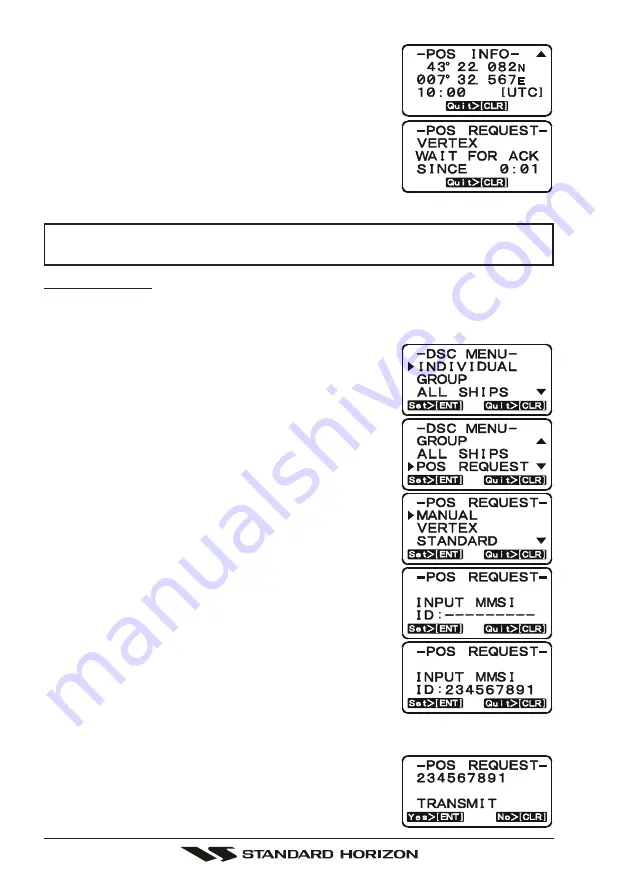
8. Press the [
T
(
DOWN
)] key to show the position
from the polled vessel transferred on the display.
9. If the
GX1100E
does not receive a reply, the dis-
play will be as shown in the illustration on the right.
To send again, press the [
ENT
] key.
NOTE
If the
GX1100E
does not receive position data from the polled vessel, the
LCD will show “NO POSITION DATA.”
Manual Request
You may enter an MMSI number manually to contact without the Setting up the
Individual / Position Call Directory.
1. Press the [
CALL
(
MENU
)] key. The “
DSC MENU
DSC MENU
DSC MENU
DSC MENU
DSC MENU
”
will appear in the display.
2. Press the [
S
(
UP
)] / [
T
(
DOWN
)] keys to select
“
POS REQUEST
POS REQUEST
POS REQUEST
POS REQUEST
POS REQUEST
”.
3. Press [
ENT
] key to show the Position request di-
rectory. This directory uses the INDIVIDUAL Di-
rectory information.
4. Press the [
S
(
UP
)] / [
T
(
DOWN
)] keys to select
the “
MANUAL
MANUAL
MANUAL
MANUAL
MANUAL
”, then press the [
ENT
] key.
5. Press the [
S
(
UP
)] / [
T
(
DOWN
)] keys to scroll
through numbers, 0-9. To enter the desired num-
ber and move one space to the right press the
[
ENT
] key. Repeat this procedure until all nine
space of the MMSI number which you want to con-
tact are entered.
6. If a mistake was made entering in the MMSI num-
ber repeat pressing the microphone’s [
H/L
] key until
the wrong nunber is selected, then press the
[
S
(
UP
)] / [
T
(
DOWN
)] keys to correct the entry.
7. When finished entering the MMSI number, press
and hold the [
ENT
] key.
8. Press the [
ENT
] key to transmit the position re-
quest DSC call.
9. When the
GX1100E
receives the position from the
polled vessel, the
GX1100E
will produce a ringing
Содержание Eclipse DSC+ GX1100E
Страница 15: ...Page 15 GX1100E Figure 4 Controls and Connectors ...
Страница 29: ...Page 29 GX1100E MEMO ...
Страница 66: ...GX1100E Page 66 14 4 GX1100E DIMENSIONS ...


