background image

Page 72

CP500

R

WAAS  3D

02:00

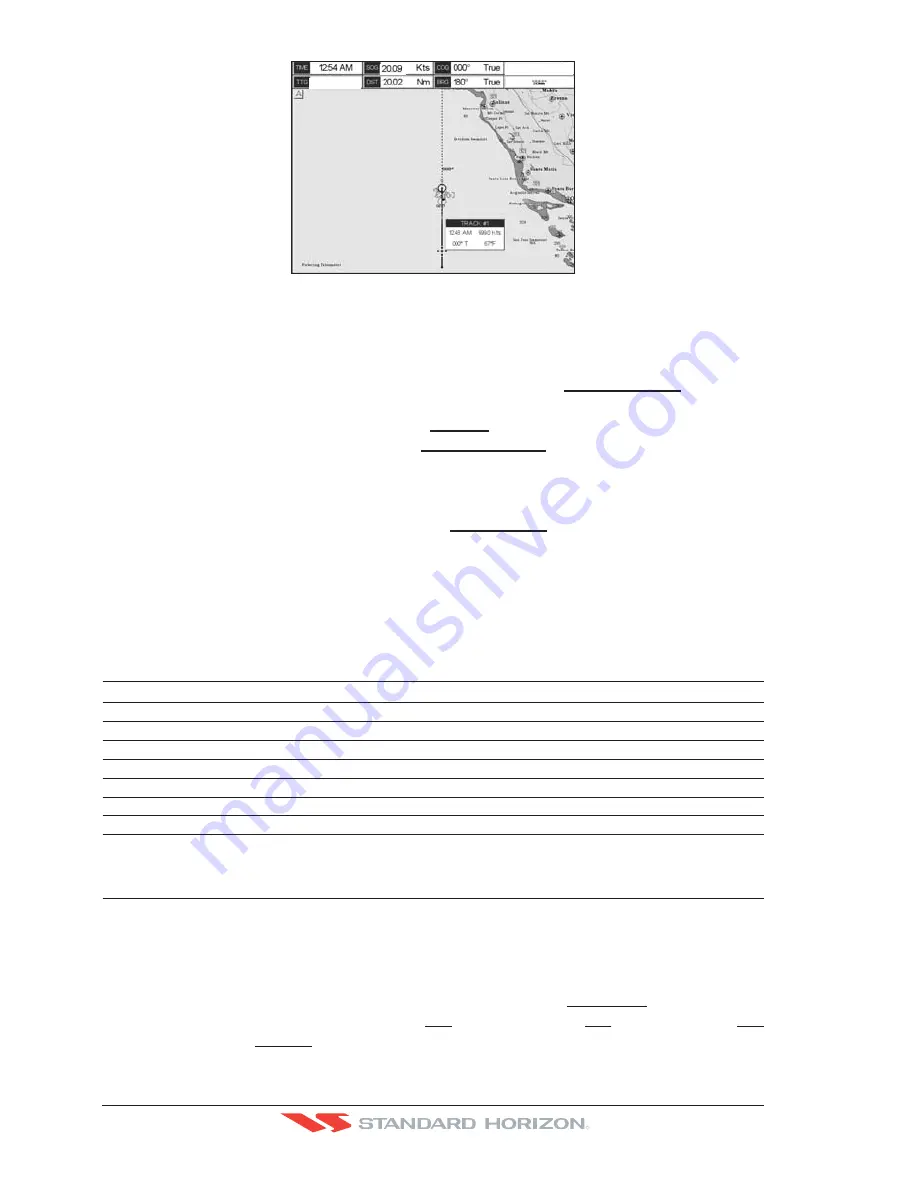
Figure 10.0 - Tracking

10.0.0 Saving and starting a new Track

A Track is automatically saved to memory. To start a new Track:
1. Press 

[MENU]

. Move the ShuttlePoint knob to highlight 

USER POINTS

 and press

[ENT].

2. Move the ShuttlePoint knob to highlight 

TRACK

 and press 

[ENT].

3. Move the ShuttlePoint knob to highlight 

ACTIVE TRACK


and press 

[ENT] 

or move the

ShuttlePoint knob to the right.

4. Move the ShuttlePoint knob up/down to select the next available open Track and press

[ENT]

 or move the ShuttlePoint knob to the right.

5. Move the ShuttlePoint knob to highlight 

TRACKING 

and press 

[ENT]

. Move the

ShuttlePoint knob to set On and press 

[ENT]

.

6. Press

 [CLR]

 or move the ShuttlePoint knob to the left until the Chart page is shown.

7. A new Track now will be laid down.

10.0.1 Other Settings in Track Menu

You will notice the Track


Menu has other selections:

TRACKING

Allows turning on or off the tracking function

ACTIVE TRACK

This selection allows you to save a Track to one of the 5 Tracks available

VISIBLE

Shows or hides a Track shown in ACTIVE TRACK menu

LINE COLOR

Selects the color of the Track line

DELETE

Deletes a Track selected in the ACTIVE TRACK menu

STEP UNIT

Allowable selection are Distance or Time

DISTANCE

User adjustable Distance interval of when Track point is laid down on the Chart page.

TIME

User adjustable Time interval of when Track point is laid down on the Chart page.

10.1 USING THE TRIP LOG

On the Chart, Navigation, Highway and NMEA Data pages the windows may be customized
to show TRIP LOG information.
1. Select one of the pages listed above, press and hold

 [MENU]

. You will notice one of the

data boxes will be highlighted.

2. Press

 [ENT]

 and move the ShuttlePoint knob to highlight  

TRIP LOG

, press 

[ENT]

.

3. A popup window will be shown with 

Nm 

(Nautical Mile), 

Sm 

(Statute Mile), 

Km

(Kilometer) and 

RESET

. Move the ShuttlePoint knob to select the desired units of

Содержание CP500

Страница 1: ......

Страница 2: ...CP500 12 WAAS GPS Chart Plotter Owner s Manual GPS Chart Plotters R ...

Страница 3: ...ewiththeinstructionsmaycauseharmfulinterference with radio communications There is no guarantee that interference will not occur in a particular instance If this equipment does cause harmful interference to other equipment try to correct the problem by relocating the equipment Consult an authorized STANDARD HORIZION dealer or other qualified service technician if the problem cannot be corrected Op...

Страница 4: ...ng of the GPS Chart Plotter screen is a very important operation and must be done carefully Since the surface is covered by a antireflective coating the procedure for cleaning all the surfaces can be performed using the following procedure you need a tissue or lens tissue and a cleaning spray Windex containing Isopropanol a normal spray cleaner sold for the PC screen for example PolaClear by Polar...

Страница 5: ...Page 6 CP500 R ...

Страница 6: ...1 Cursor Vs Home mode 24 3 1 2 Cursor and Menu selection speed 24 3 1 3 Changing the Ship Icon 25 3 1 4 Changing the backlight and contrast 25 3 1 5 Selecting North Up or Course Up 25 3 2 AUTOMATIC TIME 26 3 3 SELECTING LORAN TD OR OTHER COORDINATE SYSTEM 27 3 4 CHANGING THE CHART COLOR 28 3 5 SELECTING LANGUAGE 28 3 6 SELECTING PAGES WITH SOFT KEYS 29 3 7 CUSTOMIZING THE SOFT KEYS 30 3 8 OTHER SE...

Страница 7: ... 56 7 1 1 Moving a Mark or Waypoint 56 7 2 MARKS WAYPOINTS LIST 57 7 3 CREATING MODIFY A NEW MARK IN THE USER POINTS LIST 58 7 4 GOTO CURSOR ROUTE AND MARK 59 8 MAN OVER BOARD MOB FUNCTION 61 8 0 PLACING A MOB POINT 61 8 1 DELETING A MOB POINT 61 9 ROUTES 63 9 0 CREATING A ROUTE USING WAYPOINTS 63 9 1 CHANGING NAME TO A ROUTE 63 9 2 CREATING AN OLYMPIC ROUTE 64 9 3 MAKING ADDITIONAL ROUTES 65 9 4 ...

Страница 8: ...jects Settings 84 12 1 CUSTOMIZING CHART SETTINGS 85 12 2 NAVIGATION PAGE 85 12 3 HIGHWAY PAGE 86 12 4 CELESTIAL PAGE 87 12 5 GPS STATUS PAGE 88 12 5 0 WAAS EGNOS Setting 88 12 5 1 GPS Setup Menu 88 12 6 NMEA DISPLAY PAGE 89 12 7 NMEA DATA PAGE 90 12 8 NMEA TREND PAGES 91 12 9 VHF DIGITAL SELECTIVE CALLING 91 12 9 0 DSC Distress Call 92 12 9 1 Position Request 92 13 ADVANCED SETTINGS 93 13 0 INPUT...

Страница 9: ... alert is received 105 16 4 PLACING CURSOR ON THE PTX ICON 106 16 4 0 Delete PTX 106 16 4 1 Goto PTX 106 16 4 2 The MOBILARM Alarm Status List 107 17 TROUBLESHOOTING 109 18 TECHNICAL TESTS 111 18 0 SYSTEM TEST 111 18 0 0 RAM Menu reset 111 18 0 1 DIM Menu 111 18 0 2 Cartridges used by Standard Horizon Technicians 112 18 0 3 Serial Ports used by Standard Horizon Technicians 112 19 SPECIFICATIONS 11...

Страница 10: ...er include 12 inch sunlight viewable display Full VGA 800 x 600 high resolution LCD WAAS GPS antenna with 15 meter of cable 2 Video camera or DVD NTSC or PAL inputs 1 VGA video output connects to compatible TV or monitor Customizable picture in picture video window Dual Frequency Fish Finder capable with optional FF525 or FF520 and transducer Capable of using a RADAR Antenna USA ONLY Dual chart wi...

Страница 11: ...s DST527 In hull Mount Depth DST528 Thru hull Long stem Depth Temp 600W Transducers F 525 Fish Finder F ACVC10 Video Adapter cable VGAC10 VGA Adapter cable Dual Frequency Fish Finder Dual Frequency Fish Finder 1 3 RADAR UNIT SUPPLIED BY SI TEX USA The Radar antenna will be supplied by SI TEX in USA only and the part code is as follows MODEL NUMBER DESCRIPTION MDS 1 2kW 24 Mile 12 4 diameter Radome...

Страница 12: ...ow are pictures showing actual examples of the two types of installation BRACKET Mount FLUSH Mount 2 1 BRACKET MOUNTING Before installing ensure the area the bracket is mounted to is strong enough to support the weight of the GPS Chart Plotter especially while under way After the location is found attach the mounting base to the area using the supplied hardware The CP500 is supplied with a flush m...

Страница 13: ...ntenna in the desired location to verify correct operation If mounted close to Radar after the GPS Chart Plotter has a fix turn on the Radar to ensure the GPS Chart Plotter holds the fix use the GPS Status Page The thread used on the antenna is an industry standard 1inch 14TPI used on a wide range of mounting brackets NOTE The antenna cable can be cut and spliced to ease installation Care must be ...

Страница 14: ...o protect the NMEA Output Input circuits from becoming damaged however it can also be installed in the red wire 2 Two Accessory cables exactly the same cable are supplied with the CP500 3 Connect one of the Accessory cables to the PWR ACC 1 connector on the rear panel The other Accessory cable is used to connect to ACC 2 connector 4 This cable has many wires however only the RED and BLACK wires ar...

Страница 15: ... Common ground for NMEA devices Connect to Output of NMEA device Connect to Input of NMEA device Default is NMEA 0183 with GLL RMB RMC and XTE sentences Connect to Output of NMEA device Connect to Input of NMEA device Default is NMEA 0183 with GLL RMB RMC and XTE sentences Connect to Input of NMEA device Default is NMEA 0183 with APA APB XTE COG and BOD sentences Dual Frequency Fish Finder Dual Fr...

Страница 16: ...The CP500 uses NMEA WPL and RTE sentences to share information from the PC Refer to the table below for connection to a Serial DB9 connector Receive Transmit Signal Common D 9 PIN B C 500 P NMEA Out NMEA In Green wire 2 3 5 CONNECTION SETTING UP THE COM PORT The Send and Receive default is Port1 To change the Port follow the directions below 1 Press MENU twice Move the ShuttlePoint knob to highlig...

Страница 17: ...horizon com and click on Owner s Manuals and click to down load files called Radar Installation Manual and Radar Operation Manual VHF Connections To connect the CP500 to a VHF a port will be needed to be selected Refer to the ACC 2 connections for a connection example NOTE The optional FF525 or FF520 uses port 2 when connected and the optional Radar antenna uses port 5 When these optional devices ...

Страница 18: ...ollowing options ACTIVATE VIDEO the possible choices are Full Screen View PiP Picture in Picture View and Auto Switch If Full Screen Viewis chosen the GPS Chart Plotter will show a warning message with the instructions to adjust the image from the Video Input If the user agrees to proceed the image from the video input will be shown If Picture in Picture PiP View is chosen a Video Input image can ...

Страница 19: ...pressing CLR for 1 second Pressing and holding CLR for 1 second from the Chart page Display or from any main page Navigation Highway Celestial GPS Status DSC NMEA DISPLAY the following Soft Keys are shown FULL SCREEN PIP VIEW AUTO SWITCH If no video signal is detected on the Video Input connector the Soft Keys will be shown in gray and will not be selectable c Quick Activation by Soft Keys It is p...

Страница 20: ... quickly and accurately b It also scrolls the desired option in the menu page s It changes the GPS Chart Plotter from Home mode to Cursor mode on the chart screen c For a detailed explanation of Cursor VS Home mode refer to Par 3 1 1 The ENT key Press ENT to select the desired option or to confirm selection The CLR key a Press CLR to set Home mode b Press CLR to exit from menu or data windows or t...

Страница 21: ...art The Soft Keys The 6 keys in the bottom of the front panel hereinafter named Soft Keys have different functions associated depending on the software their labels are shown on the screen immediately above the keys the user can customize the function associated Figure 3 0 Soft Keys These keys allow quick selection to the many pages the GPS Chart Plotter has These keys can be customized to your pr...

Страница 22: ...turned on two pages the start up page see the following picture and the Caution page are briefly shown before the GPS Status page Figure 3 1 0 Start Up page 3 When the GPS Chart Plotter is first turned on it will take some time for the GPS to acquire a fix of your position Look closely at the GPS Status page and you will see satellites and relative signal strengths After a fix is received the GPS ...

Страница 23: ...nd Menu selection speed The GPS Chart Plotter allows you to control the speed the Cursor moves when the ShuttlePoint knob is pressed To change the speed Figure 3 1 2 Cursor Speed menu 1 Press MENU Move the ShuttlePoint knob to highlight SETUP MENU and press ENT 2 Move the ShuttlePoint knob to highlight GENERAL SETUP and press ENT or move the ShuttlePoint knob to the right 3 Move the ShuttlePoint k...

Страница 24: ...int knob to the left to exit the menu and show the Chart page 3 1 4 Changing the backlight and contrast With the GPS Chart Plotter is turned On briefly press PWR to show the backlight and contrast popup window Move the ShuttlePoint knob to the left or right to adjust the LCD backlight intensity or up or down to change the LCD contrast Press ENT to set Figure 3 1 4 Backlight and Contrast adjustment...

Страница 25: ...e Chart page indicating the direction of North 3 2 AUTOMATIC TIME The time information supplied by the GPS satellites is in Universal Time Coordinates UTC or Greenwich England Mean Time To change the GPS Chart Plotter to read the correct time first you must figure out the offset and if it is daylight savings time For example on the West coast of theUnitedStatesorPacificStandardTimetheoffsetneededw...

Страница 26: ...ime offset is automatically changed 8 Press CLR or move the ShuttlePoint knob to the left until the Chart page is shown 3 3 SELECTING LORAN TD OR OTHER COORDINATE SYSTEM The GPS Fix coordinates can be changed to show Latitude Longitude Loran TD s or UTM Below is the window that will appear when customizing the Coordinate System Figure 3 3 Coordinate System menu 1 Press MENU Move the ShuttlePoint k...

Страница 27: ...LANGUAGE To ease operation in different countries the software includes translation and display of the following 15 languages US English Italian French German Spanish Norwegian Swedish Portuguese Chinese Traditional Danish Dutch Greek Finnish Russian Chinese Simplified The translations are included in Menu descriptions Soft Key labels and on Info Functions to ease operation See also Par 6 0 7 Sets...

Страница 28: ...t knob to highlight the first top selection in the menu and press ENT c A language window will be shown press ENT select your language and press ENT 3 6 SELECTING PAGES WITH SOFT KEYS The Soft Keys located under the LCD are used to select the pages quickly without the need to go into the menu The default pages are VIDEO NAV HIGHWAY CELESTIAL CHART and LIST When one of the Soft Keys is pressed popu...

Страница 29: ...above settings 3 Move the ShuttlePoint knob up or down to select the desired page 4 Press ENT or move the ShuttlePoint knob to the right to save the page to the selected Soft Key 3 8 OTHER SETTINGS IN GENERAL SETUP MENU The GENERAL SETUP menu has other selections that allow you to customize TIME SETUP Selects a sub menu to allow the time setup It is possible to choose the Time Zone select the Dayl...

Страница 30: ...This menu selection allows the data windows to be customized on the Chart and Navigation pages LANGUAGE Allows changing the language for menus and data screens AUTO INFO By default when the cursor is moved over a buoy Mark or other item a popup window will show information of the item This menu item allows the window to be turned On or Off CURSOR WINDOW By default when the cursor is moved a window...

Страница 31: ...Page 32 CP500 R ...

Страница 32: ...ES and press ENT or move the ShuttlePoint knob to the right 3 A popup window will be shown with a list of different Port Services In the table below is shown the list of the available Port Services Figure 4 0 0 Port Services Table 4 Move the ShuttlePoint knob to highlight the desired type of service and press ENT 5 Another popup window will appear displaying the distance and position of the servic...

Страница 33: ... show the actual position of the Port on the Chart page 7 Press CLR again at any time to return your cursor to your vessels position WAAS 3D Figure 4 0 1 Find a Port 4 0 2 Tide Stations This feature is used to locate Tide Stations nearest the position of your vessel Once a Tide Station is selected the Tide Graph can be used to determine Tide height and draught of the Tide based on a user specified...

Страница 34: ...ntheTideGraph 1 MovingtheShuttlePointknobtotheleftorrightchanges the time moving the ShuttlePoint knob up or down selects the Tide height and Tide draught on the Tide Graph NOTE The Local Offset matchs the Time Offset entered in the Time Setup menu see Par 3 2 4 0 3 Wrecks This feature is used to locate Wrecks nearest the position of your vessel A Wreck is represented with an icon on the chart see...

Страница 35: ...st the position of your vessel An Obstruction is represented with an icon on the chart see the following table snag stump wellhead diffuser crib fish haven foul ground ice boom ground tackle foul area ICON DESCRIPTION F o u l Obstn 46 Obstn Wk Mast 1 2 Figure 4 0 4 Obstruction icons Table 1 Press INFO 2 Move the ShuttlePoint knob to highlight OBSTRUCTIONS and press ENT or move the ShuttlePoint kno...

Страница 36: ...ight 3 A popup window will be shown with a list of Outdoor Recreational Area objects 4 Move the ShuttlePoint knob to highlight the desired object and press ENT 5 Another popup window will appear displaying the distance and position of the Lakes closest to your location 6 Using the ShuttlePoint knob highlight the desired Lake and press ENT This will show information on the Lake 7 Press CLR to show ...

Страница 37: ...nfo available services If you press ENT all available information about the cartographic point under the cursor will be shown See the next paragraph 4 0 5 1 Full Info On Lakes The following is an example of Full Info on Lakes Figure 4 0 5 1 Example of Full Info page To see the Fishing object press MENU when the Fishing object is highlighted On the screen appears ...

Страница 38: ...5 Press ENT to show the actual position of the Lake on the Chart page 6 Press CLR again at any time to return your cursor to your vessels position 4 0 7 Points Of Interest This feature is used to locate Points Of Interest nearest the position of your vessel 1 Press INFO 2 Move the ShuttlePoint knob to highlight POINTS OF INTEREST and press ENT or move the ShuttlePoint knob to the right 3 A Categor...

Страница 39: ... press ENT or move the ShuttlePoint knob to the right 3 The Select Name popup window will appear This window will allow you to enter in the name of the User Point you wish to locate 4 Move the ShuttlePoint knob up down to change each number or letter and left right to move to the next or previous position in the name of the Mark 5 Once the name of the desired Mark reads in the Select Name window p...

Страница 40: ...r cursor to your vessels position WAAS 3D Figure 4 0 9 Find GPS Coordinates 4 0 10 Information This feature allows you to obtain information on any position on the Chart page 1 Press INFO 2 Move the ShuttlePoint knob to highlight INFORMATION and press ENT or move the ShuttlePoint knob to the right 3 A page will be shown with objects information The upper side of the page contains the Info Tree and...

Страница 41: ...Page 42 CP500 R ...

Страница 42: ...ound chart with details Depths Land Elevation color shading of sea depth and land altitude for improved chart appearance Bathymetric Spot Soundings Data Base with depth and bathy information for an extraordinary view of the seabed depth Detailed Port Plan to information complete port and marina charts with detail Search Find quickly locates chart contents and objects Tides Preview allows viewing o...

Страница 43: ...real time during navigation Enhanced Mixing Levels seamless data presentation Off line redraw cartography level transition without image construction Cartographic Data related Features Guardian Alarm the Guardian Alarm is a user defined area in front of your vessel to alert you while navigating of possible obstacles on the chart Safety Status Bar a status bar with six boxes to show the status of c...

Страница 44: ...described in the following 6 0 0 Zoom Type Zoom Type refers to the chart scale selection It has two options Standard default or Flexi Zoom When Zoom Type is set to Flexi Zoom a short ZOOM IN ZOOM OUT push causes a change of chart level while a long ZOOMIN ZOOMOUT push press and hold causes an expansion or compression of the chart image without a chart level change LONG PUSH SHORT PUSH ACQUIRING AC...

Страница 45: ...until the menu disappears or an easier method is to move the ShuttlePoint knob to the left a few times 6 0 1 Icons Size On MAX charts it is possible to set the size of all icons drawn on the charts selecting between Standard and Large size ICONS SIZE standard ICONS SIZE large Figure 6 0 1 Icons Size To activate this function follow the procedure 1 Press MENU Move the ShuttlePoint knob to highlight...

Страница 46: ...de during navigation Perspective view of the chart is a type of bird s eye view of a chart and give you a more realistic perspective of the chart As the upper side of the map is more compressed than the lower side a wider map area is visible so it allows showing more chart information immediately ahead and around the cursor Perspective View ON Perspective View OFF Figure 6 0 3 Perspective View To ...

Страница 47: ...s Any warning or alarm condition is identified by the red color to indicate possible risk To activate this function follow the procedure 1 Press MENU Move the ShuttlePoint knob to highlight SETUP MENU and press ENT 2 Move the ShuttlePoint knob to highlight MAX FUNCTIONS and press ENT or move the ShuttlePoint knob to the right 3 Move the ShuttlePoint knob to highlight SAFETY STATUS BAR and press EN...

Страница 48: ... Pingos and Production installations Red when Guardian Technology detects cautionary or restricted area Safety Status Bar O ZOOM DANGERS CAUTIONS BEST MAP DATA OFF DECLUT Figure 6 0 5 Safety Status Bar 6 0 6 Satellite Imagery This function allows to overlay the Satellite image for background map When it is set On the Palette is set to Normal to display the proper colors NOTE The satellite image is...

Страница 49: ...ic one The color of the arrow denotes the strength of the current as follows 0 to 0 1 kn 0 2 to 1 0 kn 1 1 to 2 0 kn 2 1 to 3 0 kn 3 1 to 9 9 kn Yellow Yellow Orange Orange Red Figure 6 0 7a Tidal stream arrows table When the GPS Chart Plotter receives a valid position fix the Tide icons are shown on the charts on the basis of the current date and time the screen displays and changes arrows as dat...

Страница 50: ...NT or move the ShuttlePoint knob to the right 3 Move the ShuttlePoint knob to highlight CHART LANGUAGE and press ENT or move the ShuttlePoint knob to the right A new popup window will appear on the screen The available functions are described in the table below Language Allows setting the language to display chart information The language is chosen among the list of languages available on the cart...

Страница 51: ...tures Diagrams How to show the pictures or diagrams of a Multimedia Object They are shown on the Chart page with the camera icon see the figure below WAAS 3D Figure 6 0 9a Example of camera icon Move the cursor over the camera icon You are get the quick info on the object and there is the camera icon on the top bar of the window WAAS 3D Figure 6 0 9b Example of Quick Info on camera icon Press IMAG...

Страница 52: ...ible to fit it to screen by pressing ENT to change the contrast by pressing ZOOM IN or ZOOM OUT and to display the next picture associated if any by moving the ShuttlePoint knob left or right 6 0 10 Enhanced Port Info OptionalC MAPBY JEPPESEN MAXC Cards includeadditionalPortServicesthatwerenotpresent before Additional attributes of Port Areas and Port Marinas have been included as Location Country...

Страница 53: ...Page 54 CP500 R ...

Страница 54: ...ob to the desired or approx Lat Lon and press MARK 2 You will notice a Mark is placed under the location of the Cursor and a popup window is shown with the exact Lat Lon of the Mark 3 If the position is incorrect pressing EDIT allows changing of the position Mark name and icon type Vessel location Mark placed under Cursor Lat Lon of Mark DST BRG from vessel location 2 1 4 Press Soft Key to show to...

Страница 55: ... to the right to select the Lat Lon and press ENT 9 Move the ShuttlePoint knob up or down to select the first character 10 Move the ShuttlePoint knob to the right to select the next character 11 Repeat steps 9 and 10 until the desired position is shown Press ENT and CLR to store the Mark 7 1 0 Deleting a Mark or Waypoint 1 Move the ShuttlePoint knob over the Mark or Waypoint to delete 2 Press DELE...

Страница 56: ...DIT Allows you to edit a previous stored Mark or Waypoint NEW MARK Allows entering in Marks editing icon type and position MODE This selection controls how the Marks or Waypoints are shown on the Chart page Selections are a SHOW icon and name are shown b ICON only icon no name is shown c HIDE Mark or Waypoint is hidden d SHOW ALL All Marks or Waypoints are shown e ICON ALL All Icons are shown with...

Страница 57: ...it in the name will be highlighted 8 Move the ShuttlePoint knob up or down to select the first character 9 Move the ShuttlePoint knob to the right to select the next character 10 Repeat steps 8 and 9 until the Mark name is shown Press ENT 11 Move the ShuttlePoint knob to the right to select the Lat Lon field and press ENT 12 Move the ShuttlePoint knob up or down to select the first character 13 Mo...

Страница 58: ...ess GOTO and a GOTO popup window will be shown Figure 7 4 GO TO menu 1 3 Move the ShuttlePoint knob to highlight CURSOR and press ENT Figure 7 4a GO TO menu 2 4 The GPS Chart Plotter is now navigating from your current position to the location selected at step 1 A bearing line between the vessels location and the destination point is shown A popup window shows the Distance DST and Bearing BRG from...

Страница 59: ...ursor over the designed Waypoint and press GOTO For more information about Routes refer to Section 9 GOTO MARK 1 Move the ShuttlePoint knob to an open position no buoy warning etc under the cursor on the Chart page 2 Press GOTO to show the GOTO popup window 3 Move the ShuttlePoint knob to highlight MARK and press ENT to show the MARKS WAYPOINTS List 4 Move the ShuttlePoint to highlight the desired...

Страница 60: ...hart page press MOB to start navigating back to the point Press CLR 2 You will notice a MOB Mark will be on the Chart page and all navigation is referring back to this point 3 If the cursor is moved over the MOB Icon the popup windows over Soft Keys will be shown allowing quick access to the Navigation or Highway pages WAAS 3D Figure 8 0 MOB point 8 1 DELETING A MOB POINT 1 Move the ShuttlePoint k...

Страница 61: ...Page 62 CP500 R ...

Страница 62: ...ttlePoint knob to the second Lat Lon of the next leg in the Route 4 Press ROUTE You will notice another Waypoint is shown under the cursor and a line joins the starting Waypoint to the Second Waypoint Figure 9 0 Creating a Route using Waypoints 5 Repeat steps 3 and 4 until all Waypoints are entered into the Route NOTE At this point the Route is saved as ROUTE01 If you would like to save the Route ...

Страница 63: ...nt will be placed under the cursor 3 Move the ShuttlePoint knob to the second Lat Lon of the next leg in the Route 4 Press ROUTE Another Waypoint is shown under the cursor and a line joins the starting Waypoint to the second Waypoint 5 Repeat steps 3 and 4 until all Waypoints are entered into the Route Figure 9 2 Olympic Route creation 1 6 Then move the ShuttlePoint knob to the last Waypoint and p...

Страница 64: ... over the top of a Mark that you wish to be the starting point in the Route and press ROUTE 2 Next move the ShuttlePoint knob until the cursor is over the Mark that you want to be the next leg in the Route 3 Press ROUTE You will notice a bearing line joins the first and second Mark which means these Marks are selected into the Route 4 Repeat steps 3 and 4 until all Marks are entered into the Route...

Страница 65: ...ositioned the cursor at the location you want press ENT see the right side of the above picture Figure 9 5a Inserting Waypoint procedure 2 9 6 GOTO A ROUTE By having created some Routes you can choose one of them to place a GOTO on 9 6 0 By select Route 1 Move the ShuttlePoint knob to an open position no buoy warning etc under the cursor on the Chart page 2 Press GOTO to show the GOTO popup window...

Страница 66: ...appears to confirm Move the ShuttlePoint knob to highlight YES and press ENT The Route has been deleted WARNING An active Route one that you are navigating to cannot be deleted until you stop navigating to the Route 9 8 OTHER SETTINGS IN ROUTE MENU You will notice the ROUTE menu has other selections SELECT Choose an available Route to create or choose a stored Route to show and follow on the Chart...

Страница 67: ...or Route legs which were classified as dangerous are displayed in RED It means that there is at least one dangerous object in the vicinity of this leg and it has been found Route legs which were classified as safe are displayed in GREEN It means that the data was checked on detailed map levels and no problems were found for all segments of the leg Route legs for which there was not sufficient data...

Страница 68: ... dangerous objects with better accuracy When accuracy is maximal a segment length is the shortest When accuracy is minimal a segment length is the longest Selects among Minimum Low Medium High and Maximum See the picture below The default setting is Medium ROUTE CHECK REPORT Shows the list of the dangerous objects found on the charts crossed by the Route A B C D E F A B Width C D Depth E F Accurac...

Страница 69: ...Page 70 CP500 R ...

Страница 70: ... to highlight TRACK and press ENT 3 Move the ShuttlePoint knob to highlight STEP UNIT and press ENT or move the ShuttlePoint knob to the right 4 Move the ShuttlePoint knob to highlight and choose Dist or Time and press ENT or move the ShuttlePoint knob to the right Figure 10 Distance Units and Time Units 5 Move the ShuttlePoint knob to highlight DISTANCE or TIME step interval and press ENT or move...

Страница 71: ...Menu has other selections TRACKING Allows turning on or off the tracking function ACTIVE TRACK This selection allows you to save a Track to one of the 5 Tracks available VISIBLE Shows or hides a Track shown in ACTIVE TRACK menu LINE COLOR Selects the color of the Track line DELETE Deletes a Track selected in the ACTIVE TRACK menu STEP UNIT Allowable selection are Distance or Time DISTANCE User adj...

Страница 72: ...ghlighted it will be shown in a yellow frame 2 Move the ShuttlePoint knob to highlight the Trip Log window TLOG and press ENT 3 A popup window will be shown Move the ShuttlePoint knob to TLOG and press ENT 4 Another popup window will be shown Move the ShuttlePoint knob to RESET and press ENT 5 A warning popup window will be shown to confirm if you want to reset the Trip Log Move the ShuttlePoint k...

Страница 73: ...Page 74 CP500 R ...

Страница 74: ...information shown below will assist you to transfer the User Points Routes and Track history to the optional User C CARD To open the User C CARD page 1 Press MENU Move the ShuttlePoint knob to highlight USER POINTS and press ENT 2 Move the ShuttlePoint knob to highlight USER C CARD and press ENT Figure 11 0 User C CARD Menu 11 0 0 Formatting the User C CARD 1 Press MENU Move the ShuttlePoint knob ...

Страница 75: ...Select the file from the User C CARD list by using the ShuttlePoint knob and press ENT 4 Move the ShuttlePoint knob to highlight LOAD and press ENT 5 A LOADING message will momentarily be shown then a pop up Information window show LOADING OK 6 Press ENT to confirm 11 0 3 Deleting a file from the User C CARD You may want to delete a saved file on the User C CARD 1 Press MENU Move the ShuttlePoint ...

Страница 76: ...D WAAS 3D WAAS 3D Figure 12 Screen display pages example The pages can selected in the following ways Selection by MENU 1 Press MENU The following page is shown on the screen Figure 12a Main Menu 2 Move the ShuttlePoint knob to highlight the desired page and press ENT Selection by SOFT KEY Press one of the Soft Keys under the display then press the relating Soft Key to show the desired page WAAS 3...

Страница 77: ...NM For more detail optional C MAP BY JEPPESEN NT MAX C CARDs are used It is possible to set the chart as a single or two charts side by side 1 Press MENU Move the ShuttlePoint knob to highlight CHART and press ENT Two Chart page types are available Single and Dual 2 Move the ShuttlePoint knob to highlight Single or Dual and press ENT WAAS 3D WAAS 3D Figure 12 0 Chart selection menu Figure 12 0a Ex...

Страница 78: ... ENT 6 Press CLR or move the ShuttlePoint knob to exit the menu and show the Chart page 12 0 1 Customizing the Data Windows ThedatafieldscontainedontheGeneral 1LineSmall Largeand2LineSmalldatawindows can be changed to the following selections SOG Speed Over Ground COG Course Over Ground DST Distance BRG Bearing XTE Cross Track Error TTG Time To Go STR Steering HDG Heading from Electronic Compass D...

Страница 79: ...ata windows and you want to reset the log 12 0 2 Additional Functions on Chart page When on the Chart page you will notice icons of Buoys Towers Lights Wrecks Tide Stations and Port Icons If the cursor is moved over the top of these icons a popup window will be shown with information about the icon 12 0 3 Turning Off Information on Icon Points The GPS Chart Plotter allows you to select to see info...

Страница 80: ...ve the ShuttlePoint knob to highlight SETUP MENU and press ENT 2 Move the ShuttlePoint knob to highlight MAP CONFIGURATIONS and press ENT 3 Move the ShuttlePoint knob to highlight DISPLAY MODE and press ENT 4 Move the ShuttlePoint knob up or down to select the preset and press ENT 5 Press CLR until the Chart Page is shown Figure 12 0 4 Display Mode settings The table below shows the selections for...

Страница 81: ... Currents Turns the displaying of Tides and Currents On or Off When data time is available Tidal stream arrows are shown on the charts indicating the direction and strength of the Tide If no data time is available from the GPS or the GPS Chart Plotter is not in Simulation mode the icon on the map is generic one The color of the arrow denotes the strength of the current as follows 0 to 0 1 kn 0 2 t...

Страница 82: ...oads Turns the displaying to roads On or Off Points of interest Turns the displaying of Points of Information On or Off ROAD 1 1 2 POINT OF INTEREST LIBRARY 2 Figure 12 0 7 Example of Roads and Points Of Interest 12 0 8 Chart Settings Settings that control how the chart features will be shown on the Chart Page of the GPS Chart Plotter Lat Lon Grid Turns the displaying of the Latitude and Longitude...

Страница 83: ...of the VAD object See the figure below Example of VAD object 1 1 Chart Lock Turns the chart function On Off When Chart Lock is On the available zoom scales are only the ones containing cartographic data Instead when Chart Lock is Off it is possible to zoom down into zoom scales not covered by cartographic data after the last available zoom scale covered by cartographic data The DSI Data Safety Ind...

Страница 84: ...AP CONFIGURATIONS and press ENT or move the ShuttlePoint knob to the right 3 Move the ShuttlePoint knob up or down to select the desired item within the groups Marine Settings Depth Settings Land Settings Chart Settings or Underwater Object Settings and press ENT See the previous sections for details on selections 12 2 NAVIGATION PAGE This page is useful to show information when heading to a desti...

Страница 85: ...s priority to the compass Flux Gate or Gyro Compass data if received If no data is received from the compass the Compass Rose Tape uses the COG value from the GPS 12 3 HIGHWAY PAGE Showsa3DviewofthevesseltravellingthroughthewaterwhenNavigatingtoadestinationpoint Mark or following a Route Press ZOOM IN or ZOOM OUT to change the highway scale ...

Страница 86: ...4 Celestial page Refer to the image above The time 1 displayed corresponds to the location of the cross haircursor 3 intheTideGraph 2 MovingtheShuttlePointknobtotheleftorrightchanges the time moving the ShuttlePoint knob up or down selects the Tide height and draught draft on the Tide Graph NOTE The draught window shows the height of the tide water during a 24hr period of time For example iftheShu...

Страница 87: ...on of Precision VDOP Vertical Dilution of Precision 12 5 0 WAAS EGNOS Setting From this page it is possible to disable the WAAS EGNOS function following this procedure 1 Press MENU Move the ShuttlePoint knob to enter GPS STATUS page and press ENT 2 Press and hold ENT The GPS SETUP menu appears on the screen 3 Move the ShuttlePoint knob to highlight DIFF CORRECTION SOURCE and press ENT 4 Move the S...

Страница 88: ... and GPS information can be shown in any of the boxes The default NMEA Display shows 3 windows When going to a destination this screen is useful to navigate as to get to the destination keep the Course Over Ground COG and Bearing BRG figures the same Figure 12 6 NMEA Display page The NMEA sentences read from external devices are BWC DSC DSE GGA GLL GSA GSV HDG HDM HDT RMC VHW VTG DPT DBT MTW VWR V...

Страница 89: ... the Green and Brown wires To check to see if the GPS Chart Plotter is transmitting the sentences 1 Press MENU Move the ShuttlePoint knob to highlight NMEA DISPLAY and press ENT Figure 12 7 NMEA Display menu 2 Move the ShuttlePoint knob to highlight DATA and press ENT 3 Connect the BLUE Wire on the GPS Chart Plotter to the junction of the Brown wire and the VHF wire The display should look similar...

Страница 90: ... select a NMEA Trend Page 1 Press MENU Move the ShuttlePoint knob to highlight NMEA DISPLAY and press ENT Figure 12 8 NMEA Display menu 2 Move the ShuttlePoint knob to highlight DEPTH TREND WIND SPEED TREND TEMP TREND SOG TREND and press ENT 17 17 5 18 18 5 17 5 Figure 12 8a NMEA Trend pages 12 9 VHF DIGITAL SELECTIVE CALLING Digital Selective Calling is a semi automated method of establishing a V...

Страница 91: ... Distress situation a vessel that is equipped with a DSC VHF and connected to a GPS has the capability to transmit a DSC Distress Call with GPS Position When the STANDARD HORIZON VHF receives a DSC Distress Call DSC Position information of the vessel in Distress is transferred to the GPS Chart Plotter The GPS Chart Plotter Logs the Distress call into the DSC DISTRESS LOG and also prompts the user ...

Страница 92: ...ut or Output wires 13 1 NAVIGATE The Navigate menu allows customization of the Coordinate System Loran TD s Map Datum Map Orientation Resolution angle the vessel has to change before the chart is redrawn and Static Navigation See the following table Coordinate System Selections are a TD Time Difference based on Loran see the following Par 13 1 0 b UTM Universal Transverse Mercator Grid c ddd mm mm...

Страница 93: ...he GPS Chart Plotter computes compass direction from the constellation of GPS Satellites For the GPS Chart Plotter to compute direction the vessel must be moving through the water This menu allows the GPS Chart Plotter to customize the following selections Bearings Selects between True and Magnetic When Magnetic bearings is enabled the GPS Chart Plotter applies the selected Magnetic Variation Auto...

Страница 94: ...in this case if the same object type is found again later the Alarm will be shown The GPS Chart Plotter shows an icon on the charts that identifies when a Grounding Alarm is detected Figure 13 3 Grounding Alarm 13 4 SIMULATION The built in Simulator function allows you to become proficient in the use of the GPS Chart Plotter No current position fix is required because the GPS Chart Plotter simulat...

Страница 95: ...ess CLR multiple times until the Chart page is shown 13 5 DSC POLLING This menu is used to enable or disable features related to the DSC function Auto Position Selects between Manual or Auto See also the Par 12 8 1 When Auto Position item is set to Manualand receiving the Position Request the Position Request pop up window is not displayed and the cursor does not move to the position of the receiv...

Страница 96: ...nce from your vessel that a target may reach before a target is deemed a threat CPA Alarm Occurs if CPA is less or equal to CPA Limit This test is done for active targets only TCPA Time to closest Point of Approach is the time remaining until the CPA will occur TCPA Limit This is the time remaining before the CPA is reached TCPA Alarm Occurs if TCPA is less or equal to TCPA Limit This test is done...

Страница 97: ...appears on the screen The available functions are described in the following table Display Turns the display of AIS Targets overlay on the cartography On or Off Activation Range Defines the range from the fix within which the AIS Target becomes active The values allowed are from 0 1 to 20 Nm CPA Alarm Turns On or Off the alarm CPA Limit The values allowed are from 0 1 to 10 Nm TCPA Alarm Turns On ...

Страница 98: ...ollow the procedure 1 Press MENU MovetheShuttlePointknobtohighlightUSERPOINTSandpress ENT 2 Move the ShuttlePoint knob to highlight AIS LIST and press ENT Figure 14 4 AIS List page 3 Move the ShuttlePoint knob up or down to select the Target and scroll the page up or down Press ENTER exitsthepageandshowstheTargetshipontheChartpagealong with the current position of the GPS Chart Plotter ...

Страница 99: ...Page 100 CP500 R ...

Страница 100: ...round temperature level of humidity visibility in miles WIND Speed Dir 0 WAVE Height Dir 1 TEMPERATURE 18 HUMIDITY 30 VISIBILITY 20 WEATHER TYPE Sun WEATHER TYPE Rain WEATHER TYPE Fog WEATHER TYPE Snow WEATHER TYPE Clouds WEATHER TYPE Partly Cloudy WEATHER TYPE Thunderstorm Data Type Display Figure 15 Weather data package 15 0 C WEATHER SERVICE MENU To select the menu 1 Press MENU Move the Shuttle...

Страница 101: ...her loading from the User C CARD 15 0 2 Forecast Allows selecting the Layer of specific weather data to be displayed on the screen and to change date and time of the forecast preview The following functions are available Panning default usage of the cursor key is the normal panning function Zoom in out zoom in out functions are allowed as usual by using ZOOM IN ZOOM OUT Set of date and time to mod...

Страница 102: ...unded and the vessels position is shown on the Standard Horizon GPS Chart Plotter 16 0 MOBILARM GPS CHART PLOTTER CONNECTION Connect the MOBILARM system to one of the Ports on the Standard Horizon GPS Chart Plotter Refer to Par 2 3 2 0 PWR ACC 1 Cable and NMEA Connections and MOBILARM Owner s Manuals for connections Connection Example Blue Brown Black Green Red PWR ACC 1 Cable To Standard Horizon ...

Страница 103: ... knob up down to select MOBILARM and press ENT or move the ShuttlePoint knob to the right Selecting MOBILARM format activates the function 7 Press CLR or move the ShuttlePoint knob to the left until the Chart page is shown The GPS Chart Plotter continuously verifies the communication status with MOBILARM PTX Personal Transponder device When a signal from the PTX is lost for more than one minute th...

Страница 104: ...nal Transponder device that is worn by the crew If a crew member falls in the water the MOBILARM sends a signal to the GPS Chart Plotter which creates and displays a PTX icon on the Chart page 16 3 0 MOBILARM MOB alert is received When crew member falls in the water the MOBILARM sends a signal to the GPS Chart Plotter which creates and displays a PTX MOB icon on the Chart page Figure 16 3 0 The PT...

Страница 105: ... the PTX delete the PTX icon or show the Alarm Status list as shown below ACQUIRING Figure 16 4 Example of PTX information window 16 4 0 Delete PTX The Delete PTX function permanently removes the selected PTX from the MOBILARM Alarm Status List and from the Chart page Using the ShuttlePoint knob move the cursor over the PTX icon and then press DELETE A warning popup window will be shown Select YES...

Страница 106: ...Plotter has received an alarm from To review the page 1 Select the Chart page 2 Press MENU to show the Main menu 3 Move the ShuttlePoint knob to highlight USER POINTS and press ENT 4 Move the ShuttlePoint knob to highlight MOBILARM and press ENT 03 45 14 PM 10 31 24 PM 213 22 120W 305 04 015W 20 01 022N 79 56 320N PTX number PTX position Time the PTX alarm was received 2 PTX status 1 3 4 1 2 3 4 R...

Страница 107: ...Once the navigation has been activated close all menus data pages if open and center the chart selected PTX DELETE Deletes the selected PTX SHOW Centers the chart on the selected PTX SHOW ALL Selects the best chart scale to see PTX icons on the map at the same time ...

Страница 108: ...ernal temperature is very high Control the contrast Protect the GPS Chart Plotter from direct sunlight The GPS Chart Plotter does not respond to any command Try to turn Off and then turn On If the problem persists reset the RAM refer to section 18 0 0 RAM Menu reset or remove power from the battery The location of my fix is not shown correctly on the Chart page Please report to Jeppesen Marine the...

Страница 109: ...Page 110 CP500 R ...

Страница 110: ...E After performing a RAM Clear all Marks Routes and tracks will be erased To back up these points refer to Section 11 for details This test verifies the integrity of the memories and if desired during this test all the internal memory can be erased and the default setting restored RAM Clear To clear internal memory If the GPS Chart Plotter exhibits unusual operations or appears to be malfunctionin...

Страница 111: ...lem Change Parameters Tochangetheparametersoftheserialinterface ThismenuallowstoselectthePort Signal Source between PORT 1 PORT 2 PORT 3 the Baud Rate between 300 1200 2400 4800 9600 38400 115200 the Data Bits Word Length between 7 or 8 the Parity between even odd or none the StopBits between 1 or 2 Default settings are Port PORT 2 Baud Rate 4800 Data Bits 8 Parity none Stop Bits 1 Input Data Disp...

Страница 112: ...Points Marks Waypoints 3000 Routes 100 max 50 Waypoints each Track Points 10000 recordable in 20 Tracks NMEA Output sentences GLL VTG BWC WCV APA APB HDG BOD XTE RMA RMB RMC GGA HSC DBT DPT MTW VHW NMEA Input sentences BWC DBT DPT DSC DSE GGA GLL GSA GSV HDG HDM HDT MTW MWD MWV PCMPA PCMPD PJRCD PJRCF PKODG RMC RTE TLL VDM VHW VTG VWR VWT WPL 246 9 7 184 5 7 3 307 5 12 1 21 0 8 PWR ZOOM OUT ZOOM I...

Страница 113: ...Page 114 CP500 R PROTECTIVE COVER SHAPE UNIT SHAPE 410 278 315 R15 4 POS O4 5 MOUNTING HOLES 4 POS i CUTTING LINE 200 208 227 Figure 19a CP500 Flush Mount cutout Dimensions are in mm ...

Страница 114: ...in diameter x 32mm in height flush mounted or 61 5mm on flag pole mount Weight without cable 0 35 lb 160 g Cable white 15 meter 8x28AWG cable with 6 pins female connector Electrical Characteristics Input Voltage 10 Vdc to 35 Vdc unregulated Input Current 0 8 Wmax GPS Receiver Sensitivity Tracking Navigation 160 dBm Acquisition Reacquisition 160 dBm Cold Starts 145 dBm GPS Performance GNSS Systems ...

Страница 115: ...Page 116 CP500 R ...

Страница 116: ...nd the bottom of the hull keel Draught determines the minimum depth of water a ship or boat can safely navigate On the Celestial page the draught window shows the height of the tidal water during a 24hr period of time This height is dependant on the time of day selected using the ShuttlePoint knob DSC Digital Selective Calling Digital Selective Calling is a semi automated method of establishing a ...

Страница 117: ...e Wind Speed when an external wind instrument with NMEA is connected TTG Time To Go Shows time to go to reach a Destination point UNITS Nm Nautical Mile 1 NM 1 15 Sm or 1 85Km Sm Statue Mile 1Sm 0 87Nm or 1 61Km Km Kilometer 1 Kilometer 0062 Sm or 0 54Nm FT Feet 1 Foot 0 167 Fathoms or 0 305 Meters FA Fathom 1 Fathom 6 Feet or 1 83 Meters Mt Meter 1 Meter 3 28 Feet or 0 55 Fathoms Kts Knot 1 Knot ...

Страница 118: ...s the sea water temperature when the FF520 50 200kHz BLACK BOX FISH FINDER or a Digital Speed Log Temp instrument with NMEA is connected XTE Cross Track Error The distance your vessel is off course left or right to a Destination point ...

Страница 119: ...Page 120 CP500 R ...

Страница 120: ... 101 Cable 15 Calibration 94 Cartographic Data 44 Cartography 11 113 Cartridges 112 Category 39 Caution page 23 CELESTIAL 30 Celestial page 20 87 117 Chain 27 change the fields 21 Changing date 87 Changing the User C CARD 76 Chart 21 Chart Boundaries 82 84 Chart Lock 82 84 Chart page 23 78 Chart Scale 80 chart scale 21 Chart selection menu 78 Chart Settings 83 CHART COMPASS 30 CHART HIGHWAY 30 Cle...

Страница 121: ... Currents 43 Dynamic Nav Aids 43 48 E EGNOS 88 Enhanced Mixing Levels 44 Enhanced Port Info 43 53 ENT 21 Estimated Time of Arrival 79 ETA 79 117 External bracket 12 External device 90 Extra Large Coverage 43 F Fathom 118 Feet 118 FF520 11 16 119 FF525 30 91 FIND 30 Find 43 FIND SERVICES 33 FISH FINDER 30 93 Fish Finder 11 FISH FINDER 200kHz 30 FISH FINDER 200kHz CHART 30 FISH FINDER 50 200kHz 30 F...

Страница 122: ...aypoints List 58 Max Functions Menu 45 MEASURE DISTANCE 31 MENU 21 Meter 118 Miles 118 Mixing Levels 82 84 MMSI 97 98 MOB 22 61 105 MOBILARM 103 Mooring 68 mounting 13 Moving a Waypoint 56 Moving Mark 56 MTW 89 113 Multilanguage Support 44 Multimedia Object 52 MWD 113 MWV 113 N Name of ship 97 Name Tags 81 82 name the Route 63 Nautical Mile 118 Nav Aids Light Sectors 81 NAV AIDS PRESENTATION 30 Na...

Страница 123: ...magery 49 Saving Track 72 Scale 80 Screen display pages 29 77 Seabed Type 81 82 Search 43 Select Route 67 select the language 28 SEND 67 Serial Ports 112 Setup Menu 21 Shallow Water 68 Ship Icon 25 31 Shoreline Constructions 68 ShuttlePoint knob 21 SI TEX 12 SIM Pin 101 Simulation 95 Simulation Mode 95 Single 78 Sleeping Target 97 Smart GPS Cable 15 Soft Key 20 22 SOG 79 118 SOG TREND 30 SPD 79 SP...

Страница 124: ...9 88 118 Velocity Made Good 79 Vertical Dilution of Precision 79 VGA 11 18 VGA output 18 VGA Video Output 18 VHF Connections 18 VHF radio call 91 VHW 89 113 Video camera 11 Video Input 19 30 video output 11 VMG 79 118 VTG 89 113 VWR 89 113 VWT 89 113 W WAAS 14 80 88 115 118 Warping Facility 68 warranty 11 WATER TEMP 119 Water Temperature 79 Waypoint 22 55 56 63 113 WCV 113 Weather data package 101...

Страница 125: ...re purchaser abuse or other qualifying exceptions exist The purchaser must pay any transportation expenses incurred in returning the Product to STANDARD HORIZON for service This limited warranty does not extend to any Product which has been subjected to misuse neglect accident incorrect wiring by anyone other than STANDARD HORIZON improper installation or subjected to use in violation of instructi...

Страница 126: ......

Отзывы: