background image

10

Horizon GPS Chart400 User Manual

3.2 Main Screens

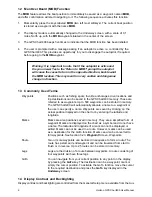
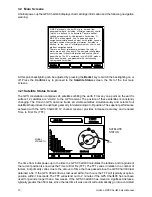
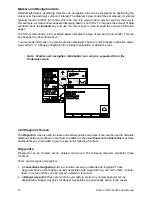
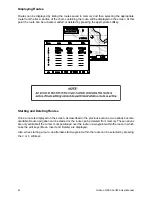
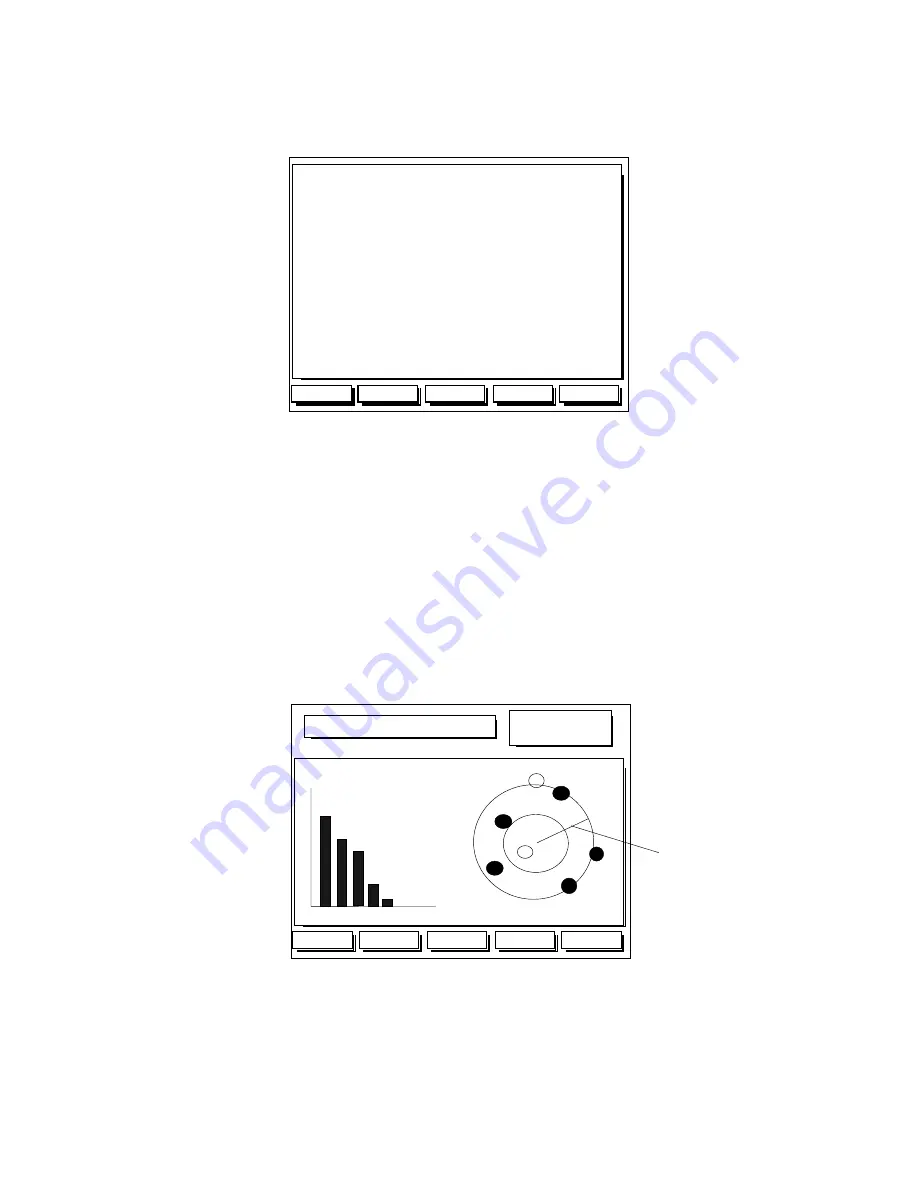
At initial power-up the GPS Chart400 displays chart cartridge information and the following navigation
warning:

BckLgt

Confirm

C-MAP electronic charts (ECs) are derived from

geographical data - including official government charts

- which we believe to be accurate. They are neither

verified nor approved by Hydrographic Authorities. C-

MAP ECs are designed only to ease and speed

navigation calculations and so must not be relied upon as

a primary source of navigation information, but rather a

backup to the use of official government charts and

prudent navigation habits.

There is no direct relationship between the color of

water areas and their depth. The navigator shall always

query the area for depth information and use the official

paper charts. The ECs contained in this C-MAP product

have been derived on agreement with the following

Hydrographic Authorities:

At this point backlighting can be adjusted by pressing the BackLt key to switch the backlighting on or
off. Press the Confirm key to proceed to the Satellite Status screen, the first of the four main
screens.

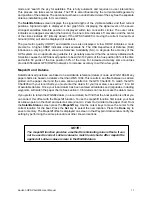
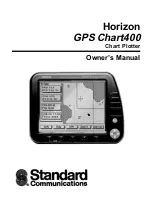
3.21 Satellite Status Screen

The GPS constellation comprises 24 satellites orbiting the earth. From any one point on the earth’s
surface 12 satellites are “visible” to the GPS receiver. The position of these satellites is constantly
changing. The Horizon GPS antenna tracks all visible satellites simultaneously and selects four
satellites that produce the optimum geometry for determining a 3-D position. The superior performance
achieved with the GPS Chart400 12 channel receiver provides increased accuracy and reduced
Time to First Fix (TFF).

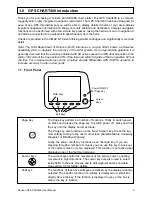
SATELLITE
STATUS

SIGNAL
STRENGTH

GPS Fix

GPS Fix

9 Jan 98

9 Jan 98

07:05:34am

01 14 15 20 21 25 29

01 14 15 20 21 25 29

9

8

7

6

5

4

3

2

1

0

9

8

7

6

5

4

3

2

1

0

29

20

25

MapShft

Aux

HDOP: 1.1

HDOP: 1.1

COG

14

21

15

01

The time from initial power-up to the time the GPS Chart400 calculates the latitude and longitude of
the current position is known as the Time to First Fix (TFF). The TFF varies in relation to a number of
factors, but primarily varies due to the amount of time that has passed since the GPS Chart400 last
obtained a fix. If the GPS Chart400 was last used within four hours the TFF will typically acquire a
position within 18 seconds. The TFF will extend out to 2  minutes if the GPS Chart400 has not been
used for periods longer than a few weeks. If the GPS Chart400 has moved a significant distance,
typically greater than 50 miles, since the last time it was used it will automatically go into a cold start

Содержание GPS Chart400

Страница 1: ...Horizon GPS Chart400 Chart Plotter Owner s Manual ...

Страница 2: ...all appear to be defective or not up to factory specifications SCC will pay all labor charges incurred in providing such warranty service To obtain warranty service the defective product must be returned to SCC together with proof of the date of purchase The Purchaser must pay any transportation expenses in returning the product to SCC SCC will examine the product and respond to the Purchaser in a...

Страница 3: ...ng List 7 2 2 Replacement Parts 7 2 3 Installation and Wiring Connections 7 3 0 GPS Chart400 Operation 9 3 1 Overview 9 3 2 Main Screens 10 3 21 Satellite Status Screen 10 Mapshift and Datums 11 3 22 Underway Screen 12 Zoom In Zoom Out 12 CTR 12 Hide 12 Lat Lon Window 13 Scale 13 Autopan 13 GoTo 13 Markers and Navigation Aids 14 3 23 Waypoint Screen 14 Waypoints 14 Waypoint Screen 15 Creating a Ne...

Страница 4: ...nce Calculations 23 Calculating Distances and Bearings 24 3 24 BirdsEye Highway Screen 25 3 3 Auxiliary Screen 26 Setting up your GPS Chart400 26 Navigating the Menus 27 1 General Setup 27 2 Navigation Setup 27 3 CDI Units Alarms 28 4 Map Configuration 28 5 Track History 29 6 Simulation Mode 29 4 0 Troubleshooting Guide 30 5 0 Specification 31 6 0 Navigation Diagram 32 7 0 List of Datums 33 8 0 NM...

Страница 5: ...time For increased accuracy some countries provide Differential GPS DGPS networks to increase accuracy to within a few yards 1 1 Front Panel Soft Keys MOB Keys Cursor Keys Power ON OFF or Page Key Page Key The Page key performs a number of functions Firstly to switch power on press and release the Page key To switch power off press and hold the key until the display becomes blank The Page key also...

Страница 6: ... Chart400 memory These are referred to as waypoints Up to 500 waypoints can be stored in memory The GPS Chart400 will automatically allocate a name to a waypoint or the user can specify a name Waypoints are saved by clicking on the actual position displayed on the chart or by entering the latitude and longitude Marks Marks are also positions saved in memory They are a simplified form of waypoint M...

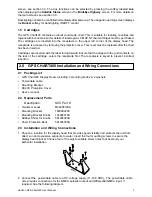
Страница 7: ...hat the edge with the gold contacts on the rear of the cartridge enters the receptacle first The receptacle is keyed to prevent incorrect insertion 2 0 GPS CHART400 Installation and Wiring Connections 2 1 Packing List GPS Chart400 Display Head including 2 mounting knobs 2 washers Power data cable Mounting Bracket DC400 Protection Cover User s manual 2 2 Replacement Parts Description SCC Part Owner...

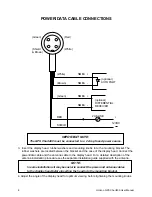
Страница 8: ...the case of the display head Connect the power data cable and the antenna cable to the display head For a detailed description of the antenna installation procedure see the separate installation guide supplied with the antenna NOTE In some installations it may be easier to connect the power and antenna cables to the display head before inserting the head into the mounting bracket 4 Adjust the angl...

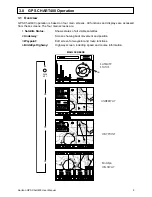
Страница 9: ...Waypts Routes Dist B R G D I S T 0 86m 3 4 5 Scale WAYPOINT SATELLITE STATUS GPS Fix GPS Fix 29 May 97 29 May 97 07 05 34am 01 14 15 20 21 25 29 01 14 15 20 21 25 29 9 8 7 6 5 4 3 2 1 0 9 8 7 6 5 4 3 2 1 0 25 14 29 15 20 21 01 MapShft Aux HDOP 1 1 HDOP 1 1 COG BirdsEye HIGHWAY CTR Zoom In Zoom In Zoom Out Zoom Out GoTo To Cursor Wpt Route To Cursor Wpt Route B R G DTG 1 2 3 2 3 4 5 n COG S O G 0 0...

Страница 10: ...ellites orbiting the earth From any one point on the earth s surface 12 satellites are visible to the GPS receiver The position of these satellites is constantly changing The Horizon GPS antenna tracks all visible satellites simultaneously and selects four satellites that produce the optimum geometry for determining a 3 D position The superior performance achieved with the GPS Chart400 12 channel ...

Страница 11: ...e position 50 of the time For increased accuracy some countries provide Differential GPS DGPS networks to increase accuracy to within a few yards Mapshift and Datums Satellite derived positions are based on a worldwide reference datum known as WGS 1984 Many paper charts are based on datums other than WGS 1984 This results in an offset between a Lat Lon plotted on the paper chart and the same Lat L...

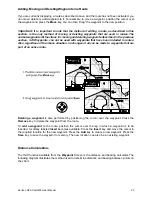
Страница 12: ...een Press the key once to center the cursor Press the key twice within one second to center the boat This method allows centering of the boat or cursor when initially not displayed on the screen NOTE After centering the screen around the boat or cursor you can change the scale by pressing the Zoom In or Zoom Out keys and the Chart400 will retain the scale selected This is a very usefull feature fo...

Страница 13: ... chart eight nautical miles wide is currently displayed Autopan Autopan changes the area of chart displayed to automatically maintain the boat position on the screen This function can only be enabled while the Underway screen is displayed The Autopan function is enabled by pressing the Ctr key twice to center the boat A suitable chart scale can be selected by pressing the Zoom In or Zoom Out keys ...

Страница 14: ...ap Configuration for a further explanation of attention areas Note Marker and navigation information can only be expanded from the Underway screen 3 23 Waypoint Screen The Waypoint screen is used to create and edit waypoints and routes It can also be used to calculate distances between locations on the chart In addition to the usual Zoom In and Zoom Out keys three additional keys are provided to g...

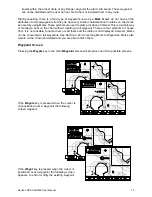
Страница 15: ... Marks also remain on the chart until deleted and you are able to GoTo them Waypoint Screen Pressing the Waypts key in the main Waypoint screen will produce one of two possible screens If the Waypts key is pressed when the cursor is not positioned over a waypoint the following screen appears If the Waypt key is pressed when the cursor is positioned over a waypoint the following screen appears to e...

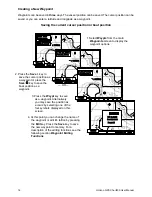
Страница 16: ...ints 2 Press the key to save the cursor position as a waypoint or press the key to save the boat position as a waypoint Save Save 3 Press the key to save as a waypoint Alternatively you may save the position as a by selecting one of the four symbols displayed on this screen Waypt mark 4 At this point you can change the name of the waypoint or edit it s lat lon by pressing the key Press the key to ...

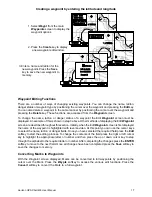
Страница 17: ...ese functions are accessed from the Waypoint screen To change the name lat lon or danger status of a waypoint the Edit Waypoint screen must be displayed An example of this is shown in step 3 above Other methods of displaying the Edit Waypoint screen are described throughout this section Initially when the Edit Waypoint screen is first displayed the name of the waypoint is highlighted with reverse ...

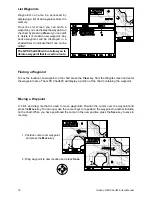
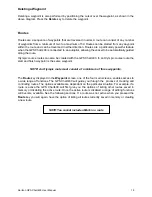
Страница 18: ... key from the Waypts screen and enter the waypoint name The GPS Chart400 will display a portion of the chart containing the waypoint Moving a Waypoint A click and drag method is used to move waypoints Position the cursor over the waypoint and press the Move key You can now use the cursor keys to reposition the waypoint to another location on the chart When you have positioned the cursor in the new...

Страница 19: ...t400 In an Olympic course route the start and finish waypoint is the same waypoint NOTE An Olympic route must consist of a minimum of three waypoints The Route key displayed in the Waypoint screen one of the four main screens enables access to a wide range of functions The GPS Chart400 will guide you through the process of creating and controlling routes The options available are dependant on the ...

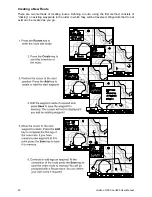
Страница 20: ...eating a New Route There are two methods of creating routes Defining a route using the first method consists of clicking on existing waypoints in the order in which they will be traversed Waypoints that do not exist can be created as you go ...

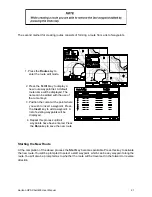
Страница 21: ...o save the new route Done 2 Press the key to display a new route waypoint list A default route name will be displayed The name can be edited with the use of the cursor keys TxtCrt 1 Press the key to enter the route edit mode Routes Starting the New Route At the completion of the above process the Start key becomes available Press this key to activate the new route You will be prompted to select a ...

Страница 22: ... 1 7 3 S 3 6 4 8 1 7 3 S 1 7 4 4 2 9 9 6 E 1 7 4 4 2 9 9 6 E Move List Start TxtEdit Starting and Deleting Routes Once a route is displayed on the screen as described in the previous sections two options become available Route navigation can be started or the route can be deleted from memory These options are only available if the cursor is not positioned over the route or a waypoint within the ro...

Страница 23: ...hat have been included in routes Also regardless of the above situation no changes at all can be made to waypoints that are part of an active route Deleting a waypoint is also performed by positioning the cursor over the waypoint Press the Remove key to delete the waypoint from the route To add a waypoint to the route position the cursor over the leg in which a waypoint is to be inserted A softkey...

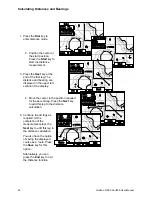
Страница 24: ... 3 S 3 6 4 8 1 7 3 S 1 7 4 4 2 9 9 6 E 1 7 4 4 2 9 9 6 E B R G D I S T WPT002 WPT002 End 3 5M 288 LEG DIST LEG DIST 1 9M Next 4 Move the cursor to the position required for the second leg Press the key to add this leg to the distance calculation Next 5 Continue to add legs as required At the completion of the measurement press the key to add this leg to the distance calculation Next 3 Press the ke...

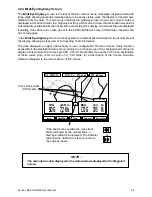
Страница 25: ... in the central area of the display allowing a clear view of surrounding chart information The data displayed in upper right window is user configurable The Nav Screen Setup function accessible in the Navigation Setup menu allows you to choose one of four navigational functions to display in this window The choices are XTE CTS STR and VMG See section 6 0 for an explanation of these terms Also refe...

Страница 26: ...us OFF Anchor Alarm OFF Guard Zone OFF Track History ON Plotting Interval Distance Resolution by Dist 0 05 Nm Resolution by Time 10 sec Track Memory Used 23 Clear Track Memory Mode Normal Speed 9 5 Kts Heading 027 T Starting Waypoint MARINA Dest Waypoint ANCH RCK Active Simulation OFF Land Settings Menu Marine Settings Menu Nav Aids and Features Menu Other Settings Menu Chart Settings Natural Feat...

Страница 27: ...th up so that North is always at the top of the display or Projected Track up Projected Track up maintains the boat direction toward the top of the screen The chart is automatically rotated to achieve this affect In this mode a small square appears in the upper right corner of the LCD indicating the direction of North This a mode of operation is particularly useful for navigating narrow harbors or...

Страница 28: ...tion exceeds the value chosen This radius can be set anywhere from OFF to 9 99 distance units in 0 01 steps The Anchor Alarm function is intended for differential GPS operation where the error introduced by Selective Availability SA has been significantly reduced Guard Zone Guard Zone is a cross track error XTE alarm The alarm is sounded when the distance from the boat to the intended track XTE ex...

Страница 29: ... the GPS Chart400 To erase the track from the GPS Chart400 memory select Clear Track Memory from this menu 6 Simulation Mode Simulation mode provides a method of becoming familiar with the GPS Chart400 functions There are two simulator modes to choose from In both modes boat movement and satellite data are simulated and all navigation functions are available The first simulation method Demo mode a...

Страница 30: ... d n o c e s 0 2 n a h t s s e l e b d l u o h s x i f t s r i f o t t n e r e f f i d s i 0 0 4 t r a h C e h t n o d e t a c i d n i n o i t i s o P l a c o l m o r f d e v i r e d n o i t i s o p e m a s e h t m o r f s t r a h c t r a h c t c e r r o c e h t t c e l e S m u t a d t r a h c t c e r r o c n I m u t a d 0 0 1 o t p u s e i r a v 0 0 4 t r a h C n o d e t a c i d n i n o i t i s o...

Страница 31: ... 16Mbit memory 48Mbit max Plotting Scales 1 8 nm to 4096 nm with push button zoom chart dependent Operation Features One button Boat or Cursor re centering Dual Speed 8 way Cursor control Interfaces DGPS Input NMEA 0183 RTCM 104 ver 2 0 Autopilot Output NMEA 0183 Physical characteristics Chartplotter Size 138 mm H x 180 mm W x 67 mm D 5 4 x 7 1 x 2 6 Weight 0 62 kg Display 90 mm H x 120 mm W 3 5 x...

Страница 32: ...G Course Over Ground CTS Course To Steer optimum course to steer to return to original track DTG Distance To Go ETA Expected Time of Arrival SOG Speed Over Ground STR Steering difference between COG and CTS TTG Time To Go XTE Cross Track Error 6 0 Navigation Diagram ...

Страница 33: ...LOKO REV KERTAU CAMP AREA AS IGN47 NAD 1927 REV NAHRWAN CANTON AS 66 IGN47 51 NAD 1983 ROME 1940 CAPE IGN72 NAHRWAN S AMERICAN 69 CARTHAGE INDIAN NANKING 1960 SANTO DOS 65 CHATHAM 1971 INDIAN 1954 NAPARIMA BWI SAO BRAZ CHAU ASTRO INDIAN 1975 NEW P SANTO SAPPER H 43 CMP INCHAUSPE IRELAND 1965 NORWEGIAN SCHWARZECK 8 1 Autopilot Output The GPS Chart400 provides the following sentences for NMEA0183 co...

Страница 34: ...PS Chart400 User Manual STANDARD COMMUNICATIONS CORP 1997 ALL RIGHTS RESERVED PRINTED IN NEW ZEALAND MARCH 1998 M34055104A Standard Communications Corp P O Box 92151 Los Angeles CA 90009 2151 Telephone 310 532 5300 ...

Отзывы: