background image

Z100080 


ZX-

1 Operator’s Manual


Spinergy/SMP 


Page 20 

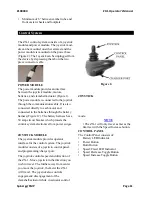
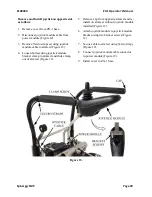
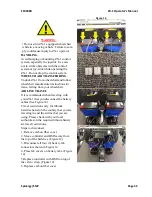
Remove and Install joystick on opposite side 
as follows:


1.


Remove cover from ZX-1 base. 

2.


Disconnect joystick module cable from 
power module (Figure 12). 

3.


Remove Velcro straps securing joystick 
module cable to armrest (Figure 12). 

4.


Loosen bolt securing joystick module 
bracket clamp in armrest and slide clamp 
out of armrest (Figure 12). 

5.


Remove cap from opposite armrest and re- 
install on armrest without joystick module 
installed (Figure 12). 

6.


Attach joystick module to joystick module 
bracket using two bracket screws (Figure 
12). 

7.


Secure cable to armrest using Velcro straps 
(Figure 12). 

8.


Connect joystick module cable connector 
to power module (Figure 12). 

9.


Install cover to ZX-1 base. 


Figure 12. 

Содержание ZX-1

Страница 1: ...Z100080 ZX 1 Operator s Manual Spinergy SMP Page 1 ZX 1 OPERATOR S MANUAL Z100080 REV 6 March 1 2015 1914 Palomar Oaks Way Suite 100 WWW SPINERGY COM Carlsbad CA 92008 Local 760 496 2121 U S A ...

Страница 2: ...e Updates and Modifications 8 CONTACT SPINERGY 9 II COMPONENTS AND SPECIFICATIONS 10 PHYSICAL PROPERTIES OF COMPATIBLE WHEELCHAIR 10 CONTROL SYSTEM 10 Power Module 10 Joystick Module 10 Joystick 10 Control Panel 10 Battery LED Indicator 12 Power Button 12 Horn Button 12 Speed Crawl Indicator 12 Speed Decrease Button 12 Speed Increase Button 12 Mode Select Buttons and LEDs 12 Programing Charger Por...

Страница 3: ...hecks 21 22 OPERATING ZX 1 22 ZX 1 Wheelchair Compatibility 23 Prescription Medication and Physical Limitations 23 Alcohol 23 Connecting ZX 1 to Wheelchair 23 Disconnecting ZX 1 from Wheelchair 24 Braking 24 Freewheel Mode 24 Cornering 24 Unlocking ZX 1 Manually 24 Locking ZX 1 Electronically 25 Unlocking ZX 1 Electronically 25 ENVIRONMENTAL FACTORS 25 Safety First 25 Outdoor Driving Surfaces 26 I...

Страница 4: ...ring 32 V BATTERY CHARGING AND MAINTENANCE 33 BATTERY CHARGING 33 Battery Break in 33 Charge the Batteries 33 Battery Maintenance 33 Battery LED Indicator 33 Reading Battery LED Indicator 34 MAINTENANCE 35 Cleaning 35 Tires 35 STORAGE INSTRUCTIONS 35 Short Term Storage 36 Long Term Storage 36 BATTERY REPLACEMENT INSTRUCTIONS 36 To replace batteries 37 Battery Recycling Directive 91 157 EEC 37 VI T...

Страница 5: ...0 Speed Crawl Indicator Ripples Up and Down 40 Speed Crawl Indicator Flashes 40 Mode Select LED Flashes 40 Circuit Breaker Tripping 40 41 Wiring Schematic Lead 42 Wiring Schematic Lithium 43 WARRANTY 44 ZX 1 WARRANTY POLICY 44 Limited Lifetime Warranty 44 One year limited warranty 44 Warranty Exclusions 44 ...

Страница 6: ...eel chair by providing powered mobility to man ual wheelchairs HOWTOUSETHISOPERATOR SMANUAL Read and follow all instructions warnings cautions and notes in this manual before operating the ZX 1 If there is any information in this manual that you do not understand or if you require additional assistance for setup or operation please contact Spinergy Failure to follow the instructions in this manual...

Страница 7: ...is 6 degrees CAUTION Fuse rating is 50 Amps Do not replace with a lower rated higher rated or slow blow fuse Fuse is located above batteries attached to frame Maximum weight of user not to exceed 250 lbs Maximum curb height 2 NOTE Minimum distance on fully charged bat tery is 5 miles for Lead Batteries and 9 miles for Lithium Batteries based on the max occupant weight rating of 250lbs Breaking dis...

Страница 8: ...r damage or injury due to improper or unsafe use of the Spinergy ZX 1 Spinergy specifically disclaims responsibility for bodily injury and property damage that occurs during any use that does not comply with this manual or any federal state local laws or ordinances If you do not understand the instructions warnings cautions or notes presented in this owner s manual or if you do not feel comfortabl...

Страница 9: ...ergy SMP Page 9 CONTACTSPINERGY For more information about our products and services or to send us your valuable comments contact Visit Our Website www Spinergy com Mailing Address 1914 Palomar Oaks Way Suite 100 Carlsbad CA 92008 U S A ...

Страница 10: ...Joystick Module Clamshell Actuator Wheels 2 Figure 1 Physical Properties of Compatible Wheelchair The ZX 1 can be used with any manual wheel chair with the following characteristics Rigid frame with a horizontal round cam ber tube Folding Chair Compatible with Swing Arm Attachment Camber tube must be mounted level with wheelchair rear wheel axles No obstructions under camber tube 24 25 26 wheelcha...

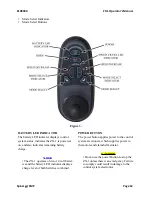
Страница 11: ...ies through the battery JOYSTICK Figure 2 harness Figure 12 The battery harness has a 50 amp circuit breaker which protects the control system electronics from power surges JOYSTICK MODULE The joystick module provides operator interface for the control system The joystick module consists of a joystick control panel and programming charger port The joystick controls speed and direction of the ZX 1 ...

Страница 12: ...ining battery charge NOTE The ZX 1 operates on two 12 volt batter ies and the battery LED indicator displays charge level of both batteries combined POWER BUTTON The power button applies power to the control system electronics which supplies power to the motors and clamshell actuator CAUTION Do not use the power Button to stop the ZX 1 unless there is an emergency Failure to comply could result in...

Страница 13: ...r is illuminated Figure 3 Clamshell actuator adjustment can be opened closed by deflecting joystick forward or aft To re enter drive mode press either mode select button and joystick becomes the operator control stick NOTE Once in actuator adjustment mode and clamshell actuator completely closes around wheelchair camber tube only allow aft wheelchair wheels to slightly raise off the ground Failure...

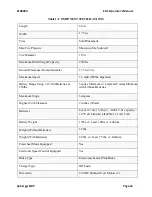
Страница 14: ...12 Volt Batteries at 250lbs 5 miles Minimum w Lead and 9 miles Minimum with Lithium Batteries Maximum Slope 6 degrees Highest Curb Clearance 2 inches 50mm Batteries Lead 12 volt 15 Ah 2 AGM 5 hr capacity 12 75 ah Lithium LiFePO4 12 volt 15 Ah Battery Weight 17lbs w Lead 10lbs w Lithium Weight Without Batteries 65 lbs Weight With Batteries 82 lbs w Lead 75 lbs w Lithium Freewheel Mode Equipped Yes ...

Страница 15: ...injury to operator Do not adjust your manual wheelchair to suit ZX 1 ZX 1 must be adjusted to suit wheelchair Failure to comply may cause wheelchair to tilt when disconnected from ZX 1 CENTER OF GRAVITY FOR ZX 1 Center of gravity CG for ZX 1 is directly correlated to the position of armrest brackets The distance from center of wheelchair rear axle to front edge of backrest vertical posts is the CG...

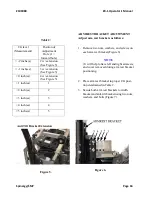
Страница 16: ...s and cover removed during arm rest bracket positioning 2 Place arm rest bracket in proper CG posi tion determined in Table 2 3 Secure both arm rest brackets to width bracket and anti tilt bracket using two nuts washers and bolts Figure 7 Figure 6 CG level Measurement Position of Adjustment Hole 1 forward hole 2 inche s 2 w extension See Figure 5 1 inch es 3 w extension See Figure 5 0 inch es 4 w ...

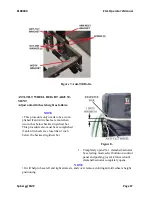
Страница 17: ... two inches below backrest rigidizer bar This procedure also must be accomplished if anti tilt wheels are closer than 1 inch below the backrest rigidizer bar Figure 8 1 Completely open ZX 1 clamshell actuator by selecting mode select button on control panel and pushing joystick forward until clamshell actuator completely opens NOTE It will help to have left and right armrests and cover removed dur...

Страница 18: ...Z100080 ZX 1 Operator s Manual Spinergy SMP Page 18 Figure 9 Figure 10 ...

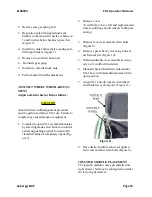
Страница 19: ...ely open ZX 1 clamshell actuator by selecting mode select button on control panel and pushing joystick forward until clamshell actuator completely opens Fig ure 3 It will help to have left and right armrests removed during anti tilt wheels width posi tioning 3 Remove four cross member allen bolts Figure 9 4 Remove spacer bar by removing bolts at each end of bar Figure 10 5 Widen adjustable cross m...

Страница 20: ...igure 12 4 Loosen bolt securing joystick module bracket clamp in armrest and slide clamp out of armrest Figure 12 5 Remove cap from opposite armrest and re install on armrest without joystick module installed Figure 12 6 Attach joystick module to joystick module bracket using two bracket screws Figure 12 7 Secure cable to armrest using Velcro straps Figure 12 8 Connect joystick module cable connec...

Страница 21: ...or and damage to equipment PRE RIDE SAFETY CHECK DAILY INSPECTION 1 Check tires and solid caster wheels verify tires and wheels do not contain flat spots and are properly seated on rims WARNING Maintain proper air pressure as shown on tire sidewall in PSI BAR kPa at all times Do not under or overinflate ZX 1 tires Failure to comply could result in injury to operator or damage to tires Inflate ZX 1...

Страница 22: ...nt hardware are secure 4 Inspect for any loose hardware on the wheelchair and ZX 1 5 Ensure all wheels are free of debris Inspect Adjust Periodically 1 Ensure wheelchair rolls straight no exces sive drag or pull to one side 2 Ensure arms are secure but easy to release and adjustment levers engage properly 3 Ensure arms operate and lock in securely 4 Inspect charger AC power cord for dam age Replac...

Страница 23: ...perate ZX 1 safely Failure to comply may result in injury to operator or damage to equip ment ALCOHOL The ZX 1 user must exercise care and common sense when operating his her ZX 1 This includes awareness of safety issues while under the influence of alcohol WARNING Do not operate ZX 1 while under influ ence of alcohol Failure may cause injury to operator and damage to equipment CONNECTING ZX 1 TO ...

Страница 24: ...o a stop a disc park brake is automatically activated FREEWHEEL MODE Each motor on the ZX 1 is equipped with a freewheel lever that can set the ZX 1 into freewheel mode The freewheel lever disengages the motor from the gearbox and enables the drive wheel to roll freely WARNING Never sit on ZX 1 equipped wheelchair in freewheel mode Never disengage motor from gearbox while operating ZX 1 Always mak...

Страница 25: ...ower button 2 After 1 second control system will beep 3 Release the power button 4 Position joystick forward until control sys tem beeps 5 Position joystick backward until control system beeps 6 Release joystick listen for long beep 7 ZX 1 is now locked UNLOCKING ZX 1 ELECTRONI CALLY Unlock ZX 1 as follows 1 Using power button toggle control system on maximum speed crawl indicator rip ples up and ...

Страница 26: ...as well The ZX 1 may be used safely on lawns and in park areas Whenever possible try to avoid the following terrain and situations Avoid driving on uneven terrain and or soft surfaces Avoid tall grass that may become lodged in ZX 1 running gear Avoid loosely packed gravel and sand Avoid operating ZX 1 in fresh or salt water Avoid using ZX 1 at the edge of a stream lake or ocean A safe rule to stan...

Страница 27: ...ENT STEPS AND CURBS Proceed with extreme caution when operating ZX 1 near raised surfaces unprotected ledges and drop offs such as curbs porches and stairs Always approach any obstacle straight toward the obstacle perpendicular to be conquered Riding over curbs or obstacles can cause tipping and serious bodily harm If you have any doubt that you can safely cross any curb or obstacle ALWAYS ASK FOR...

Страница 28: ...ng ramps When operating the ZX 1 on wheelchair building access ramps slow ZX 1 operation during tight turns which require keen cornering skills Use caution when approaching any ramps or steep grades Reduce ZX 1 to lowest speed setting during ramp operations and perform wide turns around tight corners While operating ZX 1 on inclines keep ZX 1 moving if possible Operate ZX 1 pointed straight up or ...

Страница 29: ... operate ZX 1 on steps or escala tors Failure to comply may cause injury to operator and damage to equipment DOORS Pass through doors as follows Determine whether door opens toward or away from ZX 1 operator Gently operate ZX 1 forward and push door open If door opens toward ZX 1 operator slowly operate ZX 1 backward to pull door open ELEVATORS Most modern elevators are equipped with door edge saf...

Страница 30: ...broadcast transmitters radio and TV broadcast antennas towers and amateur HAM radios NOTE Other types of hand held devices such as cordless phones laptop computers AM FM radios TV sets CD players cassette players and small appliances such as electric shav ers and hair dryers so far as we know are not likely to cause EMI problems to your ZX 1 Every power wheelchair or power assist device can resist...

Страница 31: ...ort all unintended movement incidents and unintended parking brake movements to Spinergy WARNING Power off ZX 1 as soon as it is safe dur ing unintended or uncontrollable motion occurs or if unintended park brake release occurs Failure to comply could result in injury to operator Power off ZX 1 if operator anticipates being seated for extended period of time This will prevent unexpected motion fro...

Страница 32: ...ng from your wheelchair AIRLINE TRAVEL It is recommended when traveling with your ZX 1 that you disconnect the battery cables See Figure 14 Travel restrictions vary for lithium batteries based on the country that you are traveling in and the airline that you are using Please check with your local authorities on the required lithium battery air travel restrictions Steps to disconnect 1 Remove carbo...

Страница 33: ...ERY MAINTENANCE AGM batteries are used to operate the ZX 1 The batteries are maintenance free See page 31 for battery replacement instructions BATTERY LED INDICATOR The battery LED indicator displays remaining battery charge and control system status It indicates the ZX 1 is powered on READING BATTERY LED INDICATOR Monitor and charge batteries as follows Battery LED indicator shows green yel low r...

Страница 34: ... then please see page 24 for the manual method to un dock wheelchair they age The best way to prolong ZX 1 batteries is by proper charging technique Battery life is shortened each time charge discharge takes place Do not allow batteries to sit without charge after discharging Always recharge ZX 1 bat teries promptly after they are discharged If ZX 1 battery LED indicator reading seems to fall more...

Страница 35: ... The wheel rims are split rims and will come apart if nuts are loosened or removed Do not loosen or remove any of the five nuts securing two halves of rims together Failure to comply may result in injury or death DO NOT over inflate tires Clean tires with ordinary kitchen cleaners and a damp cloth Do not use solvents on tires Solvents can cause the tire material to break down or become too soft ST...

Страница 36: ...pt to charge a frozen bat tery A cold or frozen battery should be warmed for several days prior to charging Turn power off Store in location safe from theft or vandal ism Do not store where heavy objects could potentially fall on top of or against the ZX 1 Do not place heavy objects on top of the ZX 1 LONG TERM STORAGE Follow all instructions for Short Term Storage and the following When storing f...

Страница 37: ... be difficult 4 Remove strap that secures batteries to frame compartment 5 Remove both batteries from frame com partment 6 Place new batteries in frame compartment use only sealed AGM non spillable batter ies that meet DOT CFR 173 159 d IATA Packing Instructions 806 and IATA Provi sion A67 7 Fasten strap tightly around both batteries ensuring batteries stay properly seated in frame compartment BAT...

Страница 38: ...cuit breaker as follows 1 Wait at least ten minutes for the control system electronics to return to normal operating temperature 2 Power off ZX 1 3 Press main circuit breaker to reset 4 Power on ZX 1 CAUTION If the main circuit breaker continues to trip there is probably an underlying elec trical fault that needs attention Do not continue to reset the main circuit breaker withoutcorrectingtheunder...

Страница 39: ...cuit to a battery condition Possible Solution Contact authorized Spinergy representative for repair 6 Malfunction ZX 1 will not drive Possible Solution Verify charger is not still connected0 and cable is undamaged 7 Malfunction Joystick fault Possible Solution Verify joystick is in center position before powering on control system 8 Malfunction Control system fault indicated Possible Solution Veri...

Страница 40: ... Spin ergy representative for repair SPEED CRAWL INDICATOR IS STEADY Speed Crawl indicator shows steady Possible Solution 1 Normal condition display may vary slightly based on control system program ing SPEED CRAWL INDICATOR RIPPLES UP AND DOWN Indicates control system is locked Possible Solution 1 Set power to on maximum speed crawl indicator will be rippling up and down 2 Position joystick forwa...

Страница 41: ...ies 3 If batteries test good battery charger may be the issue 4 ContactauthorizedSpinergyrepresentative for repair SPEED CRAWL MODE WITH LITHIUM BATTERIES Possible Solution 1 If the lithium batteries are low in voltage and the operator is traveling up a grade the system will automatically go into Crawl mode until a level ground is attained ...

Страница 42: ...Operator s Manual Spinergy SMP Page 42 LEAD BATTERY WIRING SCHEMATIC Figure 15 Joystick Left Motor PM Right Motor Actuator Battery Battery 110V A C Outlet Charger Black Red Red Black Circuit Breaker Proximity Switch ...

Страница 43: ... s Manual Spinergy SMP Page 43 LITHIUM BATTERY WIRING SCHEMATIC Figure 16 Joystick Left Motor PM Right Motor Actuator Battery Battery 110V A C Outlet Charger Black Red Red Black Circuit Breaker Proximity Switch BMS O B R B ...

Страница 44: ...Motor Gearbox Assembly Controller Shocks castor assemblies Proximity switch Note The LEAD Battery is covered by a separate six month warranty provided by the battery manufacturer The Lithium Batteries are covered by a three year Battery Warranty provided by Spinergy Inc The LEAD batteries are not war ranted by Spinergy WARRANTY EXCLUSIONS This warranty does not extend to those items which may requ...

Страница 45: ... 8 disconnecting 24 doors 29 E elevators 29 emi 30 emi rfi recommendations 30 environmental factors 25 escalators 29 F first time use 15 freewheel mode 24 G general safety 22 grass 27 gravel 27 H handling 15 horn button 12 I inclement weather 26 inclines 28 initial setup 15 introduction 6 J joystick 10 joystick module 10 joystick module placement 10 L lifts 31 locking 23 locking zx 1 23 M main cir...

Страница 46: ...ication 23 profile indicator 12 programing charger port 10 R ramps 28 rfi 30 S safety 21 shipping and delivery 6 speed profile decrease button 12 speed profile increase button 12 stairs 29 steps 27 T tight spaces 29 tires 35 transferring 32 transporting 31 troubleshooting 38 U updates 6 W warnings 6 warranty 44 weight limitations 21 ...

Страница 47: ...Z100080 ZX 1 Operator s Manual Spinergy SMP Page 47 1914 Palomar Oaks Way Suite 100 Carlsbad CA 92008 U S A ...

Отзывы: