background image

117

US

Ad
dit
ion
al Inf

o

rmat

ion

• If there is equipment that generates 

electromagnetic radiation, such as a 
wireless LAN, other 

Bluetooth

 device, 

or a microwave oven nearby, move 
them away.

The sound of your 

Bluetooth

 device 

cannot be heard on this receiver.

• Turn up the volume on your 

Bluetooth


device first, and then adjust the volume 
using 

2

 +/– (or MASTER 

VOLUME on the receiver).

Severe hum or noise

• If there are obstacles between the 

receiver and your 

Bluetooth

 device, 

remove or avoid the obstacles.

• If there is equipment that generates 

electromagnetic radiation, such as a 
wireless LAN, other 

Bluetooth

 device, 

or a microwave oven nearby, move 
them away.

• Turn down the volume of the 

connected 

Bluetooth

 device.

The Control for HDMI function does not 
work.

• Check the HDMI connection 

(page 25).

• Make sure “Control for HDMI” is set 

to “On” in HDMI Settings menu 
(page 94).

• Make sure the connected equipment is 

compatible with the Control for HDMI 
function.

• Check the Control for HDMI settings 

on the connected equipment. Refer to 
the operating instructions of the 
connected equipment.

• If you unplug the HDMI cable or 

change the connection, repeat the 
procedures of “Preparing for the 
“BRAVIA” Sync” (page 79)
.

• When “Control for HDMI” is set to 

“Off”, the “BRAVIA” Sync does not 
work properly, even if the equipment 
is connected to the HDMI IN jack.

• The types and the number of 

equipment which can be controlled by 
the “BRAVIA” Sync are restricted in 
the HDMI CEC standard as follows.
– Recording equipment (Blu-ray Disc 

recorder, DVD recorder, etc.): up to 
3 equipment

– Playback equipment (Blu-ray Disc 

player, DVD player, etc.): up to 3 
equipment

– Tuner-related equipment: up to 4 

equipment

– AV receiver (audio system): up to 1 

equipment

The remote control does not function.

• Point the remote control at the remote 

control sensor on the receiver 
(page 10).

• Remove any obstacles in the path 

between the remote control and the 
receiver.

• Replace all the batteries in the remote 

control with new ones, if they are 
weak.

• Make sure you select the correct input 

on the remote control.

“BRAVIA” Sync (Control 
for HDMI)

Remote control

Содержание STR-DN840

Страница 1: ...4 454 467 13 1 STR DN840 Multi Channel AV Receiver Operating Instructions ...

Страница 2: ...ert the user to the presence of the Hot Surface that may be hot if it is touched during the normal operation This equipment has been tested and found to comply with the limits set out in the EMC Directive using a connection cable shorter than 3 meters For customers in the United States Owner s Record The model and serial numbers are located on the rear of the unit Record these numbers in the space...

Страница 3: ...structions 1 Disconnect the AC power cord from the MAINS 2 Strip 10 to 15 mm of the wire insulation of the speaker cord 3 Connect the speaker cord to the apparatus and the speakers carefully so as not to touch the core of speaker cord by hand Also disconnect the AC power cord from the MAINS before disconnecting the speaker cord from the apparatus and the speakers The following FCC statement applie...

Страница 4: ...ping the radiator at least 20cm or more away from person s body excluding extremities hands wrists feet and ankles About This Manual The instructions in this manual are for model STR DN840 The model number is located at the lower right corner of the front panel The illustrations used in this manual are of the USA model and they may be different from your model Any differences in operation are mark...

Страница 5: ... from Microsoft or an authorized Microsoft subsidiary MPEG Layer 3 audio coding technology and patents licensed from Fraunhofer IIS and Thomson x v Color x v Colour and x v Color x v Colour logo are trademarks of Sony Corporation BRAVIA is a trademark of Sony Corporation PlayStation is a registered trademark of Sony Computer Entertainment Inc WALKMAN is a registered trademark of Sony Corporation M...

Страница 6: ...OF MERCHANTABILITY AND FITNESS FOR A PARTICULAR PURPOSE ARE DISCLAIMED IN NO EVENT SHALL THE FOUNDATION OR CONTRIBUTORS BE LIABLE FOR ANY DIRECT INDIRECT INCIDENTAL SPECIAL EXEMPLARY OR CONSEQUENTIAL DAMAGES INCLUDING BUT NOT LIMITED TO PROCUREMENT OF SUBSTITUTE GOODS OR SERVICES LOSS OF USE DATA OR PROFITS OR BUSINESS INTERRUPTION HOWEVER CAUSED AND ON ANY THEORY OF LIABILITY WHETHER IN CONTRACT ...

Страница 7: ...ing a USB device 45 Tuner Operations Listening to FM AM radio 48 Presetting FM AM radio stations Preset Memory 50 Enjoying Sound Effects Selecting the sound field 51 Using the Sound Optimizer function 54 Selecting the calibration type 55 Adjusting the Equalizer 55 Using the Pure Direct function 55 Resetting sound fields to the default settings 56 Using Network Features About the network functions ...

Страница 8: ... Input Assign 83 Using a bi amplifier connection 85 Reverting back to the factory default settings 85 Adjusting Settings Using the Settings menu 86 Easy Setup 88 Speaker Settings menu 88 Audio Settings menu 92 HDMI Settings menu 94 Input Settings menu 95 Network Settings menu 95 System Settings menu 96 Operating without using the OSD 97 Using the Remote Control Reassigning the input button 103 Res...

Страница 9: ...s Do not mix manganese batteries and other kinds of batteries Do not expose the remote control sensor to direct sunlight or lighting apparatuses Doing so may cause a malfunction If you do not intend to use the remote control for an extended period of time remove the batteries to avoid possible damage from battery leakage and corrosion When you replace the batteries the remote control buttons may b...

Страница 10: ...e 71 If the indicator flashes in quick succession the software update has error page 106 B SPEAKERS page 35 C TUNING MODE TUNING Press TUNING MODE to operate a tuner FM AM Press TUNING to scan a station D A F D 2CH MOVIE MUSIC page 51 53 E Display panel page 11 F SOUND OPTIMIZER page 54 G BLUETOOTH page 76 Operates the Bluetooth function H DIMMER Adjusts the brightness of the display panel in 3 le...

Страница 11: ...E TrueHD Lights up when the receiver is decoding Dolby True HD signals F DTS HD indicator Lights up the respective indicator when the receiver is decoding the corresponding DTS format signals G Speaker system indicator page 35 H Tuning indicator ST Lights up when the receiver tunes to a stereo broadcast MEM Lights up when memory function such as Preset Memory page 50 etc is activated I SLEEP Light...

Страница 12: ...vailable page 71 Q BT Lights up when Bluetooth device is connected R Wireless LAN signal strength indicator Lights up to show the strength of the wireless LAN signal page 38 39 S Wired LAN indicator Lights up when LAN cable is connected T USB Lights up when iPod iPhone or USB device is detected When playing a Dolby Digital or DTS format disc make sure that you have completed the digital connection...

Страница 13: ...the HDMI TV OUT or MONITOR OUT jack to your TV to watch the selected input image page 24 Rear panel HDMI IN OUT jacks page 24 27 29 OPTICAL IN jacks page 24 28 COAXIAL IN jack page 29 FM ANTENNA jack page 30 AM ANTENNA terminals page 30 LAN port page 32 Wireless LAN antenna page 32 AUDIO IN jacks page 24 28 29 SUBWOOFER OUT jacks page 22 VIDEO IN OUT jacks White L Red R Black Yellow ...

Страница 14: ...ss MEM E To control the receiver A 1 on standby Turns the receiver on or sets it to the standby mode Saving the power in standby mode When Control for HDMI Network Standby Pass Through and BT Standby are set to Off B TV 11 on standby Turns the TV on or sets it to the standby mode C Input buttons Selects the equipment you want to use When you press any of the input buttons the receiver turns on The...

Страница 15: ...he display changes cyclically as follows 0 30 00 t 1 00 00 t 1 30 00 t 2 00 00 t OFF To check the remaining time before the receiver turns off press SLEEP The remaining time appears on the display panel The Sleep Timer will be canceled when you perform the following Press SLEEP again Update the software of the receiver Press 1 MEM Hold down SHIFT N then press MEM to store a station during tuner op...

Страница 16: ... Preview for HDMI function is available for HDMI BD DVD GAME and VIDEO input This function does not work in the following cases The equipment is not connected to the HDMI input jack The equipment connected to the supported HDMI input jack is not turned on The current input is not HDMI input When Fast View is set to Off When an unsupported HDMI video format 480i 576i 4K some 3D video signal some vi...

Страница 17: ... Disc player CD player B TV 1 z C Numeric buttons z z z z z CLEAR z z z G POP UP MENU z z TOP MENU z z I OPTIONS z z z J HOME z z z z K z z z z z m M z z z z z N X x z z z z z Q RETURN O z z z R V v B b z z z z S DISPLAY z z z z z T SHUFFLE z REPEAT z z z W TV INPUT z ...

Страница 18: ...ty image Digital Preparing the receiver See Connecting the AC power cord mains lead page 33 and Turning on the receiver page 33 Setting the receiver See Setting up the receiver using the Easy Setup page 33 Setting the audio output settings on the connected equipment To output multi channel digital audio check the digital audio output setting on the connected equipment For a Sony Blu ray Disc playe...

Страница 19: ...ng frequency of more than 96 kHz are played back at 96 kHz or 88 2 kHz Digital audio formats supported by the receiver Audio format Display Maximum number of channels Connection between the playback equipment and the receiver COAXIAL OPTICAL HDMI Dolby Digital DOLBY D 5 1 a a Dolby Digital EX DOLBY D EX 6 1 a a Dolby Digital Plusa DOLBY D 7 1 a Dolby TrueHDa DOLBY HD 7 1 a DTS DTS 5 1 a a DTS ES D...

Страница 20: ... the front high speakers simultaneously 5 1 channel speaker system To fully enjoy theater like multi channel surround sound requires five speakers two front speakers a center speaker and two surround speakers and a subwoofer 7 1 channel speaker system using surround back speakers You can enjoy high fidelity reproduction of DVD or Blu ray Disc software recorded sound in 6 1 channel or 7 1 channel f...

Страница 21: ...can enjoy vertical sound effects by connecting additional two front high speakers Place the front high speakers at an angle between 25 to 35 at an angle of 20 5 in height Since the subwoofer does not emit highly directional signals you can place it wherever you want Tip 20 5 ...

Страница 22: ... to disconnect the AC power cord mains lead A Monaural audio cord not supplied B Speaker cord not supplied Right Left Right Center speaker B Left B B Surround speaker B A Surround back Bi amplifier Front high Front B speaker Front A speaker A Subwoofer Right Left ...

Страница 23: ... amplifier connection page 23 Set the SB Assign to Bi Amp in the Speaker Settings menu page 90 After you have installed and connected your speaker be sure to select the speaker pattern from the Speaker Settings menu page 88 If you are not using surround back speakers and front high speakers you can connect the front speakers to the SPEAKERS SURROUND BACK BI AMP FRONT HIGH FRONT B terminals using a...

Страница 24: ...t HDMI TV OUT jack to a TV Before connecting cords be sure to disconnect the AC power cord mains lead A Optical digital cord not supplied B Audio cord not supplied C Video cord not supplied D HDMI cable not supplied Sony recommends that you use an HDMI authorized cable or Sony HDMI cable ARC TV A Audio Video signals Video signals Audio signals C D or B Recommended connection Alternative connection...

Страница 25: ...If your TV does not support System Audio Control function set the HDMI Audio Out to TV AMP in the HDMI Settings menu page 94 4a Connecting the video equipment High Definition Multimedia Interface HDMI is an interface which transmits video and audio signals in digital format By connecting Sony BRAVIA Sync compatible equipment using HDMI cables operations can be simplified See BRAVIA Sync Features p...

Страница 26: ...not be displayed properly We do not recommend using an HDMI DVI conversion cable When you connect an HDMI DVI conversion cable to a DVI D equipment the sound and or the image may be lost Connect a separate audio cords or digital connecting cords then set the Audio Input Assign in the Input Settings menu page 83 when the sound is not output correctly When connecting optical digital cords insert the...

Страница 27: ...as a better sound quality When you need a higher sound quality connect your equipment to the BD for AUDIO jack and select BD as input The default settings for the BD input button on the remote control is Blu ray Disc player Be sure to change the default setting of the BD input button so that you can use the button to control your equipment For details see Reassigning the input button page 103 You ...

Страница 28: ...upplied C Video cord not supplied Connecting equipment with jacks other than HDMI jacks B Audio signals Audio signals Satellite tuner cable TV tuner Video signals C B A Video signals C VCR DVD recorder Video game or Recommended connection Alternative connection ...

Страница 29: ...r cord mains lead A Coaxial digital cord not supplied B Audio cord not supplied A USB cable not supplied Connecting a Super Audio CD Player CD player Recommended connection Alternative connection Super Audio CD player CD player Audio signals B A or Connecting an iPod iPhone USB device iPod iPhone USB device A ...

Страница 30: ...on of the receiver A Broadband line connection A Broadband line connection to the Internet is required in order to listen to Sony Entertainment Network SEN and to update the software of the receiver Modem This is the device that is connected to the broadband line to communicate with the Internet Some of these devices are integrated with the router Router Use a router compatible with 100 Mbps or gr...

Страница 31: ...used in an environment in which there is power supply noise from electric products or in a noisy network environment use a shielded type LAN cable Server A server is a device which delivers content music photos and videos to a DLNA device on a home network A device that can be used as a server a computer etc must be connected to your wireless or wired LAN home network For details on servers which ...

Страница 32: ...the router with a wired connection A For a wired LAN connection only B For a wireless LAN connection only Be sure to use a wireless LAN router access point An audio playback on a server may occasionally be interrupted when you use a wireless connection Configuration example Internet Modem Server Router LAN cable not supplied LAN cable not supplied Note ...

Страница 33: ... receiver in accordance with the instructions on the TV screen Switch the input of the TV to the input which the receiver is connected When you turn on the receiver for the first time or after the receiver is initialized the Easy Setup screen appears on the TV screen Follow the on screen instructions to set up the receiver You can set up the following functions using the Easy Setup Language Speake...

Страница 34: ...er output is not set to SPK OFF page 35 Make sure that you are not using PARTY STREAMING function page 68 Disconnect the headphones Remove any obstacles in the path between the optimizer microphone and the speakers to avoid measurement errors Get accurate measurement by making sure the environment is quiet The speakers emit very loud sound during the calibration and the volume cannot be adjusted P...

Страница 35: ...tional front speaker system to the SURROUND BACK BI AMP FRONT HIGH FRONT B terminals select Speaker B Bi Amp If you connect front speakers to the SURROUND BACK BI AMP FRONT HIGH FRONT B terminals using a bi amplifier connection select Bi Amp Off If you connect surround back or front high speakers to the SURROUND BACK BI AMP FRONT HIGH FRONT B terminals select Off To select the front speaker You ca...

Страница 36: ...n the TV screen 2 Press V v repeatedly to select Settings then press 3 Press V v repeatedly to select Network Settings then press 4 Press V v repeatedly to select Internet Settings then press 5 Press V v repeatedly to select Wired Setup then press If Change Settings appears on the TV screen select OK then press 6 Press V v repeatedly to select Auto then press IP settings information appears on the...

Страница 37: ...r access point You may encounter setup difficulties if the receiver and the wireless LAN router access point are located too far from each other If you do move the devices closer to each other Searching for an access point and setting up a wireless network Access Point Scan method You can set up a wireless network by searching for an access point To set up the network using this connection method ...

Страница 38: ...not been secured by encryption using the security key the security setting display does not appear in step 8 When checking the network settings see Information page 95 Setting up a wireless network using an access point compliant with WPS You can easily set up a wireless network using an access point compliant with WPS The WPS setting can be made using either the push button configuration method o...

Страница 39: ...Input the receiver s PIN code into the wireless LAN router access point The receiver starts the network settings Completed appears after the network settings are complete and lights up on the display panel To return to the Network Settings menu press Depending on the network environment the network settings may take some time 5 Perform the server settings To listen to audio content stored on the s...

Страница 40: ... on the TV the home menu may take some time to appear on the TV screen 3 Press V v repeatedly to select a menu you want then press to enter the menu The menu item list appears on the TV screen Example When you select Watch 4 Press V v repeatedly to select the menu item you want to adjust then press to enter the menu item 5 Repeat steps 3 and 4 to select the parameter you want When OPTIONS appears ...

Страница 41: ...playback Menu icon Description Watch Selects the video source to be input to the receiver page 41 Listen Selects the music from the SA CD CD USB device Bluetooth device Home Network or SEN page 41 You can also enjoy FM AM radio of the built in receiver Sound Effects Enables you to enjoy sound development provided by various Sony proprietary technologies or functions page 51 Settings Adjusts the se...

Страница 42: ...ume differently using the MASTER VOLUME knob on the receiver or the 2 button on the remote control To turn the volume up or down quickly Turn the knob quickly Press and hold the button To make fine adjustment Turn the knob slowly Press the button and release it immediately To activate the muting function Press The muting function will be canceled when you do the following Press again Change the vo...

Страница 43: ...onsibility in the event that data recorded to iPod iPhone is lost or damaged when using an iPod iPhone connected to this receiver This product has been designed specifically to work with iPod iPhone and has been certified to meet Apple performance standards Compatible iPod iPhone models Notes iPhone 3GS iPhone 3G iPhone 4S iPod touch 2nd generation iPod classic iPod nano 4th generation video iPod ...

Страница 44: ...e is connected iPod iPhone appears on the TV screen 4 Follow the on screen instructions to select the iPod iPhone control mode To operate the iPod iPhone using the remote control Press USB before you use the following buttons Selecting the iPod iPhone control mode iPhone CTRL HOME V v B b Press Operation N Starts play X x Pauses play m M Fast reverses or forwards Goes to the previous next track RE...

Страница 45: ...does not play files encoded with DRM You can use the following Sony USB devices on this receiver Verified Sony USB device Message and explanation Reading The receiver is recognizing and reading information of the iPod or iPhone Not supported An unsupported iPod or iPhone is connected No device is connected No iPod or iPhone is connected No music No music was found Headphones not supported No sound...

Страница 46: ...e sure to connect after the display Creating Library or Creating Database on the USB device has disappeared 1 Press HOME The home menu is displayed on the TV screen 2 Select Listen then press 3 Select USB then press When the USB device is connected USB appears on the TV screen You can operate the USB device using the remote control of the receiver 4 Select the content you want from the content lis...

Страница 47: ... folder levels tree structure of files including ROOT folder The maximum number of audio files and folders may vary depending on the file and folder structure Do not save other types of files or unnecessary folders on a USB device Compatibility with all encoding writing softwares recording devices and recording media cannot be guaranteed Incompatible USB device may produce noise or interrupted aud...

Страница 48: ...e and explanation Reading The receiver is recognizing and reading information of the USB device Device error The memory of the USB device could not be recognized page 45 Not supported An unsupported USB device is connected an unknown device is connected or the USB device is connected through a USB hub page 45 No device is connected No USB device is connected or the connected USB device is not reco...

Страница 49: ... FM stereo reception 1 Tune in the station you want to listen to using Auto Tuning Direct Tuning page 49 or select the preset station you want page 50 2 Press OPTIONS 3 Select FM Mode then press 4 Select Mono then press You can enter the frequency of a station directly by using the numeric buttons 1 Press D TUNING 2 Hold down SHIFT then press the numeric buttons to enter the frequency then press E...

Страница 50: ...e time to change the AM tuning scale All preset stations will be erased when you change the tuning scale Presetting FM AM radio stations Preset Memory You can store up to 30 FM and 30 AM stations as your favorite stations 1 Tune to the station that you want to preset using Auto Tuning page 49 or Direct Tuning page 49 2 Select Preset Memory then press 3 Select a preset number then press The station...

Страница 51: ...ant You can select the sound field you want by pressing SOUND FIELD repeatedly on the remote control You can also use A F D 2CH Movie or Music on the receiver Auto Format Direct A F D mode This mode allows you to listen to higher fidelity sound and select the decoding mode for listening to a 2 channel stereo sound as multi channel sound 2 channel sound mode You can switch the output sound to 2 cha...

Страница 52: ...so the best sound ambience just as the movie s sound engineer intended in the mastering process You can select the effect type for HD D C S as follows Dynamic This setting is suitable for an environment which is reverberant but lacks a spacious feeling where sound absorption is not sufficient It emphasizes the reflection of sound and reproduces the sound of a large classical movie theater Thus the...

Страница 53: ... features a resonant and unique reverberative sound x Jazz Club JAZZ Reproduces the acoustics of a jazz club x Live Concert CONCERT Reproduces the acoustics of a 300 seat live house x Stadium STADIUM Reproduces the feeling of a large open air stadium x Sports SPORTS Reproduces the feeling of sports broadcasting x Portable Audio PORTABLE Reproduces a clear enhanced sound image from your portable au...

Страница 54: ...PLIIx Movie Music is available only when the speaker pattern is set to a setting with surround back speaker s PLIIz Height is available only when the speaker pattern is set to a setting with front high speakers The sound fields for music and movie do not work in the following cases DTS HD Master Audio DTS HD High Resolution Audio or Dolby TrueHD with sampling frequency of more than 48 kHz are bein...

Страница 55: ...lity bass treble level for each speaker 1 Select Sound Effects from the home menu then press 2 Select Equalizer then press 3 Select Front Center Surround or Front High then press 4 Select Bass or Treble 5 Adjust the gain then press This function does not work when Analog Direct is being used Frequencies for Bass and Treble are fixed Depending on the audio format the receiver may play back signals ...

Страница 56: ...at has an authorized DLNA logo displayed on the device page 62 You can use the receiver as a device equivalent to a UPnP media renderer on your home network With an Internet connection you can listen to music services page 65 and update the software of the receiver You can listen to the same music at the same time in different rooms through the PARTY STREAMING function You can register Media Remot...

Страница 57: ...t This section explains how to set up Windows Media Player when using it as a server For details on the settings of other server devices refer to the operating instructions or help of the respective devices or applications The items displayed on the computer may be different from the ones shown below depending on the version of the operating system or the computer environment For details refer to ...

Страница 58: ...ndow appears If the item you want does not appear on the display try to change the display type of the Control Panel 3 Select Change advanced sharing settings 4 Select Choose media streaming options from Media streaming 5 If Media streaming is not turned on appears on the Media streaming options window select Turn on media streaming Tip ...

Страница 59: ...To refresh the server list page 62 This section explains how to set up manufacturer installed Windows Media Player 12 for Windows 7 For details on how to operate Windows Media Player 12 refer to Help for Windows Media Player 12 1 Go to Start Control Panel 2 Select View network status and tasks under Network and Internet The Network and Sharing Center window appears If the item you want does not ap...

Страница 60: ...ll The Allow All Media Devices window opens If all the devices in the local network are set to Allowed select OK and close the window 10Select Allow all computers and media devices 11Select OK to close the window 12Refresh the server list When the settings are completed refresh the server list of the receiver and select this server from the server list For details on selecting a server see To refr...

Страница 61: ...that Location type is changed to Private and select Close 8 Confirm that Private network is displayed on the Network and Sharing Center window and close the window 9 If Share my media in the Media Sharing window that is displayed in step 3 is not checked check Share my media then select OK A list of connectable devices is displayed 10Select Settings that appears beside Share my media to 11Check Al...

Страница 62: ...ptions menu appears 2 Select Delete then press The confirmation display appears on the TV screen 3 Select OK then press Completed appears and the selected server is deleted Even if you delete the server from the server list the server will appear in the list again if the receiver finds it on the network such as when you refresh the server list Enjoying audio content stored on the server You can pl...

Страница 63: ... power cord from the wall outlet The receiver may take time to display items when browsing a folder that contains a large amount of audio content In this case use the Keyword Search page 74 If you select a folder such as an artist folder genre folder etc then press the N button the receiver plays all items in the selected folder The receiver resumes from the last selected item when the function is...

Страница 64: ...sily enjoy the receiver by the operation on your remote device To register the TV SideView Device 1 Press HOME NETWORK You can also select HOME NETWORK from Listen in home menu 2 Press OPTIONS 3 Select TV SideView Device Registration then press 4 Select Start Registration then press The receiver starts to detect TV SideView device that is ready for registration Connecting appears on the TV screen ...

Страница 65: ...For details see 6 Connecting to the network page 30 Visit the website below for more information on the SEN http www sonyentertainmentnetwork com Checking the copyright protection Operating Home Network function using the remote control To Do the following Pause playback Press X during playback Press N to resume playback Stop playback Press x Gotobeginning of the current track previous next track ...

Страница 66: ...ess RETURN O to go to the previous directory If No service is available appears and you cannot obtain a service provider list press OPTIONS and select Refresh Internet content may be discontinued or changed without notice The receiver displays the last selected service or station when the function is changed to SEN function until the receiver is turned off When Network Standby is set to On the las...

Страница 67: ... select the preset station directly You can enjoy listening to the content of a variety of music services offered on the Internet Visit the website below for more information on music services how to enjoy services and the registration code of the receiver http munlimited com home Checking the registration code You may be required to enter the registration code of the receiver when you enjoy a new...

Страница 68: ...r an interruption when using a wireless connection connect your receiver to the router with a wired connection page 32 While PARTY streaming a device called a PARTY host starts a PARTY and streams music and a device called a PARTY guest joins a PARTY and receives music from the PARTY host Before using the PARTY STREAMING function make sure that PARTY STREAMING is set to On page 96 You can enjoy th...

Страница 69: ...e streamed 3 Press PARTY START START PARTY appears on the display panel The receiver starts PARTY streaming as a PARTY host To close a PARTY Press PARTY CLOSE The receiver can join a PARTY that has been started by another device so that you can enjoy the same audio content being played in a different room While the PARTY host device is having a PARTY press PARTY JOIN and the receiver joins the PAR...

Страница 70: ...later Refer to Compatible iPod iPhone iPad models on this page for details on the supported versions of iOS or iTunes Update iOS or iTunes to the latest version before using with the receiver Refer to the operating instructions of your device for details on operating iOS devices iTunes or AirPlay You cannot use this receiver as a PARTY host while using the AirPlay function 1 Tap click on the icon ...

Страница 71: ...s or iTunes For details on the use of iTunes refer to the Help of iTunes The volume level of iOS devices or iTunes may not be able to be linked with the volume level of this receiver Updating the software By downloading the latest version of the software you can take advantage of the newest functions The receiver accesses the Sony server to update the software If a new update is available New Soft...

Страница 72: ...dby indicator lights off The receiver does not finish the update after 40 minutes and UPDATING keep on flashes on the display panel Unplug the power cord and then plug in the power cord again The receiver will try to update the software If the condition continues contact your nearest Sony dealer To cancel the procedure or to go back to the previous screen Press RETURN O at any point before the rec...

Страница 73: ...le The receiver does not recognize the data on the server Software update is required The service is not available in the current version of the receiver software Visit the website below for more information on the software update http munlimited com home No preset station is stored There is no station stored on the receiver for the selected preset number Message and explanation No service is avai...

Страница 74: ...tons to enter a keyword A keyword can be up to 15 characters Enter a keyword that will match the letters or a word at the beginning of the name or title of the item you want to search for When the receiver searches for an item The at the beginning of a name and the following space will be ignored 3 Press An item that matches the keyword appears If the item appears is not the one you are searching ...

Страница 75: ...ceiver Profile is standardization of the function for each Bluetooth device specification This receiver supports the following Bluetooth version and profiles Communication System Bluetooth Specification version 3 0 Compatible Bluetooth Profiles A2DP Advanced Audio Distribution Profile Receiving audio content of high quality AVRCP 1 3 Audio Video Remote Control Profile Controlling audio video equip...

Страница 76: ...vices may appears on the Bluetooth device display depending on the type of Bluetooth device This receiver is displayed as STR DN840 When establishing a connection with this receiver select the audio profile A2DP AVRCP at the Bluetooth device If the Bluetooth device does not support the AVRCP profile you cannot perform playback or other operations with this receiver page 75 5 Select STR DN840 on th...

Страница 77: ...blished the device name appears on the TV screen and BT lights up on the display panel To disconnect from a Bluetooth device press BLUETOOTH on the receiver You can also disconnect from your Bluetooth device For details refer to the operating instructions of your Bluetooth device While connected to a Bluetooth device this receiver cannot be detected and a connection cannot be established from anot...

Страница 78: ...audio 1 Select BT AAC in step 4 in Setting the Bluetooth Standby mode then press 2 Select On or Off then press On AAC audio is available Off AAC audio is not available To turn off this function Select Off in step 2 then press You can enjoy high quality sound if the AAC is enabled When you change the setting the Bluetooth device is disconnected from the receiver automatically Select Address Info in...

Страница 79: ...te with non Sony equipment Equipment not compatible with BRAVIA Sync cannot activate these features Preparing for the BRAVIA Sync The receiver is compatible with the Control for HDMI Easy Setting function If your TV is compatible with the Control for HDMI Easy Setting function you can set the Control for HDMI function of the receiver and playback equipment automatically by setting the Control for ...

Страница 80: ...ol for HDMI Easy Setting function page 79 or If your TV is not compatible with the Control for HDMI Easy Setting function page 80 Before you perform the Control for HDMI Easy Setting on your TV be sure to turn on the TV and other connected equipment including the receiver first If the playback equipment cannot function after you have made the settings for Control for HDMI Easy Setting check the Co...

Страница 81: ...of the TV When Control for HDMI is set to On the HDMI Audio Out settings in the HDMI Settings menu will set automatically based on the System Audio Control settings page 94 If the TV is turned on before turning on the receiver the TV will momentarily loose the sound output System Power Off When you turn the TV off using the power button on the TV s remote control the receiver and the connected equ...

Страница 82: ...page 93 or A V Sync page 93 To use the Home Theatre Control function your TV must be able to access a broadband service For details refer to the operating instructions of your TV Remote Easy Control You can use the TV remote control to operate the menu of the receiver Select the receiver AV AMP recognized by the TV The receiver is recognized as Tuner AV AMP by the TV Your TV must be compatible wit...

Страница 83: ...ver and the TV are not activated the ARC does not work OPT Specifies the digital audio signals input to the DIGITAL OPTICAL jack COAX Specifies the digital audio signals input to the DIGITAL COAXIAL jack Analog Specifies the analog audio signals input to the AUDIO IN L R jacks Based on the input appears on the display panel and other modes cannot be selected When Analog Direct is being used audio ...

Страница 84: ... 6 Press Default setting When you assign the digital audio input the INPUT MODE setting may change automatically One reassignment is allowed for each input Input name BD DVD GAME SAT CATV VIDEO SA CD CD Assignable audio input jacks OPT 1 a a a a a a OPT 2 a a a a a a COAX a a a a a a None a a a a a a Notes ...

Страница 85: ... Amp the speaker level and distance settings of the surround back speakers and front high speakers become invalid and those of the front speakers are used Reverting back to the factory default settings You can clear all memorized settings and revert the receiver back to the factory default settings by performing the following procedure This procedure can also be used to initialize the receiver bef...

Страница 86: ...ome menu then press to enter the menu mode The Settings menu list appears on the TV screen 3 Select the menu item you want then press to access the menu item Example When you select Speaker Settings 4 Select the parameter you want then press To return to the previous screen Press RETURN O To exit the menu Press HOME to display the home menu then press HOME again Adjusting Settings HOME RETURN O V ...

Страница 87: ...Input Mode Input Edit Audio Input Assign Name In Control for HDMI Pass Through HDMI Audio Out Subwoofer Level Fast View D L L Sound Optimizer Equalizer Sound Field A V Sync Auto Volume Dual Mono D Range Comp Auto Calibration Calibration Type Speaker Pattern A P M Center Lift Up SB Assign Manual Setup Crossover Freq Test Tone Distance Unit Network Settings page 95 Internet Settings Information PART...

Страница 88: ...tting process without saving the measurement results 3 Save the measurement result Select Save Exit in step 2 The A P M Automatic Phase Matching function is activated after you save the measurement result The A P M function does not work in the following cases The calibration type is set to Off when using the Calibration Type page 90 When Dolby TrueHD or DTS HD signals with a sampling frequency of...

Страница 89: ...nd back speakers or front high speakers are connected even though surround speakers are not connected Connect the surround speaker s to the SPEAKERS SURROUND terminals The surround back speaker is connected only to the SPEAKERS SURROUND BACK BI AMP FRONT HIGH FRONT B R terminals When you connect only one surround back speaker connect it to the SPEAKERS SURROUND BACK BI AMP FRONT HIGH FRONT B L ter...

Страница 90: ...ight on the screen allowing you to enjoy natural representation without discomfort 1 10 Off This function does not work in the following cases Headphones are connected There is no center speaker There are no front high speakers 2ch Stereo Analog Direct and Multi Stereo is being used The sound field for music is being used x SB Assign Surround back speaker assign Lets you set the SPEAKERS SURROUND ...

Страница 91: ...h you want to adjust the size then press 2 Select the parameter under Size then press 3 Set the size of the selected speaker then press Large If you connect large speakers that will effectively reproduce bass frequencies select Large Normally select Large Small If the sound is distorted or you feel a lack of surround effects when using multi channel surround sound select Small to activate the bass...

Страница 92: ... SW You can select which speakers will output the test tone 3 Adjust the speaker level for manual test tone then press Fix SB appears when only one surround back speaker is connected x Distance Unit Lets you select the unit of measurement for setting distances feet The distance is displayed in feet meter The distance is displayed in meters Audio Settings menu You can adjust settings for the audio ...

Страница 93: ...nnected equipment This function is useful for example when the sound of a commercial is louder than the TV programs On Off Be sure to reduce the volume level before you turn on off this function As this function is available only when Dolby Digital DTS or Linear PCM signals are input the sound may suddenly increase when you switch to other formats This function does not work in the following cases...

Страница 94: ...oes not output HDMI signals when in standby mode Turn on the receiver to enjoy the connected equipment s source on the TV This setting saves power in the standby mode when compared with the On setting When Auto is selected it may take a little more time for the image and sound to be output to the TV than when On is selected x HDMI Audio Out Lets you set the HDMI audio signals output from the playb...

Страница 95: ...plays an input to the Listen menu Watch Listen Displays an input to both the Watch and Listen menus x Audio Input Assign Lets you set the audio input jack s assigned to each input For details see Using other audio input jacks Audio Input Assign page 83 x Name In Lets you set the name displayed on the Watch Listen menu You can enter a name of up to 8 characters for inputs and display it It is more ...

Страница 96: ...ters to be easily recognizable by other devices on the home network To assign the device name 1 Select Device Name then press 2 Press to select the current device name 3 Hold down SHIFT then press numeric text button to enter the device name 4 Press The default device name is STR DN840 is the last 6 digits of MAC Address of the receiver x Network Standby While the Network Standby mode is set to On...

Страница 97: ...on 1 Select Network Update then press 2 Select Version then press The software version appears on the TV screen x Update Alert Lets you set whether or not to inform you of newer software version information on the TV screen On Off Operating without using the OSD You can operate this receiver using the display panel even if the TV is not connected to the receiver 1 Press AMP MENU The menu is displa...

Страница 98: ...FR 10 0 dB 0 5 dB interval Center speaker levelb CNT LEVEL CNT 10 0 dB to CNT 10 0 dB 0 5 dB interval Surround left speaker levelb SL LEVEL SL 10 0 dB to SL 10 0 dB 0 5 dB interval Surround right speaker levelb SR LEVEL SR 10 0 dB to SR 10 0 dB 0 5 dB interval Surround back speaker levelb SB LEVEL SB 10 0 dB to SB 10 0 dB 0 5 dB interval Surround back left speaker levelb SBL LEVEL SBL 10 0 dB to S...

Страница 99: ...speaker distanceb CNT DIST CNT 1 00 m to CNT 10 00 m CNT 3 3 to CNT 32 9 0 01 m 1 inch interval Surround left speaker distanceb SL DIST SL 1 00 m to SL 10 00 m SL 3 3 to SL 32 9 0 01 m 1 inch interval Surround right speaker distanceb SR DIST SR 1 00 m to SR 10 00 m SR 3 3 to SR 32 9 0 01 m 1 inch interval Surround back speaker distanceb SB DIST SB 1 00 m to SB 10 00 m SB 3 3 to SB 32 9 0 01 m 1 in...

Страница 100: ...t Mode INPUT MODE AUTO OPT COAX ANALOG Naming Inputs NAME IN For details see Name In in Input Settings menu page 95 Digital audio input Assignment A ASSIGN For details see Using other audio input jacks Audio Input Assign page 83 Surround settings SURROUND HD D C S Effect Typef HD D C S TYP DYNAMIC THEATER STUDIO EQ settings EQ Front speakers bass level FRT BASS FRT B 10 dB to FRT B 10 dB 1 0 dB st...

Страница 101: ...IZER OFF LOW NORMAL Synchronizes audio with video output A V SYNC 0 ms to 300 ms 10 ms interval HDMI AUTO Advanced AUTO volume AUTO VOL A VOL ON A VOL OFF Digital broadcast language selection DUAL MONO MAIN SUB MAIN SUB Dynamic range compression D RANGE COMP ON COMP AUTO COMP OFF HDMI settings HDMI Control for HDMI CTRL HDMI CTRL ON CTRL OFF Pass Through PASS THRU ON AUTO OFF HDMI Audio out AUDIO ...

Страница 102: ... such as sound field 1 Select the input for which you want to check the information 2 Press AMP then press DISPLAY repeatedly Each time you press DISPLAY the display will change cyclically as follows Index name of the input1 t Input you selected t Sound field currently applied2 t Volume level t Stream information3 When listening to FM and AM radio Preset station name1 t Frequency t Sound field cur...

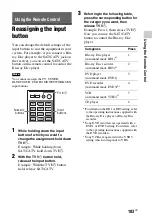
Страница 103: ...se SAT CATV 3 Referring to the following table press the corresponding button for the category you want then release TV 1 Example Press 1 then release TV 1 Now you can use the SAT CATV button to control the Blu ray Disc player a For details on the BD1 or BD3 setting refer to the operating instructions supplied with the Blu ray Disc player or Blu ray Disc recorder b Sony DVD recorders are operated ...

Страница 104: ...ven if the unit itself has been turned off If you are not going to use the receiver for a long time be sure to disconnect the receiver from the wall outlet To disconnect the AC power cord mains lead grasp the plug itself never pull the cord USA and Canada models only One blade of the plug is wider than the other for the purpose of safety and will fit into the wall outlet only one way If you are un...

Страница 105: ...e shorter under the following conditions When a person metal object wall or other obstruction is between the devices with a Bluetooth connection Locations where a wireless LAN is installed Around microwave ovens that are in use Locations where other electromagnetic waves occur Bluetooth devices and wireless LAN IEEE 802 11b g use the same frequency band 2 4 GHz When using your Bluetooth device nea...

Страница 106: ...stions or problems concerning your receiver please consult your nearest Sony dealer Troubleshooting If you experience any of the following difficulties while using the receiver use this troubleshooting guide to help you remedy the problem Should any problem persist consult your nearest Sony dealer Note that if service personnel changes some parts during repair these parts may be retained The recei...

Страница 107: ...urn on the receiver to select the HDMI equipment you want to enjoy Make sure Pass Through is set to On in the HDMI Settings menu if you connect equipment not compatible with the BRAVIA Sync to the receiver page 94 The OSD menu does not appear on the TV screen Press HOME Check that the TV is connected correctly Depending on the TV the OSD menu may take some time to appear on the TV screen Display p...

Страница 108: ... is not outputting any sound Make sure you have connected to both the L and R jacks of an analog equipment analog equipment requires both L and R jack connections Use an audio cord not supplied Adjust the speaker level page 90 Check that the speaker settings are appropriate for the setup using the Auto Calibration menu or Speaker Pattern in the Speaker Settings menu Then check that sound is output...

Страница 109: ...ver AMP if you want to listen to the sound from the receiver When you connect the receiver to a video equipment projector etc sound may not be output from the receiver In this case set the HDMI Audio Out to AMP in the HDMI Settings menu page 94 If you cannot listen to the sound of the equipment connected to the receiver while TV input is selected on the receiver Be sure to change the input of the ...

Страница 110: ...est tone is output from a different speaker than the speaker displayed on the TV screen The speaker pattern set up is incorrect Make sure that the speaker connections and the speaker pattern match correctly When the receiver is in standby mode there is no sound output from the TV When the receiver enters into standby mode sound is from the last HDMI equipment selection before you turned off the re...

Страница 111: ...d reconnect the iPod iPhone You are using an unsupported iPod iPhone See Compatible iPod iPhone models page 43 for the supported device types The ringtones volume of the iPhone does not change Adjust the ring volume using the controls on the iPhone Are you using a supported USB device If you connect an unsupported USB device the following problems may occur See Compatible USB devices page 45 for t...

Страница 112: ...not be played back USB device formatted with file systems other than FAT16 or FAT32 are unsupported If you use partitioned USB device only audio files on the first partition can be played back Playback is possible up to 8 levels including ROOT folder The number of folders has exceeded 256 including ROOT folder The number of files in a folder has exceeded 256 Files that are encrypted or protected b...

Страница 113: ...nstable Restart it Confirm that the receiver and the server are connected to the wireless LAN router access point correctly Confirm that the server has been set correctly page 57 Confirm that the receiver has been registered to the server and allows the music streaming from the server When the system is connected to the wireless network move the receiver and the wireless LAN router access point cl...

Страница 114: ...the server has been set correctly page 57 Confirm that the receiver has been registered to the server and allows the music streaming from the server Check to confirm whether the audio file on the server has been damaged or erased Refer to the operating instructions supplied with the server You cannot play the following tracks A track that violates playback restrictions A track with irregular copyr...

Страница 115: ...rated by other devices on a network The receiver cannot play the track that is currently being played by the PARTY host The PARTY host is playing a track of an audio format that cannot be played on the receiver It may take a while before the playback sound is output The receiver joins an unintended PARTY If more than one PARTY has been started when the receiver joins the receiver may not be able t...

Страница 116: ... without any obstacles between Pairing cannot be done Move the Bluetooth device closer to the receiver Pairing may not be possible if other Bluetooth devices are present around the receiver In this case turn off the other Bluetooth devices Enter the same passkey that was entered at the Bluetooth device correctly page 76 Cannot make the Bluetooth connection The Bluetooth device you attempted to con...

Страница 117: ...tion Check the Control for HDMI settings on the connected equipment Refer to the operating instructions of the connected equipment If you unplug the HDMI cable or change the connection repeat the procedures of Preparing for the BRAVIA Sync page 79 When Control for HDMI is set to Off the BRAVIA Sync does not work properly even if the equipment is connected to the HDMI IN jack The types and the numb...

Страница 118: ...matically turn off after a few seconds Check the iPod iPhone or USB device then unplug it and turn on the power again For other messages see Message list after Auto Calibration measurement page 89 iPod iPhone message list page 45 USB message list page 48 and Network features message list page 72 Reference sections Refer to the following web site for details of the latest information on the receive...

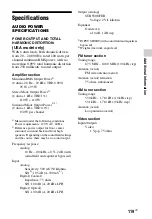
Страница 119: ...rround back and front high speakers Depending on the sound field settings and the source there may be no sound output Frequency response Analog 10 Hz 100 kHz 0 5 2 dB with sound field and equalizer bypassed Input Analog Sensitivity 500 mV 50 kilohms S N3 105 dB A 500 mV4 Digital Coaxial Impedance 75 ohms S N 100 dB A 20 kHz LPF Digital Optical S N 100 dB A 20 kHz LPF Output Analog SUBWOOFER Voltag...

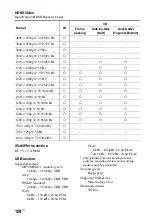
Страница 120: ...be guaranteed Transfer speed High speed Supported USB device Mass Storage Class Maximum current 500 mA Format 2D 3D Frame packing Side by Side Half Over Under Top and Bottom 4096 2160p 23 98 24 Hz a 3840 2160p 29 97 30 Hz a 3840 2160p 25 Hz a 3840 2160p 23 98 24 Hz a 1920 1080p 59 94 60 Hz a a a 1920 1080p 50 Hz a a a 1920 1080p 29 97 30 Hz a a a a 1920 1080p 25 Hz a a a a 1920 1080p 23 98 24 Hz a...

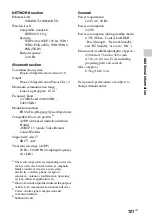
Страница 121: ...A2DP 20 Hz 20 000 Hz Sampling frequency 44 1 kHz 1 The actual range will vary depending on factors such as obstacles between devices magnetic fields around a microwave oven static electricity cordless phone reception sensitivity antenna s performance operating system software application etc 2 Bluetooth standard profiles indicate the purpose of Bluetooth communication between devices 3 Codec Audio...

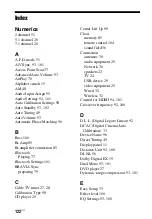
Страница 122: ... 101 BRAVIA Sync preparing 79 C Cable TV tuner 27 28 Calibration Type 98 CD player 29 Center Lift Up 90 Clear memory 85 remote control 104 sound field 56 Connection antennas 30 audio equipment 29 Network 30 speakers 22 TV 24 USB device 29 video equipment 25 Wired 32 Wireless 32 Control for HDMI 94 101 Crossover frequency 92 100 D D L L Digital Legato Linear 92 DCAC Digital Cinema Auto Calibration ...

Страница 123: ...l Setup 90 Menu 86 98 Message Auto Calibration 89 Error 118 iPod iPhone 45 Network features 72 USB 48 Movie mode 52 Music mode 53 Music Services 65 Muting 42 N Name Input 51 Network settings 95 Network Standby 96 Network Update 97 O One Touch Play 80 OSD On Screen Display 40 P PARTY STREAMING 68 Pass Through 94 101 Passkey 76 PlayStation 3 27 Preset Memory 50 Preset stations 50 PROTECTOR 118 Pure ...

Страница 124: ... 100 System Audio Control 81 System Power Off 81 System Settings 96 102 T Test Tone 92 98 Treble 100 Tuner 48 Tuner Settings 101 TV 24 U Update Alert 97 USB device 45 USB FAIL 118 V Viewing information on the display panel 102 W Wake on LAN 63 Watch 40 Wired network 36 Wireless LAN antenna 13 Wireless LAN signal strength 12 Wireless network 37 WPS PIN code 39 Push button 38 ...

Страница 125: ...NY or one or more of the THIRD PARTY SUPPLIERS GRANT OF LICENSE SONY grants you a limited license to use the SOFTWARE solely in connection with your compatible device DEVICE and only for your individual non commercial use SONY and the THIRD PARTY SUPPLIERS expressly reserve all rights title and interest including but not limited to all intellectual property rights in and to the SOFTWARE that this ...

Страница 126: ...greements that apply to such content You acknowledge and agree that SONY may take appropriate measures to protect the copyright of content stored processed or used by the SOFTWARE Such measures include but are not limited to counting the frequency of your backup and restoration through certain SOFTWARE features refusal to accept your request to enable restoration of data and termination of this EU...

Страница 127: ... OR MAKE ANY CONDITIONS OR REPRESENTATIONS A THAT THE FUNCTIONS CONTAINED IN ANY OF THE SOFTWARE WILL MEET YOUR REQUIREMENTS OR THAT THEY WILL BE UPDATED B THAT THE OPERATION OF ANY OF THE SOFTWARE WILL BE CORRECT OR ERROR FREE OR THAT ANY DEFECTS WILL BE CORRECTED C THAT THE SOFTWARE WILL NOT DAMAGE ANY OTHER SOFTWARE HARDWARE OR DATA D THAT ANY SOFTWARE NETWORK SERVICES INCLUDING THE INTERNET OR...

Страница 128: ...location of the DEVICE You acknowledge that for the purpose of providing such services SONY the THIRD PARTY SUPPLIERS or their partners may collect archive process and use such location data and that such services are governed by the privacy policies of SONY or such third party By using any such services you agree that you have reviewed the privacy policies applicable to such services and consent ...

Страница 129: ...nforcing protecting or concerning the validity of intellectual property rights ARBITRATION INSTRUCTIONS To begin arbitration either you or SONY must make a written demand to the other for arbitration The arbitration will take place before a single arbitrator It will be administered in keeping with the Expedited Procedures of the Commercial Arbitration Rules and the Supplementary Proceedings for Co...

Страница 130: ... time the change was is made and 2 you mail written notice to the address in the immediately preceding paragraph within 30 days after the particular change was is made Should such a situation arise you will still be bound by the DISPUTE procedures you previously agreed to and existing before the change you rejected was made MISCELLANEOUS Any DISPUTE determined not subject to arbitration and not in...

Страница 131: ...rty beneficiary of and shall have the right to enforce each provision of this EULA with respect to the SOFTWARE of such party YOUR ACCOUNT RESPONSIBILITIES Should you return your DEVICE to its place of purchase sell or otherwise transfer your DEVICE or if this EULA is terminated you are responsible for and must uninstall the SOFTWARE from the DEVICE and delete any and all accounts you may have est...

Страница 132: ...SONY or one or more of the THIRD PARTY SUPPLIERS GRANT OF LICENSE SONY grants you a limited license to use the SOFTWARE solely in connection with your compatible device DEVICE and only for your individual non commercial use SONY and the THIRD PARTY SUPPLIERS expressly reserve all rights title and interest including but not limited to all intellectual property rights in and to the SOFTWARE that thi...

Страница 133: ...content You acknowledge and agree that SONY may take appropriate measures to protect the copyright of content stored processed or used by the SOFTWARE Such measures include but are not limited to counting the frequency of your backup and restoration through certain SOFTWARE features refusal to accept your request to enable restoration of data and termination of this EULA in the event of your illeg...

Страница 134: ... or condition of any kind SONY AND EACH OF THE THIRD PARTY SUPPLIERS for purposes of this Section SONY and each of the THIRD PARTY SUPPLIERS shall be collectively referred to as SONY EXPRESSLY DISCLAIM ALL WARRANTIES DUTIES OR CONDITIONS EXPRESS OR IMPLIED INCLUDING BUT NOT LIMITED TO THE IMPLIED WARRANTIES OF MERCHANTABILITY NONINFRINGEMENT AND FITNESS FOR A PARTICULAR PURPOSE SONY DOES NOT WARRA...

Страница 135: ...ents and peripheral devices that interact with the SOFTWARE and 5 location data as indicated below SONY and its affiliates partners and agents may use and disclose Information subject to applicable laws in order to improve its products and services or to provide products or services to you Such uses include but are not limited to a administering the functionalities of the SOFTWARE b to improve ser...

Страница 136: ...nenforceable that provision shall be enforced to the maximum extent permissible so as to maintain the intent of this EULA and the other parts will remain in full force and effect JURISDICTION JURY TRIAL WAIVER The United Nations Convention on Contracts for the International Sale of Goods shall not apply to this EULA Furthermore this EULA will not be governed or interpreted in any way by referring ...

Страница 137: ...G NOTICE ON A SONY DESIGNATED WEB SITE BY EMAIL NOTIFICATION TO AN EMAIL ADDRESS PROVIDED BY YOU BY PROVIDING NOTICE AS PART OF THE PROCESS IN WHICH YOU OBTAIN UPGRADES UPDATES OR BY ANY OTHER LEGALLY RECOGNIZABLE FORM OF NOTICE If you do not agree to the amendment you should promptly contact SONY for instructions Your continued use of the SOFTWARE after the effective date of any such notice shall...

Страница 138: ......

Страница 139: ......

Страница 140: ... 2013 Sony Corporation Printed in Malaysia 4 454 467 13 1 ...

Отзывы: