background image

22

23

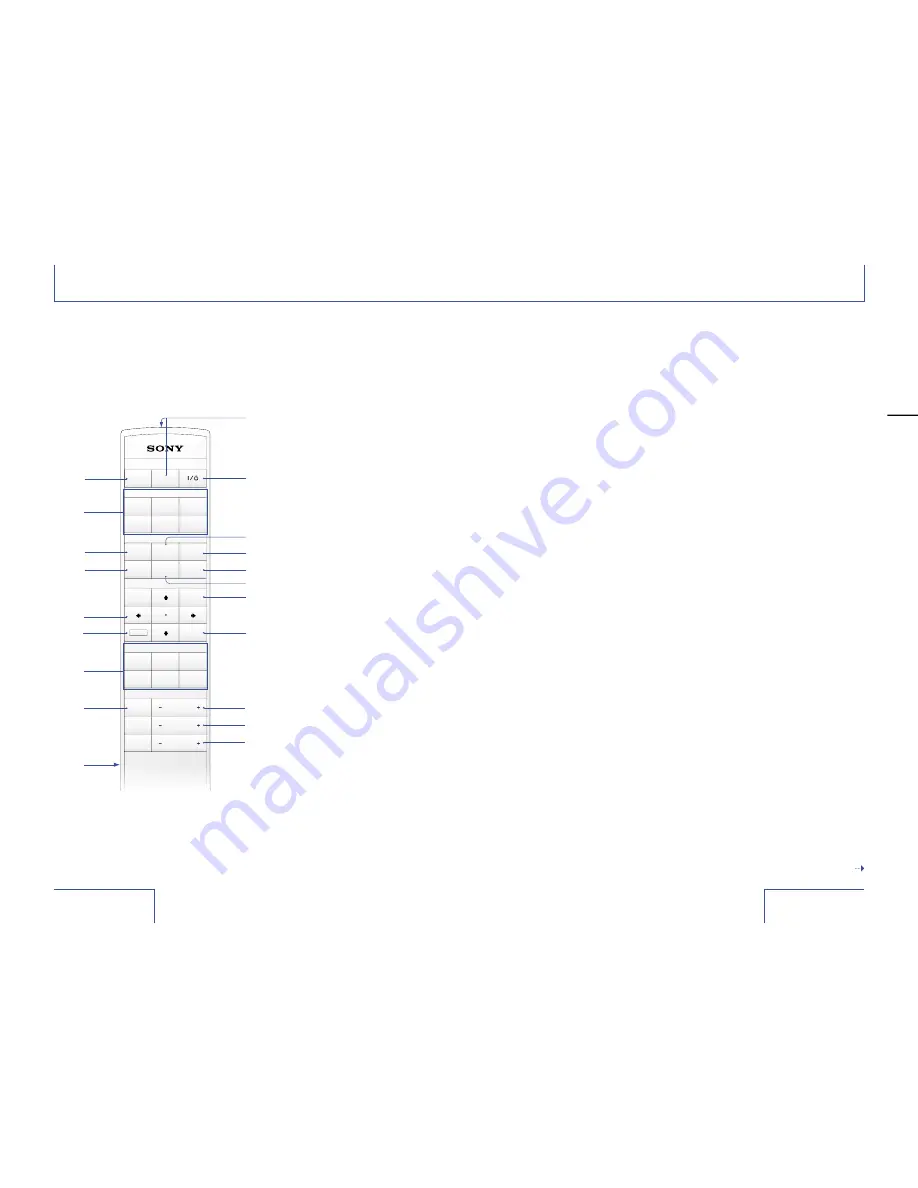
1

  PICTURE MUTING button

Turns off the picture. Press 
again to restore the picture.

2

  INPUT buttons 

Select the input signal.

VIDEO:

For the video signal of 
equipment connected to the 
projector’s VIDEO jack.

S VIDEO:

For the video signal of 
equipment connected to the 
projector’s S VIDEO jack.

A:

For the video signal of 
equipment connected to the 
projector’s INPUT A 
connectors.

B:

For the video signal of 
equipment connected to the 
projector’s INPUT B 
connectors.

DVI:

For the video signal of 
equipment connected to the 
projector’s DVI-D connectors. 

HDMI:

For the video signal of 
equipment connected to the 
projector’s HDMI connectors.

3

  COLOR SPACE button

Each time you press this 
button, the “Color Space”  
setting changes between 
“Normal” and “Wide.”

Identification of parts (continued)

�����

������� ����

�������

������

�����
�����

����

����

�����

�����

����

����

����

����

����

�����

� �����

���

����

����

������

������

�����

�����

�������

���� �

������

���� �

�����

��������

������

��������

���� �

5

6

7

1

3

8

qd

qs

q;

qa

Remote

2

9

Indicators on the buttons light up if you shake or tilt the 
remote. The indicators are turned off automatically if you 
do not move the remote for about 20 seconds.
Buttons which have the same names as those on the 
control panel function identically.

ql

qh

qk

qj

qg

qf

4

w;

qf

  IRIS CONT button

Emphasizes the contrast 
during projection. Each time 
you press this button, the “Iris 
Control” setting changes 
cyclically as follows: “Off,” “1,” 
“2.”

qg

  MENU button

Displays the menu.

qh

  ENTER button

Enters the settings of items 
in the menu.

qj

  COLOR +/− button

Adjusts the intensity of the 
color. The intensity increases 
as you press the + button and 
decreases as you press the – 
button.

qk

  CO/− button

Adjusts the contrast. The 
contrast increases as you 
press the + button and 
decreases as you press the – 
button.

ql

  /− button

Adjusts the brightness. The 
brightness becomes brighter 
as you press the + button and 
darker as you press the – 
button.

w;

  CONTROL S OUT jack 

(minijack)

Connect to the CONTROL S 
IN jack on the projector when 
using it as a wired remote. 
Even when you use the remote 
as a wired remote, batteries 
must be inserted in the 
remote.

continued 

4

  GAMMA button

Selects the projector’s gamma 
value from settings you made 
using “ImageDirector” (see 
page 52). Each time you press 
this button, the “Gamma 
Correction” setting changes 
cyclically as follows: “Off,”
“Gamma1,” “Gamma2,” 
“Gamma3.”

5


M/m/</, 

(arrow)


buttons

6

  RESET button

Resets items that have been 
adjusted to their factory preset 
values. The button activates 
while the menu is displayed or 
the items are adjusted 
(displayed). 

7

  PICTURE MODE buttons

DYNAMIC:

Enhances picture contrast and 
sharpness.

STANDARD:

Recommended for normal 
viewing conditions. Select this 
if you encounter roughness 
when viewing the picture with 
“Dynamic.”

CINEMA:

Recommended when viewing 
a movie.

USER 1~3:

Adjust the quality of the 
picture to suit your taste and 
store the settings. For details, 
see “PICTURE MODE” in the 
PICTURE SETTING menu on 
page 32.

8

  WIDE MODE button

Each time you press this 
button, the “Wide Mode” 
setting changes cyclically as 
follows: “Full,” “Normal,” “Wide 
Zoom,” “Zoom,” “Subtitle” (see 
page 40).

9

  Infrared transmitter

q;


?

/

button

Turns the projector on when 
the projector is in standby 
mode. To turn off the 
projector, press the 

?/1


button twice or press and hold 
the 

?/1

 button for about one 

second according to the 
indications on the screen.

qa

  COLOR TEMP button

Each time you press this 
button, the “Color Temp” 
setting changes cyclically as 
follows: “High,” “Middle,” 
“Low,” “Custom1,” “Custom2,” 
“Custom3.” 
For details, see page 34.

qs

  SOURCE DIRECT button

Reproduces a faithful picture 
from the HD (High Definition) 
input signal.

qd

  LENS CONT button

Each time you press this 
button, the “Lens Control” 
setting changes cyclically as 
follows: “Focus,” “Zoom,” 
“Shift.” You can adjust each 
setting by pressing the arrow 
buttons.

Overview

Содержание QUALINA 004

Страница 1: ... ...

Страница 2: ...e or more of the following measures Reorient or relocate the receiving antenna Increase the separation between the equipment and receiver Connect the equipment into an outlet on a circuit different from that to which the receiver is connected Consult the dealer or an experienced radio TV technician for help You are cautioned that any changes or modifications not expressly approved in this manual c...

Страница 3: ...u 51 ImageDirector 52 Features 52 Operating system environment for ImageDirector 52 Installing ImageDirector 53 Uninstalling ImageDirector 54 Table of Contents Overview Bring out the fascination of a movie theater 8 Identification of parts 18 Projecting Images Projecting images 26 To turn off the power 29 Projecting Images Overview Adjustments and Settings Using the Menu Installation Connections O...

Страница 4: ... filter maintenance 74 Replacing the lamp air filter 74 Note for maintaining good performance 75 Troubleshooting 76 Power 76 Picture 77 Remote 78 Caution messages 78 Warning messages 79 Information panel display 80 ImageDirector 81 Additional Information Warranty card and after sale services 82 Specifications 83 Dimensions 86 Index 88 The pictures used as examples in this Owner s Guide are still i...

Страница 5: ...ottom up and developed the technology that is fully assimilated to re create superb picture quality and naturally rich color gradation Technologies used to establish the emotional space The projection lens excels in creating sharp focused images with high contrast The carefully designed cooling mechanism is absolutely silent The Silicon X tal Reflective Display reproduces pictures accurately from ...

Страница 6: ...deo sources containing fast moving images Excellent contrast from white to black 12 bit panel driver The 12 bit panel driver in this projector used at the final stage of digital signal processing compensates with a high degree of accuracy ensuring the accurate delivery of the high 2000 1 contrast level As a result a linear contrast from white to black with intense velvety darkness is successfully ...

Страница 7: ...qual which makes it very effective at reproducing pictures evenly colored to the four corners of the screen Highly uniform color reproduction over the entire screen Isometric illumination system In previous projectors one of the physical distances between the lamp and each panel of red R green G and blue B had to differ from the other two which caused color heterogeneity This color heterogeneity w...

Страница 8: ...level The name and serial number that Carl Zeiss assigns to each Zeiss lens are proof of the quality of the products Exquisite detail Carl Zeiss lens Internal structure MTF Diagrams The Modulation Transfer Function MTF is an objective method used to clearly represent and evaluate the performance of lenses In the diagrams the horizontal axis gives the real image height in mm the distance Short foca...

Страница 9: ...ront ventilation holes intake The calorific value of the pure xenon lamp is very high reaching hundreds of degrees without cooling off To dissipate the heat the projector is provided with an efficient cooling structure in which heat sinks with a radiation coating are installed around the lamp This unique configuration is made of extruded aluminum Heat sink with a radiation coating A 5 mm thick foa...

Страница 10: ...older Plug holder Notes Make sure that the AC power cord is connected properly Attach the plug holder to avoid unplugging the AC power cord accidentally Also the plug holder prevents the AC power cord from becoming clogged with dust For safety use the AC power cord supplied with the unit continued Front Top 1 Front remote detector SIRCS receiver 2 Lens Lens protector 3 Ventilation holes Note on ve...

Страница 11: ...g off the power see To turn off the power on page 29 2 FOCUS button Adjusts the picture focus using the arrow buttons 3 ZOOM button Adjusts the size of the picture using the arrow buttons 4 SHIFT button Adjusts the vertical position of the picture using the arrow buttons 5 INPUT button Selects the input signal Each time you press the button the input signal switches cyclically as follows INPUT A I...

Страница 12: ...ker as you press the button w CONTROL S OUT jack minijack Connect to the CONTROL S IN jack on the projector when using it as a wired remote Even when you use the remote as a wired remote batteries must be inserted in the remote continued 4 GAMMA button Selects the projector s gamma value from settings you made using ImageDirector see page 52 Each time you press this button the Gamma Correction set...

Страница 13: ...ew one or mix different types of batteries If you do not intend to use the remote for a long time remove the batteries to avoid damage from battery leakage If batteries have leaked remove them wipe the battery compartment dry and replace the batteries with new ones Notes on remote operation Make sure that there is nothing between the remote and the remote detector on the projector to obstruct the ...

Страница 14: ...e control panel to turn on the FOCUS setting display Then press the arrow buttons to adjust the focus Press the LENS CONT button on the remote repeatedly or the ZOOM button on the control panel to turn on the ZOOM setting display Then press the arrow buttons to adjust the size of the picture Press the LENS CONT button on the remote repeatedly or the SHIFT button on the control panel to turn on the...

Страница 15: ...ton on the remote or control panel Power OFF appears Note The message disappears if you press any button except the 1 button on the remote or on the control panel or if you do not press any button for 5 seconds 2 Press the 1 button on the remote or on the control panel again The fan runs for several seconds to reduce internal heat build up 3 Confirm that the 1 indicator light is lit in red If you ...

Страница 16: ...or button Press the ENTER button to enter the value and return the previous screen When changing the setting Press the M or m button to change the setting Press the or ENTER button to enter the value and return the previous screen For details on setting individual items see the relevant menu pages To turn off the menu display Press the MENU button The menu display disappears automatically if no bu...

Страница 17: ...icular input signal do not appear in the menu Contrast Adjusts the picture contrast The higher the setting the greater the contrast The lower the setting the lower the contrast Brightness Adjusts the picture brightness The higher the setting the brighter the picture The lower the setting the darker the picture Color Adjusts color intensity The higher the setting the greater the intensity The lower...

Страница 18: ...ected To increase the value for Clarity press the button To decrease the value for Clarity press the button To increase the value for Reality press the M button To decrease the value for Reality press the m button Cinema Black Pro Emphasizes the black color Iris Control Off Normal contrast 1 Select to set the contrast level between 2 and Off 2 Select to enhance the black by emphasizing the contras...

Страница 19: ...for H increases the picture moves to the right and as the setting decreases the picture moves to the left As the setting for V increases the picture moves up and as the setting decreases the picture moves down AUTO WIDE SETTING When set to 2 the most appropriate screen projection mode is selected automatically according to the signal being input and displays the picture to fill a 16 9 screen Examp...

Страница 20: ...you can select the desired projection mode If the signal contains an aspect ratio signal the screen projection mode changes according to the aspect ratio signal in the picture received If the signal does not contain an aspect ratio signal the screen projection mode does not change even though Auto Wide is set to 2 However the Auto Wide settings will be enabled again if you change the channel the i...

Страница 21: ...signal source or a computer Full A 16 9 image squeezed horizontally is displayed in the correct aspect A 4 3 image is enlarged horizontally Normal A picture with a normal 4 3 ratio is displayed Adjustable items depending on the screen projection mode Item V Position Title Area Full Normal Wide Zoom Zoom a Subtitle a a a Adjustable Not adjustable V Position Adjusts the vertical position of the pict...

Страница 22: ...istered in the preset memory a suitable picture is displayed on the screen according to the signal type The type of input signal is displayed in the INPUT SETTING menu You can adjust the preset data using the INPUT SETTING menu This projector also has 20 user memory Preset signals Memory No Preset signal fH kHz fV Hz Sync H Size 1 Video 60 Hz 15 734 59 940 H neg V neg 2 Video 50 Hz 15 625 50 000 H...

Страница 23: ... 855 H neg V pos 1664 When you input a signal that is not preset the picture may not be displayed correctly No 22 and 34 are interlace signals No 11 to 21 23 to 28 32 and 36 are available for input signals via the DVI D connector Set DVI Signal Sel to Computer Also No 52 and 73 are available when DDC Display Data Channel is set to off on the computer DDC allows the computer to obtain information a...

Страница 24: ...ogressive component signal e g DVD a DTV a a PC a a can be input cannot be input Color System Selects the color system of the input signal Auto One of the following signals is selected automatically NTSC PAL SECAM NTSC4 43 PAL M PAL N NTSC3 58 PAL SECAM NTSC4 43 PAL M PAL N Set the color system to a selected input signal Normally set to Auto If the picture is distorted or colorless select the colo...

Страница 25: ...ture horizontally or vertically Off The picture is not reversed HV Select to reverse the picture horizontally and vertically H Select to reverse the picture horizontally V Select to reverse the picture vertically continued Status on screen display When set to Off the on screen display is turned off except for the menus messages displayed when the power is turned off and warning messages Language S...

Страница 26: ... to standby mode when AC line voltage is supplied High Altitude Mode Off Select this when using the projector at normal altitudes On Select this when using the projector at an altitude of 1 500 m or higher The INFORMATION menu is used for checking information such as the frequency of the input signal You can display the settings but you cannot adjust them Example INFORMATION menu fH Displays the h...

Страница 27: ...rosoft Corporation in the United States and other countries MMX and Pentium are trademarks or registered trademarks of Intel Corporation or its subsidiaries in the United States and other countries Installing ImageDirector To use ImageDirector you need to install it on your computer You need to do this before you use ImageDirector for the first time or whenever you replace the operating system on ...

Страница 28: ...rograms The Add Remove Programs dialog box appears 5 Select ImageDirector2 from the list then click Add Remove for Windows 2000 Professional Change Remove Uninstallation of ImageDirector starts Follow the instructions on the screen For Windows XP Home Edition Professional 1 Click Start on the taskbar The Start menu appears 2 Click Control Panel on the Start menu The Control Panel window appears 3 ...

Страница 29: ...y high or the temperature is very low If you install the projector on the ceiling keep the temperature near the intake ventilation holes under 35 ºC 95 ºF Intake Exhaust Do not block the part of the projector Very dusty areas Avoid installing the projector in a location where there is a lot of dust otherwise the air filter will clog The dust blocking the air through the filter may cause the intern...

Страница 30: ...When the upper edge is longer than the base edge as shown in the figure below For details on the kind of aspect ratio signals that can be changed see the chart on page 42 continued To correct trapezoidal distortion When the projected image is a trapezoid change the projector s position height by moving the adjusters For details on how to use the adjusters see page 19 If the image is still a trapez...

Страница 31: ...tallation measurement When you install the projector on the ceiling see the following chart for the appropriate installation measurements Center of the lens Center of the lens Exhaust Unit mm inches Attaching the supplied air filter cover When you install the projector on the ceiling attach the supplied air filter cover to prevent the air filter from becoming clogged with dust Air filter cover Fil...

Страница 32: ...80 337 3 4 11660 459 3 8 200 1245 49 1 8 6380 251 1 8 8300 326 3 4 1245 49 1 8 8280 326 1 8 11490 452 1 2 1868 73 5 8 11460 451 1 4 15580 613 3 8 250 1557 61 3 8 7990 314 1 2 10380 408 7 8 1557 61 3 8 10370 408 1 4 14380 566 1 4 2335 92 14340 564 7 8 19490 767 1 2 300 1868 73 5 8 9590 377 3 4 12470 491 1868 73 5 8 12450 490 3 8 17270 680 2802 110 3 8 17230 678 3 8 23400 921 1 2 Unit mm inches VPLL...

Страница 33: ...tings see INPUT B Signal Sel in the SET SETTING menu on page 46 You can connect HD High Definition signal equipment Connecting a computer If you set your computer to output the signal to both your computer s display and an external monitor the picture on the external monitor may not appear properly In such a case set your computer to output the signal to only the external monitor For details refer...

Страница 34: ...Even when you use the remote as a wired remote batteries must be inserted in the remote 5 REMOTE connector This is a connector for system control with which you can operate the projector from a computer etc 6 USB connector When the projector is connected to a computer via this connector you can adjust the gamma values of the projector from the computer using the ImageDirector software provided on ...

Страница 35: ...heck the information and status in the window but you cannot change the settings INFORMATION The present status of the projector is displayed MENU The present settings of the projector are displayed Controlling the projector from a computer Click Control You can perform various adjustments and settings of the projector on a computer display The functions of the buttons in the windows are the same ...

Страница 36: ...e Reminder Report Timing field Regular Report A report on the present status of the projector installation status etc of the projector is periodically sent by e mail Set the timing for sending the e mail messages as follows At Specify the time when e mail is to be sent Select the hour from the drop down list Every Week on Days Select this check box to send e mail on the selected days every week Mo...

Страница 37: ...d or Simple When the number of charactors in an e mail message is limited such as with messages sent to a mobile phone etc select Simple Mail Account field Mail Address Type the appropriate e mail address You can enter up to 64 characters Outgoing Mail Server SMTP Type the address of the SMTP server You can enter up to 64 characters Requires the use of POP Authentication before send email POP befo...

Страница 38: ...e On room lighting Do not place the screen in any place where it will be subjected to direct sunlight or interior light To obtain a clear picture keep the following in mind Use a convergent downlight Use a diffuse light such as a fluorescent light through a mesh Block any sunlight from windows with a curtain or blind Cover reflective floors and walls with a carpet or wallpaper On care and maintena...

Страница 39: ... PICTURE MUTING button to release the muting function see page 27 The computer signals are not being output from the computer to an external monitor Set the computer signal so that it is output to an external monitor The computer signal is set to output to both the display of the computer and an external monitor Set the computer signal so that it is output only to an external monitor The picture i...

Страница 40: ...ernal temperature is too high Turn off the power Check to see that nothing is blocking the ventilation holes Check to see if the air filter is clogged with dust Check to see whether or not the projector is tilted at an angle of more than 20 degrees Frequency is out of range The input signal cannot be projected as the frequency is out of the acceptable range of the projector Input a signal that is ...

Страница 41: ...Please check DVI Signal Sel Invalid input setting Set DVI Signal Sel according to the input signal see page 46 Frequency is out of range This input signal cannot be projected as the frequency is out of the acceptable range of the projector Input a signal that is within the frequency range ImageDirector Refer to the online help of the ImageDirector software when any messages are displayed on the sc...

Страница 42: ...ms terminated G with sync Y 1 Vp p 2 dB sync negative 75 ohms terminated B CB PB 0 7 Vp p 2 dB 75 ohms terminated R CR PR 0 7 Vp p 2 dB 75 ohms terminated SYNC HD Composite sync input 1 5 Vp p high impedance positive negative Horizontal sync input 1 5 Vp p high impedance positive negative VD Vertical sync input 1 5 Vp p high impedance positive negative DVI D TMDS Digital RGB HDMI Digital RGB Y CB ...

Страница 43: ...e 7 8 W Operating temperature 0 ºC to 35 ºC 32 ºF to 95 ºF Operating humidity 35 to 85 no condensation Storage temperature 20 ºC to 60 ºC 4 ºF to 140 ºF Storage humidity 10 to 90 Supplied accessories Remote RM PJR1F 1 R03 Size AAA batteries 4 AC power cord set 1 Owner s Guide this guide with a document case 1 CD ROM ImageDirector 1 End User Licence Agreement 1 Air filter cover 1 Safety regulations...

Страница 44: ...86 87 Side Bottom Unit mm inches Front Top Unit mm inches Additional Information Specifications Continued Dimensions ...

Страница 45: ... Power On 29 50 DNS Server 51 Dot Phase 36 DRC High Dens 34 DRC Palette 34 DRC Progressive 34 DVI 22 DVI D connector 22 67 DVI Signal Sel 46 DYNAMIC 23 Dynamic 32 E Emphasizing the contrast 23 34 ENTER button 21 23 30 F Fan 75 fH 51 Focus 23 FOCUS button 21 27 fV 51 G GAMMA button 23 Gamma Correction 33 52 H HDMI 22 67 High Altitude Mode 50 57 H Size 36 I J K I P Mode 34 Illumination 47 ImageDirec...

Страница 46: ......

Отзывы: