000
6.Clip Operations: Clip Operations on the Thumbnail Screen
75
5
Turn the MENU knob to select [Execute], then
press the knob.
The clip is copied, and a completion message
appears.
6
Press the MENU knob to dismiss the message.
Copying all clips
You can copy all clips stored on the same SxS
memory card at the same time to another SxS
memory card.
1
Select Thumbnail >Copy Clip >All Clips in the
setup menu.
2
Turn the MENU knob to select [Execute], then
press the knob.
A confirmation screen appears.
3
Turn the MENU knob to select [Execute], then
press the knob.
All clips are copied, and a completion message
appears.
4
Press the MENU knob to dismiss the message.
Deleting Clips
You can delete clips from SxS memory cards. Clips
can be deleted on the thumbnail screen or the
filtered clip thumbnail screen (page 76).
1
Select Thumbnail >Delete Clip >Select Clip in
the setup menu.
2
Turn the MENU knob to select [Execute], then
press the knob.
The clip selection screen appears.
3
Turn the MENU knob to select a clip to delete,
then press the knob.
A check mark is attached to the selected clip.
4
Simultaneously press the SET button and SHIFT
button.
A confirmation screen appears.
5
Turn the MENU knob to select [Execute], then
press the knob.
The clip is deleted, and a completion message
appears.
6
Press the MENU knob to dismiss the message.
The clips below the deleted clip on the thumbnail
screen move up one position.
Deleting all clips
You can delete all clips stored on the same SxS
memory card at the same time.
[Notes]
ˎ
ˎ
Deleted clips cannot be restored.
ˎ
ˎ
If the media or clip is protected, this function is disabled.
1
Select Thumbnail >Delete Clip >All Clips in the
setup menu.
2
Turn the MENU knob to select [Execute], then
press the knob.
A confirmation screen appears.
3
Turn the MENU knob to select [Execute], then
press the knob.
All clips are deleted, and a completion
message appears.
4
Press the MENU knob to dismiss the message.
Displaying Clip Properties
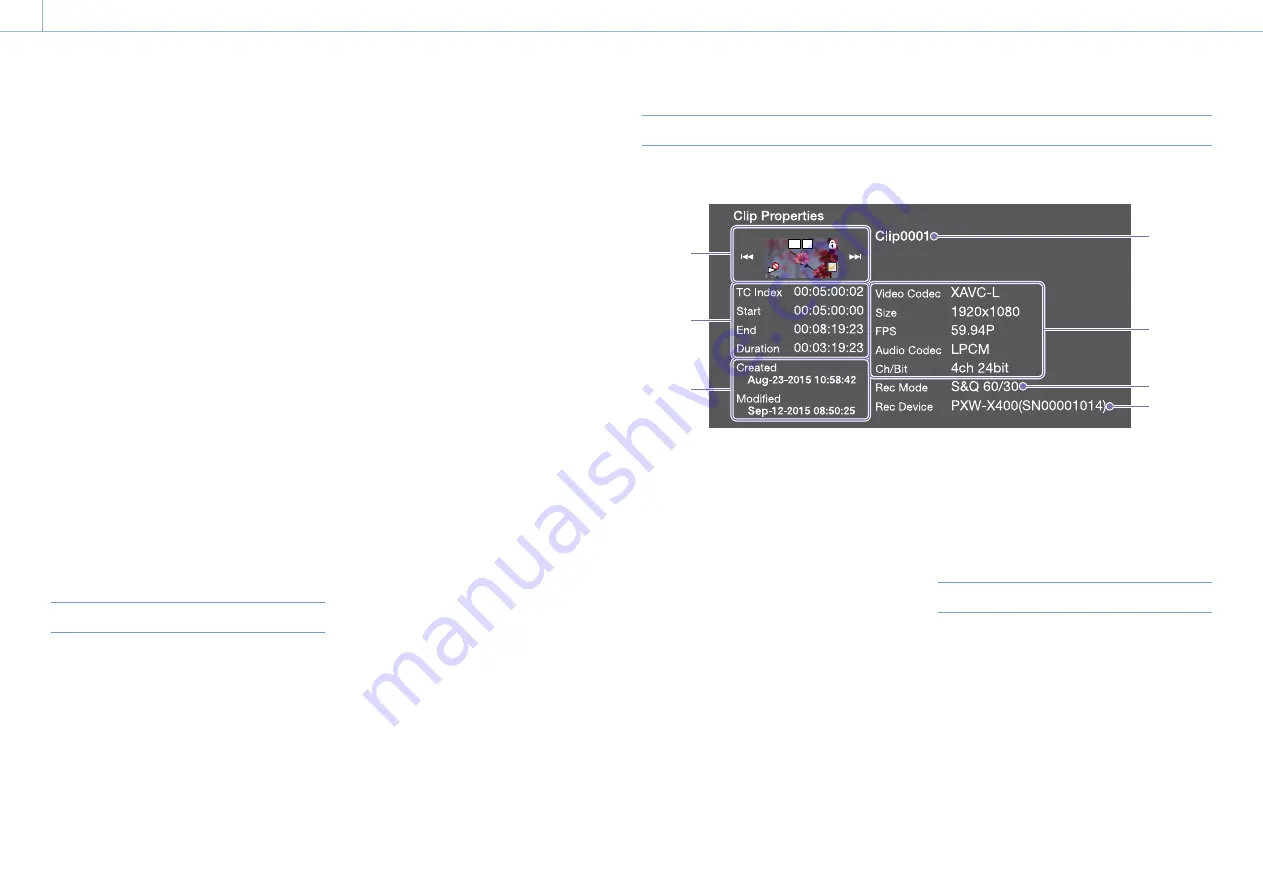
The clip properties screen for the selected clip appears when you select Thumbnail >Display Clip
Properties in the setup menu.
1
2
3
4
5
6
7
OK S
1.
Current clip image
Displays the index picture and status of the
selected clip.
2.
Timecode display
TC Index: Timecode of the displayed image
Start: Timecode of the recording start point
End: Timecode of the recording end point
Duration: Duration between start and end points
3.
Creation date and modified date
4.
Clip name
5.
Recording format
Video Codec: Video codec
Size: Picture size
FPS: Frame rate
Audio Codec: Audio codec
Ch/Bit: Audio recording channel/Number of bits
for audio recording
6.
Special recording information
7.
Recording device name
To hide the clip properties screen, do one of the
following.
Press the RESET/RETURN button: Returns to the
Thumbnail menu screen.
Press the THUMBNAIL button: Sets the camcorder
to E-E mode and displays the camera picture.
Press the PLAY/PAUSE button: Starts playback of
the selected clip.
Adding Clip Flags to Clips
You can add clip flags (OK, NG or KP marks) to clips
to filter the display of clips based on the clip flags.
You can perform this operation on the thumbnail
screen or the filtered clip thumbnail screen
(page 76).
1
Select the thumbnail for the clip to which you
want to add the clip flag, then select
Thumbnail >Set Clip Flag in the setup menu.
2
Turn the MENU knob to select a clip flag, then
press the knob.


