(E)
17
MJ620
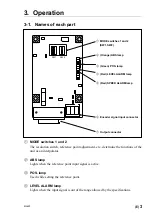
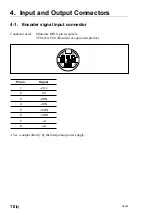
Encoder signal input connector
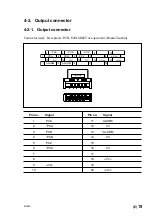
Output connector
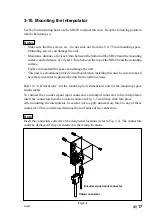
3-10. Mounting the interpolator
Use the four mounting holes on the MJ620 to mount this unit. Keep the following points in
mind when doing so.
Notes
.
Make sure that the screws, etc., do not stick out from the 8
x
7.5mm mounting space.
Protruding screws can damage the unit.
.
Maintain a distance of at least 7mm between the bottom of the MJ620 and the mounting
surface, and a distance of at least 17mm between the top of the MJ620 and the mounting
surface.
Failure to maintain this space can damage the unit.
.
This unit is a standalone printed circuit board; when installing this unit, be sure to take all
necessary measures to protect the unit from electronic noise.
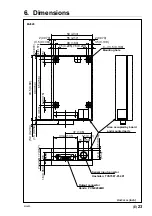
Refer to “6. Dimensions” for the mounting hole dimensions and for the mounting space
requirements.
To connect the encoder signal input connector, and output connector to the interpolator,
insert the connectors into the locations shown in Fig. 3-3 until they click into place.
After mounting the interpolator, be careful not to apply unnecessary force to any of these
connectors. This could cause disconnection or failure of the connectors.
Note
Insert the connectors correctly at the designated locations (refer to Fig. 3-3). The connectors
could be damaged if they are inserted in the wrong locations.
Fig. 3-3

