


28
Internal parts
Ch
ap
te
r 2 Des
c
rip
tio
n
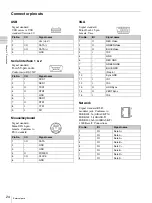
Jumpers
The Motherboard provides various jumpers for
configuring and monitoring the server.
Item
Description
J1C3
Bank Select Jumper.
The server stores two
versions of the BIOS: the current BIOS, and the
one previously installed. If you have a problem
with your BIOS, you may revert to the
previously installed BIOS. If you upgrade the
BIOS version more than once, the two versions
stored in your server will be identical.
1 - 2 Bank 0: Boot to an alternate BIOS.
2 - 3 Boot from the standard BIOS. These pins
should be jumpered for normal operation.
Force Lower Bank
Normal (Default) Operation
J1D1
CMOS Clear Jumper.
If you are not able to
access the BIOS setup screens, use the CMOS
Clear jumper to reset the configuration RAM.
1 - 2 Protect CMOS: these pins should be
jumpered for normal operation.
2 - 3 Erase CMOS: If these pins are jumpered
for 5 to 10 seconds, the CMOS settings will be
cleared on the next server reset. These pins
should not be jumpered for normal operation.
To clear the CMOS: Power down the server,
leaving AC power connected. Place the jumper
on pins 2 - 3 for 5 to 10 seconds. Move the
jumper back to pins 1 - 2. Power on the server.
J1D2
Password Clear Jumper.
If the user or
administrator password(s) is lost or forgotten,
moving the password clear jumper into the
“clear” position clears both passwords. The
password clear jumper must be restored to its
original position before a new password(s) can
be set.
1 - 2 Protect password: These pins should be
jumpered for normal operation.
2 - 3 Erase password: If these pins are
jumpered, then the password will be cleared on
the next server boot. These pins should not be
jumpered for normal operation. To use this
jumper to reset the password: Power down the
server. Place the jumper on pins 2 - 3. Power
on the server and wait 5 to 10 seconds. Power
down the server. Move the jumper back to pins
1 - 2. Power on the server.
J1E3
BMC Force Update.
If you are not able to
access the BIOS setup screens, the CMOS
Clear jumper will need to be used to reset the
configuration RAM.
1 - 2 Disable force update: These pins should
be jumpered for normal operation.
2 - 3 Enable force update: Jumpering these
pins forces a BMC update.
Item
Description
Default
Clear CMOS
Default
Clear Password
Default
Force BMC Update
Содержание HDXS-C200
Страница 2: ...2 ...
Страница 9: ...Table of Contents 9 About this chapter 99 Notes on spare parts 99 Parts list 100 Parts location 101 ...
Страница 10: ...10 Table of Contents ...
Страница 13: ...13 Functional description Chapter 1 Overview ...
Страница 68: ...68 PuTTY terminal emulator Chapter 4 Utilities ...
Страница 96: ...96 Powered off replacement parts Chapter 6 Parts Replacement ...
Страница 101: ...101 Parts location Chapter 8 Spare Parts Parts location 1 2 2 2 2 2 2 2 2 2 2 2 2 ...
Страница 102: ...102 Parts location Chapter 8 Spare Parts 101 102 103 104 104 104 104 104 104 104 104 104 ...
Страница 103: ...103 Parts location Chapter 8 Spare Parts 201 202 203 204 204 204 204 204 204 204 204 204 204 204 ...
Страница 104: ...104 Parts location Chapter 8 Spare Parts A B A B 301 302 303 304 305 306 306 306 306 306 ...
Страница 105: ...105 ...
Страница 106: ...Sony Corporation ...


