background image

1-15

DCR-TRV240/TRV340

62

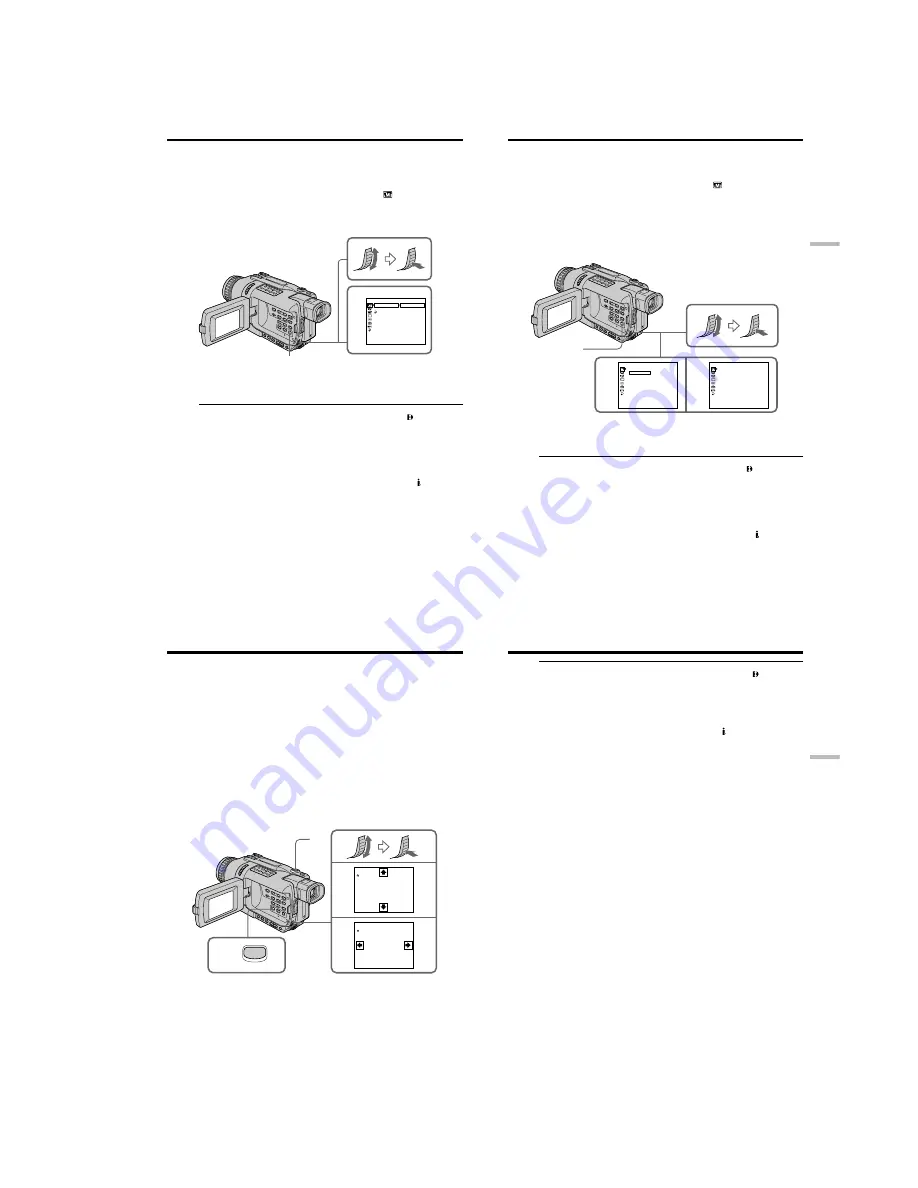
During playback, you can process a scene using the following picture effect functions:
NEG.ART, SEPIA, B&W and SOLARIZE.

(

1

)

In the playback or playback pause mode, press MENU to display the menu
settings.

(

2

)

Turn the SEL/PUSH EXEC dial to select P EFFECT in 

, then press the dial.

(

3

)

Turn the SEL/PUSH EXEC dial to select the desired picture effect mode, then
press the dial.
For details of each picture effect function, see page 46.

To cancel the picture effect

Set P EFFECT to OFF in the menu settings.

Notes

• Picture effect functions work only for tapes recorded in the Digital8   system.
• You cannot process externally input scenes using the picture effect functions.
• You cannot record pictures on a tape on your camcorder when you have processed

the picture using the picture effect function. However, you can record pictures on a
“Memory Stick” (DCR-TRV340 only) (p. 133, 140), or on a VCR using your camcorder
as a player.

Pictures processed by picture effect functions

Pictures processed by picture effect functions are not output through the   DV IN/OUT
jack.

When you set the POWER switch to OFF (CHG) or stop playing back

The picture effect function is automatically canceled.

— Advanced Playback Operations —

Playing back tapes with picture effects

2

MANUAL  SET
  P  EFFECT
  D  EFFECT
    RETURN

[MENU] : END

OFF
NEG. ART
SEPIA
B&W
SOLARIZE

MENU

63

Advanced Playback Operations

During playback, you can process a scene using the following digital effect functions:
STILL, FLASH, LUMI. and TRAIL.

(

1

)

In the playback mode, press MENU to display the menu settings.

(

2

)

Turn SEL/PUSH EXEC dial to select D EFFECT in 

, then press the dial.

(

3

)

Turn SEL/PUSH EXEC dial to select the desired digital effect mode, then press
the dial.
The bars appear on the screen.
In the STILL or LUMI. mode, the picture is captured and is stored in memory
as a still image at the time you press the SEL/PUSH EXEC dial.

(

4

)

Turn the SEL/PUSH EXEC dial to adjust the effect.
For details of each digital effect function, see page 47.

To cancel the digital effect

Set D EFFECT to OFF in the menu settings.

Notes

•Digital effect functions work only for tapes recorded in the Digital8   system.
•You cannot process externally input scenes using digital effect functions.
•You cannot record images on a tape on your camcorder when you have processed the

image using digital effect functions. However, you can record images on a “Memory
Stick” (DCR-TRV340 only) (p. 133, 140), or on a VCR using your camcorder as a
player.

Pictures processed by digital effect functions

Pictures processed by digital effect functions are not output through the   DV IN/OUT
jack.

When you set the POWER switch to OFF (CHG) or stop playing back

The digital effect function is automatically canceled.

Playing back tapes with digital effects

4

2

MANUAL  SET
  D  EFFECT
    OFF
    ST ILL
    FLASH
    LUMI.
    TRAIL

[MENU] : END

MANUAL  SET
  D  EFFECT

    LUMI.

[MENU] : END

I I I I I I I I

• • • • • • • •

MENU

64

You can enlarge moving and still images recorded on tapes.
Besides the operation described here, your camcorder can enlarge still images recorded
on “Memory Stick”s (DCR-TRV340 only) (p. 164).

(

1

)

In the playback or playback pause mode, press PB ZOOM. The image is
enlarged, and 

R


r

 indicators which showing the direction to move the image

appear on the screen.

(

2

)

Turn SEL/PUSH EXEC dial to move the enlarged image, then press the dial.

R

: The image moves downwards.

r

: The image moves upwards.

(

3

)

Turn SEL/PUSH EXEC dial to move the enlarged image, then press the dial.

T

: The image moves rightward (Turn the dial downwards.)

t

: The image moves leftward (Turn the dial upwards.)

(

4

)

For DCR-TRV340 only:

Adjust the zoom ratio by the power zoom lever.
You can enlarge the image from 1.1 times up to five times its size.

W : Decreases the zoom ratio.

T : Increase the zoom ratio.

To cancel the PB ZOOM function

Press PB ZOOM to turn off the indicator.

Enlarging recorded images

– Tape PB ZOOM

3

4

2

PB  ZOOM


×

 5.0

[EXEC] : 

T


t

PB  ZOOM


×

 5.0

[EXEC] : 

r


R

1

PB ZOOM

65

Advanced Playback Operations

Notes

•The PB ZOOM function works only for tapes recorded in the Digital8   system.
•You cannot process externally input scenes using the PB ZOOM function.
•You cannot record images on a tape on your camcorder when you have processed the

image using the PB ZOOM function. However, you can record images on a “Memory
Stick” (DCR-TRV340 only) (p. 133), or on a VCR using your camcorder as a player.

Images in the PB ZOOM function

Images in the PB ZOOM function are not output through the   DV IN/OUT jack.

PB ZOOM function is automatically canceled when:

– The POWER switch is set to OFF (CHG)
– You stop playing back
– You press MENU
– You press TITLE
– You insert a “Memory Stick” (DCR-TRV340 only)

To record an image processed by Tape PB ZOOM on “Memory Stick”s
(DCR-TRV340 only)

Press PHOTO to record the image processed by Tape PB ZOOM.

Enlarging recorded images – Tape PB ZOOM

Содержание DCR-TRV240

Страница 1: ...impedance more than 47 kΩ kilohms Output impedance with less than 2 2 kΩ kilohms Stereo minijack ø 3 5 mm Input impedance more than 47 kΩ kilohms Headphone jack Stereo minijack ø 3 5 mm USB jack mini B LANC jack Stereo mini minijack ø 2 5 mm MIC jack Stereo minijack ø 3 5 mm DV input output 4 pin connector LCD screen Picture 6 2 cm 2 5 type 50 3 37 4 mm 2 1 1 2 in Total dot number 61 600 280 220 V...

Страница 2: ... It is best to use only unleaded solder but unleaded solder may also be added to ordinary solder SAFETY CHECK OUT After correcting the original service problem perform the following safety checks before releasing the set to the customer ATTENTION AU COMPOSANT AYANT RAPPORT À LA SÉCURITÉ LES COMPOSANTS IDENTIFÉS PAR UNE MARQUE 0 SUR LES DIAGRAMMES SCHÉMATIQUES ET LA LISTE DES PIÈCES SONT CRITIQUES ...

Страница 3: ...CND E HK KR JE AR BR a f 15p Remark a with VC 276 board IC4901 4903 4905 5001 5101 5102 with VC 276 board IC4801 4802 15p Printer ready 1 Wireless Remote Commander 1 2 AC L10A L10B L10C AC power adaptor 1 Power cord 1 3 NP FM30 battery pack 1 4 Size AA R6 battery for Remote Commander 2 5 A V connecting cable 1 6 Shoulder strap 1 7 Lens cap 1 8 USB cable 1 9 Memory Stick 1 DCR TRV340 only 0 CD ROM ...

Страница 4: ...o or TV programs 1 21 Inserting a scene from a VCR Insert Editing 1 22 Viewing images recorded on a tape on your computer Windows users only 1 22 Customizing Your Camcorder Changing the menu settings 1 25 Memory Stick operations DCR TRV340 only Using Memory Stick Introduction 1 28 Recording still images on Memory Stick s Memory Photo recording 1 30 Superimposing a still image in the Memory Stick o...

Страница 5: ...7 1 2 INITIALIZATION OF 8 A B C D E F 1B 1C 1F PAGE DATA 5 8 1 2 1 INITIALIZATION OF D PAGE DATA DCR TRV240 5 9 1 Initializing the D Page Data 5 9 2 Modification of D Page Data 5 9 3 D Page Table 5 9 1 2 2 INITIALIZATION OF A D PAGE DATA DCR TRV340 5 10 1 Initializing the A D Page Data 5 10 2 Modification of A D Page Data 5 10 3 D Page Table 5 10 4 A Page Table 5 10 1 2 3 INITIALIZATION OF B 1B PA...

Страница 6: ...EO OUT Chroma Level Adjustment VC 276 board 5 48 4 VIDEO OUTY Chroma Level Check VC 276 board 5 48 5 Hi8 Standard8 Y C Output Level Setting VC 276 board 5 49 6 Hi8 standard 8mm AFC f0 Adjustment VC 276 board 5 49 3 5 AUDIO SYSTEM ADJUSTMENTS 5 50 1 Hi8 Standard8 AFM BPF f0 Adjustment VC 276 board 5 50 2 Hi8 Standard8 AFM 1 5 MHz Deviation Adjustment VC 276 board 5 51 3 Hi8 Standard8 AFM 1 7 MHz De...

Страница 7: ...efer to 2 3 to remove the cabinet R section 4 Refer to 2 4 to remove the lens section 5 Refer to 2 5 to remove the EVF section 6 Refer to 2 6 to remove the battery panel section 7 Refer to 2 8 and 2 9 to remove the cabinet L section Include the CS frame assembly and control switch block SS 1380 8 Disconnect CN4401 2P of VC 276 board 9 Add 5V from the DC POWER SUPPLY and unload with a pressing the ...

Страница 8: ...y Method While pressing the STOP key set the switch from OFF to VTR or PLAYER and continue pressing the STOP key for 5 seconds continuously The service mode will be displayed and the counter will show the backup No and the 5 character self diagnosis codes 3 2 Switching of Backup No By rotating the control dial past self diagnosis codes will be shown in order The backup No in the indicates the orde...

Страница 9: ...and perform operations from the beginning Load the tape again and perform operations from the beginning Load the tape again and perform operations from the beginning Load the tape again and perform operations from the beginning Load the tape again and perform operations from the beginning Load the tape again and perform operations from the beginning Load the tape again and perform operations from ...

Страница 10: ...orrection Inspect the lens block focus reset sensor Pin qd of CN1551 of VC 276 board when focusing is performed when the focus ring is rotated in the focus manual mode and the focus motor drive circuit IC1553 of VC 276 board when the focusing is not performed Inspect the lens block zoom reset sensor Pin qs of CN1551 of VC 276 board when zooming is performed when the zoom switch is operated and the...

Страница 11: ...Remote Commander 2 p 205 5 A V connecting cable 1 p 37 6 Shoulder strap 1 p 199 7 Lens cap 1 p 20 8 USB cable 1 p 95 154 9 Memory Stick 1 DCR TRV340 only p 115 0 CD ROM SPVD 008 USB Driver 1 p 95 154 1 2 3 4 5 6 7 8 9 0 Contents of the recording cannot be compensated if recording or playback is not made due to a malfunction of the camcorder storage media etc Quick Start Guide 8 Quick Start Guide T...

Страница 12: ...er These points are normal in the manufacturing process and do not affect the recording in any way Do not let your camcorder become wet Keep your camcorder away from rain and sea water Letting your camcorder become wet may cause your camcorder to malfunction Sometimes this malfunction cannot be repaired a Never leave your camcorder exposed to temperatures above 60 C 140 F such as in a car parked i...

Страница 13: ... be shorter Playing time Battery pack Playing time Playing time on LCD screen with LCD closed NP FM30 supplied 80 110 NP FM50 130 180 NP FM70 270 370 NP QM71 315 430 NP FM90 410 560 NP QM91 FM91 475 645 Approximate number of minutes when you use a fully charged battery Approximate continuous playing time at 25 C 77 F The battery life will be shorter if you use your camcorder in a cold environment ...

Страница 14: ...r camcorder starts recording The REC indicator appears on the screen The camera recording lamp located on the front of your camcorder lights up To stop recording press START STOP again The recording lamp lights up in the viewfinder when you record with the viewfinder Notes Fasten the grip strap firmly Do not touch the built in microphone during recording Recording Basics Recording a picture 5 3 4 ...

Страница 15: ...T side When you shoot close to a subject If you cannot get a sharp focus move the power zoom lever to the W side until the focus is sharp You can shoot a subject that is at least about 80 cm about 2 feet 5 8 inch away from the lens surface in the telephoto position or about 1 cm about 1 2 inch away in the wide angle position When the POWER switch is set to MEMORY DCR TRV340 only You cannot use the...

Страница 16: ...A or MEMORY DCR TRV340 only mode slide NIGHTSHOT to ON The and NIGHTSHOT indicators flash on the screen To cancel the NightShot function slide NIGHTSHOT to OFF Using Super NightShot The Super NightShot function makes subjects up to 16 times brighter than those recorded in the NightShot mode 1 In CAMERA mode slide NIGHTSHOT to ON The and NIGHTSHOT indicators flash on the screen 2 Press SUPER NS The...

Страница 17: ...ecording start point In the standby mode hold down the 7 side of EDITSEARCH The recorded portion is played back to go forward 7 to go backward Release EDITSEARCH to stop playback If you press START STOP re recording begins from the point you released EDITSEARCH You cannot monitor the sound Rec Review You can check the last recorded section In the standby mode press the 7 side of EDITSEARCH momenta...

Страница 18: ...button To view pictures at slow speed slow playback Press y on the Remote Commander during playback For slow playback in the reverse direction press then press y on the Remote Commander To resume normal playback press N To view pictures at double speed Press 2 on the Remote Commander during playback For double speed playback in the reverse direction press then press 2 on the Remote Commander To re...

Страница 19: ...rd still images on tapes with the self timer You can also use the Remote Commander for this operation 1 In the standby mode press MENU to display the menu settings 2 Turn the SEL PUSH EXEC dial to select SELFTIMER in then press the dial 3 Turn the SEL PUSH EXEC dial to select ON then press the dial 4 Press MENU to make the menu settings disappear 5 Press PHOTO deeper The self timer starts counting...

Страница 20: ...ess FADER until the desired fader indicator flashes The indicator changes as follows FADER t M FADER t BOUNCE t MONOTONE no indicator T DOT T WIPE T OVERLAP The last selected fader mode is indicated first of all 2 Press START STOP The fader indicator stops flashing After fade in out ends your camcorder automatically returns to the normal mode To cancel the fader function Before pressing START STOP...

Страница 21: ...e is good for recording dark picture more brightly OLD MOVIE You can add an old movie type atmosphere to pictures Your camcorder automatically sets the wide mode to ON picture effect to SEPIA and sets the appropriate shutter speed STILL LUMI Still image Moving picture Still image Moving picture 48 1 In CAMERA mode press MENU to display the menu settings 2 Turn the SEL PUSH EXEC dial to select D EF...

Страница 22: ...ckering or changes in color may occur in the following modes If this happens turn the PROGRAM AE function off Soft portrait Sports lesson Using the PROGRAM AE function 2 MANUAL SET PROGRAM AE P EFFECT D EFFECT FLASH MODE FLASH LVL N S LIGHT AUTO SHTR RETURN MENU END AUTO SPOTLIGHT PORTRAIT SPORTS BEACH SKI SUNSETMOON LANDSCAPE MENU 52 You can manually adjust and set the exposure Normally exposure ...

Страница 23: ...the subject a little and make a frame recording We recommend that you use a tripod and operate your camcorder using the Remote Commander after step 5 1 In the standby mode press MENU to display the menu settings 2 Turn the SEL PUSH EXEC dial to select FRAME REC in then press the dial 3 Turn the SEL PUSH EXEC dial to select ON then press the dial 4 Press MENU to make the menu settings disappear The...

Страница 24: ...ETURN TITLE END TITLE SET ____________________ ABCDE FGHIJ KLMNO PQRST UVWXY Z TITLE END 12345 67890 ÀÈÌÒÙ ÁÉÍÓÚ ÂÊÔÆŒ ÃÕÑçß ÄÏÖÜÅ P1 F DM i ø C cP2 SET TITLE SET ____________________ ABCDE FGHIJ KLMNO PQRST UVWXY Z TITLE END 12345 67890 ÀÈÌÒÙ ÁÉÍÓÚ ÂÊÔÆŒ ÃÕÑçß ÄÏÖÜÅ P1 F DM i ø C cP2 SET TITLE SET ____________________ ABCDE FGHIJ KLMNO PQRST UVWXY Z TITLE END 12345 67890 ÀÈÌÒÙ ÁÉÍÓÚ ÂÊÔÆŒ ÃÕÑçß Ä...

Страница 25: ... processed the image using digital effect functions However you can record images on a Memory Stick DCR TRV340 only p 133 140 or on a VCR using your camcorder as a player Pictures processed by digital effect functions Pictures processed by digital effect functions are not output through the DV IN OUT jack When you set the POWER switch to OFF CHG or stop playing back The digital effect function is ...

Страница 26: ...rts playback at the point where the date changes Each time you press or your camcorder searches for the previous or next date To stop searching Press x Notes The date search function works only for tapes recorded in the Digital8 system If one day s recording is less than two minutes your camcorder may not accurately find the point where the recording date changes If a tape has a blank portion betw...

Страница 27: ...r a tape you want to record over into the VCR and insert the recorded tape into your camcorder 2 Set the input selector on the VCR to DV IN if it is available Refer to the operating instructions of your VCR 3 Set the POWER switch to VCR on your camcorder 4 Play back the recorded tape on your camcorder 5 Start recording on the VCR Refer to the operating instructions of your VCR When you have finish...

Страница 28: ...or DCR TRV340 76 Dubbing only desired scenes Digital program editing on tapes TV VCR component Note on IR SETUP codes Digital program editing is not possible if the VCR does not support IR SETUP codes About IR SETUP codes The IR SETUP code is stored in the memory of your camcorder Be sure to set the correct code to match your VCR The default setting is code number 3 Brand IR SETUP code Sony 1 2 3 ...

Страница 29: ... 55 06 TOTAL 0 00 00 00 SCENE 0 MENU END VIDEO EDIT EDIT SET CONTROL ADJ TEST CUT IN CUT OUT IR SETUP PAUSEMODE IR TEST RETURN IR i LINK 0 08 55 06 MENU END i LINK VIDEO EDIT EDIT SET CONTROL ADJ TEST CUT IN CUT OUT IR SETUP PAUSEMODE IR TEST RETURN 0 08 55 06 MENU END OTHERS DATA CODE BEEP COMMANDER DISPLAY VIDEO EDIT INDICATOR RETURN READY MENU END VIDEO EDIT MARK UNDO ERASE ALL START EDIT SET 1...

Страница 30: ...program mark changes to light blue 9 Repeat steps 5 to 8 then set the program When the program is set the program mark changes to light blue You can set up to 20 programs 84 Dubbing only desired scenes Digital program editing on tapes 5 6 8 9 VIDEO EDIT MARK UNDO ERASE ALL START EDIT SET 1 IN 0 08 55 06 TOTAL 0 00 00 00 SCENE 0 MENU END VIDEO EDIT MARK UNDO ERASE ALL START EDIT SET 1 OUT 0 08 55 0...

Страница 31: ...tate of the analog video signals your computer may not be able to output the images correctly when you convert analog video signals into digital video signals via your camcorder Depending on the analog video unit the image may contain noise or incorrect colors You cannot record or capture video output via your camcorder when the video tapes include copyright protection signals such as the ID 2 sys...

Страница 32: ...set your camcorder to the recording pause mode 6 First press X on the VCR and after a few seconds press X on your camcorder to start inserting the new scene Inserting automatically stops near the zero point on the counter Your camcorder automatically stops The end point c of the insert stored in memory is canceled To change the insert end point Press ZERO SET MEMORY again after step 5 to make the ...

Страница 33: ...8 With the CD ROM inserted connect the USB jack on your camcorder to the USB connector on your computer using the supplied USB cable Your computer recognizes the camcorder and the Windows Add Hardware Wizard starts Viewing images recorded on a tape on your computer Windows users only 96 Viewing images recorded on a tape on your computer Windows users only 9 Follow the on screen messages so that th...

Страница 34: ...e 3 Move the cursor to PIXELA ImageMixer and click The language selection dialog box appears 4 Select the language for installation 5 Follow the on screen messages Follow the directions on the screen to install DirectX DirectX 8 0 will be installed Viewing images recorded on a tape on your computer Windows users only 100 Capturing images with PIXELA ImageMixer Ver 1 0 for Sony To use this software...

Страница 35: ...ttings select the menu items with the SEL PUSH EXEC dial The default settings can be partially changed First select the icon then the menu item and then the mode 1 In CAMERA VCR or MEMORY DCR TRV340 only mode press MENU to display the menu settings 2 Turn the SEL PUSH EXEC dial to select the desired icon then press the dial to set 3 Turn the SEL PUSH EXEC dial to select the desired item then press...

Страница 36: ... VCR VCR VCR VCR VCR VCR When you play back tapes recorded in the Hi8 standard 8 system only Notes on AUDIO MIX When playing back a tape recorded in the 16 bit mode you cannot adjust the balance You can adjust the balance only for tapes recorded in the Digital8 system Note on PB MODE The mode will return to the default setting when you remove the battery pack or power source you turn the POWER swi...

Страница 37: ...o another VCR You cannot select AUDIO MODE for tapes recorded in the Digital8 system You however can select AUDIO MODE when you dub tapes recorded in the Hi8 standard 8 system to another VCR using the i LINK cable continued on the following page Changing the menu settings 112 Notes on DEMO MODE You cannot select DEMO MODE when a cassette is inserted in your camcorder The DEMO MODE default setting ...

Страница 38: ...ick s Do not disassemble or modify Memory Stick s Do not let Memory Stick s become wet Do not use or keep Memory Stick s in locations that are Extremely hot such as in a car parked in the sun or under the scorching sun Under direct sunlight Very humid or subject to corrosive gases When you carry or store a Memory Stick put it in its case Memory Stick operations Using Memory Stick Introduction Writ...

Страница 39: ...he screen 120 Selecting the moving image size You can select either 320 240 or 160 112 for moving image sizes The default setting is 320 240 1 Set the POWER switch to VCR or MEMORY Make sure that the LOCK switch is set to the left unlock position 2 Press MENU to display the menu settings 3 Turn the SEL PUSH EXEC dial to select MOVIE SET in then press the dial 4 Turn the SEL PUSH EXEC dial to selec...

Страница 40: ...A CODE on the Remote Commander during playback You can record still images on Memory Stick s in CAMERA mode even while you are in the standby mode or recording moving pictures to tape Set PHOTO REC to MEMORY in the menu settings before operation The default setting is MEMORY Press PHOTO to record still images on Memory Stick s in CAMERA mode while you are standing by for recording or recording mov...

Страница 41: ...es only Superimposing a still image in the Memory Stick on an image MEMORY MIX M OVERLAP Still image Moving picture C CHROM Still image Moving picture Blue M LUMI Still image Moving picture M CHROM Still image Moving picture Blue 128 Superimposing a still image in the Memory Stick on an image MEMORY MIX Recording superimposed images on a tape Before operation Insert a tape for recording into your ...

Страница 42: ... Memory Stick s When the overlapping still image has a large amount of white the thumbnail image of the picture may not be clear Image data modified on your computer or shot with other equipment You may not be able to play modified images back with your camcorder During recording You cannot change the mode setting When recording images on a Memory Stick using the MEMORY MIX function The PROGRAM AE...

Страница 43: ...ard 8 system When attempting to input images that are distorted due to poor radio wave reception when a TV tuner unit is in use DV DV OUT DV IN OUT Signal flow optional Recording images from a tape as still images 136 Copying still images from a tape PHOTO SAVE DCR TRV340 only Using the search function you can automatically capture only still images from tapes recorded in the Digital8 system and r...

Страница 44: ...DCR TRV340 only Your camcorder can read moving picture data recorded on tapes and record it as a moving picture on a Memory Stick Your camcorder can also capture moving picture data through the input connector and record it as a moving picture on a Memory Stick Before operation Insert a recorded tape into your camcorder Insert a Memory Stick into your camcorder 1 Set the POWER switch to VCR 2 Pres...

Страница 45: ...camcorder 2 Insert the tape for playback and a Memory Stick for recording into your camcorder 3 Press MENU to display the menu settings 4 Turn the SEL PUSH EXEC dial to select VIDEO EDIT in then press the dial 5 Turn the SEL PUSH EXEC dial to select MEMORY then press the dial 6 Turn the SEL PUSH EXEC dial to select IMAGE SIZE then press the dial 7 Search for the beginning of the first scene you wa...

Страница 46: ...ough space to record LOW MEMORY appears on the screen However you can record pictures up to the time indicated If you set over the maximum recording time OVER MEMORY LIMIT appears on the screen However you can record moving pictures up to the maximum recording time 148 DCR TRV340 only You can play back still images recorded on a Memory Stick You can also play back six images including moving pictu...

Страница 47: ...ay back images with your camcorder When playing back image data modified on your computer When playing back image data shot with other equipment To play back recorded images on a TV screen Before operation connect your camcorder to the TV with the A V connecting cable supplied with your camcorder Turn the audio volume of the TV down before operation or noise howling may be output from the TV speak...

Страница 48: ...ewing images recorded on Memory Stick s on your computer If you cannot install the USB driver The USB driver has been registered incorrectly as your computer was connected to your camcorder before installation of the USB driver was completed Perform the following procedure to correctly install the USB driver Step1 Uninstall the incorrect USB driver 1 Turn on your computer and allow Windows to load...

Страница 49: ...the folder Desired file type Double click in this order Still image Dcim folder t 100msdcf folder t Image file Moving picture Mssony folder t Moml0001 folder t Image file Copying a file to the hard disk of your computer before viewing it is recommended If you play back the file directly from the Memory Stick the image and sound may break off Unplug the USB cable or eject the Memory Stick To unplug...

Страница 50: ... s to tape 164 DCR TRV340 only You can enlarge still images recorded on a Memory Stick You can select and view a desired part from the enlarged still image Also you can copy the desired part of the enlarged still image to tapes or Memory Stick s Before operation Insert a Memory Stick into your camcorder 1 Set the POWER switch to MEMORY or VCR Make sure that the LOCK switch is set to the left unloc...

Страница 51: ... dial to select ON then press the dial 6 Press MENU to make the menu settings disappear The mark is displayed beside the data file name of the protected image To cancel image protection Select OFF in step 5 then press the SEL PUSH EXEC dial Note Formatting erases all information on the Memory Stick including the protected image data Before formatting a Memory Stick check its contents If the write ...

Страница 52: ... tab on the Memory Stick is set to LOCK You cannot delete images Deleting images DELETE 172 DCR TRV340 only You can specify a recorded still image to print out by writing a print mark This function is useful for printing out still images later Your camcorder conforms to the DPOF Digital Print Order Format standard for specifying still images to print out Before operation Insert a Memory Stick into...

Страница 53: ...This is not a malfunction This is not a malfunction Slow shutter Super NightShot or Color Slow Shutter mode is activated This is not a malfunction Troubleshooting Types of trouble and how to correct trouble START STOP does not operate The power goes off The image on the viewfinder screen is not clear The SteadyShot function does not work The autofocusing function does not work The picture does not...

Страница 54: ...the Memory Stick is set to LOCK c Release the lock p 115 continued on the following page The Memory Stick does not function Recording does not function The image cannot be deleted You cannot format the Memory Stick Deleting all the images cannot be carried out You cannot protect the image You cannot write a print mark on the still image The photo save function does not work Types of trouble and ho...

Страница 55: ...sages CLOCK SET Set the date and time p 17 FOR InfoLITHIUM Use an InfoLITHIUM battery pack p 187 BATTERY ONLY Q Z TAPE END The cassette has run out of tape Q NO TAPE Insert a cassette tape CLEANING CASSETTE The video heads are dirty The x indicator and CLEANING CASSETTE message appear one after another on the screen p 193 COPY INHIBIT You tried to record a picture that has a copyright control sign...

Страница 56: ...eratures for a long time or left in a fully charged state or the battery pack is frequently used Regard the remaining battery time indication as the approximate shooting time The E mark indicating that there is little remaining battery time sometimes flashes depending on the operating conditions or ambient temperature and environment even if the remaining battery time is about five to 10 minutes 1...

Страница 57: ...face of the tape or on the lens In this state the tape may stick to the head drum and be damaged or your camcorder may not operate correctly If there is moisture inside your camcorder the beep sounds and the indicator flashes When the Z indicator flashes at the same time the cassette is inserted in your camcorder If moisture condenses on the lens the indicator will not appear If moisture condensat...

Страница 58: ... then input it into your Sony VAIO AC power adaptor Unplug the unit from the wall outlet when you are not using it for a long time To disconnect the power cord pull it out by the plug Never pull the power cord itself Do not operate the unit with a damaged cord or if the unit has been dropped or damaged Do not bend the power cord forcibly or place a heavy object on it This will damage the cord and ...

Страница 59: ...ej ed DCR TRV340 only Notes on the intelligent accessory shoe The intelligent accessory shoe supplies power to optional accessories such as a video light or microphone or printer DCR TRV340 only The intelligent accessory shoe is linked to the POWER switch allowing you to turn the power supplied by the shoe on and off Refer to the operating instructions of the accessory for further information The ...

Страница 60: ... in the viewfinder wf Video flash ready p 105 This indicator appears when you use the video flash light optional wg Video flash mode p 105 This indicator appears when you use the video flash light optional wh Tape counter p 26 Time code p 26 Self diagnosis display p 182 Remaining battery time p 13 wj FULL charge p 13 205 Quick Reference To prepare the Remote Commander Insert 2 size AA R6 batteries...

Страница 61: ... Control switch block CF 2500 2 13 Control switch block FK 2500 2 5 EVF section LB 076 board 2 6 Battery panel section Battery terminal board 2 7 Memory Stick 10P Connector Memory stick model 2 8 Control switch block SS 1380 2 9 Cabinet L section CS frame assembly 25 2 10 VC 276 board 2 11 Mechanism deck Memory stick model DCR TRV340 Service position to check the VTR section Service position to ch...

Страница 62: ...stal indicator module REMOVING THE BACK LIGHT PD 160 BOARD SERVICE POSITION Back light Cold cathode fluorescent tube Adjustment remote commander RM 95 PD 160 board Multi CPC jig J 6082 311 A Liquid crystal indicator module Indication LCD block assembly LANC jack CN5502 DC IN AC POWER ADAPTOR AC IN 4 Two claws 2 Four claws Two claws B 9 Back light C D 7 Remove the two solderings 6 LCD holder 3 Remo...

Страница 63: ...3 Tapping screw M1 7 5 2 Two tapping screws M1 7 5 5 Tapping screw M1 7 5 7 Tapping screw M1 7 5 4 Remove the FP 411 flexible board in the direction of the arrow B DC IN qs Microphone qa Microphone 4P qf Microphone Cushion F 3 MI screw M2 4 H 6 FP 406 flexible board 30P 4 Two MI screws M2 4 H Push the eject knob in the direction of the arrow A and open the cassette lid A 7 Front panel section 5 Cl...

Страница 64: ... section qg Harness PD 117 20P 3 Cabinet upper qd Night Shot switch of Lens device LSV 700A 1 MI screw M2 4 H qf Control switch block CF 2500 22P q Three MI screws M2 4 H qa Three MI screws M2 4 H 4 MI screw M2 4 H 9 MI screw M2 4 H 6 Jack cover retainer 8 Jack cover qs Two MI screws M2 4 H ...

Страница 65: ...e the solderings 3 Remove the eight solderings 7 Tapping screw M1 7 5 1 Two tapping screws M1 7 5 8 Two tapping screws B1 7 3 5 head 9 Iris flexible assembly 2 Two tapping screws M1 7 5 4 Stepping motor Z700 Zoom 5 Stepping motor F700 Focus A A B B REMOVING THE IRIS FLEXIBLE ASSEMBLY 8Lens device LSV 700A CD 357 BOARD SERVICE POSITION AC IN AC POWER ADAPTOR DC IN Adjustment remote commander RM 95 ...

Страница 66: ... adhesive tape 3 Two tapping screws M1 7 5 4 Four tapping screws M1 7 5 1 Two claws 4 2 Two claws 9 VF lens B assembly 6 Illuminator 4 LCD LCX032AP 5 16P 8 LCD LCX032AP 5 7 Prism sheet 3 Lamp guide 5 LB 076 board LB 076 board Routing of the flexible board of the Operation FP 407 flexible board when attaching the EVF cabinet lower assembly Routing of the flexible board of the Operation FP 407 flexi...

Страница 67: ...odel TRV340 7 Tapping screw M1 7 5 3 FP 409 flexible board 10P 5Strap sheet metal lower 6 Battery terminal board 4 Battery terminal board 6P 1 Jack lid 2500 REMOVING THE BATTERY TERMINAL BOARD A 2 7 MEMORY STICK 10P CONNECTOR MEMORY STICK MODEL TRV340 8 Memory stick 10p connector 7 MS holder 4 MS section 2 Two screws M1 7 2 5 p 1 Screw M1 7 2 5 p 3 6 Two screws M1 7 2 5 p 5 FP 409 flexible board 1...

Страница 68: ...Grip belt ES REMOVING THE CS FRAME ASSEMBLY 25 6 CS frame assembly 25 A A 4 FP 264 flexible board 15P PRECAUTION DURING CABINET L SECTION INSTALLATION OK NG B 6 8 Remove the control switch block SS 1380 in the direction of the arrow B 3 Screw M1 7 2 5 p 4 Two dowels 7 Two dowels 1 Tape A 5 Tapping screw M1 7 5 VC 276 Board 2 Control switch block SS 1380 12P Push the eject knob in the direction of ...

Страница 69: ...276 board 2 Screw M1 7 2 5 p 4 Two screws M1 7 2 5 p 5 3 FP 410 flexible board 6 FP 264 flexible board 20P 1 MI screw M2 4 H 2 11 MECHANISM DECK 5 MD frame 4 1 Turn over VC 276 board in the direction of the arrow 6 Mechanism deck V C 2 7 6 B o a r d 2 Three screws M1 7 2 5 p 3 Three dowels ...

Страница 70: ...ck the VTR section set the VTR to the Forced VTR power ON mode Operate the VTR functions using the adjustment remote commander with the HOLD switch set in the OFF position SERVICE POSITION TO CHECK THE VTR SECTION Setting the Forced VTR Power ON mode Cnnection to Check the VTR Section 1 Select page 0 address 01 and set data 01 2 Select page 0 address 10 and set data 00 3 Select page D address 10 s...

Страница 71: ...the Cabinet R section Connection to Check the Camera Section To check the camera section set the camera to the Forced camera power ON mode When you want to operate to zoom and focus use the controls on the remote commander with the HOLD switch off Setting the Forced Camera Power ON mode 1 Select page 0 address 01 and set data 01 2 Select page 0 address 10 and set data 00 3 Select page D address 10...

Страница 72: ...K 2500 5P 5 Harness PD 117 6P Harness PD 117 1 MI screw M2 4 H 2 Tripod retainer Tripod screw Y 7 Claw Routing of the harness PD 117 2 13 CONTROL SWITCH BLOCK FK 2500 3 Control switch block FK 2500 1 Control switch block FK 2500 5P 2 Peel off the adhesive side Routing of the flexible board of the Operation Control switch block FK 2500 when attaching the Control switch block FK 2500 ...

Страница 73: ...xible board 6P 1 Harness PD 117 6 20P 2 Hinge assembly 1 Harness PD 117 6 FP 412 flexible board 4 Two screws M1 7 2 5 p 2 Hinge cover C 3 Hinge cover M 1 Two claws 5 Claw A Remove the Harness PD 117 in the direction of the arrow A Then bend the harness so that it is laid along with the connector 7 Hinge assembly 7 For removing the LCD unit See page 2 2 Tape A Harness PD 117 Routing of the harness ...

Страница 74: ...TION CD 357 CCD IMAGER EVF BACK LIGHT CHA DISPLAY DRIVE BACK LIGHT LCD DRIVE TG STEADY SHOT LASER LINK CAMERA VIDEO DV INTERFACE CAMERA MECHA HI CONTROL AUDIO D D CONVERTER PD 160 SI 032 SI 032 VC 276 CD 357 LB 076 PD 160 SI 032 VC 276 NAME FUNCTION ...

Страница 75: ...flexible boards contained in the mechanism deck are not shown FP 411 FP 414 FP 412 FP 407 FP 409 MEMORY STICK MODEL TRV340 FP 410 FP 161 FP 406 CONTROL SWITCH BLOCK SS 1380 CONTROL SWITCH BLOCK CF 2500 CONTROL SWITCH BLOCK FK 2500 IRIS FLEXIBLE ASSEMBLY FP 264 ...

Страница 76: ...PITCH AD YAW AD MIC L R HP L R MF A B IR L R L R Y C Y C V V IR ON SIRCS PWM XCS IC3701 IC4501 AFM FSC IC2201 XCS AU1 IC4501 XCS IC3603 IC4501 SPCK IC1401 CK CONT IC4501 SPCK IC1401 XCS IC2201 IC4501 DOP IC3201 AFCK HD VD OE HD VD OE RXD TXD Y C AFM FSC EN0 EN1 DIR 0 A B DIR 1 A B FC RST ZM RST HD VD PB RF C C Y Y SFD BCK AS DATA MCLK DATA FROM SFD DATA TO SFD SE301 CN301 MF A B LIA1 LIA2 PITCH SE...

Страница 77: ...C 276 19 22 PAGE 3 5 IC5102 1 9 16 25 48 29 45 26 CS FLASH IC4901 IC5101 2 12 39 49 19 32 36 DSCK IC1401 18 CS SDARM IC4901 215 214 213 238 239 187 184 109 113 116 60 39 62 93 222 221 IC1402 SDRAM 115 74 99 25 97 91 117 118 119 61 62 59 87 88 123 120 55 56 54 53 48 47 46 34 27 22 11 9 2 36 135 170 153 144 137 133 130 44 84 85 86 72 65 196 83 76 195 177 191 182 171 172 199 207 SFD BCK ADAO2 HD VD O...

Страница 78: ...TRRV TRRT ATF ERR TO OVERALL BLOCK 4 5 MC BUS TO OVERALL BLOCK 1 5 PAGE 4 27 SEE PAGE 4 46 PAGE 3 7 PAGE 4 23 PAGE 3 10 12 4 8 11 16 CN1108 2 4 FOR ADJUSTMENTS PB RF IC3201 5 SP2 EVEN MC BUS MC BUS IC3301 IC3303 BW Y SP 18 22 24 DATA TO SFD DATA FROM SFD SFD BCK RF AGC OUT PB Y RF CAM SO CAM SCK CAM SO CAM SCK PB C RF PB RF PB AFM RF 17 10 4 5 9 11 7 8 3 BL CONT CN1106 16 BL CONT XCS LCD IC4501 TO...

Страница 79: ...R MODE SWITCH S901 LED DRIVE Q4401 LOADING MOTOR M903 Q002 SENSOR TAPE END LED TAPE D001 M FG1 2 CAPSTAN FG Q001 SENSOR TAPE TOP H001 SENSOR T REEL H002 S001 S002 REC PROOF SENSOR S REEL ME MP HI8 MP C C LOCK REC PROOF ME SW HI8 MP SW XCC DOWN 4 60 4 58 4 73 4 58 4 57 4 58 14 9 7 2 22 23 CN1108 4 4 FOR ADJUSTMENTS RF SWP IC4501 172 CAMERA CONTROL 84 111 155 215 172 170 115 23 135 66 65 63 130 129 ...

Страница 80: ...O STBY SW BATT SIG XEJECT SW XRESET 82 83 10 12 88 87 IC4703 I F LANC I O Q4801 BL CONT 104 105 126 XCC DOWN XCS MECHA SIRCS PWM 26 25 VTR DD ON FAST CHARGE BATT EXT SW SHOE ON INIT CHARGE ON SIRCS SIG CN1101 LANC SIG SHOE PRT UNREG 3 1 16 19 20 TO OVERALL BLOCK 4 5 TO OVERALL BLOCK 2 5 TO OVERALL BLOCK 1 5 TO OVERALL BLOCK 3 5 USB 3 1V BL REG INTELLIGENT ACCESSORY SHOE 2 2 IC1301 DC DC CONV 2 2 D...

Страница 81: ... SW XRESET 39 40 10 12 43 42 IC4703 I F LANC I O Q5001 BL CONT 79 80 59 XCC DOWN SIRCS PWM 35 VTR DD ON FAST CHARGE BATT EXT SW SHOE ON INIT CHARGE ON SIRCS SIG CN1101 LANC SIG SHOE PRT UNREG PRT HEAD UNREG 3 1 2 16 19 17 20 18 TO OVERALL BLOCK 4 5 TO OVERALL BLOCK 1 5 TO OVERALL BLOCK 3 5 USB 3 1V BL REG INTELLIGENT ACCESSORY SHOE 2 2 IC1301 DC DC CONV 2 2 IC4903 IC4901 D 1 9V D 2 8V AU 2 8V A 2 ...

Страница 82: ...MT 5V BATT UNREG DRUM ERROR D 2 8V A 4 75V CAM 15V CAM 7 5V DRUM VS CAP ERROR CAP VS Q1303 SWITCHING Q1308 SWITCHING Q1307 SWITCHING Q1304 SWITCHING Q1301 SWITCHING Q1302 SWITCHING Q1305 SWITCHING Q1306 SWITCHING L1305 L1310 L1306 L1307 D 1 9V D 1 5V USB 3 1V D 2 8V A 2 8V L1302 T1301 Q1314 D1302 1 2 RECT D1306 RECT D1302 2 2 RECT EMERGENCY DETECT 7 5V REG Q1316 1329 13 3V REG Q1333 15V REG Q1321 ...

Страница 83: ...1 FB4501 IC1401 IC1402 IC4401 MOTOR DRIVE DRUM FG PG AMP DRUM 4 58 MOTOR DRIVE REEL FG AMP LOADING DRUM ERROR DRUM CAP ERROR AMP TAPE TOP END DET CAP VS MT 5V CAP ERROR DRUM VS FB2205 L2204 L2291 VC 276 BOARD 2 3 M2100 MECHA DECK 6 27 29 17 CN4403 R4407 SENSOR VCC TAPE LED A IRIS METER CAPSTAN FG TEMP ZOOM RESET SENSOR FOCUS RESET SENSOR 8 H001 002 D001 12 CN4404 T REEL S REEL SENSOR TAPE LED SEE ...

Страница 84: ...GH BL VDD 3 4 ND901 DISP LCD VDD DISP BL CN5704 PD 160 BOARD VC 276 BOARD 3 3 PANEL 13 3V PANEL 13 3V PANEL 4 75V FB5504 IC5502 GENERATOR TIMING IC5501 RGB DRIVE PANEL 2 8V PANEL 2 8V L5501 14 FB5502 MF PHOTO SENSOR NIGHT SHOT LED CHARACTER DISPLAY BACKLIGHT D902 CN304 16 CN301 R301 A 4 75V SE 2 8V MT 5V D301 D302 SE301 302 TALLY LED D306 TO POWER BLOCK 2 3 VC 276 TO POWER BLOCK 1 3 VC 276 30 14 4...

Страница 85: ...SWP BPF_MONI RF_MON REG_GND REG_GND N C N C N C N C N C N C RF_SWP REG_GND REG_GND N C GND GND INT_MIC_R INT_MIC_L FP 406 REG_GND TPB D S_Y_I O REG_GND REG_GND VIDEO_I O REG_GND AUDIO_R_I O XS_JACK_IN S_GND AUDIO_L_I O REG_GND REG_GND REG_GND S_C_I O REG_GND S_GND NTPA AV_JACK_IN D TPA VCC NTPB LIA1 SIRCS_SIG MF_B IR_ON SIRCS_PWM HP_L SE_GND EXT_MIC_GND HP_L HP_GND LANC_SIG MF_LED MT_5V MF_LED VRE...

Страница 86: ...VDD DWN EN VCK VST COM TEST1 XPANEL_REV PANEL_4 75V PANEL_HOLD SE_GND VD_SCK XCS_LCD PANEL_13 3V BL_CONT VD_SO PANEL_ 15 3V PANEL_R BL_GND PANEL_XHD XRST_VTR PANEL_2 8V PANEL_G PANEL_B PANEL_XVD REG_GND BL_REG XRST_VTR PANEL_HOLD PANEL_R BL_GND PANEL_13 3V VD_SCK VD_SO BL_CONT PANEL_4 75V BL_REG PANEL_ 15 3V XPANEL_REV REG_GND PANEL_XVD PANEL_G XCS_LCD SE_GND PANEL_B PANEL_2 8V PANEL_XHD LCD_COM X...

Страница 87: ...d Through hole is omitted Circled numbers refer to waveforms There are few cases that the part printed on diagram isn t mounted in this model Chip parts For schematic diagrams All capacitors are in µF unless otherwise noted p pF 50V or less are not indicated except for electrolytics and tantalums Chip resistors are 1 10W unless otherwise noted kΩ 1000Ω MΩ 1000kΩ Caution when replacing chip parts N...

Страница 88: ... B C552 100uH L552 2SC4178 F13F14 T1 Q551 10V TA 33u B C556 XX C557 FB552 0uH 100k R557 MA111 K8 S0 D551 0 01u B C561 XX B C562 R558 1M 0 R563 0 R564 XX R565 R567 0 XX R566 0 R568 0 R569 1 A CAM_15V V4 GND H1 V2 CCD_OUT GND H2 V1 V3 GND RG VSHT GND CAM 7 5 GND its structure handle it carefully like for the MOS IC SIGNAL PATH 3 Y CHROMA Precautions Upon Replacing CCD imager PB E CCD IMAGER 6 adjust...

Страница 89: ...4 VCK 5 STB 6 EN 7 DWN 8 RGT 9 HST 10 HCK2 11 HCK1 12 BLK 13 VB 14 VR 15 VG 16 COM UP04312008S0 Q702 3 5 4 6 2 1 0 5 33k R701 20P CN701 1 2 3 4 5 6 7 8 9 10 11 12 13 14 15 16 17 18 19 20 NJM2125F TE2 IC701 1 2 3 4 5 3300 R703 0 5 22 R704 UP04601008S0 Q701 3 5 4 6 2 1 0 5 180k R702 33k R706 2012 2 2u F C702 6800 R707 1 A SML 310LTT D702 VCC XTALLY_LED EN VR HCK2 VB VST VCK COM HCK1 LED_DA BLK STB E...

Страница 90: ...e pat terns of layers two to five have not been included in the diagram Chip parts Transistor Diode There are a few cases that the part printed on this diagram isn t mounted in this model FP 411 FLEXIBLE FP 411 FLEXIBLE BOARD For printed wiring board There are a few cases that the part printed on this diagram isn t mounted in this model C B E 3 2 1 FP 411 FLEXIBLE 11 J302 J301 PH302 PH301 MIC PLUG...

Страница 91: ...MIC_L EXT_MIC_R LANC_SIG XLANC_JACK_IN LANC_DC HP_GND LANC_SIG XLANC_JACK_IN LANC_DC HP_L EXT_MIC_L EXT_MIC_R MF_A MF_B HP_R HP_JACK_IN MF_A HP_GND MF_B MF_4 75V MF_LED REG_GND HP_R HP_JACK_IN HP_L EXT_MIC_L EXT_MIC_R MIC_GND LIA2 VREF2 EXT_MIC_GND SE_GND VREF1 MT_5V SE_2 8V INT_MIC_L LIA1 TALLY MIC_GND REG_GND 2 8V 2 8V Vref2 Vref1 LIA1 LIA2 LANC_DC XLANC_JACK_IN LANC_SIG REG_GND HP_R A_4 75V LAN...

Страница 92: ... printed wiring board Refer to page 4 90 for parts location This board is six layer print board However the pat terns of layers two to five have not been included in the diagram Chip parts Transistor There are a few cases that the part printed on this diagram isn t mounted in this model Uses unleaded solder C B E 5 6 4 2 1 3 1 3 7 8 4 5 6 10 9 2 ...

Страница 93: ...ACK LIGHT LCD DRIVE TG PD 160 FP 412 FLEXIBLE FP 412 FLEXIBLE 1 6 S601 PANEL REVERSE 11 FP 412 FLEXIBLE BOARD For printed wiring board There are a few cases that the part printed on this diagram isn t mounted in this model Uses unleaded solder ...

Страница 94: ...6 31 SEG17 32 SEG18 PANEL_B SYNC PANEL_G XVC_SCK 1 A S601 LND007 SE_GND PANEL_2 8V SEG13 SEG2 COM4 SEG10 SEG11 SEG5 SEG3 SEG1 SEG8 SEG6 XCS SEG9 SEG5 SEG8 XCS SEG13 SO SCK C XD SEG16 SO SEG7 COM3 SEG3 SEG15 COM1 SEG4 SEG2 SEG12 COM3 SEG12 SEG11 SEG9 SEG15 SEG1 COM2 SEG16 SEG14 SEG7 COM4 SEG6 SCK C XD SEG10 COM2 COM1 SEG14 SEG4 VCC SL FP 414 FLEXIBLE is replaced as a block So that this PRINTED WIRI...

Страница 95: ... 10 TEST 11 TEST 12 TEST 13 TSTEN 14 POFF 15 RGT 16 HCK1 17 HCK2 18 HST 21 DWN 19 VDD 20 WIDE 22 EN 23 VCK 24 VST 25 XSTBY 26 OSCO 27 OSCI 28 XC SAVE 29 RPD 30 TEST 31 VSS 32 SHA 33 SHB 34 SHG 35 SHR 36 XCLR 37 XCLP 38 PRG 39 SBLK 40 FRP 41 PFRP 42 XSCK 45 SO 44 XCS 43 VDD 46 SI 47 VDO 48 XVD R5551 47k 10P CN5502 1 VB 2 XVD_OUT 3 VG 4 PSIG 5 VR 6 MAKER_CHECK 7 XHD 8 XHD_OUT 9 GND 10 GND 22k R5522 ...

Страница 96: ...RCH 20k 20k 20k 20k 2400 2400 2400 2400 3000 3000 3000 3000 4400 4400 4400 7800 7800 7800 16 4k 16 4k 16 4k 54k 54k 54k PAUSE LCD_COM XDATA KEY_AD0 DIAL_A KEY_AD0 OSD_SO REG_GND D_2 8V KEY_AD3 REG_GND KEY_AD2 D_2 8V KEY_AD3 BATT_LI_3V XCS_LCD_DRIVER REG_GND XHI_RESET KEY_AD2 LCD_COM XDATA REG_GND DIAL_B SEIDEN_GND XOSD_SCK DIAL_A REG_GND SP SP DISP_BL DISP_LCD_VDD XCS_LCD_DRIVER XHI_RESET KEY_AD1 ...

Страница 97: ...REEL SENSOR H002 H001 TAPE_TOP C TAPE_END C TAPE_LED K TAPE_LED A REG_GND S_REEL S_REEL SENSOR_VCC T REEL T REEL HALL COM ME MP REC_PROOF Hi8_MP C_LOCK_SW FP 300 FLEXIBLE LS 057 BOARD FP 302 FLEXIBLE FP 301 FLEXIBLE Q002 TAPE END SENSOR D001 TAPE LED Q001 TAPE TOP SENSOR S001 REC PROOF Hi8 MP ME MP S002 C C LOCK 1 2 3 4 5 6 7 8 9 10 11 12 13 14 15 16 VH 17 18 19 20 MR SENSOR 1 2 3 4 FP 299 FLEXIBL...

Страница 98: ...IDEN GND R001 1k S004 1 2 3 4 S001 1 2 3 4 5 6 7 8 9 10 11 12 1 A CAMERA OFF MEMORY VTR SHASSIS GND SHASSIS GND USB AV_JACK_IN VIDEO_I O NTPA TPB D S_GND REG_GND AUDIO_L_I O NTPB REG_GND D S_C_I O REG_GND S_Y_I O REG_GND REG_GND XS_JACK_IN S_GND REG_GND AUDIO_R_I O TPA REG_GND REG_GND VCC T SS 1380 20k OFF CHG XCAM_MODE_SW W CONTROL SWITCH BLOCK CONTROL SWITCH BLOCK SS 1380 is replaced as a block ...

Страница 99: ...AVEFORMS WAVEFORMS CD 357 8 CN551 3 CD 357 BOARD 2 IC551 2 3 IC551 3 4 IC551 4 3 1Vp p 74 nsec 74 nsec 5 IC551 7 7 IC551 qd qf 6 IC551 9 qs 1 IC551 1 8 3Vp p 24 0Vp p H 3 2Vp p H 1 4Vp p v 23 6Vp p v 8 3Vp p H 1 4Vp p H CAMERA REC ...

Страница 100: ... from 4 85 to 4 89 are not shown PD 160 BOARD 170 nsec 2H 2H 2H H 1 IC5501 wf LCD 7 IC5502 1 LCD 2 IC5501 ws LCD 8 IC5502 wh LCD 9 IC5502 rk LCD 3 IC5501 w LCD 4 IC5501 rk LCD 5 IC5501 rj LCD 6 IC5501 rh LCD 8 2Vp p 7 9Vp p 7 9Vp p 540mVp p H 540mVp p H 540mVp p H 2 8Vp p 2 8Vp p 2 8Vp p V 40 µsec 2 9Vp p 0 IC5701 2 ...

Страница 101: ...7 C 3 C5518 C 3 C5519 C 4 C5527 B 3 C5529 B 4 C5532 B 3 C5533 D 5 C5534 D 5 C5536 C 5 C5538 C 5 C5540 D 6 C5602 D 4 C5604 D 3 C5605 B 6 C5606 B 6 C5607 D 2 C5608 D 4 C5701 A 3 CN5501 D 5 CN5502 C 3 CN5601 D 2 CN5701 B 1 CN5702 A 1 CN5703 A 5 CN5704 A 2 CN5705 A 6 D5502 C 4 D5503 D 5 D5504 B 5 D5601 C 6 D5602 D 11 D5603 B 1 D5604 B 2 D5605 D 11 FB5502 B 4 FB5504 C 1 IC5501 B 3 IC5502 B 5 IC5601 B 6...

Страница 102: ...5 1 DCR TRV240 TRV340 SECTION 5 ADJUSTMENTS ...

Страница 103: ...C7002 Timing generator EVF Table 5 1 1 1 Adjustment Section Initialization of 8 A B C D E F 1B 1C 1F page data Camera EVF LCD System control Servo RF Video Audio Mechanism Adjustment Initialization of D page data 3 Initialization of A D page data 2 Initialization of B 1B page data 2 Initialization of 8 C 1C page data Initialization of E F 1F page data HALL adj Flange back adj Optical axis adj Colo...

Страница 104: ...F 1F page data HALL adj Flange back adj Optical axis adj Color reproduction adj AWB LV standard data input Auto white balance adj Steady shot check VCO adj RGB AMP adj Contrast adj VCO adj PSIG gray adj RGB AMP adj Black limit adj Contrast adj Center level adj V COM adj White balance adj Serial No input REEL FG adj Switching position adj AGC center level adj APC AEQ adj PLL f0 LPF f0 adj Hi8 Std8 ...

Страница 105: ...to white balance adjustment check White balance adjustment check White balance check White balance check White balance check For checking the flange back For adjusting the LCD block For adjusting the video section For adjusting the viewfinder For adjusting the flange back For adjusting the flange back J 1 J 2 J 6 J 3 J 7 J 8 J 4 J 5 Fig 5 1 1 J 9 J 10 J 11 5 1 CAMERA SECTION ADJUSTMENT 1 1 PREPARA...

Страница 106: ... time user set menus will be lost After completing adjustments reset these data If the cabinet R has been removed the self diagnosis data data on history of use total drum rotation time etc will be lost Before removing note down the self diagnosis data data of page 2 address B0 to C6 and data on history use data of page 2 address A5 to AA Refer to 5 4 Service Mode for the self diagnosis data and d...

Страница 107: ...VF system adjustments Must be connected when performing the LCD system adjustments Must be connected when performing the EVF system adjustments Lens block EVF block Memory stick slot Front panel block To CF 2500 block Must be connected Must be connected Need not be connected SI 032 board CN301 Adjustment remote commander AUDIO L White AUDIO R Red DC IN jack AC power adaptor 8 4Vdc AC L10 AC VQ800 ...

Страница 108: ...ISPLAY CF 2500 block ON 8 FOCUS switch CF 2500 block MANUAL 9 BACK LIGHT CF 2500 block OFF 10 PROGRAM AE Menu display OFF 11 PICTURE EFFECT Menu display OFF 12 DIGITAL EFFECT Menu display OFF 13 AUTO SHUTTER Menu display OFF 14 16 9 WIDE MENU display OFF 15 SUPER NIGHT SHOT FK 2500 block OFF 2 Order of Adjustments Basically carry out adjustments in the order given Fig 5 1 4 3 Subjects 1 Color bar ...

Страница 109: ...5 1 6 2 Adjust the output voltage of the regulated power supply so that the digital voltmeter display is 6 1 0 1Vdc 3 Turn off the power supply 4 Turn on the HOLD switch of the adjusting remote commander 5 Turn on the power supply 6 Perform the initialization of the data Note3 This is normal though the following message is indicated on the LCD screen FOR InfoLITHIUM BATTERY ONLY Initialization Pro...

Страница 110: ...ata Order Page Address Data Procedure 1 2 00 29 Set the data 2 2 01 29 Set the data and press the PAUSE button Note If the following symptoms occur after completing of the Modification of D page data check that the data of the Fixed data 2 addresses of D page are same as those of the same model of the same destination 1 The self diagnosis code E 20 00 is displayed on the LCD screen 2 The power is ...

Страница 111: ...nging the data press the PAUSE button of the adjustment remote commander each time when setting new data to write the data in the non volatile memory Processing after Completing Modification of A D Page data Order Page Address Data Procedure 1 0 10 00 Set the data 2 2 00 29 Set the data 3 2 01 29 Set the data and press PAUSE button Note If the following symptoms occur after completing of the Modif...

Страница 112: ...page data reset the data of this address to 00 4 New data for changing are not shown in the tables because they are different in destination When changing the data copy the data built in the same model Note If copy the data built in the different model the camcorder may not operate 5 When changing the data press the PAUSE button of the adjustment remote commander each time when setting new data to...

Страница 113: ...ata of the Fixed data 2 address shown in the following table by manual input Modifying Method 1 Before changing the data select page 0 address 01 and set data 01 2 When changing the 8 C page data select page 0 address 10 and set data 00 3 When changing the 1C page data select page 0 address 10 and set data 01 After completing the modification of 1C page data reset the data of this address to 00 4 ...

Страница 114: ...adj Fixed data 1 Hi8 std8 switching position adj Fixed data 1 Hi8 std8 AFC fo adj Hi8 Std8 Y C output level set Fixed data 1 Hi8 std8 AFM 1 5MHz deviation adj Hi8 std8 AFM 1 7MHz deviation adj Hi8 std8 AFM BPF fo adj Fixed data 2 VCO adj EVF Fixed data 1 RGB AMP adj EVF Fixed data 1 Contrast adj EVF Fixed data 1 Fixed data 2 Fixed data 1 Fixed data 2 VCO adj LCD V COM adj LCD RGB AMP adj LCD Black...

Страница 115: ... page 0 address 10 to 00 Note2 Fixed data 1 Initialized data Refer to 1 Initializing the 8 C 1C Page Data Fixed data 2 Modified data Refer to 2 Modification of 8 C 1C Page Data Table 5 1 9 00 to 18 19 20 to 34 35 36 to 49 4A 4B to 79 7A 7B 7C 7D 7E 7F 80 81 82 83 84 to 89 8A 8B 8C 8D 8E 8F 90 91 92 93 94 to A3 08 00 46 01 02 00 00 00 Fixed data 1 Fixed data 2 Fixed data 1 Fixed data 2 Fixed data 1...

Страница 116: ...t Modifying Method 1 Before changing the data select page 0 address 01 and set data 01 2 When changing the E F page data select page 0 address 10 and set data 00 3 When changing the 1F page data select page 0 address 10 and set data 01 After completing the modification of 1F page data reset the data of this address to 00 4 New data for changing are not shown in the tables because they are differen...

Страница 117: ... Data 00 to 05 06 07 08 to 35 36 37 to 9B 9C 9D 9E 9F A0 A1 A2 to AA AB AC to BE BF C0 C1 C2 C3 C4 C5 to E9 EA EB EC to FF Fixed data 1 Fixed data 2 Fixed data 1 Fixed data 2 Fixed data 1 Fixed data 2 Fixed data 1 Fixed data 2 Modified data Copy the data built in the same model Fixed data 1 Fixed data 2 Fixed data 1 Fixed data 2 Fixed data 1 Fixed data 2 Fixed data 1 Fixed data 2 Fixed data 1 Fixe...

Страница 118: ...h setting POWER CAMERA Adjusting method Order Page Address Data Procedure 1 0 01 01 Set the data 2 6 94 8B Set the data 3 6 95 17 Set the data 4 6 01 6D Set the data and press PAUSE button 5 6 02 Check that the data changes to 01 Note3 6 6 01 00 Set the data and press PAUSE button Note3 The adjustment data will be automatically input to page F address 17 18 19 Checking method Order Page Address Da...

Страница 119: ... 3cm 3 Make the height of the minipattern box and the camcorder equal 4 Check that the output voltage of the regulated power supply is the specified voltage 5 Check that at both the zoom lens TELE end and WIDE end the center of the Siemens star chart and center of the exposure screen coincide Specified voltage The specified voltage varies according to the minipattern box so adjust the power supply...

Страница 120: ...he power and turn on again 2 Perform Flange BackAdjustment 2 3 2 Flange Back Adjustment 2 Perform this adjustment after performing Flange BackAdjustment 1 Subject Subject more than 500m away Subjects with clear contrast such as buildings etc Measurement Point Check operation on TV monitor Measuring Instrument Adjustment Page F Adjustment Address 46 to 56 Note1 Make the lens horizontal and perform ...

Страница 121: ...he focus 1 00 XX Odd Focused Even Unfocused Checking method 1 Select page 6 address 40 and set data 01 2 Select page 6 address 41 and set data 01 3 Place the Siemens star 2 0m from the front of the lens 4 To open the IRIS decrease the luminous intensity to the Siemens star up to a point before noise appear on the image 5 Shoot the Siemens star with the zoom TELE end 6 Turn on the auto focus 7 Chec...

Страница 122: ...enter of the Siemens star is located in the center of the optical axis frame 6 Shoot the Siemens star with the zoom WIDE end 7 Measure on the monitor TV screen in which area of the optical axis frame the center of the Siemens star is located Measure the amount of displacement distance between the center of the Siemens star and the center of the optical axis frame The measurement value is named L1 ...

Страница 123: ... OFF Setting method 1 Select page 6 address 48 and set data 01 2 Adjust the zoom and the camera direction and set to the specified position 3 Mark the position of the picture frame on the monitor display and adjust the picture frame to this position in following adjustments using Color reproduction adjustment frame Processing after Completing Camera System Adjustments After completing the camera s...

Страница 124: ...ss 01 and set data 00 8 Auto White Balance LV Standard Data Input Adjust the white balance reference at 3200K and adjust the normal coefficient of the light value Subject Clear chart Color reproduction adjustment frame Measurement Point Display data of page 1 Note5 Measuring Instrument Adjustment remote commander Adjustment Page F Adjustment Address 1E 1F 2A to 2D Specified Value 0FF0 to 1010 Note...

Страница 125: ...data 4 F 3E Write down the data 5 F 3E 2C Set the data and press PAUSE button 6 F 3F Write down the data 7 F 3F 40 Set the data and press PAUSE button 8 F 40 Write down the data 9 F 40 59 Set the data and press PAUSE button 10 F 41 Write down the data 11 F 41 A0 Set the data and press PAUSE button 12 6 01 83 Set the data and press PAUSE button 13 6 01 81 Set the data and press PAUSE button 14 6 02...

Страница 126: ...ce point is within the circle shown Fig 5 1 13 A 5 6 01 00 Set the data and press PAUSE button Outdoor white balance check 6 Place the C14 filter on the lens 7 6 01 3F Set the data and press PAUSE button 8 Check that the center of the white luminance point is within the circle shown Fig 5 1 13 B 9 Remove the C14 filter LV data check 10 Place the ND filter 1 5 1 0 0 1 0 4 on the lens 11 6 01 00 Set...

Страница 127: ...trary Measurement Point Display data of page 1 Note1 Measuring Instrument Adjustment remote commander Specified Value 2B00 to 4B00 Note1 Displayed data of the adjustment remote commander 1 XX XX Display data Note2 The data of page 0 address 10 must be 00 Switch setting 1 STEADY SHOT Menu display ON 2 ZOOM TELE end Adjusting method Order Page Address Data Procedure Pitch sensor check SI 032 board S...

Страница 128: ...rument Frequency counter Adjustment Page C Adjustment Address 51 52 Specified Value f 15734 30Hz Note1 The data of page 0 address 10 must be 00 Adjusting method Order Page Address Data Procedure 1 0 01 01 Set the data 2 C 51 Change the data and set the VCO frequency f to the specified value 3 C 51 Press PAUSE button 4 C 51 Read the data and this data is named D51 5 Convert D51 to decimal notation ...

Страница 129: ...rm pedestal to the specified value 3 C 54 Press PAUSE button 4 0 01 00 Set the data 3 Contrast Adjustment VC 276 board Set the level of the VIDEO signal for driving the LCD to the specified value If deviated the screen image will be blackish or saturated whitish Mode Camera Subject Arbitrary Measurement Point Pin qs of CN1108 EVF VG Measuring Instrument Oscilloscope Adjustment Page C Adjustment Ad...

Страница 130: ...t the VCO free run frequency If deviated the LCD screen will be blurred Mode VTR stop Signal No signal Measurement Point Pin 8 of CN5502 HSY Measuring Instrument Frequency counter Adjustment Page C Adjustment Address 61 62 Specified Value f 15734 30Hz Note1 The data of page 0 address 10 must be 00 Adjusting method Order Page Address Data Procedure 1 0 01 01 Set the data 2 C 61 Change the data and ...

Страница 131: ...t the data 3 RGB AMP Adjustment PD 160 board Set the D range of the RGB decoder used to drive the LCD to the specified value If deviated the LCD screen will become blackish or saturated whitish Mode VTR stop Signal No signal Measurement Point Pin 3 of CN5502 VG Ext trigger Pin 4 of CN5502 PSIG Measuring Instrument Oscilloscope Adjustment Page C Adjustment Address 64 Specified Value A 7 68 0 05V No...

Страница 132: ...n 6 3 C4 00 Set the data 7 3 C5 00 Set the data 8 0 01 00 Set the data 9 Check that the specified value of RGB AMP Adjustment is satisfied 5 Contrast Adjustment PD 160 board Set the level of theVIDEO signal for driving the LCD to the specified value If deviated the screen image will be blackish or saturated whitish Mode VTR stop Signal No signal Measurement Point Pin 3 of CN5502 VG Ext trigger Pin...

Страница 133: ...of LCD to the specified value If deviated the LCD display will move producing flicker and conspicuous vertical lines Mode VTR stop Signal No signal Measurement Point Check on LCD display Measuring Instrument Adjustment Page C Adjustment Address 63 Specified Value The brightness difference between the section A and section B is minimum Note1 This adjustment should be carried out upon completion of ...

Страница 134: ...cessary adjust them 1 LCD panel 2 Light induction plate 3 IC5501 Note2 The data of page 0 address 10 must be 00 Adjusting method Order Page Address Data Procedure 1 0 01 01 Set the data 2 C 67 7E Set the data and press PAUSE button 3 C 68 6C Set the data and press PAUSE button 4 C 68 Check that the LCD screen is not colored If not colored proceed to step 10 5 C 67 Change the data so that the LCD s...

Страница 135: ...ge A address 10 set data 00 and press the PAUSE button DCR TRV340 5 Select page 2 7 address 4D 62 and set data 00 Note2 6 Select page 0 address 01 and set data 00 7 Disconnect the power supply of the unit Fig 5 2 1 2 1 2 TAPE PATH ADJUSTMENT 1 Preparations for Adjustment 1 Clean the tape path face tape guide capstan shaft pinch roller 2 Connect the adjustment remote commander to the LANC jack 3 Tu...

Страница 136: ... sure to quit following this procedure 2 2 3 OVERALL TAPE PATH CHECK 1 Recording of the tape path check signal 1 Clean the tape running side tape guide capstan shaft pinch roller 2 Connect the adjustment remote commander to the LANC jack 3 Turn the HOLD switch of the adjustment remote commander to the ON position 4 Set to the camera recording mode 5 Select page 3 address 1C set data 5D and press t...

Страница 137: ...io operation check for NTSC WR5 3ND Parts code 8 967 993 32 System operation check for NTSC WR5 5ND Parts code 8 967 993 42 12 Hi8 standard8 alignment tapes For tracking adjustment WR5 1NP Parts code 8 967 995 02 For video frequency characteristics adjustment WR5 7NE Parts code 8 967 995 13 For checking Standard 8 mode operations For LP WR5 4NL Parts code 8 967 995 51 For SP WR5 5NSP Parts code 8 ...

Страница 138: ...the adjustment remote commander to operate theVTR block When removing the cabinet R assembly disconnect the following connector 1 VC 276 board CN1110 22P 0 5mm 2 VC 276 board CN1106 20P 0 8mm 5 The memory stick connector is need not be connected To remove it disconnect the following connector DCR TRV340 VC 276 board CN1105 10P 0 5mm 6 The viewfinder block is need not be connected To remove it disc...

Страница 139: ...nd perform the adjustments Fig 5 3 2 VTR recording mode Playback mode Adjustment remote commander LANC jack Main unit AUDIO VIDEO jack TV monitor VIDEO Yellow AUDIO L White AUDIO R Red Main unit LANC jack AUDIO VIDEO jack Adjustment remote commander VIDEO Yellow AUDIO L White AUDIO R Red Pattern generator Video output 75 Ω Pin No 1 2 3 4 5 6 7 8 9 10 Signal Name REG GND N C BPF MONI N C PB RF REG ...

Страница 140: ...ce more than 47kΩ Output 7 5dBs at load impedance 47kΩ impedance less than 2 2kΩ Tape type ME Particle type metal tape MP Evaporated type metal tape 1V 0 714V 0 286V Horizontal sync signal Q I White 75 Yellow White 100 Cyan Green Magenta Red Blue Burst signal 0 286V White 75 White 100 Q I Black Cyan Yellow Green Magenta Red Blue Color bar signal waveform Name Tracking WR5 1NP Video frequency chara...

Страница 141: ... Select page 0 address 01 and set data 01 2 Read the serial No on the name plate and take it as D1 Example If the serial No is 77881 D1 77881 Note Use six digits of the low rank when a serial No is more than seven digits 3 Obtain D2 and H1 corresponding to D1 from Table 5 3 2 Example If D1 is 77881 D2 D1 65536 12345 H1 FE Table 5 3 2 4 Input H1 to page 8 address 91 Model code input Example If H1 i...

Страница 142: ...2 51968 52224 52480 52736 52992 53248 53504 53760 54016 54272 54528 54784 55040 55296 55552 55808 56064 56320 56576 56832 57088 57344 57600 57856 58112 58368 58624 58880 59136 59392 59648 59904 60160 60416 60672 60928 61184 61440 61696 61952 62208 62464 62720 62976 63232 63488 63744 64000 64256 64512 64768 65024 65280 0000 0100 0200 0300 0400 0500 0600 0700 0800 0900 0A00 0B00 0C00 0D00 0E00 0F00 ...

Страница 143: ...0D S reel is defective 0A 0B 0E 0F S reel and T reel are defective 2 PLL f0 LPF f0 Adjustment VC 276 board Mode VTR stop Measurement Point Display data of page 3 address 02 03 Measuring Instrument Adjustment remote commander Adjustment Page C Adjustment Address 1F 20 22 29 Specified Value Data of page 3 address 02 is 00 Data of page 3 address 03 is 00 Note1 The data of page 0 address 10 must be 00...

Страница 144: ...tape and repeat steps 1 to 7 When the A channel is defective Data of page C Contents of defect address 10 EE Writing into EEPROM IC4502 is defective E8 Adjustment data is out of range E7 No data is returned from IC3301 When the B channel is defective Data of page C Contents of defect address 12 E8 Adjustment data is out of range E7 No data is returned from IC3301 4 AGC Center Level and APC AEQ Adj...

Страница 145: ...Set the data and press PAUSE button 6 C 21 CA Set the data and press PAUSE button 7 C 2C 03 Set the data and press PAUSE button 8 Playback the recorded signal at Preparations before adjustments 9 2 4D 40 Set the data Note3 7 62 01 10 3 33 08 Set the data 11 Confirm that the playback RF signal is stable Fig 5 3 4 12 3 01 07 Set the data and press PAUSE button 13 3 02 Check that the data changes fro...

Страница 146: ... or jitter on the Hi8 Standard8 mode played back screen Mode Playback Signal Hi8 Standard8 alignment tape For tracking adjustment WR5 1NP Measurement Point CH1 Pin 8 of CN1108 RF SWP CH2 Pin 5 of CN1108 PB RF Measuring Instrument Oscilloscope Adjustment Page C Adjustment Address 40 41 Specified Value t1 0 10 µsec Note1 The data of page 0 address 10 must be 00 Adjusting Method Order Page Address Da...

Страница 147: ...ss Data Procedure 1 Set to the playback mode 2 0 01 01 Set the data 3 3 01 00 Set the data and press PAUSE button 4 3 01 81 Set the data and press PAUSE button 5 3 02 Check that the data changes from 81 to 00 6 3 03 Check that the data is 00 Note2 7 Check that Duty of CAP FG signal satisfies the specified value If not repeat steps 3 to 7 8 0 01 00 Set the data Note2 If the data of page 3 address 0...

Страница 148: ...t the data 2 S VIDEO OUT Y Level Adjustment VC 276 board Mode VTR stop Signal No signal Measurement Point Y signal terminal of S VIDEO jack 75Ω terminated Measuring Instrument Oscilloscope Adjustment Page C Adjustment Address 25 Specified Value A 1000 20mV Note1 The data of page 0 address 10 must be 00 Adjusting method Order Page Address Data Procedure 1 0 01 01 Set the data 2 D FE 10 Set the data...

Страница 149: ...data and press PAUSE button 12 D FE 00 Set the data and press PAUSE A 12 button Note2 13 0 01 00 Set the data 14 Turn off the power and turn on again Note2 DCR TRV240 DCR TRV340 4 VIDEO OUT Y Chroma Level Check VC 276 board Mode VTR stop Signal No signal Measurement Point Video signal terminal of AUDIO VIDEO jack 75Ω terminated Measuring Instrument Oscilloscope Specified Value Sync level A 293 18m...

Страница 150: ...rd Adjust the pull in range of the clock generator IC2201 for A D conversion during Hi8 standard 8mm playback Mode VTR stop Signal No signal Measurement Point Display data of page 3 address 9D Measuring Instrument Adjustment remote commander Adjustment Page C Adjustment Address 43 Specified Value 7C to 84 Note The data of page 0 address 10 must be 00 Adjusting method Order Page Address Data Proced...

Страница 151: ...ment WR5 11NS Measurement Point AUDIO VIDEO jack left or right Measuring Instrument Distortion meter Adjustment Page C Adjustment Address 4E Specified Value The Main and Sub channel distortion rate should be almost the same within 1 and minimum Note The data of page 0 address 10 must be 00 Adjusting method 1 Select page 0 address 01 and set data 01 2 Set the Hi Fi SOUND switch menu display to 2 3 ...

Страница 152: ...Hi Fi SOUND switch menu display to 2 3 Select page C address 4D change the data and set the 1kHz signal level to the specified value 4 Press the PAUSE button 5 Set the Hi Fi SOUND switch menu display to STEREO 6 Select page 0 address 01 and set data 00 4 Digital8 Playback Level Check Mode Playback Signal Digital8 alignment tape For audio operation check WR5 3ND Measurement Point AUDIO VIDEO jack l...

Страница 153: ...ection 5 Check that the noise level is the specified value 6 Remove the jumper wires 8 Overall Separation Check Mode Recording and playback Signal No signal MIC jack left right 400Hz 66dBs signal MIC jack right left Measurement Point AUDIO VIDEO jack left right Measuring Instrument Audio level meter Specified Value Below 40dBs Left channel check Right channel check Checking Method 1 Connect the le...

Страница 154: ... addresses from 00 to FF Changing the data Data setting The data increases when the PLAY N button is pressed and decreases when the STOP x button is pressed There are altogether 256 data from 00 to FF Writing the adjustment data The PAUSE button must be pressed to write the adjustment data 8 A B C D E F 1B 1C 1D page in the nonvolatile memory The new adjusting data will not be recorded in the nonv...

Страница 155: ...0 81 82 83 84 85 86 87 88 89 90 91 92 93 94 95 96 97 98 99 100 101 102 103 104 105 106 107 108 109 110 111 112 113 114 115 116 117 118 119 120 121 122 123 124 125 126 127 128 129 130 131 132 133 134 135 136 137 138 139 140 141 142 143 144 145 146 147 148 149 150 151 152 153 154 155 156 157 158 174 159 175 160 161 162 163 164 165 166 167 168 169 170 171 172 173 177 176 178 179 180 181 182 183 184 1...

Страница 156: ...e when shift starts when first error occurs Lower MSW code when first error occurs F7 Lower MSW code to be moved when first error occurs F8 EMG code when second error occurs FA Upper MSW code when shift starts when second error occurs Lower MSW code when second error occurs FB Lower MSW code to be moved when second error occurs FC EMG code when last error occurs FE Upper MSW code when shift starts...

Страница 157: ...LS chassis is moving Normal stop position The pinch roller separates the tension regulator returns and the brakes of both reels turn on Position at which is used when the pendulum gear swings from S to T or from T to S PB REC CUE REV PAUSE FF positions The pinch roller is pressed and tension regulator is on REW position REW are carried at this position The mechanism will not move any further in th...

Страница 158: ...2 address 42 2 By discriminating the bit value of display data the state of the switch can be discriminated DCR TRV340 Page 7 Address 0E Using method 1 Select page 7 address 0E 2 By discriminating the bit value of display data the state of the switch can be discriminated Bit 0 1 2 3 4 5 6 7 Function POWER SW VTR MODE SW SS 1380 block S001 POWER SW CAM MODE SW SS 1380 block S001 START STOP SW SS 13...

Страница 159: ...d 1 Select page 3 address 61 2 By discriminating the bit value of display data the state of the switch can be discriminated Bit 4 5 6 Function AUDIO VIDEO jack FP 410 flexible J201 S VIDEO jack FP 410 flexible J201 MIC jack FP 411 flexible J302 When bit value 1 Used Not used Used When bit value 0 Not used Used Not used Bit 1 2 3 Function AUDIO VIDEO jack FP 410 flexible J201 S VIDEO jack FP 410 fl...

Страница 160: ...2500 S003 MEMORY INDEX CF 2500 S026 2 0D to 24 STOP FK 2500 S404 FOCUS CF 2500 S004 EDIT SEARCH CF 2500 S024 PB ZOOM CF 2500 S006 MPEG PLAY CF 2500 S005 PHOTO PHOTO START SS 1380 S004 25 to 3F FF FK 2500 S407 BACK LIGHT CF 2500 S016 EDIT SEARCH CF 2500 S025 TITLE CF 2500 S009 MEMORY MIX CF 2500 S029 2 PANEL REVERSE FP 412 S601 40 to 5D REW FK 2500 S409 FADER CF 2500 S010 MENU CF 2500 S012 MEMORY D...

Страница 161: ... 9 Record of Use check 2 Note When replacing the drum assembly initialize the data Page D Address D0 to D1 DCR TRV240 Using method 1 The record of use data is displayed at addresses D0 D1 Initializing method 1 Select page 0 address 01 and set data 01 2 Select page D address D0 to D7 and set data 00 3 Select page 0 address 01 and set data 00 Address D0 D1 Function Drum rotation counted time Hour L ...

Страница 162: ...tailed code Occurred 3rd time BC Repaired by code Occurred 4th time 1 BD Block function code Occurred 4th time BE Detailed code Occurred 4th time C0 Repaired by code Occurred 5th time 1 C1 Block function code Occurred 5th time C2 Detailed code Occurred 5th time C4 Repaired by code Occurred the last time 1 C5 Block function code Occurred the last time C6 Detailed code Occurred the last time 1 01 C ...

Страница 163: ...mplacer que par une pièce portant le numéro spécifié 6 1 1 OVERALL SECTION Ref No Part No Description Remarks Ref No Part No Description Remarks SONY A A Cabinet R section See page 6 5 Cabinet L section 1 2 See page 6 2 6 3 ns 16 1 1 2 4 1 1 3 5 6 MIC901 7 8 9 9 9 11 13 12 10 14 1 1 1 15 17 1 1 1 TRV240 US TRV340 US 1 3 067 347 01 MI SCREW M2 H 2 3 065 310 01 RING RUBBER 3 X 3949 376 1 CAP N ASSY ...

Страница 164: ... 54 3 066 169 01 SHEET MD 55 3 072 268 01 FRAME SHOE 56 1 680 118 11 FP 264 FLEXIBLE BOARD 57 1 815 124 11 CONNECTOR EXTERNAL HOT SHOE TRV340 57 1 815 124 21 CONNECTOR EXTERNAL HOT SHOE TRV240 58 3 072 308 01 COVER MD 59 3 067 347 01 MI SCREW M2 H 60 3 072 273 01 HOLDER MS TRV340 61 1 816 271 11 CONNECTOR MEMORY STICK 10P TRV340 62 1 683 625 11 FP 409 FLEXIBLE BOARD TRV340 63 1 500 226 11 BEAD FER...

Страница 165: ...06 3 713 791 01 SCREW M1 7X4 TAPPING P2 107 1 476 415 11 SWITCH BLOCK CONTROL SS 1380 TRV340 107 1 476 415 21 SWITCH BLOCK CONTROL SS 1380 TRV240 108 4 974 725 01 SCREW M1 7X2 5 P 109 3 941 343 21 TAPE A 110 X 3952 148 1 PANEL ASSY MS BATTERY TRV340 US CND E HK KR JE AR 110 X 3952 149 1 PANEL ASSY BATTERY TRV240 110 X 3952 276 1 PANEL ASSY MS BATTERY TRV340 BR 111 3 072 305 01 LID 2500 JACK 112 3 ...

Страница 166: ...8 203 11 SCREW B1 7X6 TAPPING 159 1 676 822 11 FP 161 FLEXIBLE BOARD 160 3 065 567 01 TAPPING M1 7 161 X 3951 165 1 HINGE ASSY VF 162 X 3952 134 1 CABINET LOWER ASSY EVF 163 1 683 624 11 FP 407 FLEXIBLE BOARD 164 A 7078 049 A LB 076 BOARD COMPLETE 165 3 065 058 01 GUIDE LAMP 166 3 072 211 01 ILLUMINATOR 167 3 072 210 01 SHEET PRISM 168 X 3952 214 1 LENS B ASSY VF 169 X 3952 132 1 CABINET UPPER ASS...

Страница 167: ...7 085 11 SWITCH BLOCK CONTROL CF 2500 TRV240 203 1 477 085 21 SWITCH BLOCK CONTROL CF 2500 TRV340 204 3 065 373 01 SCREW Y TRIPOD 205 3 072 455 01 RETAINER TRIPOD 206 3 067 347 01 MI SCREW M2 H 207 X 3952 129 1 CABINET R 2 ASSY TRV340 207 X 3952 135 1 CABINET R 2 ASSY TRV240 208 3 959 978 02 CUSHION PANEL 209 1 477 084 31 SWITCH BLOCK CONTROL FK 2500 210 X 3952 133 1 RING 2 ASSY ORNAMENTAL TRV340 ...

Страница 168: ...961 556 11 HARNESS PD 117 259 3 318 203 11 SCREW B1 7X6 TAPPING 260 3 072 288 01 COVER C HINGE 261 1 683 628 21 FP 412 FLEXIBLE BOARD 262 X 3952 147 1 HINGE ASSY 263 3 072 287 01 COVER M HINGE 264 3 072 403 01 FRAME 2 P 265 X 3952 150 1 CABINET M 2 ASSY P 266 3 065 567 01 TAPPING M1 7 0D902 1 518 721 11 LIGHT BACK LCD901 8 753 050 65 ACX308AK 1 LCD902 A 7028 811 A INDICATION LCD BLOCK ASSY 0ND901 ...

Страница 169: ...arks 701 3 065 932 01 PAN 2 MAIN M1 4X1 6 CAMERA 702 3 065 895 01 LEVER REEL RELEASE 703 3 065 896 01 PLATE BLIND 704 X 3951 298 1 CASSETTE COMPARTMENT ASSY 705 X 3951 302 1 DAMPER ASSY 706 X 3951 297 1 GEAR ASSY R DRIVE 707 3 065 840 01 CUT 0 98X3X0 13 LUMILER W 708 3 065 935 01 HLC CUT 1 8X4X0 5 709 3 947 503 01 SCREW M1 4 710 X 3951 299 1 SCREW ASSY DRUM FITTING 711 3 074 309 01 ROLLER A LS GUI...

Страница 170: ... LIM ARM 764 3 065 834 01 GUIDE T CASSETTE 765 3 065 824 01 SPRING T RATCHET 766 A 7096 417 A SOFT ASSY T 767 7 627 852 38 SCREW PRECISION P1 7X1 8TYPE3 768 3 065 832 01 PLATE LS CAM 769 3 065 828 01 ARM S RATCHET 770 3 065 829 01 PLATE S RATCHET RE 771 3 065 830 01 SPRING S RATCHET 772 X 3951 288 1 TABLE T ASSY REEL 773 3 065 819 01 SPRING TG1 ARM 774 3 065 821 01 RAIL T GUIDE 775 X 3951 289 1 TA...

Страница 171: ...01 RAIL T2 GUIDE 808 X 3947 398 1 SCREW ASSY M1 7 PW 809 3 065 933 01 PAN 2 MAIN 1 4X4 5 CAMERA 810 1 677 049 11 FP 228 FLEXIBLE BOARD DEW SENSOR 811 1 680 434 11 FP 299 FLEXIBLE BOARD 812 3 065 877 01 PLATE T GUIDE LOCK 813 X 3951 301 1 PLATE ASSY PINCH PRESSURE 814 3 065 881 01 SPRING P PRESSURE PLATE 815 3 065 934 01 HLW CUT 0 98X3X0 25 816 1 786 096 11 SWITCH ROTARY 817 3 065 898 01 SPRING EJE...

Страница 172: ... 917 01 GEAR 1 CAM RELAY 855 3 065 934 01 HLW CUT 0 98X3X0 25 856 3 065 915 01 GEAR 1 CAM 857 3 065 878 01 PLATE S GUIDE LOCK 858 3 065 932 01 PAN 2 MAIN M1 4X1 6 CAMERA 859 A 7096 413 A GEAR S ASSY GUIDE 860 7 624 101 04 STOP RING 1 2 E TYPE 861 A 7096 412 A GEAR T ASSY GUIDE 862 X 3951 307 1 PLATE ASSY M SLIDE 863 X 3951 305 1 ARM ASSY LS 864 3 065 901 01 ROLLER LS ARM 865 3 065 916 01 GEAR 2 CA...

Страница 173: ...V CONNECTOR CN551 1 779 332 11 CONNECTOR FFC FPC 16P DIODE D551 8 719 073 01 DIODE MA111 K8 S0 FERRITE BEAD FB552 1 414 445 11 FERRITE 0uH IC IC551 A 7028 780 A CCD BLOCK ASSY CCD IMAGER COIL L552 1 469 528 91 INDUCTOR 100uH TRANSISTOR Q551 8 729 117 73 TRANSISTOR 2SC4178 F13F14 T1 RESISTOR R551 1 218 940 11 RES CHIP 82 5 1 16W R553 1 218 959 11 RES CHIP 3 3K 5 1 16W R557 1 218 977 11 RES CHIP 100...

Страница 174: ...RANSISTOR Q5503 8 759 054 48 TRANSISTOR UP04601008S0 Q5504 8 729 052 65 TRANSISTOR 2SA1774HT2L Q5505 8 729 041 23 TRANSISTOR NDS356AP Q5506 8 729 052 64 TRANSISTOR DTC144EHT2L Q5508 8 759 054 48 TRANSISTOR UP04601008S0 Q5601 8 729 052 64 TRANSISTOR DTC144EHT2L Q5602 6 550 083 01 TRANSISTOR TPC6C01 TE85R RESISTOR R5501 1 218 985 11 RES CHIP 470K 5 1 16W R5503 1 208 935 11 METAL CHIP 100K 0 5 1 16W ...

Страница 175: ...0 21 FERRITE 0uH IC IC301 6 701 681 01 IC NJL61H400A TRANSISTOR Q301 8 729 141 73 TRANSISTOR 2SD1938 F S TX SO RESISTOR R301 1 216 810 11 METAL CHIP 120 5 1 16W R307 1 216 864 11 METAL CHIP 0 5 1 16W R316 1 216 817 11 METAL CHIP 470 5 1 16W R319 1 216 019 00 METAL CHIP 56 5 1 10W R320 1 216 019 00 METAL CHIP 56 5 1 10W SENSOR SE301 1 803 042 31 SENSOR ANGULAR VELOCITY PITCH SERVICE SE302 1 803 042...

Страница 176: ...IPOD TRV240 TRV340 US CND E HK KR JE 3 072 650 11 MANUAL INSTRUCTION ENGLISH TRV240 TRV340 US CND E JE HK 3 072 650 21 MANUAL INSTRUCTION FRENCH TRV240 CND TRV340 CND 3 072 650 31 MANUAL INSTRUCTION SPANISH PORTUGUESE TRV240 E TRV340 E JE 3 072 650 41 MANUAL INSTRUCTION TRADITIONAL CHINESE TRV240 HK TRV340 E HK 3 072 650 51 MANUAL INSTRUCTION ARABIC TRV340 E 3 072 650 61 MANUAL INSTRUCTION KOREAN ...

Страница 177: ... Take a copy of OPTICAL AXIS FRAME with a clear sheet for use 206 OPTICAL AXIS FRAME DCR TRV240 TRV340 ...

Страница 178: ... Take a copy of CAMERA COLOR REPRODUCTION FRAME with a clear sheet for use 207 FOR CAMERA COLOR REPRODUCTION ADJUSTMENT DCR TRV240 TRV340 ...

Страница 179: ...DCR TRV240 TRV340 208 Sony EMCS Co 2002A1600 1 2002 1 Published by DI Customer Center 9 929 932 31 ...

Страница 180: ...Revision History Ver 1 0 Date 2002 01 History Official Release Contents S M Rev issued 992993231 pdf Reverse ...

Отзывы: