07
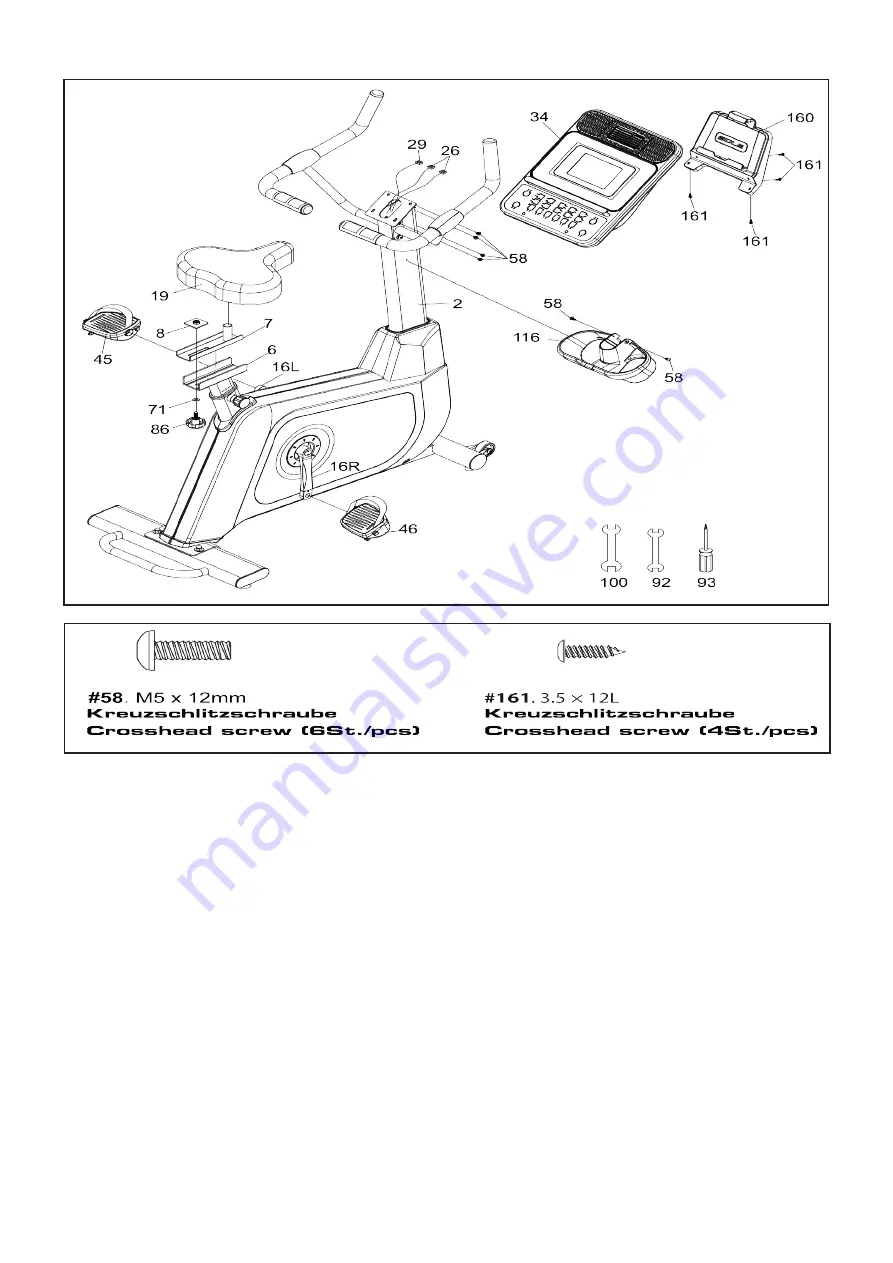
Schritt 4
1. Verbinden Sie das Computerkabel (29) und die beiden Handpulskabel
(26) mit den passenden Buchsen auf der Rückseite des Computers (34)
2 Fixieren Sie den Computer (34) mit vier Kreuzschlitzschrauben (58)
am Lenkerstützrohr (2). Achten sie darauf, dass die Kabel nicht einge-
klemmt werden!
3. Montieren Sie die Pedale (45L und 46R) an den Kurbeln (16), das
linke Pedal hat ein Linksgewinde und wird deshalb nach links herum
eingedreht. Beide Pedale sind mit L und R gekennzeichnet.
4. Montieren Sie den Sattel (19) auf dem Sattelschlitten (7) fixieren Sie
diesen mit der Griffschraube (86), einer Unterlegscheibe (71) und der
Gewindeplatte (8) am Sattelstützrohr (6).
5. Befestigen Sie die Ablage (116) mit zwei Kreuzschlitzschrauben (58)
am Lenkerstützrohr (2)
6. Zum Schluss befestigen Sie die Tabletthalterung (160) mit drei
Kreuzschlitzschrauben (161) and der Rückseite des Computers.
1.Insert the Computer Cable (29) and two Hand pulse cables (26) into
the connectors in the back of the Console (34).
2. Attach the Console (34) onto the Console Mast (2) with four Phillips
Head Screws (58). Be careful not to pinch the cables when fastening.
3. Install the Pedals (45 L, 46 R) onto the Cranks by using the
13/15mm Wrench (92). Remember that the left pedal has a reverse
thread and will be screwed into the crank in the opposite rotation from
normal threads. There is an L stamped into the end of the threaded
post of the left pedal and an R on the end of the right post. Make sure
to tighten the pedals as much as you possibly can.
4. Install the Seat mount slide (7) onto the track on top of the seat
tube with the seat post facing forward. Place the nut plate (8) onto
the seat slide behind the seat post. Place the flat washer (71) onto
the fore/aft adjustment knob (86) and thread it into the nut plate from
underneath the seat tube track. Attach the seat (19) to the seat post
using the 12/14mm Wrench (100).
5. Secure the Beverage Holder (116) onto the Console Mast (2) with
the two of Phillips Head Screws (58) by using the Phillips Head Screw
Driver (93).
6. Install the Tablet Holder (160) to back of the console with four
Sheet Metal Screws (161) by using Phillips Head Screw Driver (93).
Содержание 3421
Страница 1: ...B94 Art Nr 3421 R92 Art Nr 3422 ...
Страница 30: ...8 Explosionszeichnung Explosiondrawing B94 29 ...
Страница 31: ...8 1 Explosionszeichnung Explosiondrawing R92 30 ...


