background image

Lit. No. 78565, Rev. 02 

15 

November 1, 2019

Ready Mode

Vehicle ignition is set to ACC or ON; cab control is OFF. 

Control has power. Spreader is detected.

The control knob can be set to start-up conditions, 

but the auger will not operate until the cab control is 

turned ON.

(Accessory lights and vibrator are operational.) The 

BLAST function is not operational.

ON Mode

Vehicle ignition is set to ACC or ON; cab control is ON.

Auger motor will start. All cab control functions 

are operational. (Accessory lights and vibrator are 

operational.)

During normal spreader operation no control codes are 

displayed. Information or setup codes will appear when 

relevant. These codes will not stop spreader operation.

Error Mode

When an error condition occurs, spreader operation 

will shut down. A two-character error code will flash 

on the display and a beep will sound. If there are 

multiple error codes, the codes will flash in a repeating 

sequence.

Refer to the Error Codes portion of the 

following Cab Control Codes table. Also see the 

Troubleshooting Guide section of this manual.

Once the error condition has been resolved, press the 

ON/OFF button to clear the error code(s). Press the 

ON/OFF button again to resume spreader operation.

The error code will reappear if the error condition 

has not been rectified. If the error condition persists, 

contact your authorized dealer.

Multiple resets within a short time frame will cause 

the hopper module to time out if components are 

overheating. The control will display an 

EF

 error code.

Accessory work lights and AUX 1 can be used when 

an error code is in effect, and will remain in their 

current state. The vibrator and AUX 2 will not function.

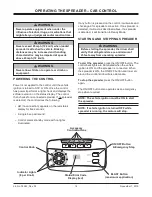
OPERATING THE SPREADER – CAB CONTROL

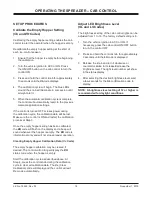
CONTROLLING MATERIAL APPLICATION

The material application settings can be adjusted 

while spreader is ON or OFF. Settings are shown by 

the indicator lights around the control knob. When the 

spreader is OFF, a single LED will light to show the 

current setting. When the spreader is ON, the number 

of blue LEDs illuminated will increase/decrease as the 

knob is turned clockwise/counterclockwise.

The control knob adjusts the auger speed. Turning the 

knob clockwise will increase the amount of material 

applied.

Turning the control knob counterclockwise will 

decrease the amount of material applied.

BLAST/Maximum Application

1.  Press and hold the BLAST button when maximum 

application is needed temporarily. The BLAST 

button will illuminate while depressed.

2.  Release the button when maximum application 

settings are no longer needed.

NOTE: Auger speed reverts to the previous 

settings once the BLAST button is released.

CAB CONTROL MODES

Standby Mode

Vehicle ignition is set to ACC or ON; cab control is 

OFF. Control has power. No spreader was detected. 

No lights are illuminated on the control. Press any 

button to wake.

Содержание Drop Pro 600

Страница 1: ...nual CAUTION Read this manual before installing or operating the spreader TrynEx International LLC 531 Ajax Drive Madison Heights MI 48071 2429 www snowexproducts com This Owner s Manual is for SnowEx...

Страница 2: ......

Страница 3: ...HE SPREADER 13 Driving and Spreading on Snow and Ice 13 Powering the Control 14 Starting and Stopping Spreader 14 Controlling Material Application 15 BLAST Maximum Application 15 Cab Control Modes 15...

Страница 4: ...Lit No 78565 Rev 02 4 November 1 2019...

Страница 5: ...on OWNER S INFORMATION OWNER S INFORMATION Owner s Name Owner s Name _______________________________________________________________________ ___________________________________________________________...

Страница 6: ...se become familiar with the warning and caution labels on the spreader NOTE If labels are missing or cannot be read see your sales outlet CAUTION Indicates a potentially hazardous situation that if no...

Страница 7: ...ovember 1 2019 SAFETY SERIAL NUMBER LABEL Code Definition YY 2 Digit Year MM 2 Digit Month DD 2 Digit Day LL 2 Digit Location Code XXXX 4 Digit Sequential Number ZZZZZZ 5 7 Digit Assembly Part Number...

Страница 8: ...out if required before servicing or performing maintenance CAUTION DO NOT leave unused material in hopper Material can freeze or solidify causing unit to not work properly Empty and clean after each...

Страница 9: ...e road Wait until it is safe to operate Mobile Communication Equipment such as cell phones text messaging devices pagers or two way radios WARNING Gasoline is highly flammable and gasoline vapor is ex...

Страница 10: ...107 7 7 613 778 1139 1545 450 428 562 796 1117 M33 x 3 50 M36 x 4 00 2101 2701 1468 1952 325 M16 x 2 00 231 167 M18 x 2 50 318 222 Recommended Fastener Torque Chart Size Size Torque ft lb Grade 5 Grad...

Страница 11: ...nstaller to verify that struck load of snow or ice control material does not exceed GVWR or GAWR rating label and complies with FMVSS CAUTION Read and adhere to manufacturer s ice control material pac...

Страница 12: ...et is trained to provide this service and service your spreader with factory original parts MOUNTING THE SPREADER CAUTION During removal or mounting securely grip spreader to avoid dropping MODEL SD 6...

Страница 13: ...can have a serious or even fatal collision if you drive after drinking Please do not drink then drive or spread ice control materials Here are some tips for driving in these conditions Drive defensiv...

Страница 14: ...T Button maximum application ON OFF Button Emergency Stop POWERING THE CONTROL Power is not applied to the control until the vehicle ignition is turned to ACC or ON Once the control has power it perfo...

Страница 15: ...ition persists contact your authorized dealer Multiple resets within a short time frame will cause the hopper module to time out if components are overheating The control will display an EF error code...

Страница 16: ...pper setting as described above for Cb code Lb Low battery Hopper module is sensing 10V Lb becomes an error code when module senses 6V Refer to the Lb row under Error Codes next page CAB CONTROL CODES...

Страница 17: ...s nC No connection Spreader not connected to vehicle harness Connect vehicle and spreader harness Check vehicle harness fuse Inspect spreader and vehicle harnesses Check module OH Overheating Spreader...

Страница 18: ...nd a beep will sound whenever the hopper is empty The EH code is informational only and will not stop spreader operation Clearing Empty Hopper Calibration Data Cc Code The empty hopper calibration may...

Страница 19: ...pread ice melters with the storm to prevent unmanageable levels of ice Never exceed 10 mph 16 km h when spreading For a heavier pass drive slower Never operate spreader near pedestrians Calculate spre...

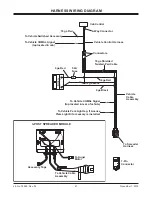
Страница 20: ...a clean dry location away from direct sunlight FUSE REPLACEMENT See the Harness Wiring Diagram on the following page for fuse ratings and locations If a problem should occur and fuse replacement is n...

Страница 21: ...To Vehicle CHMSL Signal tap located in cab To Vehicle CHMSL Signal tap located in rear of vehicle To Vehicle Park Light tap if License Plate Light Kit accessory is installed 50A Fuse 6 ga Red 18 ga Re...

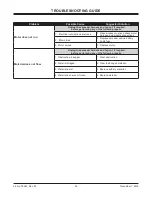
Страница 22: ...ired Cab control shuts down Unplug the spreader harness and tag out if required before performing any of the following repairs 1 Cross reference displayed error code with list on page 16 17 1a See sug...

Страница 23: ...ck motor harness and module connections 2 Blown fuse 2 Replace spreader vehicle battery cable fuse 3 Motor seizes 3 Replace motor Material does not flow Unplug the spreader harness and tag out if requ...

Страница 24: ...nted TrynEx International reserves the right under its product improvement policy to change construction or design details and furnish equipment when so altered without reference to illustrations or s...

Отзывы: