121
System Log
Display a list of events that have occurred on the storage system. Reviewing this
list can help you identify and resolve any problems that you might encounter.
1.
Click
System log
on the
Advanced
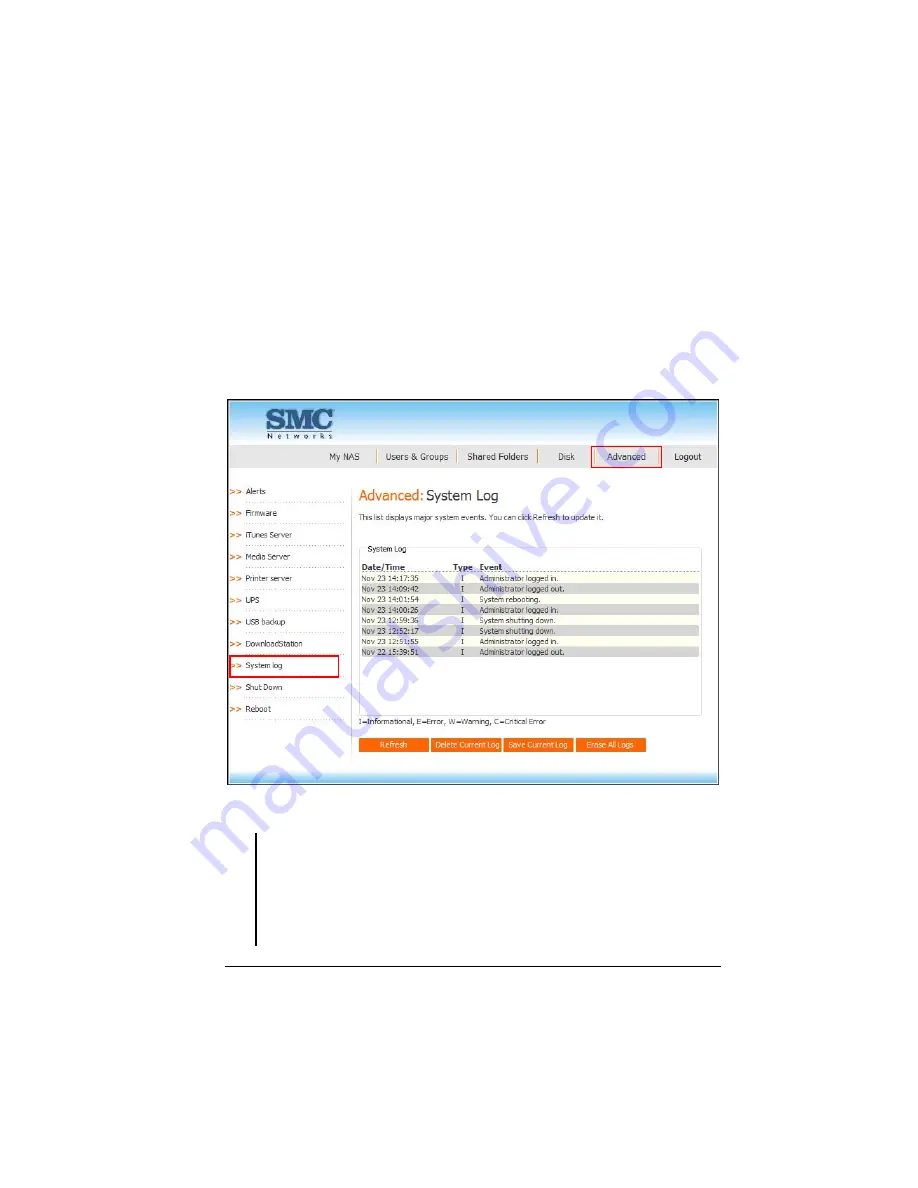
page and the following screen appears.
The date and time of the event, the type of event (
I
stands for informational,
E
stands for error,
W
stands for warning, and
C
stands for critical error), and
a brief description of the event are displayed.
2.
If an event occurs while you are viewing this list, click
Refresh
to update it.
NOTE:
z
You can get the previously saved system log file from the “Event Log” shared folder via
Samba connection.
z
When you click Refresh it will refresh the user interface via the web interface.
z
When you click Delete Current Log it will delete log information in buffer.
z
When you click Save Current Log it will save log information from buffer to file on
default path.
Содержание NAS04 - annexe 3
Страница 1: ...USER GUIDE SMCNAS04 SMCNAS24 TigerStore SMB Network Attached Storage Server...
Страница 2: ...SMCNAS04 SMCNAS24 User s Guide Revision 1 8 February 2008...
Страница 7: ......
Страница 11: ......
Страница 21: ......
Страница 27: ......
Страница 31: ...20 4 Click Finish when the following screen appears to exit installation...
Страница 32: ...21 5 Click Setup NAS Discovery Utility 6 The following screen appears Click Next...
Страница 37: ...26 14 The following screen appears...
Страница 49: ...38 18 When the hard disk drive appears on screen click CONFIGURE 19 The following screen appears Click OK...
Страница 54: ...43 25 The system will reboot and the following screen appears wait for approximately 3 5 minutes...
Страница 55: ...44 26 After rebooting log in by root again and no password is required...
Страница 56: ...45 27 The following screen appears click Upgrade 28 When the confirmation message appears click OK...
Страница 65: ...54 6 The system will reboot and the following screen appears wait for approximately 3 5 minutes...
Страница 66: ...55 7 After rebooting it will display your new RAID mode log in again...
Страница 67: ...56 8 The following screen appears click Upgrade 9 When the confirmation message appears click OK...
Страница 81: ...70 1 Click Network setting and the following screen appear...
Страница 83: ...72 Enable FTP Server To enable FTP server take note of the following z Transfer Mode Default is passive mode...
Страница 86: ...75 z Click File and the following screen appears...
Страница 98: ...87 3 Click Shared Folders and the following screen appears...
Страница 99: ...88 4 Select the shared folder and click Assign Access The following screen appears...
Страница 126: ...115 6 Select the shared folder e g USBBackup or sdb1 and click Assign Access The following screen appears...
Страница 127: ...116 7 Select the authorized user s and grant access right Read Only or Read Write Then click Apply...
Страница 141: ......
Страница 143: ...132 For non JAVA based...


