


Electrical Connection of the Sunny Backup 2200
SMA Solar Technology AG
60
SBU2200-TEN083320
Technical Description
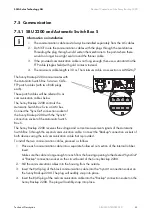
7.4 Sunny Remote Control 1
The Sunny Remote Control 1 is connected
to the "Display" connection terminal in the
Sunny Backup 2200.
1. Loosen the preinstalled plug feed-
through on the base of the housing.
2. Take the entire feed-through element
out of the installation opening.
3. Place the cable equipped with the
RJ45 plugs into a hollowed out
section of the internal rubber insert.
Make sure the cable is long enough
to reach from the housing opening to
the desired "Display" connection
socket on the circuit board.
4. Install all communication cables (see
section 7.5 „Communication“ (61))
before assembling the feed-through
element and then re-inserting it into
the installation opening on the Sunny
Backup 2200.
5. Insert the RJ45 plug into the "Display"
connection socket on the Sunny
Backup 2200. The plug will audibly
snap into place.
6. Connect the second RJ45 plug of the
cable (outside of the Sunny Backup
2200) to the connection socket of the
Sunny Remote Control 1 display.


