


P68
-56-
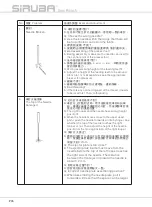
Step 2: As LED displays “press”, put the
required fabric, and keep pressing the left
key again until LED displays “scan.” When
the auto adjustment finishes, it would
display “set ok.”
2.Manual setting:
Step1: Based on AD value with or without
fabric, adjust the parameter 31 to make the
parameter value be in the middle of the both
two.
Step2: If the differences between the two are
too small, please turn down the intensity of
the electric eye with the parameter 30, and
then repeat the step 1.
3.Upper/bottom electric eye should be aligned
correctly before performing; othe rwise ,if the
displacement is too far, it will cause the
error.
步驟
2: LED
顯 示
press
下 , 放入 所 要 車 縫
之布 料, 再次 按住 左 鍵 直到
LED
顯 示
scan
後 即 可放 開, 自動 調 整 完畢 後會 顯
示
set ok
。
2.
手動 設定 :
步 驟
1:
依 據 有無 布料 之
AD
值 , 調整 參 數
31
使之參 數值 在兩 者中 間 。
步 驟
2:
若 兩 者差 異過 小, 請將 參 數
30
之
電眼 強度 調小 ,再 重覆 步驟
1
。
3.
上下 電眼
L ED
接 收 , 發 射須 對準 , 若偏
移 太大 將造 成檢 測誤 動作 。
The adjustment of the second segment
sensor:
1.Turn on the power of the sewing machine.
The “dot” mark would not be shown on the
operation box next to the digit 0, if the
correspondence between the upper sensor
& the bottom sensor work normally, as
the below figure. If shows the dot, it
indicates the correspondence is abnormal.
(Fig.50/51)
第 二 段 電 眼 感 測 器 調 整
:
1.
打 開 縫 紉 機 電 源 , 若 上 電 眼 感 測 器
&
下 電 眼 感 測 器 感 測 對 應 正 常 , 此 時
操 作 盒 上
0
數 字 右 下 角 不 會 出 現
”
點
”
記
號 , 如 下 圖 示
;
若 有 出 現
”
點
”
記 號 , 則 表
示 上 電 眼 感 測 器
&
下 電 眼 感 測 器 感
測 對 應 不 正 常 。
(
圖
50/51)
圖
50/Fig. 50
“
點
”
記 號
“dot” mark
A
B
A
B
B
A
表 示前 電 眼記 號
Display front sensor
表 示後電 眼 記號
Display rear sensor
Содержание 700QD
Страница 1: ...700QD 988QD INSTRUCTION BOOK 700Qe 988Qe...
Страница 2: ......
Страница 3: ......
Страница 4: ......
Страница 7: ...Introduction h Consider environment s safety may be caught in moving parts Wear object cause 1 P1...
Страница 8: ...2 P2...
Страница 10: ...P4...
Страница 11: ...Introduction 5 P5...
Страница 12: ...6 P6...
Страница 13: ...Introduction 7 ground P7...
Страница 88: ...P82...
Страница 89: ...Introduction P83...
Страница 90: ...P84...
Страница 91: ...Introduction P85...
Страница 92: ...P86 74 All machine components must be...
Страница 93: ......


