

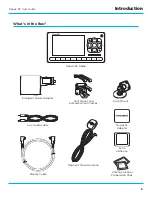


10
Roady BT User Guide
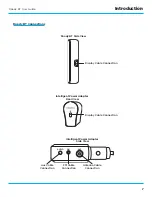
Installation
Installing the Vent Mount
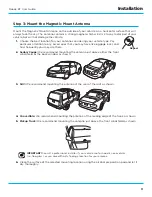
1.
Locate a vent with horizontal louvers sturdy enough to hold the Roady
BT Radio .
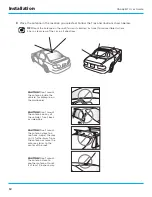
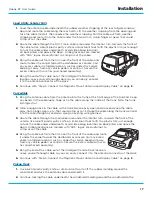
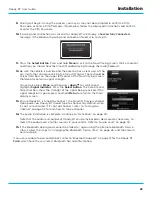
2.
If the vent louvers in your vehicle are recessed, you may need to use
the longer vent clamps with the Vent Mount . If so, remove the shorter
vent clamps and install the longer ones into the Vent Mount . Be sure to
observe the orientation of the vent clamps as shown, and replace both
vent clamps .
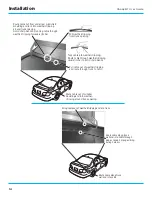
3.
Remove the adhesive liner from the back of the Magnet and
adhere the adhesive side of the Magnet to the Vent Mount .
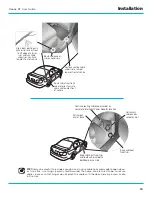
4.
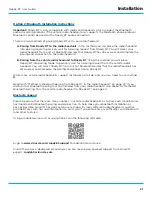
Install the Vent Mount onto the vehicle vent .
i.
Insert the vent mount into the vent opening .
ii.
Push until hooked on the rear of the vent louver . Rest the foot against the bottom of the vent .
iii.
If necessary, adjust the tilt of the Vent Mount by repositioning the foot to a different tilt
adjustment hole .
5.
Attach the Roady BT Display to the magnet on the Vent Mount .
TIP!
To remove the Vent Mount, push the mount into the vent . Then lift up until disengaged
from the rear of the vent louver, and remove the Vent Mount .
Extended Vent Clamps
Short Vent
Clamps
Vent Mount
Rear View
Round End
Orientation
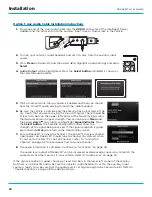
Vent Mount Rear View
Slide Left Clamp to
Hole in Center
Pull Clamp Out
Towards You
Insert Round End
of the Extended
Clamp in the
Center Hole
Slide Clamp to Left
to Complete
Installation
Repeat to Replace
Right Clamp
PUSH
I
II
III
Dash
Dash
Dash
Vent
Louver
Vent
Vent
HOOKED
TILT
ADJUSTMENT
HOLES
FOOT


