Hardware Installation
9
Please follow the instructions below to complete the hardware installation:
Step 1 Open the package and take out the product making sure that all the enclosed contents are not damaged or missing. Should
you find damages or missing contents, please contact your supplier immediately.
Step 2 Place the enclosure on a stable surface, ensure that it is well ventilated without blockage to the vent and kept away from
locations near water or where the product may become vulnerable resulting in damages.
Step 3 Use the provided key in the accessories kit and inserted into the key access opening to eject the removable drive tray latch
and extract the removable drive tray.
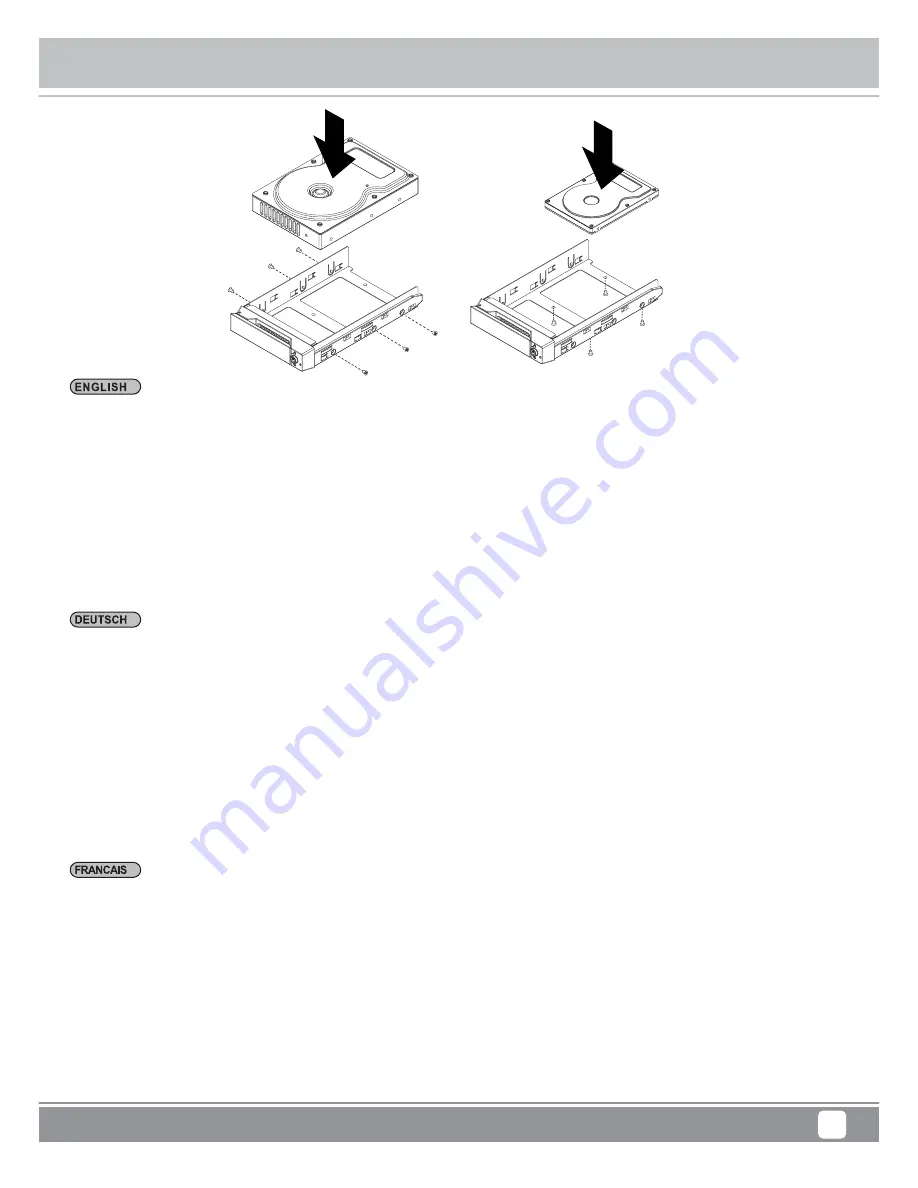
Step 4 Mount your hard drives onto the removable drive tray and secure it with the screws included in the accessory kit to avoid any
damage to the hard drive due to accidental movements.
Step 5 Choose one of the provided cables of your preference to connect the preferred interface connection on the enclosure unit to
the computer.
Step 6 Attach the AC power cable to the power socket. Once completed, you may power on the unit.
Once your computer has also booted, your operating system should recognize the drive automatically. If the hard drive installed
requires formatting, follow the formatting instructions given by the operating system to format the drive volume to your preference.
Once the formatting has been completed, the device is ready for use.
Bitte folgen Sie den unten stehenden Anweisungen, um die Hardwareinstallation durchzuführen:
Schritt 1 Öffnen Sie die Verpackung und nehmen Sie das Produkt heraus. Stellen Sie sicher, dass sämtliche Inhalte unbeschädigt
sind und nicht fehlen. Falls Sie Schäden oder fehlende Inhalte feststellen sollten, kontaktieren Sie bitte umgehend Ihren Händler.
Schritt 2 Stellen Sie das System auf eine stabile Unterlage. Stellen Sie sicher, dass es gut belüftet ist, die Öffnungen nicht blockiert
werden und von Orten in der Nähe von Wasser oder an denen das Produkt beschädigt werden könnte ferngehalten wird.
Schritt 3 Benutzen Sie den mitgelieferten Schlüssel im Zubehörset und stecken Sie ihn in die Schlüsselzugangsöffnung, um die
Wechselrahmenklappe auszuwerfen und den Wechselrahmen zu entnehmen.
Schritt 4 Entfernen Sie die Laufwerksstabilisierung vom Wechselrahmen. Legen Sie dann die Festplatte in den Wechselrahmen und
sichern Sie sie mit den Schrauben aus dem Zubehörset. Legen Sie den Wechselrahmen nach Abschluss wieder die Laufwerksposition
ein und legen Sie den Hebel um.
Schritt 5 Wählen Sie eines der mitgelieferten Kabel, um eine geeignete Verbindung des Wechselrahmens mit dem Computer herzustellen.
Schritt 6 Verbinden Sie das AC Stromkabel mit dem DC Netzadapter. Stecken Sie dann ein Ende in die Netzbuchse des Wechselrahmens
und das andere Ende in die Steckdose. Danach können Sie das Gerät einschalten.
Nach dem Start Ihres Computers sollte Ihr Betriebssystem das Laufwerk automatisch erkennen. Falls das installierte Laufwerk formatiert
werden muss, folgen Sie bitte den Anweisungen des Betriebssystems zur Formatierung der Festplatte, um das Laufwerk nach Ihren
Wünschen zu formatieren. Sobald die Formatierung abgeschlossen wurde, ist das Laufwerk zur Nutzung bereit.
Veuillez suive les instructions ci-dessous afin de réaliser l’installation du matériel:
Etape 1 Ouvrez la boîte et sortez le produit en vous assurant que tous les éléments inclus ne sont pas endommagés ni manquant. Si
vous trouviez des éléments endommagés ou manquant, veuillez contacter votre fournisseur immédiatement.
Etape 2 Placez le boîtier sur une surface stable,vérifiez la bonne aération du lieu sans blocage du vent et gardez à distance de lieux
proche d’eau ou d’endroits rendant le produit vulnérable et pouvant causer des dommages.
Etape 3 Utilisez la clé fournie dans le kit d’accessoires et insérez-là dans l’ouverture pour éjecter le cache du plateau de disque
extractible et enlever le plateau de disque extractible.
Etape 4 Enlevez les fixations du disque de la baie amovible puis monter s’y le disque dur et fixez-le avec les vis contenues dans le kit
d’accessoires. Une fois réalisée, insérez la baie de disque dans son emplacement et verrouillez.
Etape 5 Choisissez l’un des câbles fournis, suivant votre interface, pour la connexion du boîtier à l’ordinateur.
Etape 6 Attachez le câble d’alimentation AC à l’adaptateur DC puis branchez une extrémité sur la prise du boîtier et l’autre extrémité
dans la prise de courant. Une fois réalisée, vous pouvez démarrer le boîtier.
Une fois que votre ordinateur est démarré, le système d’exploitation devrait reconnaître automatiquement le disque. Si le disque dur
nécessite un formatage, suivez les instructions de formatage fourni par le système d’exploitation afin de formater le volume du disque
comme vous le souhaitez. Une fois le formatage terminé, l’appareil est prêt à l’emploi.
Tower Storage
TS433-TB
Содержание TS433-TB
Страница 1: ...Tower Storage TS433 TB 4 Bay 2 5 3 5 HDD SSD RAID enclosure with Thunderbolt 2...
Страница 7: ...Packaging contents 5 TS433 TB TS433 TB 1 x 4 Thunderbolt x 1 x 1 Tower Storage TS433 TB...
Страница 30: ......
Страница 44: ...G11226730...


