GB
6
l)
ALWAYS wait until the impact driver has come to a complete stop before putting it down.
m)
Periodically check all nuts, bolts and other fixings and tighten where necessary.
n) Only use bits and accessories specifically designed for use with impact drivers. Conventional bits
and accessories may shear off during use, or be otherwise damaged, potentially ejecting
dangerous projectiles.
o)
Ensure that fasteners are suitable for impact driver use.
Nuts, bolts, and screws that are not
suitable for high torque application may be damaged.
Battery charger safety
Use the battery charger correctly.
• Refer to the section of this manual relating to use of the battery charger before attempting to
charge the battery.
• DO NOT attempt to use the charger with any batteries other than those supplied. Keep your
battery charger clean; foreign objects or dirt may cause a short or block air vents. Failure to follow
these instructions may cause overheating or fire
• If the supply cord is damaged, it must be replaced by the manufacturer, the service agent or
similarly qualified persons in order to avoid a hazard
WARNING
:
DO NOT attempt to recharge non-rechargeable batteries.
Battery safety
WARNING
: Li-Ion batteries, if incorrectly used, stored, or charged are a fire, burn, and explosion
hazard.
• Keep the battery out of reach of children
• ONLY charge Li-Ion batteries using the charger provided or designed specifically for your product
• ONLY use Li-Ion batteries provided with a product or specifically designed to be compatible
• Allow batteries to cool for 15 minutes after charging or heavy use. Failure to follow these
instructions may cause overheating or fire
• When not in use batteries should be stored at room temperature (approximately 20°C)
• Ensure that battery contacts cannot accidentally short in storage. Keep batteries clean; foreign
objects or dirt may cause a short. Keep away from other metal objects, for example paperclips,
coins, keys, nails and screws
• Under abusive conditions, liquid may be ejected from the battery. This liquid may cause skin
irritation or burns. Avoid contact. If contact accidentally occurs, flush with water. If liquid contacts
eyes, seek medical help
• DO NOT open, disassemble, crush, heat above 60°C or incinerate. Do not dispose of in fire or
similar
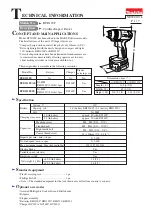
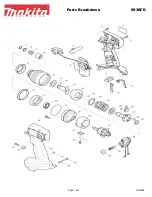
1. Hex Bit Holder
2. Collar
3. Motor Vents
4. Battery Charge Indicator
5. Forward/Reverse Switch
6. Trigger Switch
7. Hand Grip
8. Battery Release
9. Battery
10. LED Work Light
11. Battery Charger
12. Mains Plug
13. Green LED
14. Red LED
Product Familiarisation
Intended Use
Battery-operated impact driver with high levels of torque suitable for medium duty tasks such as
driving screws, nuts, bolts and other fasteners.
Unpacking Your Tool
• Carefully unpack and inspect your product. Fully familiarise yourself with all its features and
functions
• Ensure all parts of the product are present and in good condition. If any parts are missing or
damaged, have such parts replaced before attempting to use this product
Before Use
IMPORTANT:
Your impact driver’s battery comes partly charged. It is recommended that you fully
charge the battery before using the tool for the first time. It is also recommended that you fully drain
then fully charge the battery for a further 2 times to condition the battery, ensuring optimal usage is
achieved for the duration of the battery life.
Charging the battery
WARNING
: ONLY use this charger to charge the supplied battery or additional purchased
batteries that are specifically designed for this tool.
WARNING
: The Battery Charger (11) is designed for indoor use only and MUST NOT be used in
damp or wet conditions.
WARNING
: Failure to follow the correct procedure when charging batteries will result in
permanent damage.
Note:
Fully charging the battery can take 3–5hrs, depending on how depleted the battery charge
is when inserting the battery into the charger. Also, it may take longer if the battery has been in a
discharged state for an extended period of time.
1. Plug the Mains Plug (12) into a mains socket
2. Insert the Battery (9) into the Battery Charger (11) (it can only fit one way) and turn the mains
power on at the socket
3. The Red LED (14) will illuminate, which indicates charging
4. The Green LED (13) will illuminate once the battery is fully charged
Notes about battery charging
Note:
Batteries are an expendable supply whose capacity shortens over time. Always adhere to the
correct handling and charging instructions in the manual. If the battery does not hold charge or
working time is shortened, purchase a genuine Silverline replacement.
• The LED Battery-Charge Indicator (4) will display the battery’s charge level:
a) Green = charged
b) Amber = mid-charged
c) Red = low charge/battery needs charging
• The battery should be charged at ambient temperatures between 10 and 40°C (ideally around
20°C)
• After charging, allow 15 minutes for the battery to cool before use
• Ensure that the charger is disconnected from the mains supply after use, and is stored correctly
• DO NOT leave batteries on charge for extended periods and NEVER store batteries on charge
• The Battery Charger monitors battery temperature and voltage while charging. Remove the
Battery once charging has been completed to maximise charge cycles of the battery and not
waste power
• Batteries can become faulty over time, individual cells in the battery can fail and the battery could
short. The charger will not charge faulty batteries. Use another battery, if possible, to check correct
functionality of the charger and purchase a replacement battery if a faulty battery is indicated
• DO NOT store Lithium-Ion (Li-Ion) battery packs in a discharged state long term. This can damage
the Lithium-Ion cells. For long-term storage, store batteries in a high charge state, disconnected
from the power tool
• The capacity of batteries will reduce over time. After 100 charge cycles, the battery’s operation
time and the maximum torque performance of the impact driver will slightly reduce. This decline
will continue until the battery has minimal capacity after 500 charge cycles. This is normal and
not a fault with the battery pack
Fitting the battery
1. Ensure the Battery (9) has adequate charge (see ‘Charging the battery’)
2. Insert the Battery into the Hand Grip (7) (the Battery can only fit one way) until the Battery
Release (8) clips lock into place with a faint clicking sound
3. Your impact driver is ready to use
Removing the battery
1. Press in and hold the Battery Release (8) clips on both sides of the Hand Grip (7) then pull out
the Battery (9)
2. The Battery can now be inserted into the Battery Charger (11) to charge, if required (see
‘Charging the Battery’) or stored in a cool, dry place
652640_Manual.indd 6
19/12/2017 12:03
Содержание 652640
Страница 2: ...2 1 2 3 4 5 6 9 7 8 10 13 14 11 12...
Страница 3: ...silverlinetools com 3 English 04 Fran ais 10 Deutsch 16 Espa ol 22 Italiano 28 Nederlands 34 Polski 40...
Страница 46: ...46 Notes...
Страница 47: ...silverlinetools com 47 Notes...