background image

I/O connection 

● Create a low-impedance ground connection for additional cabinets, system components, 

and distributed devices with the largest possible cross-section (at least 16 mm²).

● Ground unused lines at one end in the cabinet.
● Choose the greatest possible clearance between the power and signal cables (at least 20 

cm). The greater the distance over which the cables are routed in parallel, the greater the 

clearance must be. You must install additional shields if sufficient clearance cannot be 

maintained.

● Avoid unnecessarily long cable loops.
● Surge suppressors, e.g. RC elements or varistors must be connected to the operating coils 

for contactors and relays in the converter.

● In order to reduce noise/interference entering or exiting via the cable, filter auxiliary voltages 

in the control cabinet. 

6.3

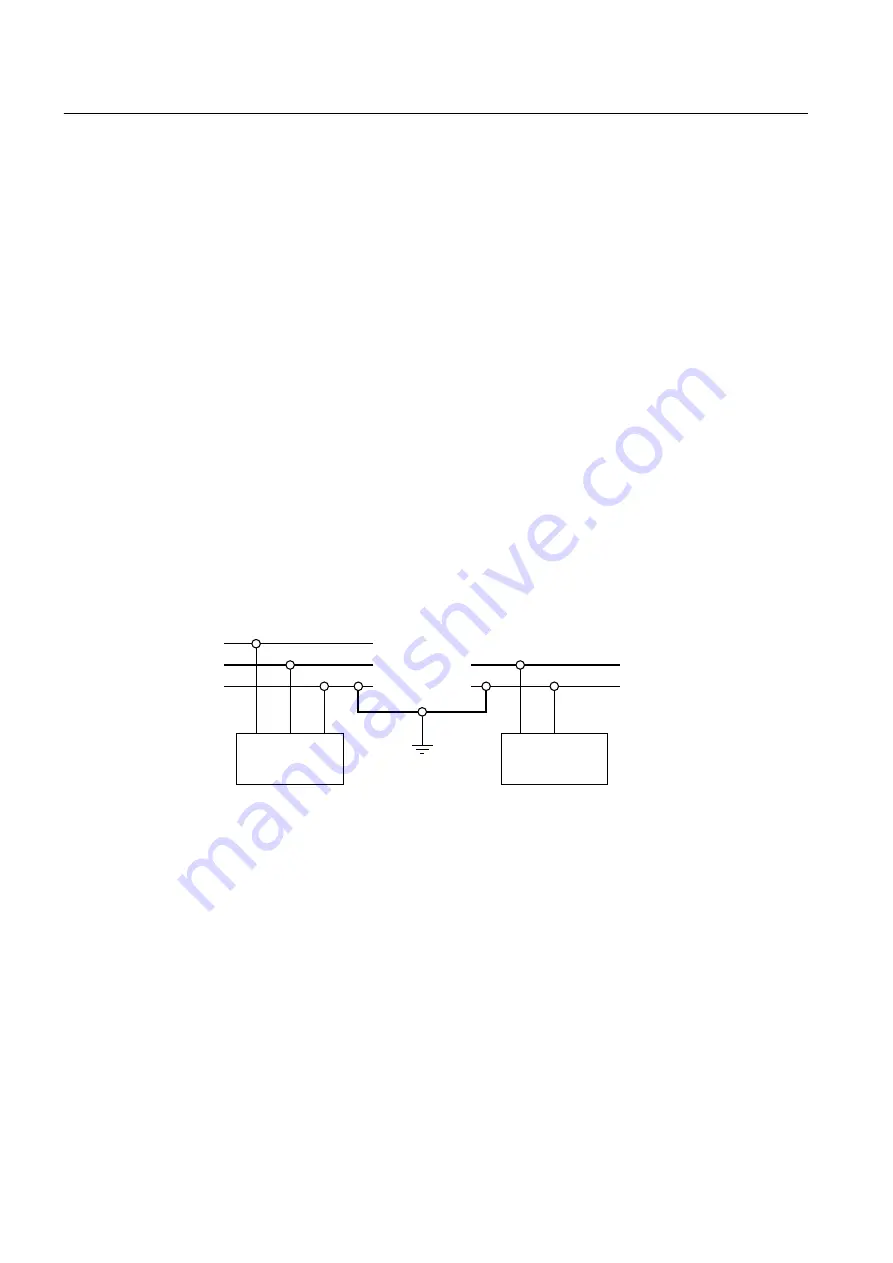
Potential concept

A noise-free connection between the internal and external supply voltage can be achieved by 

connecting the 0 V potentials to each other and grounding them. This also eliminates the need 

for the control circuit insulation monitor required by DIN EN 60204-1.

,QWHUQDO

ORDGV

([WHUQDO

ORDGV

3

0

3

0

1

Figure 6-3

Potential concept

Electrical connection
6.3 Potential concept

SINAMICS GM150  6SL3815-2LN41-4AA2

106

Operating Instructions 04/2017

Содержание SINAMICS GM150

Страница 1: ...www siemens com drives Medium Voltage Drive SINAMICS GM150 Type 6SL3815 2LN41 4AA2 Operating Instructions Installation Instructions Edition 04 2017 ...

Страница 2: ...20 04 2017 13 25 V27 00 ...

Страница 3: ...stallation Instructions Edition 04 2017 Introduction 1 Safety instructions 2 Description 3 Preparations for use 4 Installation 5 Electrical connection 6 Start up 7 Operation 8 Maintenance 9 Spare parts 10 Disposal 11 Service Support A Technical data and drawings B Checklists and forms C ...

Страница 4: ...e who based on their training and experience are capable of identifying risks and avoiding potential hazards when working with these products systems Proper use of Siemens products Note the following WARNING Siemens products may only be used for the applications described in the catalog and in the relevant technical documentation If products and components from other manufacturers are used these m...

Страница 5: ...Residual risks 28 3 Description 31 3 1 Applications 31 3 2 Safety concept 31 3 2 1 Safety components and functions 31 3 2 2 External safety components 32 3 2 3 Protection and monitoring functions of internal components 32 3 2 4 Protection and monitoring functions for external components 33 3 3 Design 33 3 3 1 Components 33 3 3 2 Design of the Basic Line Module 34 3 3 3 Design of the Motor Module 3...

Страница 6: ...alog modem option G25 56 3 6 11 Teleservice connection TS Adapter II ISDN modem option G35 56 3 6 12 1x temperature sensor evaluation unit TM150 option G51 57 3 6 13 Additional Terminal Module TM31 option G61 57 3 6 14 Additional Terminal Module TM15 option G63 58 3 6 15 Indicator lamps in the cabinet door option K20 58 3 6 16 Display instruments in the cabinet door for voltage current speed and o...

Страница 7: ... 2 Transport requirements 76 4 3 3 Observe center of gravity 77 4 3 4 Transport with a fork lift truck 77 4 3 5 Transport with a crane 78 4 3 6 Using lifting rods 78 4 3 7 Transporting transportation units packed in boxes 80 4 4 Unpacking 81 4 4 1 Removing the packaging 81 4 4 2 Removing load securing devices 82 4 4 3 Lifting the cabinet off the transport pallet 82 4 4 4 Opening doors in preparati...

Страница 8: ...C30 Sensor Module 113 6 5 9 Interconnecting optional connections 115 6 5 10 Connecting the re cooling unit to the drive 115 6 5 11 Fastening the cable ducts with cable ties 116 7 Start up 117 7 1 Venting the converter 117 7 2 Description and configuration of the PROFIBUS interface 119 7 2 1 Hardware components required for PROFIBUS communication 119 7 2 2 PROFIBUS interface diagnostics LEDs addres...

Страница 9: ...180 8 4 3 3 DC link short circuiter 180 8 4 3 4 Vdc max closed loop control 181 8 4 3 5 Fan monitoring 183 8 4 3 6 Speed monitoring with incremental encoder 183 8 4 3 7 Controlled stop EMERGENCY STOP category 1 183 8 5 Fault and system messages 184 8 5 1 External alarms and faults 184 8 5 2 Message from the grounding switch 184 8 5 3 Diagnosis 185 8 5 3 1 Indicating and rectifying faults 185 8 5 3...

Страница 10: ... combination module 222 9 7 9 Replacing fuses 223 9 7 10 Replace the sponge for the leak detector 223 9 7 11 Replacing the Power Stack Adapter 224 10 Spare parts 227 11 Disposal 229 11 1 Disposing of packaging material 229 11 2 Removing device components and old devices 229 A Service Support 231 B Technical data and drawings 233 B 1 Technical specifications 233 B 1 1 Notes about technical specific...

Страница 11: ...e 3 6 Connector X34 49 Table 3 7 Connector X35 49 Table 3 8 Connector X36 50 Table 3 9 Deionized water requirements 53 Table 3 10 Braking power Braking Module with external brake resistor 67 Table 3 11 Max permissible cable lengths 71 Table 6 1 Dimensioning cables 107 Table 6 2 Cable cross sections 107 Table 6 3 Drive and motor connection terminals 110 Table 7 1 PROFIBUS interface X126 121 Table 7...

Страница 12: ... 14 Terminal assignment for circuit breaker interface LA X52 with OFF and undervoltage coil 240 Table B 15 Terminal assignment for circuit breaker interface LA X52 with two OFF coils and undervoltage coil 240 Table B 16 Terminal assignment for circuit breaker interface LA X52 with capacitor release 240 Table B 17 Power Stack Adapter 2 Actual value channels 242 Table B 18 Power Stack Adapter 2 Trip...

Страница 13: ...le Connecting interface terminals 93 Figure 5 7 Dust protection cover closed loop control cabinet 95 Figure 5 8 Dust protection cover inverter cabinet 96 Figure 5 9 Dust protection cover rectifier 98 Figure 5 10 Remove the screws 99 Figure 5 11 Install battery 100 Figure 6 1 Shield connection using a clip 105 Figure 6 2 Bridging shield gaps 105 Figure 6 3 Potential concept 106 Figure 6 4 Example C...

Страница 14: ...ion motor with drive supply 169 Figure 8 18 Example Setting analog output 0 172 Figure 8 19 Potential supply of external signals 174 Figure 8 20 Digital signal output to the system I O 175 Figure 9 1 Grounding points 197 Figure 9 2 Attaching the grounding spider 197 Figure 9 3 Make proof grounding switch closed 198 Figure 9 4 Principle of the mechanical door interlock 200 Figure 9 5 Components of ...

Страница 15: ...ction of two Basic Line Modules option N15 234 Figure B 2 24 pulse supply via series connection of two Basic Line Modules option N15 with sinusoidal filter for operating line motors option Y15 234 Table of contents SINAMICS GM150 6SL3815 2LN41 4AA2 Operating Instructions 04 2017 15 ...

Страница 16: ...Table of contents SINAMICS GM150 6SL3815 2LN41 4AA2 16 Operating Instructions 04 2017 ...

Страница 17: ...nter Page 231 Text format features The warning notice system is explained on the rear of the inside front Always follow the safety instructions and notices in these instructions In addition to the safety related warning notices which you must read you will find the text in these instructions is formatted in the following way 1 Handling instructions are always formatted as a numbered list Always pe...

Страница 18: ...Introduction 1 1 About these instructions SINAMICS GM150 6SL3815 2LN41 4AA2 18 Operating Instructions 04 2017 ...

Страница 19: ...in this documentation may only be operated by personnel qualified for the specific task in accordance with the relevant documentation for the specific task in particular its warning notices and safety instructions Because of their training and experience qualified personnel can recognize any risks involved with handling these products systems and avoid any possible dangers 2 3 The five safety rule...

Страница 20: ...Even after switching off the mains voltage or while the connected machine is still turning high voltages can remain for a prolonged length of time High voltages can cause death or serious injury if the safety rules are not observed or if the equipment is handled incorrectly Operate the drive properly Always follow the The five safety rules Page 19 when performing any work Only remove the covers us...

Страница 21: ...ng factors for example The input currents are exceeded Incorrectly dimensioned circuit breaker or transformers Incorrectly connected cables or cables that have not been connected Excessive pollution Arcing can result in death serious injury or material damage Make sure that the system is properly dimensioned and that the power cables are correctly connected The maximum permissible input currents a...

Страница 22: ...difficult to access If you do not use appropriate protective equipment when working in places that are difficult to access you are at risk of injury For example sharp edges and splinters can cause injuries to the head and skin If you use unsuitable steps when working on the upper areas of the drive you can fall and injure yourself Use appropriate protective equipment especially a hard hat and glov...

Страница 23: ...unction if electromagnetic fields are present WARNING Interference with pacemakers The functioning of cardiac pacemakers could be impaired by electromagnetic fields Death or serious physical injury can result It is therefore not permissible for people with pacemakers to stand close to the converter NOTICE Data loss Electromagnetic fields can cause data loss to magnetic or electronic data storage m...

Страница 24: ... to the screen 10 cm Electronic components should not be brought into contact with electrically insulating materials such as plastic foil plastic parts insulating table supports or clothing made of synthetic fibers Bring components into contact only with ESD compliant materials e g ESD tables ESD surfaces ESD packaging Only carry out measurements on the components if one of the following condition...

Страница 25: ... ambient and operating temperatures to be adhered to in the technical data If the described environmental conditions are not observed warranty claims and other claims may be rejected WARNING Explosions If you operate the converter in a potentially explosive atmosphere explosions can occur which can cause death serious injuries or material damage Only operate the converter in a non explosive enviro...

Страница 26: ... System configuration is carried out by an experienced system integrator Further system components such as the circuit breaker transformer cables and motor are adjusted for converter operation The converter is only operated in conjunction with the engineered components Different operating modes overloads load cycles and differing environmental conditions are permitted only after special arrangemen...

Страница 27: ...be connected together When the converter is supplied with power the protective ground conductor must be connected to the system s grounding point Select the cross section of the protective ground conductor from one of the following variants According to local wiring regulations Calculated according to IEC 60364 5 54 543 1 Half a phase conductor cross section 2 7 4 Installation site safety WARNING ...

Страница 28: ...g personnel against any possible risk Observe the relevant nationally applicable health and safety regulations or the applicable national regulations in the country of installation In Germany electromagnetic fields are subject to regulations BGV B11 and BGR B11 stipulated by the German statutory industrial accident insurance institution Display adequate hazard warning notices on the installation P...

Страница 29: ... Operating and or environmental conditions outside of the specification External influences damage A fault can for example have the following consequences both inside and outside the drive Extraordinarily high temperatures including open fires as a result of the fault Emissions of light noise particles or gases Converters with open type IP20 protection must be installed in a distribution station o...

Страница 30: ...age to components overvoltages or loose parts as well as exceptional operating statuses can cause a failure within the enclosure This can result in an internal electric arc If an electric arc occurs and people are nearby this could lead to death serious physical injury and damage to property Ensure that only qualified personnel perform work on the drive Observe the safety and operating instruction...

Страница 31: ...rators The converter is also equipped with monitoring functions to protect external components The converter operates safely when the interlock and protection systems are functioning properly Nevertheless there are areas on the converter that are hazardous for personnel and that cause material damage if the safety information of all the instructions and the labels on the converter are not strictly...

Страница 32: ... breaker More detailed information is provided in Chapter Circuit breaker provided by the customer Page 38 Input side transformer The transformer on the input side must be configured in such a way that the maximum short circuit current is not exceeded Information on this is provided in the technical data sheet of the transformer 3 2 3 Protection and monitoring functions of internal components The ...

Страница 33: ...tions for external components Transformer and motor can be monitored in the drive A fast protective shutdown that you can activate for external problems e g short circuits is present 3 3 Design 3 3 1 Components The drive in the basic configuration is equipped with the following components 12 pulse Basic Line Module DC link Motor Module An optional 24 pulse Basic Line Module is also available for o...

Страница 34: ... diode rectifier 7 High voltage motor 4 DC link with dry type capacitors Figure 3 1 Design of the power unit 3 3 2 Design of the Basic Line Module In a 12 pulse configuration the Basic Line Module consists of a rectifier module In a 24 pulse configuration the Basic Line Module comprises two rectifier modules Description 3 3 Design SINAMICS GM150 6SL3815 2LN41 4AA2 34 Operating Instructions 04 2017...

Страница 35: ... each configuration a PowerCard is equipped with neutral point diodes The other PowerCards are fitted with gate turn off power semiconductors IGBT modules Each PowerCard comprises a heat sink with 2 neutral point diodes or 2 IGBT power semiconductors The IGBTs can limit and disconnect a short circuit current This means that a short circuit generally only results in the drive stopping and damage to...

Страница 36: ...self healing The drive is switched off when the circuit breaker is disconnected The DC link is discharged by means of balancing resistors 3 5 Description of the components 3 5 1 SINAMICS Control Unit The CU320 2 DP Control Unit is the central control module of the drive s open loop and closed loop control system The connections are wired internally to the customer terminal block Further informatio...

Страница 37: ...vary depending on the system 3 5 4 Electromechanical door interlock system The electromechanical door interlock system is designed to protect personnel and is an integral part of the safety concept During operation and when the make proof grounding switch is open all the doors are interlocked with the exception of the door for the control section The electromechanical door interlock system ensures...

Страница 38: ...en enabled under no circumstances should you switch on the circuit breaker by external mechanical or electrical means To protect the converter transformer ensure that overcurrent protection is in place 3 5 7 Converter transformer A three winding transformer is required for the 12 pulse Basic Line Module The secondary windings of the three winding transformer have a phase shift of 30 el which resul...

Страница 39: ...4 16 38 9 2 x 2 2 2 2 x 2 2 2x 3 1 The specified voltages and the necessary impulse withstand test voltages for the transformer secondary windings with respect to ground Since the transformers generally have temperature evaluation systems in the windings the specified test voltages are required for strengthened insulation If no control circuits have been installed in the windings test voltages in ...

Страница 40: ...X81 Trip line X200 X202 DRIVE CLiQ interfaces X231 X232 Analog and digital outputs S5 0 S5 1 Switches of the analog inputs voltage current measurement AI0 Switches of the analog inputs voltage current measurement AI1 X221 X222 Analog and digital inputs temperature sensor connections LEDs Diagnostics via LEDs X210 Electronics power supply Figure 3 4 Overview of PSA interfaces See also Gating of the...

Страница 41: ...1 Field of application The common power supply GSV is an AC AC converter that converts an alternating voltage into a square wave voltage You can select one of the following rated voltages with associated rated frequencies for the alternating input voltage 1 phase 115 VAC 60 Hz 1 phase 230 VAC 50 Hz 60 Hz 1 phase 240 VAC 50 Hz 60 Hz On the front panel of the device there is a labeled switch with wh...

Страница 42: ...circuit has been rectified and the device is back in proper working order This requires that the upstream miniature circuit breaker is opened and after approximately 10 seconds is closed again See also Technical specifications of the common power supply Page 237 3 5 10 2 Design 6DIHW WUDQVIRUPHU QWHUSRVLQJ WUDQVIRUPHU FWXDO YDOXH DFTXLVLWLRQ RPPRQ SRZHU VXSSO 6ZLWFKLQJ PRGXOH 7 6ZLWFKLQJ PRGXOH 7 ...

Страница 43: ...ription Tasks of the interfaces Connector Task X1 Line connection X2 Signaling X6 X7 X8 X9 Power output Signal assignment of the interfaces Connector pin Signal X1 3 L X1 4 Not assigned X1 5 N X1 6 Not assigned X1 7 PE X2 4 Undervoltage REL_A X2 5 Undervoltage REL_B Description 3 5 Description of the components SINAMICS GM150 6SL3815 2LN41 4AA2 Operating Instructions 04 2017 43 ...

Страница 44: ...tage 2P24_1 and the optional external voltage 2P24_2 for undervoltage Monitoring the auxiliary contacts of the 24 V DC miniature circuit breakers Output of eight binary control signals The logic state of the signal in each case is indicated by an LED Output of eight analog signals to the following signal receivers PADU8 Indicating instruments Control station I C Supply of the digital and analog si...

Страница 45: ...R B QWHUQDO SRZHU VXSSO DQG PRQLWRULQJ WHUQDO SRZHU VXSSO DQG PRQLWRULQJ 3RZHU 6XSSO 2 2B WR 2B B WR B B WR B 2B WR 2B 6 723 SRZHU VXSSO 2B WR 2B SLQ FRQQHFWRU DEOH SLQ FRQQHFWRU DEOH SLQ FRQQHFWRU DEOH SLQ FRQQHFWRU DEOH 2SWLRQ 2SWLRQ 3 0 1 3 B 0 3 B Figure 3 8 Logical design of the DM10 diagnosis module See also Technical specifications of the diagnostics module DM10 Page 238 LEDs of the DM10 di...

Страница 46: ... AO_7 X22 X28 or X29 AO_2 X14 X18 or X19 DO_4 X23 X28 or X29 AO_3 X15 X18 or X19 DO_5 X24 X28 or X29 AO_4 X16 X18 or X19 DO_6 X25 X28 or X29 AO_5 X17 X18 or X19 DO_7 3 5 11 3 Interface description of the connectors The individual module elements of the DM10 diagnosis module supply several interfaces The interfaces are occupied by the following connectors X231 PSA connection X232 PSA connection X1 ...

Страница 47: ...Signals DO_0 to DO_3 of connector X32 are identical to signals DI_0 to DI_3 of connector X231 which are supplied from the PSA An LED signals the logic state of the respective signals These signals are not wired to the PADU8 interface The eight digital outputs of the PSA are used internally and are therefore preassigned so not configurable The eight analog outputs of the PSA are freely parameteriza...

Страница 48: ...refore preassigned so not configurable The eight analog outputs of the PSA are freely parameterizable and can be used for commissioning and service purposes with the aid of the starter Follow the description in the Sinamics List Manual to parameterize the system Table 3 3 Connectors X1 and X31 Plugs Pin Signal type Signal designation X1 and X31 1 AO_0 Analog signal 0 X1 and X31 2 1M24 X1 and X31 3...

Страница 49: ...gnal 1 X5 3 4 1M24 X5 4 5 DO_E2 External binary signal 2 X5 5 6 1M24 X5 6 7 DO_E3 External binary signal 3 X5 7 8 1M24 X5 8 Four binary plant signals can be wired via connector X33 for diagnosis with the PADU8 Table 3 6 Connector X34 Pin Signal type Signal designation 1 1P24 24 V 2 1M24 Ground 3 1M24 Ground 4 1N24 24 V The internal supply voltlage is connected at connector X34 from which the 1P15 ...

Страница 50: ...ule Because of this fixed value range signed signals such as the actual speed value cannot be represented Eight AD8674 operational amplifiers boost the voltage signal reduced by 5 V by a factor of 2 As a result of this signal handling it is also possible to represent signals in a range of values from 10 V to 10 V In order to be able to perform signal handling with great accuracy the operational am...

Страница 51: ...iagnosis module At the same time these voltages are monitored for undervoltage and the logic signal state is visualized by one LED in each case If all the voltages being checked are within the standard range another LED H23 signals Power Supply OK Connector X36 carries the information about the status of the power supply to the closed loop control system If the status of the power supply is report...

Страница 52: ...ng pumps No interruption of the flow is permitted The only exception is a pump shutdown The shutdown time must not exceed three seconds Provide an overpressure valve in the raw water discharge of the heat exchanger To keep the temperature of the ionized water constant within specified limits and to prevent condensation on request a control valve tree way valve can be installed as bypass Because th...

Страница 53: ...ctivity during filling 10 μS cm Evaporation residue 20 mg l pH value 5 to 9 Content of metals in the hydrogen sulfide group lead antimony tin bismuth arsenic copper cadmium Content of metals from the ammonium sulfide group iron cobalt nickel chrome manganese Content of sulfur chloride and nitrogen compounds Not detectable Content of oxidizable organic substances Max a quantity equivalent to the us...

Страница 54: ...in the converter and fulfills the requirements for protective separation To monitor the temperature of explosion protected motors options for PTC tripping devices with PTB approval and PT100 for use in hazardous areas are available See also Terminal assignment of the NAMUR terminal strip option B00 Page 239 3 6 2 Auxiliary voltage supply 3 AC 200 V 50 Hz option C30 The auxiliary voltage of 3AC 200...

Страница 55: ...rovided as an extension of the customer interface and the TM31 analog inputs are to be used with a higher level control level for communication purposes Multifunction interface converters with the following adjustment range are used 0 V to 10 V 0 mA to 20 mA 4 mA to 20 mA The range must be set on the isolating transformer 3 6 5 Isolation amplifiers for optional analog outputs option E87 This optio...

Страница 56: ...ipped with a PROFIBUS interface slave The Anybus X Gateway supplied by HMS Industrial Networks is used to link the drive to the third party bus system The X gateway is connected to the CU320 Control Unit using a PROFIBUS cable The option is supplied with a null modem cable for configuring the X gateway The gateway is preconfigured to 20 bytes of I O data The data size is changed via the configurat...

Страница 57: ... part of each standard variant of the drive The Terminal Modules are used for the following functions Inclusion of warning and fault messages and control signals Communication with a higher level control level If the number of signals to be monitored is insufficient the interface can be extended to include an additional Terminal Module Additional digital inputs and outputs and two analog inputs an...

Страница 58: ...onal digital inputs and outputs isolation in three groups of eight channels 24 green status LEDs for indicating the logical signal status of the relevant terminal 3 6 15 Indicator lamps in the cabinet door option K20 This option provides five lamps in the cabinet door of the control section that indicate the operating status of the drive Fault red Alarm yellow Operating green Ready for operation w...

Страница 59: ...internal cooling option K66 Because no external air is drawn in to cool the power unit this prevents dirt from the ambient air from reaching inside the cabinet The internal air in the power unit is cooled using an air water heat exchanger 3 6 19 Output reactor option L08 The output reactor limits the capacitive charge discharge currents of motor supply cables Permissible cable lengths shielded cab...

Страница 60: ...e recharging currents of the motor cables and therefore protects the motor insulation system The dv dt filter is integrated in the power unit Drive Motor R1 R2 R3 6 Ω dv dt filter resistance L1 L2 L3 20 μH dv dt filter reactor C1 C2 C3 1 μF dv dt filter capacitor M Center of the drive N Center point of the dv dt filter Figure 3 10 Circuit diagram option L10 Description 3 6 Description of options S...

Страница 61: ...ulse frequency of the drive must not exceed 200 Hz The permissible output frequency of the drive must not exceed 100 Hz The following line length between the filter output and the motor is permitted with shielded cables cable cross section 185 mm2 200 m when six parallel cables are used 400 m when three parallel cables are used The re cooling unit requires 10 liter more flow Description 3 6 Descri...

Страница 62: ...drive N Center point of the dv dt filter Figure 3 12 Circuit diagram option L11 Usage restrictions for the input filter The drive may be operated only with following maximum currents 4 kA drive 1680 A without filter 1770 A 5 kA drive 1780 A without filter 1870 A The following line length between the filter output and the transformer is permitted with shielded cables cable cross section 185 mm2 200...

Страница 63: ...s not restart in an uncontrolled manner As a further warning an acoustic signal is output when the drive restarts You can find further information on the Voltage Sensing Module VSM10 in Section Description of the Components Prerequisites To switch in the drive via the optional automatic restart function the following general conditions must be fulfilled The auxiliary supplies must not fail The pow...

Страница 64: ...ption allows motor driven make proof grounding switches that ground the line side input voltage to be controlled automatically The motor driven make proof grounding switches are installed in an additional cabinet For safety reasons the drive controller prevents the make proof grounding switches from being switched when voltage is still present Activation is integrated in the protection and monitor...

Страница 65: ...ion and safety reasons this can be achieved by means of the motor operated isolator 3 6 27 Circuit breaker at the drive output option L52 With this option a circuit breaker is integrated at the drive output If isolation between the drive output and drive motor is required for protection and safety reasons this can be achieved by means of the circuit breaker The circuit breaker is controlled from t...

Страница 66: ...arameterized by the user Voltage is then disconnected from the drive as described for Emergency Off stop category 0 The EMERGENCY OFF button with protective collar is installed in the drive cabinet door WARNING Danger from auxiliary voltages that are connected When you press the EMERGENCY STOP button the motor is stopped either uncontrolled or controlled depending on the selected category 0 or 1 a...

Страница 67: ...ed by Castell It is a supplementary mechanism to the electromechanical door locking system integrated as standard The medium voltage breaker must be opened before access can be gained to the coded key of the key exchange unit The opened medium voltage breaker releases the key to the key exchange unit This key enables the access to the keys for the cabinet doors of the power unit This key interlock...

Страница 68: ... the degree of protection of the drive from IP43 to IP54 3 6 37 Redundant fan in the power unit option M61 To increase the plant availability the drive can be fitted with an additional redundant fan If a fan in the drive cabinet fails this is detected immediately by the differential pressure monitor in the cabinet The redundant fan is switched in by the drive controller without this causing the dr...

Страница 69: ...uit diagrams Also use the circuit diagrams MA sheet 1 and LA sheet 6 and 7 provided in the circuit manual of the drive to understand the principle of operation The capacitor release is used for circuit breakers that have a break time of 80 ms but do not have an undervoltage release If the control voltage for the switchgear fails the drive circuit breaker is deactivated by the energy stored in the ...

Страница 70: ...s fault If the motor circuit breaker MA Q11 trips an appropriate warning is issued The capacitor release supplies the auxiliary voltage for switching off the circuit breaker several minutes after failure of the input voltage See also Connecting the control cables to the circuit breaker for the capacitor release option N20 Page 112 Checking the capacitor release option N20 Page 203 3 6 41 Controlle...

Страница 71: ...data see the technical specifications Only work machines with square load characteristic curve centrifugal pumps and water turbines can be operated Field weakening operation is not permitted Possible rated output frequencies are limited to a range of 30 Hz to max 66 Hz The frequency setting range is 1 10 Table 3 11 Max permissible cable lengths Permissible maximum cable lengths shielded and unshie...

Страница 72: ...Description 3 6 Description of options SINAMICS GM150 6SL3815 2LN41 4AA2 72 Operating Instructions 04 2017 ...

Страница 73: ...ust which could impair operation For information about permissible ambient and installation conditions see the Technical data and drawings section 4 2 Inspections when receiving the delivery 4 2 1 Checking the delivery The components are assembled on an individual basis When you take receipt of the delivery please check immediately whether the scope of the delivery matches up with the accompanying...

Страница 74: ...ge during transit It is essential that you check the shock and tilt indicators before commissioning the unit WARNING Tripped shock and tilt indicators Safe operation of the device is not guaranteed if the shock or tilt indicator has tripped responded This can result in death serious injury or material damage If one of the indicators has tripped do not perform any commissioning Inform the Technical...

Страница 75: ... Inspect the load suspension devices attached to the equipment for possible damage Replace load suspension devices if they are damaged Before use check that the load suspension devices are correctly attached When lifting use only approved and undamaged lifting gear of sufficient rated capacity Check the lifting gear prior to its use WARNING Load suspension devices and lifting gear damaged If the l...

Страница 76: ... lift trucks must hold appropriate licenses You must observe the specifications to avoid transport damage to the enclosure and you must maintain the permissible climatic conditions during operation in accordance with IEC 60721 3 1 2 3 Please also observe the Technical specifications instructions When lifting the drive use only approved and undamaged sling guides and spreaders of sufficient rated c...

Страница 77: ...ng figure shows the centers of gravity as an example Carefully note the centers of gravity when performing any lifting or installation work URQW YLHZ 6LGH YLHZ Figure 4 2 Example illustration of centers of gravity 4 3 4 Transport with a fork lift truck WARNING Use of non approved fork lift trucks If the forks are too short this can cause the transport unit cabinet to tip over resulting in death se...

Страница 78: ...an result in death serious injury or material damage Observe the specifications provided in DIN EN 13155 on cross arms WARNING Standing under suspended loads If the lifting gear or load suspension devices were to fail the transport unit cabinet could fall This can result in death serious injury or material damage Do not stand underneath or near to a raised load Observe the following points for saf...

Страница 79: ...damage Use suitable lifting rods for transporting The weight of the cabinet is indicated on the rating plate NOTICE Improper lifting If the transport unit is lifted incorrectly this can damage the decorative trim cabinet doors or fans Protect the cabinet and protruding parts against damage Always lift the transport units with the appropriate spreading devices or hoisting tackle Procedure 1 If ther...

Страница 80: ...th the fork lift truck WARNING Use of non approved fork lift trucks If the forks are too short this can cause the transportation unit the device to tip over resulting in death serious injury or damage inside the cabinet The forks of the truck must protrude at the rear of the transportation unit Only use forklifts approved for the purpose of transporting the devices Transportation with the crane WA...

Страница 81: ...he rope Figure 4 5 Transporting a transportation unit still in packaging with a crane 4 4 Unpacking 4 4 1 Removing the packaging NOTICE Incorrect storage of unpacked devices Proper packaging ensures that the equipment is protected Unpackaged equipment may be damaged if it is stored or out of service over a long period Carefully observe the instructions for storage in Chapters Storage and Technical...

Страница 82: ...result in bodily injury or death Release the retaining straps before opening Stay out of the way of the impact direction of the retaining straps NOTICE Improper removal of the load securing devices The load securing device protects the cabinet from any damage If you remove the load securing device improperly the cabinet may sustain damage Correctly remove the load securing device To extract the lo...

Страница 83: ...4 4 4 1 Opening doors in preparation for use The converter is delivered in a closed state A label showing how to open the doors in a current free state is located on the door Figure 4 6 Example Label with instructions for opening the doors Proceed as follows 1 A screw marked with a label is located in the door Under the screw you will find the opening for manually opening the doors Remove the scre...

Страница 84: ...Coolant can also freeze at temperatures of below 0 C causing damage to the drive Make sure that the coolant has been completely removed from the system before the device is placed in storage If the drive is stored for a longer period of time then close and seal all water intakes and discharge points to protect against vermin and dirt If the drive was already connected to the cooling system and you...

Страница 85: ...rage must satisfy the following general conditions Select a sufficiently sized dry and horizontal place of storage that is above flood level and free of vibration veff 0 2 mm s The place of storage must be well ventilated as well as free of dust and frost Provide protection against extreme weather conditions Optimum temperatures are between 10 C 50 F to 50 C 120 F Room temperature should be approx...

Страница 86: ...the specified conditions for storing the device Ensure that it is not stored for longer than the permissible maximum of two years Protection against humidity If a dry storage area is not available then take the following precautions Wrap the device in humidity absorbent material Then wrap the device in film so that it is airtight Place a humidity meter that can be read from outside inside the film...

Страница 87: ...conditions stated in the technical data WARNING Dirt deposits during installation Dirt gets deposited in the open converter during installation work Dirt deposits can lead to the converter no longer fulfilling the requirements for cleanliness If the converter is operated with internal pollution death serious injury and material damage can result Therefore remove dirt deposits after installation Th...

Страница 88: ...To remove the rails remove the fixing screws with an M12 spanner Figure 5 1 Removing the support rails 5 4 Screwing the transport units together NOTICE Stress Stress that occurs during transport may exert mechanical pressure on the components Material damage can result Line the cabinets up precisely with each other in order to avoid shearing forces when the base units are screwed together Install ...

Страница 89: ...d pin M8 x 15 5 Screw cabinets together To screw the cabinets together proceed as follows 1 Align the cabinets 2 Insert the threaded pins through the holes Use the corner holes and then every 300 mm Figure 5 2 Screwing cabinets together 3 Attach the contact washers to the threaded pins 4 Screw the cabinets together using the nuts with a torque of 32 Nm Installation 5 4 Screwing the transport units...

Страница 90: ...d dimension drawings 5 6 Connecting cabinets DANGER Insufficient grounding The drive must be grounded to ensure that it operates safely and reliably If the drive is operated with insufficient grounding then the protection and monitoring functions can fail Death serious injury or material damage will result Always apply all of the necessary protective measures Always observe the five safety rules w...

Страница 91: ... 2 Release the nut of the grounding bar on the second cabinet Remove the nut and the washer 3 Place the connection jumper on the grounding bars in the cabinets to be connected 4 Refit the washer and nut 5 Tighten the nut torque 50 Nm See also Torques Page 210 5 7 Connecting the DC bus If several cabinets are set up as one unit you must connect the DC bus of the individual cabinets with each other ...

Страница 92: ... the assembled state Assemble them as shown in the diagram Assembling the DC bus connection ཱ ི Insulating plate Busbar Rivets not supplied Figure 5 5 Assembling the DC bus connection 5 8 Connecting the interface terminals Connecting the interface terminals of several cabinets If several cabinets are set up as one unit the interface terminals of the cabinets must be connected with each other Insta...

Страница 93: ...ever if your eyes or skin do come into contact with deionized water rinse the affected area thoroughly with tap water as soon as possible If deionized water leaks out eliminate the source of the problem and remove the liquid from the surfaces affected NOTICE Damage caused by foreign bodies in the cooling system Foreign bodies in the cooling system can cause blockages in individual circuits As a re...

Страница 94: ...tegrated dust protection cover the converter can overheat and be damaged Remove the dust protection cover prior to commissioning the converter according to the following description NOTICE Operation with bags of desiccant Five small bags of desiccant are located inside the converter The small bags of desiccant are marked with a red adhesive label The converter can be damaged if operated with these...

Страница 95: ...n strip left Pos 60 Makrolon strip right Figure 5 7 Dust protection cover closed loop control cabinet 1 Using flat nose pliers pull off all expanding rivets and remove the Makrolon plate Pos 10 2 Pull off the two expanding rivets of the curtain using flat nose pliers and remove the curtain 3 Using flat nose pliers pull off all expanding rivets of the two Makrolon strips Pos 20 Pos 60 and remove th...

Страница 96: ...g rivets Cable ties Pos 10 Makrolon plate rear Pos 20 Makrolon plate bottom left Pos 30 Makrolon plate bottom right Pos 40 Makrolon plate front left Pos 50 Makrolon plate front right Figure 5 8 Dust protection cover inverter cabinet 1 Release the Torx screws 2 Pull off the expanding rivets using flat nose pliers Installation 5 10 Removing the dust protection cover SINAMICS GM150 6SL3815 2LN41 4AA2...

Страница 97: ... following order Pos 50 Pos 40 Pos 30 Pos 10 Pos 20 5 10 4 Removing the dust protection cover of the rectifier cabinet Note All Makrolon parts that need to be removed are marked with a red sticker and the item number Installation 5 10 Removing the dust protection cover SINAMICS GM150 6SL3815 2LN41 4AA2 Operating Instructions 04 2017 97 ...

Страница 98: ...Pos 60 Makrolon plate center front Figure 5 9 Dust protection cover rectifier 1 Pull off the expanding rivets using flat nose pliers 2 Loosen the Torx screws 3 Pinch off what remains of the cable ties with the side cutter and remove them 4 Loosen the screws with the wrench and remove them 5 Remove the Makrolon plates one after the other in the following order Pos 30 Pos 60 Pos 50 Pos 40 Pos 20 Pos...

Страница 99: ...s must be observed 2 Remove the polycarbonate cover above the uninterruptible power supply 3 Remove the screws above and below the uninterruptible power supply Figure 5 10 Remove the screws 4 Remove the uninterruptible power supply so that you can take off the operator panel 5 Remove the screw securing the battery holder in place 6 Carefully remove the battery holder Installation 5 11 Installing t...

Страница 100: ...uninterruptible power supply perform steps 2 to 6 in reverse order 9 Remove the UPS without battery pack label from the converter Installation 5 11 Installing the battery of the uninterruptible power supply SINAMICS GM150 6SL3815 2LN41 4AA2 100 Operating Instructions 04 2017 ...

Страница 101: ...ny changes to the floor panel or the roof panel in order to modify the cable entry the changes may result in the drive no longer meeting the requirements for the degree of protection shown If there are holes in the floor or roof panel then animals and vermin for example can get into drive during operation If the drive is operated with an insufficient degree of protection death serious injury and m...

Страница 102: ... the mains and motor side power cables when shrinking the cable terminations other control lines and fiber optic cables in the surrounding cable channels can become damaged When shrinking ensure not to damage cables in the surrounding cable channels NOTICE Incorrectly opening the doors If you incorrectly open the doors then this can damage the locking mechanism Open the doors as described in Secti...

Страница 103: ...ove the insulating layer Use unpainted de oiled mounting plates Establish a central connection between ground and the protective conductor system PE protective conductor Cable installation Cables that are subject to or sensitive to interference should be laid as far apart from each other as possible The distance between the electric power cable and signal cable should be 20 cm The converter specif...

Страница 104: ... 2 Unshielded cables for 60 V DC and 230 V DC Unshielded cables for 25 V AC and 230 V AC Class 3 Unshielded cables for 230 V AC V DC and 1000 V AC DC Class 4 Unshielded cables for 1000 V AC DC Shield connection Do not use cable shields to conduct current In other words cable shields must not simultaneously act as neutral or PE conductors Apply the cable shield so that it covers the greatest possib...

Страница 105: ...ed cable shielding Incorrect connection or damaging of the cable shield can impair the function of the system Handle the cable shield carefully Ensure that the cable shield is correctly connected Bridge shield gaps at terminals circuit breakers contactors etc with minimum impedance and through the largest possible surface area Shield busbars Cables Terminals Figure 6 2 Bridging shield gaps Electri...

Страница 106: ...ng cable loops Surge suppressors e g RC elements or varistors must be connected to the operating coils for contactors and relays in the converter In order to reduce noise interference entering or exiting via the cable filter auxiliary voltages in the control cabinet 6 3 Potential concept A noise free connection between the internal and external supply voltage can be achieved by connecting the 0 V ...

Страница 107: ...also Torques Page 210 6 5 Connection 6 5 1 Manually unlocking power unit doors To ensure operator protection the drive is equipped with an electromechanical door interlocking system The doors cannot be opened until the make proof grounding switch has been closed In the event of a complete voltage failure including failure of the auxiliary voltage the doors cannot be released via the grounding swit...

Страница 108: ...rface Cable clamp Figure 6 4 Example Connecting the power cables 1 Clean the contact surfaces immediately before screwing the connections Use spirit and a lintless cloth for cleaning 2 Apply a thin film of grease Electrolube 2G is a suitable lubricator 3 Screw the cable lug with a M12 screw and if necessary with a washer to the contact surface Tighten the nut torque 50 Nm 4 Remove the cable shield...

Страница 109: ...ble depending on the following conditions Routing conditions Accumulation of cables Ambient temperature Bending radii Output voltage Observe the connection capabilities on the converter and on the motor terminal box Procedure 1 Open the cabinet 2 Remove or slide away the cover plate for the motor cable penetration Note To route the power cables from above into the cabinet remove the cover plate at...

Страница 110: ...nd motor connection terminals Drive connection terminals Motor connection terminals U2 U V2 V W2 W In contrast to the connection for the clockwise phase sequence two phases have to be reversed with a counter clockwise phase sequence looking at the drive shaft Note If an incorrect phase sequence was connected during the cable installation and it cannot be corrected by a subsequent swapping of the m...

Страница 111: ... cabinet It is located at the bottom of the cabinet Connect the cabinets securely to the plant grounding system via these grounding lugs Figure 6 6 Grounding lug 6 5 6 Connect the auxiliary voltage Connect the auxiliary voltage 1 phase 230 VAC 50 Hz Connect the auxiliary voltage for e g SITOP GSV closed loop control open loop control to the terminal strip The maximum permissible conductor cross se...

Страница 112: ...signments Page 238 Terminal strip Terminal box Figure 6 7 Connection for auxiliary voltages 6 5 7 Connecting the control cables to the circuit breaker for the capacitor release option N20 ON and OFF commands To transfer two OFF commands you need at least two redundant three core cables To transfer one ON command you need an additional two core cable Use shielded cables with a minimum cross section...

Страница 113: ...and description of the feedback signals of the circuit breaker in the commissioning manual of the drive 6 5 8 Connecting the encoder to the SMC30 Sensor Module Safety instructions NOTICE Incorrectly connected external encoder If the external encoder is not connected or operated correctly this can damage the components Only one measuring system can be connected to each sensor module The sensor modu...

Страница 114: ...e shielding bus serrated bar It is important here to establish the greatest possible area of contact and a good conductive connection 7 Attach the shield of the connecting cable to the module Use metal ground clamps to secure the shield in place ཱ Figure 6 8 Connecting the external encoder to the SMC30 Sensor Module Electrical connection 6 5 Connection SINAMICS GM150 6SL3815 2LN41 4AA2 114 Operati...

Страница 115: ...ection 6 5 9 Interconnecting optional connections Depending on the range of options installed further connections have to be interconnected Detailed information about interconnecting these options with the interfaces is provided in the circuit manual See also Terminal assignments Page 238 6 5 10 Connecting the re cooling unit to the drive Connect the enclosed cable for the cooling unit to the corr...

Страница 116: ...th cable ties Wind the cable ties around the entire cable duct The cable ties must be located at the same positions as in the delivered state Figure 6 10 Schematic diagram Fastening the cable ties Electrical connection 6 5 Connection SINAMICS GM150 6SL3815 2LN41 4AA2 116 Operating Instructions 04 2017 ...

Страница 117: ...rained on the specific product as a result of the differences between the individual products e g regarding topology and closed loop control Obtain information about the range of SITRAIN training courses available through your local contact person Make use of the support and services offered by the responsible Siemens Service Center when commissioning this equipment You can find the relevant conta...

Страница 118: ...e into contact with coolant rinse the affected area thoroughly with tap water as soon as possible If coolant has escaped remove the liquid from the affected surfaces Please refer to the EU safety data sheet of the coolant manufacturer Vent the cabinets successively Begin with the cabinet at the side of the cooling unit The vent valves are located on the water pipers in the upper area Figure 7 1 Ex...

Страница 119: ... of each inverter phase or rectifier unit and the heat sink furthest separated with regard to the piping from the cooling unit Figure 7 3 Example Air pocket 4 Close the venting valve when no more air bubbles remain in the hoses To do so hand tighten the screw of the vent valve 5 Repeat the operation for every cabinet 7 2 Description and configuration of the PROFIBUS interface 7 2 1 Hardware compon...

Страница 120: ...US connection diagnostics LEDs and the PROFIBUS address switch are located on the CU320 Control Unit 5 3 237 02 5 3 237 02 ི ཱ X126 PROFIBUS connection PROFIBUS diagnostics LEDs PROFIBUS address switches Figure 7 4 PROFIBUS interface X126 PROFIBUS interface Figure 7 5 X126 PROFIBUS connection Start up 7 2 Description and configuration of the PROFIBUS interface SINAMICS GM150 6SL3815 2LN41 4AA2 120...

Страница 121: ...The power supply for the teleservice terminals 2 and 7 can have a load of up to 150 mA Diagnostics LED The meaning is explained in the table below Table 7 2 Description of the DP1 LEDs Color Status Description Off Cyclic communication has not yet taken place Note If the Control Unit is operational the PROFIdrive is ready for communication The DP1 LED illuminates Green Continuous light PROFIBUS is ...

Страница 122: ...C connector 352 86 FRQQHFWRUV ZLWKRXW 3 3 FRQQHFWLRQ 6 352 86 FRQQHFWRUV ZLWK SURJUDPPLQJ GHYLFH 3 FRQQHFWLRQ 6 Figure 7 7 PROFIBUS connectors 1 Connect the cables to the PROFIBUS connector The bus terminating resistors are located in this connector 2 Connect the cable shield over a wide area on both sides Start up 7 2 Description and configuration of the PROFIBUS interface SINAMICS GM150 6SL3815 ...

Страница 123: ...he PROFIBUS communication You have several options for setting the PROFIBUS address Parameter p0918 default setting Parameter p0918 can be used to set the PROFIBUS address only when the address is set to 0 or 127 using the DIP switches Set all switches S1 to S7 to ON or OFF default setting If the address is changed the new setting does not become effective until the CU320 Control Unit is switched ...

Страница 124: ...ion via PROFIBUS To further process the PZD data internally the PROFIBUS master must always send a 1 in the eleventh bit bit 10 of the first control word control by PLC It is not sufficient to interconnect parameter p854 permanently with a 1 This also applies to slave to slave communication between multiple slaves drive with DC master as an excitation device The eleventh bit bit 10 must be preset ...

Страница 125: ...the section Indicating and rectifying faults If it is not possible to correct a fault inform the manufacturer s service personnel immediately For additional information see Chapter Service support WARNING Unpermitted operation with ground fault The type and location of the fault cannot be established just from a ground fault error message For example the glow discharge at the winding overhang of t...

Страница 126: ...ction of function diagrams to describe the operating principle Only trained personnel should be allowed to operate the drive This section describes basic operating procedures performed via the AOP30 operator panel 8 2 Operation via the AOP30 operator panel 8 2 1 General information about the AOP30 operator panel 8 2 1 1 AOP30 operator panel You can use the Advanced Operator Panel AOP30 for operati...

Страница 127: ...e of the drive unit RUN green ALARM yellow FAULT red LOCAL REMOTE green Help function describing causes of and remedies for faults and alarms Function keys for prompted navigation through the menus Realtime clock for the time stamping of faults and for setting up simple time controls LOCAL REMOTE switchover for selecting the operating location Two stage security concept to protect against unintent...

Страница 128: ...t when operating The system is accelerated to the setpoint speed Setpoint increase and setpoint decrease You can enter the setpoint using these buttons Alternatively you can enter the setpoint using the alphanumeric keys Using the numeric keypad any speed ranging between the maximum and minimum speed can be entered Function keys These keys have different functions depending on the menu The respec ...

Страница 129: ...WV XUUHQW DODUPV 2OG IDXOWV 2OG DODUPV DVLF FRPPLVVLRQLQJ RPSOHWH FRPPLVVLRQLQJ 0RWRU LGHQWLILFDWLRQ 5HVHW IDQ RSHUDWLQJ WLPH RQWURO VHWWLQJV HILQH RSHUDWLRQ VFUHHQ 6HW GDWH WLPH 5HVHW 23 VHWWLQJV LVSOD VHWWLQJV GYDQFHG VHWWLQJV 5HDG HYLFH FRQILJXUDWLRQ HILQLWLRQ RI GULYH W SH ULYH EDVH FRQILJXUDWLRQ DWD VHW EDVH FRQILJXUDWLRQ 3DUDPHWHUUHVHW 6RIWZDUH GDWDEDVH YHUVLRQ DWWHU VWDWXV H ERDUG WHVW WHVW...

Страница 130: ... change 2 To change the selected parameter activate the parameter according to the menu Press the OK function key Use either the numeric keypad or the function keys to modify the selected parameter 3 You must confirm the change according to the menu Press the OK function key 4 Press the Back function key to scroll back to the main menu Press the MENU function key to directly call the main menu Cal...

Страница 131: ...ze the display of the operation screen The following types of display are available Values 2 digital values 10 values The order of the entries in this screen determines the order of the operating variables parameters displayed in the operation screen Bars 3 bars Mixed 8 values 1 bar 4 values 2 bars Order of the display First the parameters to be displayed digitally and then the parameters to be di...

Страница 132: ...the Change function key to select the desired display type 4 Press the or function key to select the Screen 2 values entry Then press the Change function key to activate the setting ႱႧ Ⴃ HILQH RSHUDWLRQ VFUHHQ 2SHU VFUHHQ W SH 6FUHHQ W SH HOS DFN ႱႧ KDQJH 9DOXHV DUV DNWLY 6FUHHQ W SH 6FUHHQ YDOXHV The display changes to the menu for entering the parameters 2SHUDWLRQ VFUHHQ DFN KDQJH U 3 6 7 3 3 HP...

Страница 133: ... select All parameters Then confirm the selection with OK A list of all parameters of the selected DO is displayed Selection of plausible parameters see List of the signals for the operation screen below of the selected DO Select a parameter from the list of the signals for the operation screen of the selected DO The selected parameters from this list are displayed in the operation screen with an ...

Страница 134: ...nce control factor Field producing current component r0029 A p2002 Torque producing current component r0030 A p2002 Drive overload Degree of thermal overload r0036 100 Shutdown Speed setpoint motor encoder r0061 N_ACT 1 min p2000 Speed setpoint after filter r0062 N_ACT 1 min p2000 Actual speed smoothed r0063 N_ACT 1 min p2000 Control deviation r0064 1 min p2000 Slip frequency r0065 Hz Reference fr...

Страница 135: ...efault for quick commissioning Reference speed 100 p2000 p2000 Maximum speed p1082 Reference voltage 100 p2001 p2001 1000 V Reference current 100 p2002 p2002 Current limit p0640 Reference torque 100 p2003 p2003 2 x rated motor torque Reference power 100 r2004 Reference frequency Reference control factor 100 Maximum output voltage without overload Reference flux 100 Rated motor flux Reference tempe...

Страница 136: ...he REMOTE operating status is activated when the supply voltage is switched back on Off in remote Setting Yes It is possible to switch off in remote mode by pressing the OFF key Setting No The OFF key has no effect in remote operation The OFF key is always active in LOCAL mode LOCAL REMOTE also during operation Setting Yes You can switch between LOCAL and REMOTE when the drive is switched on i e m...

Страница 137: ...g No default setting The key does not act in LOCAL mode In REMOTE mode the key is always in effect For safety reasons the left right key is inactive in the default setting Pumps and fans may normally be operated only in one rotational direction In the Operation state in LOCAL mode the current rotational direction is indicated by an arrow next to the operating mode JOG key active jogging Setting Ye...

Страница 138: ...own time setpoint specify in which time the and keys change the AOP setpoint The ramp up time acts when the setpoint changes from smaller to larger i e positive or negative values The ramp down time acts in the opposite direction The times set here act in addition to the ramp up and ramp down times set in the drive The default setting for the AOP ramp up time is 20 seconds The default setting for ...

Страница 139: ...nput inhibit function 2 Press the Change function key to select the active or inactive setting active The contents of parameters can be viewed but not saved If you want to save a parameter this message appears Note Inhibit function active The OFF key acts The LOCAL REMOTE LEFT RIGHT UP and DOWN keys are inhibited The key symbol indicates the inhibit inactive No operator input restrictions 3 Press ...

Страница 140: ...meters conforms to the set access level The access level determines which parameters can be displayed and changed The higher the access level the more functions that are available The following access levels are possible Access level Functions 1 Standard Sufficient for simple applications The default setting is 1 standard 2 Extended 3 Expert The structure of the function can be changed by intercon...

Страница 141: ... IDXOWV XUUHQW DODUPV 2OG IDXOWV 2OG DODUPV Figure 8 5 Menu structure of the operation screens The operation screen The operation screen displays the most important status variables for the drive In the factory setting the following values are displayed Operation status of the drive Direction of motor rotation Time Ten parameters numerical display 9 725 2 9B 9 B 7 HII 867 B2 3 5 N 7 7 7B 7 r 67 HI...

Страница 142: ... explanatory help text for the selected display This help text de scribes e g which parameter forms the basis for the display change Open the Define operation screen menu You can find more detailed information in the Defining operation screens sec tion Diag Opens the Fault memory alarm memory menu In this menu the queue of active faults and alarms is displayed You can find further information on a...

Страница 143: ...formation The total number of alarms The time when the alarm occurred The alarms are displayed in ascending order in separate screens 1 Press the Tools key Select older or newer to fetch the alarms arranged chronologically 2 Press the Help function key to fetch information about correcting the alarm 8 2 3 2 Parameterization Parameterization menu structure The menus that you can call from the Param...

Страница 144: ...eter by assigning values or by making a selection from a list 4 Press the Help function key to fetch information about the selected parameter All DOs The All DOs function displays a list of the parameters of all the DriveObjects DO sorted numerically In this list the same parameter number can appear several times At the top left you see the number of the DO to which the parameter belongs in bracke...

Страница 145: ... main setpoints in the terminal mode and PROFIBUS mode using two command data sets This requires that you have parameterized this beforehand In terminal mode p1070 1 1 REMOTE MODE 1 In PROFIBUS mode p1070 0 1 REMOTE MODE 0 1 The command data set that must be enabled for setting the relevant main setpoint is indicated in the square parentheses of the parameter In the factory setting command data se...

Страница 146: ...lliseconds r0969 The diagram below shows that currently at least one active fault alarm is present for the VECTOR drive object The two other drive objects are fault free Ⴃ Ⴍ 8B 9 725 70 DXOW ODUP LDJ 7RROV ODUP RYHUYLHZ 1 Press the Diag function key to display the Display diagnostics menu In this menu the current and old faults and alarms are displayed Ⴃ Ⴍ XUUHQW DODUPV 2OG DODUPV 2OG IDXOWV 2OG I...

Страница 147: ...lts Faults are displayed by the red FAULT LED Any faults that have occurred are automatically displayed Up to eight faults occurring at the same time are displayed 1 Use the or function key to select the fault 2 Press the Ack function key to acknowledge the fault The operation screen is displayed 3 Press the Help function key to fetch the information for clearing the fault 9 725 DXOWV HOS DFN 4XLW...

Страница 148: ...X 5HDG HYLFH FRQILJXUDWLRQ HILQLWLRQ RI GULYH W SH ULYH EDVH FRQILJXUDWLRQ DWD VHW EDVH FRQILJXUDWLRQ 3DUDPHWHUUHVHW Figure 8 10 Commissioning service device commissioning menu structure 1 Press the MENU key 2 Press the function key to select the Commissioning Service row Press the OK function key to confirm the selection 3 Press the function key to select the Device commissioning row Press the OK...

Страница 149: ...en carried out in this status other basic device configuration parameters can be adjusted e g the basic sampling time in p0110 if required 2 Specification of the drive type You can change or select the drive object types and or the function modules for individual drive objects To do this set the drive object type with p0107 0 15 and the function module with p0108 0 15 Further details can be found ...

Страница 150: ...threshold master p9916 DRIVE CLiQ data transfer error shutdown threshold slave Definition of drive type DO CU_GM P0103 0 Application specific view p0107 0 Drive objects type drive object Control Unit p0108 0 Drive objects function module function module Control Unit Drive data basic configuration DO VECTORMV p0112 Sampling time pre setting p0115 p0115 0 Sampling times for internal control loops cu...

Страница 151: ... configuration DO CU_GM r0197 Loader 1 version r0198 Loader 2 version DO VECTORMV p0121 0 Power module component number r0126 0 Power unit components active inactive p0131 0 Motor component number p0141 0 Encoder interface Sensor Module component number p0142 0 Encoder component number p0145 0 Enable disable encoder interface p0146 0 Encoder interface active inactive p0186 0 Motor data set MDS num...

Страница 152: ...ction 4 Press the function key to select the desired menu item Basic commissioning In this menu you can set the following parameters for the basic parameterization Table 8 4 Drive Object VectorMV Parameter Parameter text p700 0 Macro binector input BI p1000 0 Macro connector inputs CI for speed setpoints p1070 0 CI Main setpoint p1080 0 Minimum speed p1082 0 Maximum speed p1120 0 Ramp function gen...

Страница 153: ...AOP settings menu structure RQWURO VHWWLQJV HILQH RSHUDWLRQ VFUHHQ 6HW GDWH WLPH 5HVHW 23 VHWWLQJV LVSOD VHWWLQJV GYDQFHG VHWWLQJV RPPLVVLRQLQJ VHUYLFH 23 VHWWLQJV 0DLQPHQX Figure 8 12 Commissioning Service AOP settings menu structure Calling up AOP settings 1 Press the MENU key 2 Press the function key to select the Commissioning Service row Press the OK function key to confirm the selection 3 Pr...

Страница 154: ...LQJ DFN ႱႧ KDQJH ႱႧ 21 ႱႧ 1 Select the desired setting using the function key 2 Change the setting using the Change function key 3 Confirm the setting using the Back function key Defining the operation screen In this menu you can define which parameters the operation screen should display A DriveObject DO selection is offered on each display The corresponding parameter list is offered for each DO ...

Страница 155: ...00 AM If a valid synchronization is detected the time stamp for faults and alarms is displayed on the AOP in real time DRIVE AOP This operating state requires that the drive be connected to and synchronized by a master clock Every time the AOP is powered up and daily at 2 00 AM the time of the drive is adopted as the time of the AOP If a valid synchronization is detected the time stamp for faults ...

Страница 156: ...atically acknowledge topology If the AOP is connected to a drive that has not yet saved a setpoint topology p99 r98 the topology is automatically acknowledged by the AOP If the selection is set to No in the Automatically acknowledge the topology row the automatic acknowledgement of the topology is disabled Mixed operation of servo vector This function is not supported Database mode for the test ba...

Страница 157: ...itch to an unwanted operational states No The values are not reset 2 Confirm the setting with OK The settings become active immediately 8 2 3 7 Commissioning Service AOP diagnostics Commissioning Service AOP diagnostics menu structure RPPLVVLRQLQJ VHUYLFH 23 GLDJQRVWLFV 0DLQPHQX 6RIWZDUH GDWDEDVH YHUVLRQ DWWHU VWDWXV H ERDUG WHVW WHVW RPPXQLFDWLRQ RUPDW IODVK 6 OHDU SHUVLVWHQW GDWDEDVH Figure 8 13...

Страница 158: ...number MLFB number Firmware Date time Database Battery status This menu shows the charging state of the AOP battery The battery ensures that the data in the database and the current time are retained A battery voltage 3 V corresponds to 100 of the battery voltage A battery voltage 2 V corresponds to the value 0 The data is secure up to a battery voltage of 2 V Depending on the battery voltage the ...

Страница 159: ...of the communication between AOP30 and CU The following items are displayed Number of fault free message frames Number of faulty message frames Number of character frame faults Number of overflow errors Number of start limiter errors Number of end limiter errors Number of character length errors Number of frame test mark errors Number of frame test mark errors Number of frame transfer errors Numbe...

Страница 160: ...he risk of files being retained the Flash File System can be manually deleted via this menu item Note The Flash memory is formatted without further confirmation after pressing the OK function key Note The CompactFlash card is not formatted Delete persistent database The database with all parameter and alarm descriptions of the found topology is stored in the battery buffered RAM The database is av...

Страница 161: ...he List Manual contains an overview of all parameters as well as a selection of function diagrams to describe the operating principle 8 3 1 Parameters The drive is adapted to the relevant drive task by means of parameters Each parameter is identified by a unique parameter number and specific attributes Such attributes are for example Readable attributes Writable attributes BICO attributes The para...

Страница 162: ...ccording to data sets as follows Data set independent parameters These parameters exist only once per drive object Data set dependent parameters These parameters can exist several times for each drive object and are addressed via the parameter index for reading and writing The following data set types can be distinguished CDS Command data set By parameterizing several command data sets and switchi...

Страница 163: ... Setting p1070 Main setpoint p1071 Main setpoint scaling r1073 Main setpoint effective p1075 Supplementary setpoint p1076 Supplementary setpoint scaling r1077 Supplementary setpoint effective r1078 Total setpoint effective These parameters concern connector inputs to which the setpoint values are connected Function diagram FP 3030 Direction reversal A reversal of the rotational direction is necess...

Страница 164: ...eds can still be passed through The drive however must not remain here because this can cause excitation of the sympathetic oscillations The suppression bandwidths allow this range to be blocked for steady state operation Because the points at which critical whirling speeds occur in a drive train can vary depending on age or thermal factors a broader control range should be blocked To ensure that ...

Страница 165: ...properties with regard to load surges set additional rounding times in the lower and upper speed range The rounding times achieve the following They protect mechanical components such as shafts and couplings The overshoot of the actual speed while approaching the setpoint is avoided The control quality is improved The ramp up and ramp down times each refer to the maximum speed p1082 Note If roundi...

Страница 166: ... time Effective ramp up time p1120 0 5 x p1130 0 5 x p1131 You can find additional information in function diagrams 3060 and 3070 8 4 1 2 Vector control Properties of vector control Vector control has the following properties and features Stability during load and setpoint changes Improved control characteristic thanks to short rise times for setpoint changes Improved disturbance characteristic th...

Страница 167: ...haracteristic I f control with fixed current Speed control Torque current control in short torque control Vector control with encoder Benefits of vector control with an encoder The speed can be controlled right down to 0 Hz standstill Stable control response throughout the entire speed range Allows a defined and or variable torque for speeds below approx 10 of the rated motor speed to be maintaine...

Страница 168: ... the actual speed value is the same as the setpoint value To provide the resulting static or dynamic load torque for suspended loads or acceleration tasks modify the following parameters p1610 constant torque increase If p1610 is set to 0 only the magnetizing current r0331 is impressed For a value of 100 the rated motor current p0305 is impressed p1611 torque increase To ensure that the drive does...

Страница 169: ... aims to maintain a constant flux Φ in the motor whereby the flux Φ is proportional to the magnetization current Iµ and the ratio of voltage V to frequency f Φ Iµ V f The torque M generated by the induction motors is in turn proportional to the vector product Φ x I of the flux and current The V f characteristic is derived from these basic premises To generate as much torque as possible with a give...

Страница 170: ...AO0 Actual speed value 0 AO1 Actual motor current value 0 Adjustable parameters p4071 Analog outputs signal source p4073 Analog outputs smoothing time constant r4074 Analog outputs actual output voltage current p4076 Analog outputs type p4077 Analog outputs characteristic value x1 p4078 Analog outputs characteristic value y1 p4079 Analog outputs characteristic value x2 p4080 Analog outputs charact...

Страница 171: ...nt r0077 A p2002 Torque generating actual current r0078 A p2002 Flux setpoint r0083 Reference flux Actual flux r0084 Reference flux DC link voltage r0088 V p2001 Phase voltage r0089 V p2001 For further diagnostic purposes Speed controller output r1480 Nm p2003 I component of speed controller r1482 Nm p2003 Scaling Variable Scaling parameter Default for quick commissioning Reference speed 100 p2000...

Страница 172: ...tput present at terminal 1 ground is at terminal 2 S Set TM31 AO_type analog output 0 to between 10 and 10 V S Set TM31 AO_char x1 to 0 00 S Set TM31 AO_char 1 to 0 000 V S Set TM31 AO_char x2 to 100 S Set TM31 AO_char y2 to 10 000 V Factory setting Digital output Terminal Factory setting DO0 X542 2 3 Pulses enabled DO1 X542 5 6 No fault DI DO8 X541 2 Ready for switching on DI DO9 X541 3 DI DO10 X...

Страница 173: ...39 7 1 Speed setpoint actual deviation in the tolerance bandwidth p2163 p2166 8 r2197 7 1 Control required to PLC 9 r0899 9 1 f or n comparison value reached or exceeded p2141 p2142 10 r2199 1 1 I M or P limit reached p0640 p1520 p1521 11 r1407 7 Reserved 12 0 Alarm motor overtemperature A7910 13 r2129 14 Reserved 14 0 Alarm thermal overload in power unit A5000 15 r2129 15 1 Pulses enabled inverte...

Страница 174: ...d it can eliminate the risk of ground loops 7UDQVIRUPHU 0RWRU QVWUXPHQWD WLRQ DQG FRQWURO 3B WR 3B 3B WR 3B 3B WR 3B URXS URXS URXS 70 0 0 0 3 0 3 0 3 0 Figure 8 19 Potential supply of external signals Signals are transmitted via a conducted electrical interface which can be affected by conducted interference To minimize external interference the signals are injected asymmetrically and are floatin...

Страница 175: ...tage DC 24 V Output current per channel 0 5 A Cumulative current of outputs per group To 40 C max 4 A To 50 C max 3 A To 60 C max 2 A 8 4 2 4 Additional settings for analog outputs Two signals are freely available for each TM31 which can be used to output the analog signals Operation 8 4 Functions SINAMICS GM150 6SL3815 2LN41 4AA2 Operating Instructions 04 2017 175 ...

Страница 176: ...ts characteristic value x2 1000 00 to 1000 00 Factory setting 100 00 Setting for the x coordinate in of the second point on the scaling characteristic Parameter Value Adjustment range p4080 0 y2 of the characteristic of the analog out puts 20 000 to 20 000 V or mA Factory setting 20 000 mA Setting for the y coordinate in V or mA of the second point on the scaling characteristic When analog output ...

Страница 177: ...cteristic Parameter Value Adjustment range p4080 1 y2 of the characteristic of the analog out puts 20 000 to 20 000 V or mA Factory setting 20 000 mA Setting for the y coordinate in V or mA of the second point on the scaling characteristic When analog output 1 is set as a voltage output p4076 1 1 4 and terminals X522 6 5 are used the unit is V When analog output 1 is set as a current output p4356 ...

Страница 178: ...og input 0 is set as a current input p4056 2 3 5 and switch S5 0 is set to I the unit is mA Parameter Value Adjustment range p4058 0 Analog inputs characteristic value y1 1000 00 to 1000 00 Default settings 0 0 Setting for the y coordinate in of the first point on the scaling characteristic Parameter Value Adjustment range p4059 0 Analog inputs characteristic value x2 20 000 to 20 000 V or mA Defa...

Страница 179: ...g A Isometer that continually monitors the insulation state of the drive including that of the motor Only one A Isometer can be connected to each live connected IT system The A Isometer adjusts monitoring in line with the line discharge capacitance The A Isometer is connected between the ungrounded line supply and the equipotential bonding conductor PE For the duration of testing disconnect the in...

Страница 180: ...les are not observed or if the equipment is handled incorrectly Always carefully observe the five safety rules Page 19 The shutdown of the circuit breaker is triggered by a safety contactor combination The plant side circuit breaker must be equipped with an undervoltage trip to ensure the wire break protection for the circuit breaker OFF command If a circuit breaker OFF command is issued as a resu...

Страница 181: ...o the DC link Due to the configuration however a diode supply cannot supply this power back to the line The vdc controller controls the supply of power back from the machine to compensate for losses from the drive system and prevent the DC link voltage from exceeding the maximum value This avoids any fault shutdown caused by braking ramps that have been set too short The drive stops controlled The...

Страница 182: ...ter Function Adjustment range p1251 Vdc_controller integral time 1 1000 ms Factory setting 40 ms Setting for the integral action time of the vdc controller The effective integral time can be determined using p1243 Parameter Function Adjustment range p1252 Vdc_controller derivative action time 1 1000 ms Factory setting 1 ms Setting for the derivative action time of the vdc controller The active der...

Страница 183: ... 1 The EMERGENCY OFF function for controlled shutdown stops the drive by means of a quick stop process along a deceleration ramp that must be parameterized Note The drive is stopped during controlled deceleration without braking modules with only a very low braking torque Depending on the load machine the ramp down procedure may take a long time Connections of the EMERGENCY STOP button Most of the...

Страница 184: ...l free contacts of the make proof grounding switch The enable signal of the closed loop open loop controller unlocked The enable signal of the closed loop open loop controller is signaled when one of the following conditions is satisfied When after grounding the drive an insulation resistance near 0 Ω is set When the Ground fault monitoring stator fault status signal has triggered This concept ens...

Страница 185: ...a fault condition identified by the drive that does not result in the drive being shutdown Alarms acknowledge themselves If the cause is no longer present the alarms reset themselves automatically The converter indicates a fault by displaying the corresponding fault and or alarm on the operator panel Faults are displayed as follows By illuminating the red LED FAULT Additionally a note relating to ...

Страница 186: ...input voltage If input voltage is 18 V and LED red Return component for repair Green Continuous light 24 V power supply OK Internal board voltages OK RUN ERR Off The electronic power supply is missing or lies outside the permissible tolerance range Green Continuous light The component is ready for operation and cyclic DRIVE CLiQ communication is in progress Orange Continuous light DRIVE CLiQ commu...

Страница 187: ...nal power supply 1P24 OK not OK H21 X34 X36 Internal power supply 1N24 OK not OK H22 X35 X36 External power supply 2P24_1 and 2P24_2 OK 2P24_1 or 2P24_2 not OK H23 Internal and external power supplies OK not OK 8 5 3 3 Diagnostics via parameters Diagnostic parameters for the device status r0002 Drive status Display of drive status r0046 Missing enable signals Display of the missing enable signals ...

Страница 188: ...11 p0812 and p0813 is displayed via r0836 Diagnostic parameters for digital inputs outputs r0721 CU digital inputs terminal actual value Display of the actual value on the digital inputs Bit Signal name 0 signal 1 signal 00 DI 0 X122 1 Low High 01 DI 1 X122 2 Low High 02 DI 2 X122 3 Low High 03 DI 3 X122 4 Low High 04 DI 4 X132 1 Low High 05 DI 5 X132 2 Low High 06 DI 6 X132 3 Low High 07 DI 7 X13...

Страница 189: ...31 Bit Signal name 0 signal 1 signal 00 DI 0 X520 1 Low High 01 DI 1 X520 2 Low High 02 DI 2 X520 3 Low High 03 DI 3 X520 4 Low High 04 DI 4 X530 1 Low High 05 DI 5 X530 2 Low High 06 DI 6 X530 3 Low High 07 DI 7 X530 4 Low High 08 DI DO 8 X541 2 Low High 09 DI DO 9 X541 3 Low High 10 DI DO 10 X541 4 Low High 11 DI DO 11 X541 5 Low High DI Digital input DI DO Bidirectional digital input output r40...

Страница 190: ...w High 07 DI DO 7 X520 9 Low High 08 DI DO 8 X521 2 Low High 09 DI DO 9 X521 3 Low High 10 DI DO 10 X521 4 Low High 11 DI DO 11 X521 5 Low High 12 DI DO 12 X521 6 Low High 13 DI DO 13 X521 7 Low High 14 DI DO 14 X521 8 Low High 15 DI DO 15 X521 9 Low High 16 DI DO 16 X522 2 Low High 17 DI DO 17 X522 3 Low High 18 DI DO 18 X522 4 Low High 19 DI DO 19 X522 5 Low High 20 DI DO 20 X522 6 Low High 21 D...

Страница 191: ... X521 5 Low High 12 DI DO 12 X521 6 Low High 13 DI DO 13 X521 7 Low High 14 DI DO 14 X521 8 Low High 15 DI DO 15 X521 9 Low High 16 DI DO 16 X522 2 Low High 17 DI DO 17 X522 3 Low High 18 DI DO 18 X522 4 Low High 19 DI DO 19 X522 5 Low High 20 DI DO 20 X522 6 Low High 21 DI DO 21 X522 7 Low High 22 DI DO 22 X522 8 Low High 23 DI DO 23 X522 9 Low High It does matter whether DI DO is set as an input...

Страница 192: ...Operation 8 5 Fault and system messages SINAMICS GM150 6SL3815 2LN41 4AA2 192 Operating Instructions 04 2017 ...

Страница 193: ...er circuit capacitors Short circuit the snubber circuit capacitors briefly before you begin work on the converter Observe Chapter Safety instructions when carrying out any work at the converter WARNING Improper maintenance and repairs Improper repairs can result in death and serious physical injury Only qualified maintenance and installation personnel may perform repairs WARNING Defective seals Wh...

Страница 194: ...n with EMERGENCY OFF or when the main switch is open This voltage can cause serious injury The five safety rules must be observed WARNING Hot anti condensation heating surface When the temperature control limit value is reached the anti condensation heating is switched on Once activated the anti condensation heating can generate a great deal of heat Contact can result in serious injury such as ski...

Страница 195: ... at regular intervals or at least once a year by qualified personnel in line with the relevant safety regulations Note The actual intervals at which maintenance procedures are to be performed depend on the environmental and operating conditions Define maintenance intervals for the drive which reflect your plant specific environmental and operating conditions and meet your availability requirements...

Страница 196: ...y power supply Always observe the five safety rules Page 19 when carrying out any work on the device 9 2 1 Grounding with a grounding device Use a three pole grounding harness for fixed ball points to ground the system Note Ordering a grounding harness You can order the grounding harness Contact the Service Center Note Number of grounding harnesses Depending on the configuration of the drive use a...

Страница 197: ...o the ball heads and Ball head in the cabinet Ball heads in the drive Figure 9 1 Grounding points Attaching the grounding spider Figure 9 2 Attaching the grounding spider Maintenance 9 2 Grounding the system SINAMICS GM150 6SL3815 2LN41 4AA2 Operating Instructions 04 2017 197 ...

Страница 198: ...can occur if grounding under voltage This can cause injury and material damage Remove the socket wrench before switching on This activates the interlocking To close the make proof grounding switch proceed as follows 1 Take the socket wrench found in the tool set 2 Turn the socket wrench in the counterclockwise direction The contacts are closed and the DC link voltage is grounded Figure 9 3 Make pr...

Страница 199: ...roperly Even when the door interlocking is released dangerous high voltages can still be present at the auxiliary circuits fans anti condensation heating closed loop control etc Make sure that work is only carried out by qualified personnel under due observance of the five safety rules the warning information in these operating instructions and the safety information on the product itself WARNING ...

Страница 200: ...stem Figure 9 4 Principle of the mechanical door interlock Circuit breaker Coded key for the key transfer unit Key transfer unit Coded key for cabinet doors Locks for the cabinet doors Figure 9 5 Components of the secure locking system Maintenance 9 3 Opening the doors SINAMICS GM150 6SL3815 2LN41 4AA2 200 Operating Instructions 04 2017 ...

Страница 201: ...s at the location of use The following servicing and inspection instructions are used as the basis for regular inspection of the equipment 9 4 2 Checklist for preventive maintenance work Maintenance Carried out by Frequency Comments Clean the cabinet exterior Operator As required Visual check clean if required Clean the cabinet interior Siemens serv ice personnel Annually Visual check clean if req...

Страница 202: ...nt to carry out the visual checks and maintenance work Mirror Flashlight Torque wrench for tightening screws NOTICE Contamination Contamination and dirt can damage the device Visually inspect the equipment at least once per year For more information please refer to the section Visual inspections Dust deposits inside the cabinet unit must be removed at regular intervals or at least once a year by q...

Страница 203: ...and screw terminals regularly to ensure that they are secure Tighten the screws if necessary When doing this comply with the specified torques Page 210 Check the cabling for defects Replace any defective parts immediately 9 4 3 6 Checking the capacitor release option N20 Check the following settings T950 Primary tapping 400 V 15 Secondary side jumpers 31 32 and 33 34 K950 Measuring circuit voltage...

Страница 204: ...t until the fan has shut down 9 5 1 1 Replacing the fan option L08 The fans must also be fitted with a temperature monitoring device to ensure that the drive operates reliably When a specific threshold is reached the temperature monitoring device switches the motor off The motor winding and the electrical system are monitored Removing the fan Note If you need to replace the rear fan first remove t...

Страница 205: ... 3V lithium battery Manufacturer Maxell Sony Panasonic Nominal capacity 220 mAh Maximum permissible charging current 10 mA limited to 2 mA in the operator panel Self discharge at 20 C 1 year Service life in the backup mode 1 year at 70 C 1 5 years at 20 C Service life in operation 2 years Replacing the backup battery 1 Switch off the main circuit breaker 2 Open the cabinet 3 Disconnect the 24 VDC ...

Страница 206: ...ry Note Dispose of the battery in accordance with the applicable country specific laws and regulations Set date and time 1 Using the MENU key select the main menu of the AOP 30 2 Using F2 select the menu item Commissioning service Confirm with F5 3 Using F2 select the menu item AOP30 settings Confirm with F5 4 Using F2 select the menu item Set date time Confirm with F5 Using F2 select the appropri...

Страница 207: ...he drive and AOP If the loading process for the new firmware is not completed successfully because of a a power outage or the connection process the currently loaded firmware is retained The prompt appears at the next switch on If a power outage or aborted connection occurs during the last 20 seconds of the loading process the AOP firmware is destroyed In this case reload the firmware from the pro...

Страница 208: ...ituation with service experts for the particular product Use a dry clean lint free ESD cleaning cloth Wipe all external parts of the rack with it Make sure that the dirt is not distributed but actually removed by constant changes of the wiping surface of the cloth For significant levels of pollution and dirt use an ESD cloth soaked in ethyl alcohol however not so much that it drips from the cloth ...

Страница 209: ...other heavy metals Use neither brass bronze or steel wire brushes nor cloths or steel wool interwoven with copper wire 9 7 Repairs WARNING Insufficient cable insulation Improperly laid or damaged cables and incorrectly attached cable shieldings can heat up in places and cause fires or short circuits wherever they make contact Check whether all the cable shields are intact Insulate damaged cable sh...

Страница 210: ...s S22 Hard materials S13 nm in lb nm in lb nm in lb M3 0 8 7 1 1 8 15 9 1 3 11 5 M4 1 8 15 9 3 9 34 5 3 0 26 6 M5 3 0 26 6 7 8 69 0 6 0 53 1 M6 6 0 53 1 13 0 115 10 0 88 5 M8 13 0 115 32 0 283 25 0 221 M10 25 0 221 65 0 575 50 0 443 M12 50 0 443 115 0 1020 88 0 779 M16 115 0 1020 270 0 2390 215 0 1900 1 Examples of soft materials are Cu Al CuZn cable entries laminate materials plastics cast resin ...

Страница 211: ...on for the PowerCard Note Replacing the current transformer The current transformer may only be replaced by technicians trained by Siemens Note Defective door interlock system Contact Customer Support if the door interlock system becomes defective See also Service Support Page 231 9 7 2 Replacing the diode module The Basic Line Module comprises several diode modules The diode module is a replaceab...

Страница 212: ...ng bracket Note The mounting bracket is not part of the diode module and must remain on the device Figure 9 8 Release the screw connection of the line supply connection busbar 3 Remove the screwed connection between the DC link busbars and the heat sinks Figure 9 9 Release the screw connection of the DC link busbar Maintenance 9 7 Repairs SINAMICS GM150 6SL3815 2LN41 4AA2 212 Operating Instruction...

Страница 213: ...oblem and remove the liquid from the surfaces affected Figure 9 10 Removing the retainers for the water hoses 5 Pull the diode module out of the cabinet Installing the intact diode module Install the intact diode module in the reverse order Note Ventilating the deionized water circuit You must vent the deionized water circuit after replacing the diode module Final checks Make sure that all the scr...

Страница 214: ...T modules connected in series in pairs The IGBT modules may malfunction if this is not complied with Replace the defective modules as associated pair Return the pair for repair A pair of IGBT modules that belong together is provided in the corresponding spare parts packages for example Ax1 Ax2 or Ax3 Ax4 Note Simple measuring instruments are not capable of determining whether the IGBT or the gatin...

Страница 215: ...iliary power supply for the gating boards from the rear 3 On each IGBT remove the six screw connections between the phase busbars and the screw connection between the phase busbar and the neutral potential Figure 9 11 Releasing screw connections Maintenance 9 7 Repairs SINAMICS GM150 6SL3815 2LN41 4AA2 Operating Instructions 04 2017 215 ...

Страница 216: ...for all work on the drive However if your eyes or skin do come into contact with deionized water rinse the affected area thoroughly with tap water as soon as possible If deionized water leaks out eliminate the source of the problem and remove the liquid from the surfaces affected 4 Remove the PowerCard CAUTION Heavy weight A PowerCard weighs 13 kg If the PowerCard falls down it could cause persona...

Страница 217: ...ry power supply to the gating modules If these electrical connections are not connected properly or are faulty this can cause faults while the drive is in operation and damage the device Once you have replaced the PowerCard make sure that the electrical connections have been carefully and securely restored Note Ventilating the deionized water circuit After replacing the PowerCard the deionized wat...

Страница 218: ...lug Figure 9 13 Replacing the operator panel 3 Disconnect the power supply and communication cable at the operator panel 4 Press the retaining lugs and withdraw the operator panel to the front 5 Snap on a new operator panel 6 Attach the connectors for the power supply and communications cable Maintenance 9 7 Repairs SINAMICS GM150 6SL3815 2LN41 4AA2 218 Operating Instructions 04 2017 ...

Страница 219: ...ompactFlash card If you overwrite the software key of the new CompactFlash card with the previous CompactFlash card the new CompactFlash card is not operational Consequently use the software key of the new CompactFlash card 4 Insert the new Siemens CompactFlash card 9 7 6 Replacing the precharging transformer WARNING Incorrect replacement of the precharging transformer Replacing the precharging tr...

Страница 220: ... precharging transformer 1 Remove the paint from at least one screw position on the base brackets This is where the transformer will be grounded 2 Install the new transformer in the reverse order to when you removed it 3 Check that the precharger is working correctly Maintenance 9 7 Repairs SINAMICS GM150 6SL3815 2LN41 4AA2 220 Operating Instructions 04 2017 ...

Страница 221: ...s Note Noting the core markings The cables are equipped with Faston connectors Make a note of the core markings When installing the new module note the core markings for the cables 3 Unfasten the five plastic screws and remove the module Installing a module Install the new module in the reverse order to when you removed it Maintenance 9 7 Repairs SINAMICS GM150 6SL3815 2LN41 4AA2 Operating Instruc...

Страница 222: ...nderneath the resistor plate To remove this AVT combination module you must first remove the resistor plate by loosening the two fixing screws Installing the AVT combination module 1 Use the screws to secure the AVT combination module 2 Reconnect the control lines Do not bend the fiber optic conductors Note When you have removed the AVT combination module under the resistor plate you must reinstal...

Страница 223: ...umbers for replacing fuses that have blown can be found in the spare parts list 9 7 10 Replace the sponge for the leak detector Principle of operation If the sponge is dry hard the switch is closed If there is water in the drive the sponge becomes soft and the switch opens Sponge hard switch is closed Sponge soft switch is opened Figure 9 17 Sponge Maintenance 9 7 Repairs SINAMICS GM150 6SL3815 2L...

Страница 224: ...crew 4 Reattach the leakage water detection Note Insert the sponge Make sure that the leakage water measurement is on the bottom pan The distance between sponge and bottom pan is then approx 1 mm 9 7 11 Replacing the Power Stack Adapter Required tools Torx screwdriver Tx30 2 5 mm slotted screwdriver Maintenance 9 7 Repairs SINAMICS GM150 6SL3815 2LN41 4AA2 224 Operating Instructions 04 2017 ...

Страница 225: ... the ground connection on the Power Stack Adapter chassis 6 Use a Torx screwdriver to loosen the four fastening screws of the Power Stack Adapter Do not remove the screws 7 Push the Power Stack Adapter upwards 8 Remove the Power Stack Adapter Sending in the Power Stack Adapter You can send in the defective Power Stack Adapter for a special examination Further information is contained in the note S...

Страница 226: ... 10 Nm 3 Ensure the correct connection of the fiber optic cables NOTICE Faulty connection of fiber optic cables The faulty connection of the fiber optic cables on the Power Stack Adapter can damage the power semi conductors Observe the connector assignment marked on the fiber optic cables Maintenance 9 7 Repairs SINAMICS GM150 6SL3815 2LN41 4AA2 226 Operating Instructions 04 2017 ...

Страница 227: ...ys indicate the part number and if known the order number MLFB of the spare part required You can find the order number as follows The device label is attached to or next to each component Find out which item code the required spare part has The parts list supplied with the drive indicates the part number and where appropriate the order number corresponding to the item code For inquiries by e mail...

Страница 228: ...Spare parts SINAMICS GM150 6SL3815 2LN41 4AA2 228 Operating Instructions 04 2017 ...

Страница 229: ... If you correctly dispose of the materials none of the materials pollutes the environment When disposing or reusing comply with the local laws and regulations WARNING Improper disassembly In the event of an improper procedure during disassembly material can slip tilt and fall down This can result in death serious injury or material damage Only specialist personnel may disassemble and dispose of de...

Страница 230: ... PCBs Electronic components Disposal 11 2 Removing device components and old devices SINAMICS GM150 6SL3815 2LN41 4AA2 230 Operating Instructions 04 2017 ...

Страница 231: ... local office This office will contact the responsible service center on your behalf You can find your contact person in the relevant contact database www siemens com your contact See also Technical Support https support industry siemens com cs ww en sc 2090 www siemens com yourcontact www siemens com yourcontact Siemens Support for on the move You can obtain optimum support anywhere you go using ...

Страница 232: ...Service Support SINAMICS GM150 6SL3815 2LN41 4AA2 232 Operating Instructions 04 2017 ...

Страница 233: ...tromagnetic Compatibility Certificate of compliance with order For the EMC Directive 2004 108 EC amendments or 2014 30 EU amendments Product cannot be operated independently limited distribution channel Interference omission This drive unit is part of a PDS Category C4 according to DIN EN 61800 3 VDE 0160 T103 IEC 61800 3 The drive unit has not been designed to be connected to the public line supp...

Страница 234: ...Table B 2 General technical specifications Technical specifications Power components Diodes IGBTs 3 3 kV or 4 5 kV Line side converter Standard Lower power ratings with 2 3 kV to 4 16 kV 12 pulse diode rectifier Basic Line Module Higher power ratings with 2 3 kV to 4 16 kV 24 pulse diode rectifier Basic Line Module Option Lower power ratings with 2 3 kV to 4 16 kV 24 pulse diode rectifier Basic Li...

Страница 235: ...of contamination 2 without conducted contamination according to DIN VDE 0110 Part 1 non condensing Degree of protection according to EN 60529 VDE 0470 T1 IEC 60529 Standard IP43 Option IP 54 option M54 Safety class Class 1 according to EN 61140 VDE 0140 T1 IEC 61140 Touch protection BGV A3 Emitted interference This drive unit is part of a PDS Category C4 according to DIN EN 61800 3 VDE 0160 T103 I...

Страница 236: ...g Transport with suitable pack aging Operation industrial Ambient temperature 25 C to 70 C 25 C to 70 C 5 C to 40 C Relative humidity 5 to 95 Only low condensation is permitted The drive must be completely dry before com missioning 5 to 75 5 to 85 Condensation is not permit ted Other climatic conditions ac cording to class 1K3 according to DIN EN 60721 3 1 IEC 60721 3 1 2K2 according to DIN EN 607...

Страница 237: ... 1 2S1 according to DIN EN 60721 3 2 IEC 60721 3 2 3S1 according to DIN EN 60721 3 3 IEC 60721 3 3 B 1 6 Technical specifications of the common power supply Table B 8 Technical specifications of the common power supply Rated voltage UErated rated input frequency fErated 1 phase 115 VAC 60 Hz 1 phase 230 VAC 50 Hz 60 Hz 1 phase 240 VAC 50 Hz 60 Hz Peak value of the rated output voltage UArated 55 V...

Страница 238: ... p848 OFF 3 6 DI p4022 4 p2103 Acknowledge faults 7 DI p4022 5 Local control AOP30 PC 8 DI p4022 6 p852 Enable operation 9 DI p4022 7 p1035 MOP raise X521 2 DI p4022 8 p1036 MOP lower 3 DI p4022 9 p1020 Fixed speed setpoint bit 0 4 DI p4022 10 p1021 Fixed speed setpoint bit 1 5 DI p4022 11 Profibus switchover 6 DI p4022 12 p1113 Direction reversal 7 DO p4022 13 r899 0 Message Ready for switching o...

Страница 239: ...ly Protected internally with fuse 2 A 3 terminals 10 DI ON command drive 11 DI OFF dynamic See HC A31 X520 3 12 DI Faster MOP raise 13 DI Slower MOP lower 14 DI RESET Acknowledge faults 15 DI Lock OFF3 16 DI Counterclockwise 0 signal for CW phase sequence 1 signal for CCW phase sequence direction of rotation changeover 17 18 Power disconnection External safety circuit Circuit breaker no OFF comman...

Страница 240: ...0 r6660 2 Undervoltage coil OFF command Table B 15 Terminal assignment for circuit breaker interface LA X52 with two OFF coils and undervoltage coil Terminal Internal control 1 2 3 4 DO p0738 r6660 0 ON command 9 DO p0739 r6660 1 OFF command 12 DO p0740 r6660 2 Undervoltage coil OFF command 15 OFF undervoltage coil 2 command Table B 16 Terminal assignment for circuit breaker interface LA X52 with ...

Страница 241: ...d current 8 A Rated voltage max switching voltage 240 400 V AC Max switching power 12 W 24 V 500 mA 2 Relay coil 1 3 NC contact X242 1 M 2 Relay coil 2 3 NC contact Note The internal safety relay must be energized in order to operate the inverter see Chapter Gating the power semiconductors If the option Safe Torque Off STO is not available this circuit function is achieved permanently by inserting...

Страница 242: ...able two PSAs Single fiber optic cable Trip line for direct data ex change between PSAs Fiber optic cable type 2 mm plastic optical fiber POF Max length of fiber optic cable 10 m B 2 4 5 DRIVE CLiQ interface Table B 19 DRIVE CLiQ interface Pin Signal name Technical data 1 TXP Transmit data 2 TXN Transmit data 3 RXP Receive data 4 Reserved do not use 5 Reserved do not use 6 RXN Receive data 7 Reser...

Страница 243: ...t proof Max load current per output 3 mA Resolution 12 bits 10 AO 3 AO 7 11 AO 2 AO 6 12 AO 2 AO 6 13 AO 1 AO 5 14 AO 1 AO 5 15 AO 0 AO 4 16 AO 0 AO 4 Max connectable cross section 1 5 mm type Screw terminal B 2 4 7 Switch for the analog inputs Table B 21 Power Stack Adapter 2 Switch for the analog inputs Switch Function Technical specifications S5 0 Switchover analog input AI0 Voltage V Current I...

Страница 244: ...nd DI 3 MEXT2 poten tial free refer ence for DI 4 DI 5 DI 6 and DI 7 10 M 11 AI 0 AI 1 The analog input can be switched between current input and voltage input using the S5 0 and S5 1 switches Voltage 0 V to 10 V Ri 100 kOhm resolution 12 bits Current 0 mA to 20 mA Ri 250 Ohm resolution 11 bits 12 AI 0 AI 1 13 TEMP 0 TEMP 1 Two wire PT100 temperature sensor 14 TEMP 0 TEMP 1 Max connectable cross s...

Страница 245: ...s of the auxiliary power and or by a diagnostic message All digital outputs are also affected by a ruptured fuse You will not be able to replace this fuse Replace the component and send it for repair B 2 4 9 Electronics power supply Table B 23 Power Stack Adapter 2 Electronics power supply Terminal Designation Technical specifications 1 Electronics ground M Voltage 24 VDC 18 V to 31 2 V 25 to 30 P...

Страница 246: ...Technical data and drawings B 2 Terminal assignments SINAMICS GM150 6SL3815 2LN41 4AA2 246 Operating Instructions 04 2017 ...

Страница 247: ... drive 2 Connect the raw water circuit and the de ionized water circuit Remove any contamination from the piping that may have occurred during shipment or storage 3 Fill and vent the de ionized water circuit according to the specifications Ensure that no air is trapped in the piping system 4 Install the separately supplied components Make the required mechanical and electrical connections as well ...

Страница 248: ...um voltage switchgear is a central component of the drive protection concept For this reason medium voltage circuit breaker control must be integrated in the drive controller The medium voltage circuit breaker must be equipped with an undervoltage coil 4 If the medium voltage switchgear does not have an undervoltage coil or a UPS supported auxiliary voltage supply provide the following alternative...

Страница 249: ... actuated These cabinet internal cables can be easily identified by their orange insulation Provide for the service power sockets in the control cabinet as well as for the optional cabinet lighting option L50 on the auxiliary voltage supply 230 V Protect the auxiliary voltage supply with 10 A fuses on the plant This voltage is not integrated in the EMERGENCY STOP sequence of the drive and is there...

Страница 250: ...oute the digital and analog signals with separate cables to minimize interference Ensure that the required distance from the power cables is maintained Note that when the analog inputs on the customer terminal strip are used as current or voltage inputs the isolation amplifiers must be set accordingly Connecting protection and monitoring devices Depending on the converter transformer version dry o...

Страница 251: ...d into two groups This must be taken into account when the evaluation is per formed factory setting To check the correct wiring and macro interconnection first select limits below the ambient temperature and check the messages After checking the correct wiring and macro interconnection set the limit values for alarm and shutdown to match the component monitored Option L96 PT100 evalua tion unit fo...

Страница 252: ...minals Switch on conditions with water cooled drives Before switching on the drive for the first time you must reduce the conductivity of the de ionized water circuit to 1 µS After filling the re cooling unit switch it on for several hours before switching on the drive The conductivity reduction may also be necessary if the drive has been out of service for an extended period such as maintenance r...

Страница 253: ... Safety shutdown 180 Switch off 70 Undervoltage trip 180 CompactFlash card Loading operator panel firmware parameter and signal descriptions 207 Replacing 219 Components that can be destroyed by electrostatic discharge ESD Guidelines 24 Crowbar 32 D Damage during transportation 73 DC link 34 36 37 38 64 180 181 Deionized water 213 216 Deionized water requirements 53 Delivery 73 Door interlock Cast...

Страница 254: ...231 P Parameter categorization 162 Parameter types 162 Power Stack Adapter 36 Actual value acquisition 242 Function 39 Internal fuse 244 PowerCard Replacing 214 Torques 216 Precharging Components 37 Function 37 Replacing the precharging transformer 219 PROFIBUS connection PROFIBUS 120 Protection and monitoring functions External components 33 Internal components 32 R Rated output frequency Sine wa...

Страница 255: ...Transformer Input side 32 V Voltage source DC link 38 Voltage source DC link drive 36 W Water condensation 66 Index SINAMICS GM150 6SL3815 2LN41 4AA2 Operating Instructions 04 2017 255 ...

Страница 256: ...Index SINAMICS GM150 6SL3815 2LN41 4AA2 256 Operating Instructions 04 2017 ...

Страница 257: ......

Страница 258: ...Further Information www siemens com drives Siemens AG Process Industries and Drives Postfach 48 48 90026 NÜRNBERG GERMANY ...

Отзывы: